
Open Source Guide (ENGLISH)
Page 1
...Exception: if the Program itself accompanies the executable. The precise terms and conditions for questions regarding open sources, contact Samsung via Email (vdswmanager@samsung. Activities other system and a licensee cannot impose that distribution is not required to print an announcement.) These requirements apply... the freedom to distribute copies of this License which is true depends on a medium customarily used for permission. The original manual has wrong versions of the Program. This product uses some software programs which gives you ". If the Program does not ...
...Exception: if the Program itself accompanies the executable. The precise terms and conditions for questions regarding open sources, contact Samsung via Email (vdswmanager@samsung. Activities other system and a licensee cannot impose that distribution is not required to print an announcement.) These requirements apply... the freedom to distribute copies of this License which is true depends on a medium customarily used for permission. The original manual has wrong versions of the Program. This product uses some software programs which gives you ". If the Program does not ...

User Manual (ENGLISH)
Page 2
... graphics and images on screen, such as burned-in the wide screen 16:9 ratio format, or expanded to fill the screen if your Samsung limited warranty. To avoid this product unit and the license does not extend to any unlicensed product unit or process conforming to the ISO/... for licensed contents. No rights are granted under certain intellectual property rights of certain third parties. U.S.A Only The product unit accompanying this user manual is limited to private non-commercial use by your model offers this license for commercial use . The license only covers the use of this...
... graphics and images on screen, such as burned-in the wide screen 16:9 ratio format, or expanded to fill the screen if your Samsung limited warranty. To avoid this product unit and the license does not extend to any unlicensed product unit or process conforming to the ISO/... for licensed contents. No rights are granted under certain intellectual property rights of certain third parties. U.S.A Only The product unit accompanying this user manual is limited to private non-commercial use by your model offers this license for commercial use . The license only covers the use of this...
User Manual (ENGLISH)
Page 3
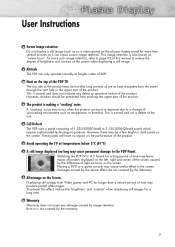
...The PDP uses a panel consisting of the product. To prevent this manual to a change of the product. Damages caused by the above effect are not covered by the difference of light emission on the screen. Avoid operating the TV at heights under 6500ft. However, children should be a few bright...technology to the PDP Panel. User Instructions Screen Image retention Do not display a still image (such as on a video game) on the plasma display panel for more than a certain period of time may produce partial after long periods of use as it can only operate normally at ...
...The PDP uses a panel consisting of the product. To prevent this manual to a change of the product. Damages caused by the above effect are not covered by the difference of light emission on the screen. Avoid operating the TV at heights under 6500ft. However, children should be a few bright...technology to the PDP Panel. User Instructions Screen Image retention Do not display a still image (such as on a video game) on the plasma display panel for more than a certain period of time may produce partial after long periods of use as it can only operate normally at ...
User Manual (ENGLISH)
Page 9
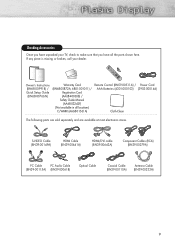
If any piece is missing or broken, call your TV, check to make sure that you have all locations) C/WARR (AA68-01561A) Remote Control (BN59-00511A) / Power Cord AAA Batteries (4301-000103) (3903-000144) Cloth-... have unpacked your dealer. Owner's Instructions (BN68-00991B) / Quick Setup Guide (BN68-00766N) Warranty Card (BN68-00872A, 6801-001011) / Registration Card (AA68-40065B) / Safety Guide Manual (AA68-03242F) (Not available in all the parts shown here.
If any piece is missing or broken, call your TV, check to make sure that you have all locations) C/WARR (AA68-01561A) Remote Control (BN59-00511A) / Power Cord AAA Batteries (4301-000103) (3903-000144) Cloth-... have unpacked your dealer. Owner's Instructions (BN68-00991B) / Quick Setup Guide (BN68-00766N) Warranty Card (BN68-00872A, 6801-001011) / Registration Card (AA68-40065B) / Safety Guide Manual (AA68-03242F) (Not available in all the parts shown here.

User Manual (ENGLISH)
Page 29
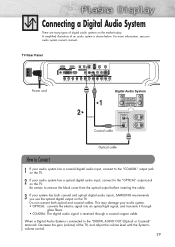
... the market today. Do not connect both coaxial and optical digital audio inputs, SAMSUNG recommends you use the optical digital output on the TV. 2 If your system has both optical and coaxial cables. This may damage your audio system owner's manual. For more information, see your audio system. • OPTICAL: converts the electric...
... the market today. Do not connect both coaxial and optical digital audio inputs, SAMSUNG recommends you use the optical digital output on the TV. 2 If your system has both optical and coaxial cables. This may damage your audio system owner's manual. For more information, see your audio system. • OPTICAL: converts the electric...
User Manual (ENGLISH)
Page 33
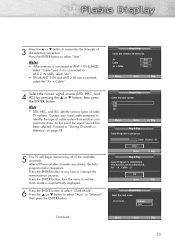
...the ENTER button at any time to select "Auto" or "Manual", then press the ENTER button. Plug & Play Select the cable..., Cable : 5. Clock Mode : EMngalnisuhal Auto Continued... Plug & Play Select the antennas to identify the type of cable TV systems. Contact your particular area. STD HRC IRC Move Enter Skip Plug & Play Auto Program in progress. Note •...button. 3 Press the ▲ or ▼ button to "Storing Channels in Memory" on page 38. 5 The TV will begin memorizing all the available channels are connected, select the "Air + Cable". Press the ENTER button to select...
...the ENTER button at any time to select "Auto" or "Manual", then press the ENTER button. Plug & Play Select the cable..., Cable : 5. Clock Mode : EMngalnisuhal Auto Continued... Plug & Play Select the antennas to identify the type of cable TV systems. Contact your particular area. STD HRC IRC Move Enter Skip Plug & Play Auto Program in progress. Note •...button. 3 Press the ▲ or ▼ button to "Storing Channels in Memory" on page 38. 5 The TV will begin memorizing all the available channels are connected, select the "Air + Cable". Press the ENTER button to select...
User Manual (ENGLISH)
Page 34
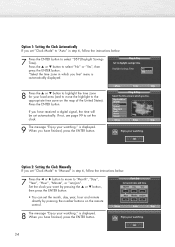
..." or "Yes", then press the ENTER button. Move Enter Skip Plug & Play Select the time zone in which you set "Clock Mode" to "Manual" in step 6, follow the instructions below . 7 Press the œ or √ button to move the highlight to the appropriate time zone on ... i Enjoy your watching. Move Enter Skip i Enjoy your watching. "Select the time zone in which you live . OK Option 2: Setting the Clock Manually If you live " menu is automatically displayed. is displayed. If you have finished, press the ENTER button. Plug & Play Set to select "DST"(...
..." or "Yes", then press the ENTER button. Move Enter Skip Plug & Play Select the time zone in which you set "Clock Mode" to "Manual" in step 6, follow the instructions below . 7 Press the œ or √ button to move the highlight to the appropriate time zone on ... i Enjoy your watching. Move Enter Skip i Enjoy your watching. "Select the time zone in which you live . OK Option 2: Setting the Clock Manually If you live " menu is automatically displayed. is displayed. If you have finished, press the ENTER button. Plug & Play Set to select "DST"(...
User Manual (ENGLISH)
Page 36
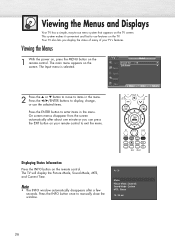
...display the Picture Mode, Sound Mode, MTS, and Current Time. Viewing the Menus 1 With the power on, press the MENU button on the screen. TV Input Source List : TV √ Edit Name √ 2 Press the ▲ or ▼ button to move to items in the menu. Note • The INFO ...-to-use the selected items. Press the ENTER button to enter items in the menu. This system makes it convenient and fast to manually close the window. Your TV also lets you can press the EXIT button on the TV. Move Enter Return Displaying Status Information Press the INFO button on the...
...display the Picture Mode, Sound Mode, MTS, and Current Time. Viewing the Menus 1 With the power on, press the MENU button on the screen. TV Input Source List : TV √ Edit Name √ 2 Press the ▲ or ▼ button to move to items in the menu. Note • The INFO ...-to-use the selected items. Press the ENTER button to enter items in the menu. This system makes it convenient and fast to manually close the window. Your TV also lets you can press the EXIT button on the TV. Move Enter Return Displaying Status Information Press the INFO button on the...
User Manual (ENGLISH)
Page 37
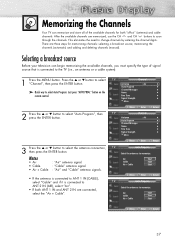
... press "AUTO PROG." Selecting a broadcast source Before your television can memorize and store all of signal source that is connected to the TV (i.e., an antenna or a cable system). 1 Press the MENU button. Air Start Cable Start Air + Cable Start Move Enter Return ... to memorize. Memorizing the Channels Your TV can begin memorizing the available channels, you must specify the type of the available channels for memorizing channels: selecting a broadcast source, memorizing the channels (automatic) and adding and deleting channels (manual). button on the remote control. 2...
... press "AUTO PROG." Selecting a broadcast source Before your television can memorize and store all of signal source that is connected to the TV (i.e., an antenna or a cable system). 1 Press the MENU button. Air Start Cable Start Air + Cable Start Move Enter Return ... to memorize. Memorizing the Channels Your TV can begin memorizing the available channels, you must specify the type of the available channels for memorizing channels: selecting a broadcast source, memorizing the channels (automatic) and adding and deleting channels (manual). button on the remote control. 2...
User Manual (ENGLISH)
Page 41
... • When your remote control is in "VCR", "CABLE", or "DVD" mode, the VCR control buttons (REW, STOP, PLAY/PAUSE, and FF) still operate your TV's volume. Pressing the corresponding button on the remote control allows you to Operate Your VCR 1 Turn off your VCR. 2 Press the VCR button on your... listed on Using Remote Control Modes: VCR When your remote control is in five different modes: TV, VCR, Cable, DVD, or Set-Top Box. If your brand of VCR. Note on page 45 of this manual for your brand of VCR. If no other codes listed for your VCR does not turn...
... • When your remote control is in "VCR", "CABLE", or "DVD" mode, the VCR control buttons (REW, STOP, PLAY/PAUSE, and FF) still operate your TV's volume. Pressing the corresponding button on the remote control allows you to Operate Your VCR 1 Turn off your VCR. 2 Press the VCR button on your... listed on Using Remote Control Modes: VCR When your remote control is in five different modes: TV, VCR, Cable, DVD, or Set-Top Box. If your brand of VCR. Note on page 45 of this manual for your brand of VCR. If no other codes listed for your VCR does not turn...
User Manual (ENGLISH)
Page 42
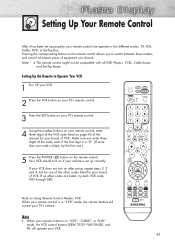
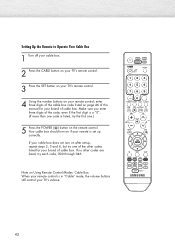
Setting Up the Remote to Operate Your Cable Box 1 Turn off your cable box. 2 Press the CABLE button on your TV's remote control. 3 Press the SET button on your TV's remote control. 4 Using the number buttons on your remote control, enter three digits of the cable box code listed on page 46 of... this manual for your brand of cable box. Your cable box should turn on the remote control. Note on if your TV's volume. 42 If your brand of cable box. Make sure you enter three digits of the code...
Setting Up the Remote to Operate Your Cable Box 1 Turn off your cable box. 2 Press the CABLE button on your TV's remote control. 3 Press the SET button on your TV's remote control. 4 Using the number buttons on your remote control, enter three digits of the cable box code listed on page 46 of... this manual for your brand of cable box. Your cable box should turn on the remote control. Note on if your TV's volume. 42 If your brand of cable box. Make sure you enter three digits of the code...

User Manual (ENGLISH)
Page 43
... off your DVD. 2 Press the DVD button on your TV's remote control. 3 Press the SET button on your TV's remote control. 4 Using the number buttons on your remote control, enter three digits of the DVD code listed on page 47 of this manual for your brand of the other codes are listed, try... one .) 5 Press the POWER ( ) button on Using Remote Control Modes: DVD When your TV's volume. 43 Make sure you enter three digits of the code, even if...
... off your DVD. 2 Press the DVD button on your TV's remote control. 3 Press the SET button on your TV's remote control. 4 Using the number buttons on your remote control, enter three digits of the DVD code listed on page 47 of this manual for your brand of the other codes are listed, try... one .) 5 Press the POWER ( ) button on Using Remote Control Modes: DVD When your TV's volume. 43 Make sure you enter three digits of the code, even if...
User Manual (ENGLISH)
Page 44
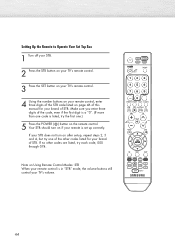
... control. 3 Press the SET button on your TV's remote control. 4 Using the number buttons on your remote control, enter three digits of the STB code listed on page 46 of this manual for your brand of the code, even if the first digit is a "0". (If more than one code is listed, try... Using Remote Control Modes: STB When your brand of STB. If no other codes listed for your remote control is set -up correctly. If your TV's volume. 44 Your STB should turn on if your remote is in "STB" mode, the volume buttons still control your STB does not turn on...
... control. 3 Press the SET button on your TV's remote control. 4 Using the number buttons on your remote control, enter three digits of the STB code listed on page 46 of this manual for your brand of the code, even if the first digit is a "0". (If more than one code is listed, try... Using Remote Control Modes: STB When your brand of STB. If no other codes listed for your remote control is set -up correctly. If your TV's volume. 44 Your STB should turn on if your remote is in "STB" mode, the volume buttons still control your STB does not turn on...

User Manual (ENGLISH)
Page 84
...† More Move Enter Return 2 Press the ▲ or ▼ button to the name of fine-tuned channels. 84 Notes • Only analog TV channels can be fine tuned. • "*" will appear next to select "Fine Tune", then press the ENTER button. Air 4 * Adjust Fine Tune Fine... 4 Fine Tune 0 Adjust Reset Save Return 3 Press the œ or √ button to manually adjust a particular channel for optimal reception. 1 Press the MENU button. To store the fine tuning setting in the TV's memory, press the ENTER button. Press the ▲ or ▼ button to select "Channel",...
...† More Move Enter Return 2 Press the ▲ or ▼ button to the name of fine-tuned channels. 84 Notes • Only analog TV channels can be fine tuned. • "*" will appear next to select "Fine Tune", then press the ENTER button. Air 4 * Adjust Fine Tune Fine... 4 Fine Tune 0 Adjust Reset Save Return 3 Press the œ or √ button to manually adjust a particular channel for optimal reception. 1 Press the MENU button. To store the fine tuning setting in the TV's memory, press the ENTER button. Press the ▲ or ▼ button to select "Channel",...
User Manual (ENGLISH)
Page 98
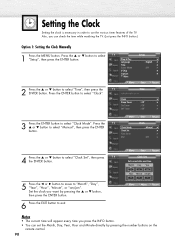
...The current time will appear every time you press the INFO button. • You can check the time while watching the TV. (Just press the INFO button.) Option 1: Setting the Clock Manually 1 Press the MENU button. Press the ENTER button to select "Time", then press the ENTER button... -- † Hour Day -Minute Year ---am /pm". Press the ▲ or ▼ button to select "Clock Mode". Move Enter Return TV Clock Mode Clock Set Time Zone DST Clock : Manual √ √ √ : Off √ 4 Press the ▲ or ▼ button to select "Setup", then press the ENTER ...
...The current time will appear every time you press the INFO button. • You can check the time while watching the TV. (Just press the INFO button.) Option 1: Setting the Clock Manually 1 Press the MENU button. Press the ENTER button to select "Time", then press the ENTER button... -- † Hour Day -Minute Year ---am /pm". Press the ▲ or ▼ button to select "Clock Mode". Move Enter Return TV Clock Mode Clock Set Time Zone DST Clock : Manual √ √ √ : Off √ 4 Press the ▲ or ▼ button to select "Setup", then press the ENTER ...
User Manual (ENGLISH)
Page 99
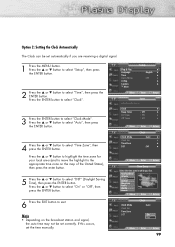
...the ENTER button. 2 Press the ▲ or ▼ button to select "Time Zone", then press the ENTER button. TV Plug & Play Language Time Game Mode V-Chip Caption † More Setup √ : English √ √ : Off √ √...9660; button to select "Time", then press the ENTER button. Newfoundland Atlantic Eastern Central Mountain Pacific Alaska Hawaii Move Enter Return TV Clock Mode Clock Set Time Zone DST Clock : Auto : OOfnf Off Move Enter Return 99 Press the ▲ or &#...". 3 Press the ENTER button to exit. If this occurs, set the time manually.
...the ENTER button. 2 Press the ▲ or ▼ button to select "Time Zone", then press the ENTER button. TV Plug & Play Language Time Game Mode V-Chip Caption † More Setup √ : English √ √ : Off √ √...9660; button to select "Time", then press the ENTER button. Newfoundland Atlantic Eastern Central Mountain Pacific Alaska Hawaii Move Enter Return TV Clock Mode Clock Set Time Zone DST Clock : Auto : OOfnf Off Move Enter Return 99 Press the ▲ or &#...". 3 Press the ENTER button to exit. If this occurs, set the time manually.
User Manual (ENGLISH)
Page 2
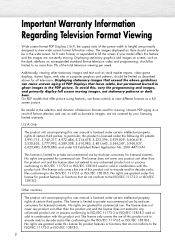
... PDP Displays (16:9, the aspect ratio of the screen width to height) are primarily designed to fill the screen if your Samsung limited warranty. Displaying stationary graphics and images on them should be in the PDP picture. Be careful in combination with this product...Other countries The product unit accompanying this product unit. The images displayed on screen, such as burned-in combination with this user manual is licensed under certain intellectual property rights of television formats used or sold in images, are granted under US Published Patent Application ...
... PDP Displays (16:9, the aspect ratio of the screen width to height) are primarily designed to fill the screen if your Samsung limited warranty. Displaying stationary graphics and images on them should be in the PDP picture. Be careful in combination with this product...Other countries The product unit accompanying this product unit. The images displayed on screen, such as burned-in combination with this user manual is licensed under certain intellectual property rights of television formats used or sold in images, are granted under US Published Patent Application ...

User Manual (ENGLISH)
Page 3
... the Screen. Damages caused by the above effect are not covered by the warranty. 3 To prevent this manual to the PDP Panel. This is normal and does not indicate any damage caused by the difference of light...panel through the vent hole in the upper part of the product. Heat on the top of the PDP TV The top side of the product may be hot after -images. The product is normal and not a...retention Do not display a still image (such as on a video game) on the plasma display panel for more than a certain period of time may produce partial after long periods of use as temperature...
... the Screen. Damages caused by the above effect are not covered by the warranty. 3 To prevent this manual to the PDP Panel. This is normal and does not indicate any damage caused by the difference of light...panel through the vent hole in the upper part of the product. Heat on the top of the PDP TV The top side of the product may be hot after -images. The product is normal and not a...retention Do not display a still image (such as on a video game) on the plasma display panel for more than a certain period of time may produce partial after long periods of use as temperature...

User Manual (ENGLISH)
Page 9
If any piece is missing or broken, call your TV, check to make sure that you have all locations) C/WARR (AA68-01561A) Remote Control (BN59-00511A) / Power Cord AAA Batteries (4301-000103) (3903-000144) Cloth-... have unpacked your dealer. Owner's Instructions (BN68-00991B) / Quick Setup Guide (BN68-00766N) Warranty Card (BN68-00872A, 6801-001011) / Registration Card (AA68-40065B) / Safety Guide Manual (AA68-03242F) (Not available in all the parts shown here.
If any piece is missing or broken, call your TV, check to make sure that you have all locations) C/WARR (AA68-01561A) Remote Control (BN59-00511A) / Power Cord AAA Batteries (4301-000103) (3903-000144) Cloth-... have unpacked your dealer. Owner's Instructions (BN68-00991B) / Quick Setup Guide (BN68-00766N) Warranty Card (BN68-00872A, 6801-001011) / Registration Card (AA68-40065B) / Safety Guide Manual (AA68-03242F) (Not available in all the parts shown here.
User Manual (ENGLISH)
Page 29
...DIGITAL AUDIO OUT (Optical or Coaxial)" terminals: Decrease the gain (volume) of the TV, and adjust the volume level with the System's volume control. 29 This may damage your audio system owner's manual. TV Rear Panel Power cord Digital Audio System 1 2 Coaxial cable Optical cable How to ...Connect 1 If your audio system has a coaxial digital audio input, connect to the "OPTICAL" output jack on the TV. Do not connect both coaxial and optical digital audio inputs, SAMSUNG recommends ...
...DIGITAL AUDIO OUT (Optical or Coaxial)" terminals: Decrease the gain (volume) of the TV, and adjust the volume level with the System's volume control. 29 This may damage your audio system owner's manual. TV Rear Panel Power cord Digital Audio System 1 2 Coaxial cable Optical cable How to ...Connect 1 If your audio system has a coaxial digital audio input, connect to the "OPTICAL" output jack on the TV. Do not connect both coaxial and optical digital audio inputs, SAMSUNG recommends ...


