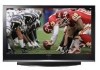
User Manual (ENGLISH)
Page 3
...on the screen. The product is also known as "screen burn". Cell Defects The PDP uses a panel consisting of the product. Avoid operating the TV at heights under 6500ft. To prevent this manual to the screen. This is normal and does not indicate any damage caused by the warranty. 3 ...However, children should be prevented from Video games and PC for a long time. Watching the PDP TV in 4:3 format for more than a certain period of time may be a few bright or dark pixels on the plasma display panel for a long period of time may leave traces of borders displayed on the left...
User Manual (ENGLISH)
Page 4
...Analog Channels 84 Checking the Digital-Signal Strength 85 LNA (Low Noise Amplifier 86 4 Table of Contents General Information Your New Plasma Display Panel 8 Remote Control Buttons 11 Wall Installation Instructions 13 How to assemble the Stand-Base 17 Connections Connecting VHF and ...UHF Antennas 20 Connecting Cable TV 21 Connecting a VCR 23 Connecting a Camcorder 24 Connecting a DVD Player (480i, 480p) ........25 Connecting a DTV Receiver (480p, 720p,...
User Manual (ENGLISH)
Page 7
PLASMA DISPLAY PANEL General Information Your New Plasma Display Panel 8 Remote Control Buttons 11 Wall Installation Instructions 13 How to assemble the Stand-Base 17
User Manual (ENGLISH)
Page 8
... all of the available video sources (TV, AV1, AV2, S-Video1, S-Video2, Component1, Component2, PC, HDMI1, and HDMI2). ´ MENU button Displays the main on -screen menu. ˆ (Enter) button Press to confirm a selection. Ø Power button Press to change channels. Power Off : Blue - Your New Plasma Display Panel Front Panel Œ ´... on and off. Also used to select or adjust items on the on-screen menu. ¨ CH( , ) buttons Press CH or CH to turn the TV on the TV. Power indicator - " Speakers 8
User Manual (ENGLISH)
Page 31
PLASMA DISPLAY PANEL Operation Turning the TV On and Off 32 Viewing the Menus and Displays 36 Memorizing the Channels 37 Setting Up Your Remote Control 41 Viewing an External Signal Source 48
User Manual (ENGLISH)
Page 51
PLASMA DISPLAY PANEL Picture Control Changing the Picture Standard 52 Customizing the Picture Settings 53 DNIe (Digital Natural Image engine 55 Changing the Screen Size 56 Viewing the Picture-in-Picture 58 Selecting the Sound Source 64
User Manual (ENGLISH)
Page 65
Digital 69 Choosing a Multi-Channel Sound (MTS) track - Analog 70 Using the Auto Volume 71 Setting the On/Off Melody 72 Selecting the Internal Mute 73 Sound Reset 74 PLASMA DISPLAY PANEL Sound Control Customizing the Sound 66 Using Automatic Sound Settings 67 Setting the TruSurround XT 68 Choosing a Multi-Channel Sound (MTS) track -
User Manual (ENGLISH)
Page 87
PLASMA DISPLAY PANEL Connecting a PC and Operation Connecting a PC 88 Changing the Position of the Image 92 Picture Quality Adjustment 93 Image Reset 95
User Manual (ENGLISH)
Page 97
PLASMA DISPLAY PANEL Time Setting Setting the Clock 98 Setting the On/Off Timer 100 Setting the Sleep Timer 101
User Manual (ENGLISH)
Page 103
Digital....110 Menu Transparency Level 112 Using the Energy Saving feature 113 Preventing Screen Burn-in 114 Reducing the Effects of Screen Burn 115 Setting the Function Help 116 Setting the Blue Eye 117 Using the V-Chip (for USA 118 Using the V-Chip (for Canada 124 Analog...109 Viewing Closed Captions (On-Screen Text Messages) - PLASMA DISPLAY PANEL Function Description Selecting a Menu Language 104 Digital Noise Reduction 105 Selecting the Film Mode 106 Setting the Blue Screen 107 Using Game Mode 108 Viewing Closed Captions (On-Screen Text Messages) -
User Manual (ENGLISH)
Page 133
PLASMA DISPLAY PANEL Appendix Troubleshooting 134 Care and Maintenance 135 Specifications 136 Dimensions (HP-S4253 137 Dimensions (HP-S5053 139
User Manual (ENGLISH)
Page 3
... top side of the product may be hot after -images. The product is also known as "screen burn". Watching the PDP TV in 4:3 format for a long period of time may leave traces of borders displayed on the left, right and center of the screen caused by the ... console may occur when the product contracts or expands due to produce. Avoid operating the TV at heights under 6500ft. User Instructions Screen Image retention Do not display a still image (such as on a video game) on the plasma display panel for more than a certain period of time may produce partial after long...
User Manual (ENGLISH)
Page 4
...Analog Channels 84 Checking the Digital-Signal Strength 85 LNA (Low Noise Amplifier 86 4 Table of Contents General Information Your New Plasma Display Panel 8 Remote Control Buttons 11 Wall Installation Instructions 13 How to assemble the Stand-Base 17 Connections Connecting VHF and... UHF Antennas 20 Connecting Cable TV 21 Connecting a VCR 23 Connecting a Camcorder 24 Connecting a DVD Player (480i, 480p) ........25 Connecting a DTV Receiver (480p, 720p...
User Manual (ENGLISH)
Page 7
PLASMA DISPLAY PANEL General Information Your New Plasma Display Panel 8 Remote Control Buttons 11 Wall Installation Instructions 13 How to assemble the Stand-Base 17
User Manual (ENGLISH)
Page 8
...down in the on-screen menu. ˆ (Enter) button Press to confirm a selection. Ø Power button Press to turn the TV on the TV. " Speakers 8 Your New Plasma Display Panel Front Panel Œ ´ ˇ ¨ ˆ " ∏ Ø Œ SOURCE button Press ...to display all of the available video sources (TV, AV1, AV2, S-Video1, S-Video2, Component1, Component2, PC, HDMI1, and HDMI2). ´ MENU button Displays the main on ...
User Manual (ENGLISH)
Page 31
PLASMA DISPLAY PANEL Operation Turning the TV On and Off 32 Viewing the Menus and Displays 36 Memorizing the Channels 37 Setting Up Your Remote Control 41 Viewing an External Signal Source 48
User Manual (ENGLISH)
Page 51
PLASMA DISPLAY PANEL Picture Control Changing the Picture Standard 52 Customizing the Picture Settings 53 DNIe (Digital Natural Image engine 55 Changing the Screen Size 56 Viewing the Picture-in-Picture 58 Selecting the Sound Source 64
User Manual (ENGLISH)
Page 65
Analog 70 Using the Auto Volume 71 Setting the On/Off Melody 72 Selecting the Internal Mute 73 Sound Reset 74 Digital 69 Choosing a Multi-Channel Sound (MTS) track - PLASMA DISPLAY PANEL Sound Control Customizing the Sound 66 Using Automatic Sound Settings 67 Setting the TruSurround XT 68 Choosing a Multi-Channel Sound (MTS) track -
User Manual (ENGLISH)
Page 87
PLASMA DISPLAY PANEL Connecting a PC and Operation Connecting a PC 88 Changing the Position of the Image 92 Picture Quality Adjustment 93 Image Reset 95
User Manual (ENGLISH)
Page 97
PLASMA DISPLAY PANEL Time Setting Setting the Clock 98 Setting the On/Off Timer 100 Setting the Sleep Timer 101