User Manual Ver.1.0 (English)
Page 3
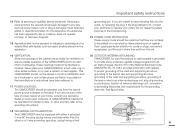
... are not sure of the type of antenna-discharge unit, connection to the operating instructions. 18 GROUNDING OR POLARIZATION: This CAMCORDER may be operated from battery power, or other similar surface: on the apparatus. 16 VENTILATION: Slots and openings in the cabinet are unable to insert the plug fully into the...
... are not sure of the type of antenna-discharge unit, connection to the operating instructions. 18 GROUNDING OR POLARIZATION: This CAMCORDER may be operated from battery power, or other similar surface: on the apparatus. 16 VENTILATION: Slots and openings in the cabinet are unable to insert the plug fully into the...
User Manual Ver.1.0 (English)
Page 6
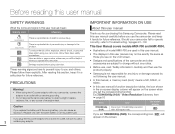
... manual SAFETY WARNINGS What the icons and signs in 720x480 (60p) resolution with protective grounding. • Do not expose the camcorder battery to you for purchasing this Samsung Camcorder. PRECAUTIONS Warning! • When using a function. To reduce the risk of personal injury or damage to use , read ...explicitly. These warning signs are hints or page number references you will appear on the LCD screen. • Designs and specifications of model HMX-F80 are used in this user manual. • The displays in this user manual may not be exactly the same as those you ...
... manual SAFETY WARNINGS What the icons and signs in 720x480 (60p) resolution with protective grounding. • Do not expose the camcorder battery to you for purchasing this Samsung Camcorder. PRECAUTIONS Warning! • When using a function. To reduce the risk of personal injury or damage to use , read ...explicitly. These warning signs are hints or page number references you will appear on the LCD screen. • Designs and specifications of model HMX-F80 are used in this user manual. • The displays in this user manual may not be exactly the same as those you ...
User Manual Ver.1.0 (English)
Page 8
... by pressing on its USB cable, as this could cause eye injuries, as well as lead to prevent personal injury or material damages. Keeping the battery at temperatures over 60˚C(140˚F) may be followed. CAUTION Means that there is a potential risk of personal injury or damage to enter the...
... by pressing on its USB cable, as this could cause eye injuries, as well as lead to prevent personal injury or material damages. Keeping the battery at temperatures over 60˚C(140˚F) may be followed. CAUTION Means that there is a potential risk of personal injury or damage to enter the...

User Manual Ver.1.0 (English)
Page 9
... when not in a fire as it may cause fire or electric shock. There is a risk of the blades exposed. Do not dispose of battery in use or during lightning storms. There is a risk of malfunction or electric shock. Do not spray cleaners directly on the camcorder. If the..., sound or smell, or smokes, unplug immediately detach the power adaptor or modify the camcorder or the power the power adaptor immediately and or battery from a Samsung There is a risk of children. There is a risk of electric shock. If the camcorder emits an abnormal If the camcorder malfunctions, Do not...
... when not in a fire as it may cause fire or electric shock. There is a risk of the blades exposed. Do not dispose of battery in use or during lightning storms. There is a risk of malfunction or electric shock. Do not spray cleaners directly on the camcorder. If the..., sound or smell, or smokes, unplug immediately detach the power adaptor or modify the camcorder or the power the power adaptor immediately and or battery from a Samsung There is a risk of children. There is a risk of electric shock. If the camcorder emits an abnormal If the camcorder malfunctions, Do not...

User Manual Ver.1.0 (English)
Page 10
... body with vinyl sheet, etc. If you push the LCD surface, display unevenness may cause a malfunction or injury. Do not drop or expose the camcorder, battery, power adaptor or other accessories to soot or steam. This may corrode the external or internal terminals, disabling normal operation. Thick soot or steam could...
... body with vinyl sheet, etc. If you push the LCD surface, display unevenness may cause a malfunction or injury. Do not drop or expose the camcorder, battery, power adaptor or other accessories to soot or steam. This may corrode the external or internal terminals, disabling normal operation. Thick soot or steam could...

User Manual Ver.1.0 (English)
Page 12
... 13 WHAT'S INCLUDED WITH YOUR CAMCORDER 13 LOCATION OF CONTROLS 14 IDENTIFIYING THE SCREEN DISPLAYS 16 Getting started 19 INSERTING/EJECTING THE BATTERY 19 CHARGING THE BATTERY 20 CHECKING THE BATTERY STATE 21 Basic operation of the camcorder 24 TURNING YOUR CAMCORDER ON/OFF 24 SWITCHING TO THE POWER SAVING MODE 24 SETTING...
... 13 WHAT'S INCLUDED WITH YOUR CAMCORDER 13 LOCATION OF CONTROLS 14 IDENTIFIYING THE SCREEN DISPLAYS 16 Getting started 19 INSERTING/EJECTING THE BATTERY 19 CHARGING THE BATTERY 20 CHECKING THE BATTERY STATE 21 Basic operation of the camcorder 24 TURNING YOUR CAMCORDER ON/OFF 24 SWITCHING TO THE POWER SAVING MODE 24 SETTING...
User Manual Ver.1.0 (English)
Page 14
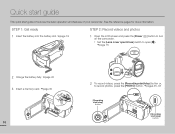
Quick start guide This quick start /stop] button STEP 1: Get ready 1 Insert the battery into the battery slot. ¬page 19 STEP 2: Record videos and photos 1 Open the LCD screen and press the [Power ( )] button to turn on the camcorder. • Set ...the [Lens cover open/close] switch to open ( ). ¬page 15 2 Charge the battery fully. ¬page 20 3 Insert a memory card. ¬page 30 CARD CARD 10 2 To record videos, press the [Recording start/stop] button or, to record...
Quick start guide This quick start /stop] button STEP 1: Get ready 1 Insert the battery into the battery slot. ¬page 19 STEP 2: Record videos and photos 1 Open the LCD screen and press the [Power ( )] button to turn on the camcorder. • Set ...the [Lens cover open/close] switch to open ( ). ¬page 15 2 Charge the battery fully. ¬page 20 3 Insert a memory card. ¬page 30 CARD CARD 10 2 To record videos, press the [Recording start/stop] button or, to record...
User Manual Ver.1.0 (English)
Page 17
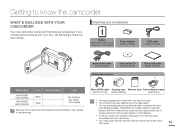
... camcorder includes the user manual CD and the printed quick start guide (AD68-06902A) Model name HMX-F80BN HMX-F800BN HMX-F80SN HMX-F800SN Color Internal memory Black - Checking your local Samsung dealer. Micro HDMI cable Carrying case Memory card External battery charger (AD39-00179A) (AD69-00929A) (IA-BC9UA4) • The exact appearance of each item may...
... camcorder includes the user manual CD and the printed quick start guide (AD68-06902A) Model name HMX-F80BN HMX-F800BN HMX-F80SN HMX-F800SN Color Internal memory Black - Checking your local Samsung dealer. Micro HDMI cable Carrying case Memory card External battery charger (AD39-00179A) (AD69-00929A) (IA-BC9UA4) • The exact appearance of each item may...

User Manual Ver.1.0 (English)
Page 19
Right/Top & Bottom 1 2 3 7 6 4 5 8 1 MODE button 2 Zoom lever (T/W) 3 PHOTO / My Clip button 4 Strap 5 Strap hook 6 Lens cover open ( ) /close ( ) switch 7 Internal microphone 8 Battery release switch (BATT.) 9 Tripod receptacle Getting to know the camcorder Rear 9 1 2 3 1 Mode indicator : Recording mode (Video/Photo) : Playback mode 2 Recording start/stop button 3 Battery slot Be careful not to cover the internal microphone and lens during recording. 15
Right/Top & Bottom 1 2 3 7 6 4 5 8 1 MODE button 2 Zoom lever (T/W) 3 PHOTO / My Clip button 4 Strap 5 Strap hook 6 Lens cover open ( ) /close ( ) switch 7 Internal microphone 8 Battery release switch (BATT.) 9 Tripod receptacle Getting to know the camcorder Rear 9 1 2 3 1 Mode indicator : Recording mode (Video/Photo) : Playback mode 2 Recording start/stop button 3 Battery slot Be careful not to cover the internal microphone and lens during recording. 15
User Manual Ver.1.0 (English)
Page 20
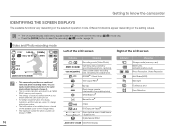
...) Zoom (optical zoom / intelli zoom / digital zoom) Digital Special Effect JAN/01/2012 12:00AM Date/Time Display Indicator Meaning Storage media (memory card) Battery info. (remaining battery level) , Photo Resolution, Video Resolution Anti-Shake(HDIS) Back light Continuous shot Face Detection You can display is in the same mode without having...
...) Zoom (optical zoom / intelli zoom / digital zoom) Digital Special Effect JAN/01/2012 12:00AM Date/Time Display Indicator Meaning Storage media (memory card) Battery info. (remaining battery level) , Photo Resolution, Video Resolution Anti-Shake(HDIS) Back light Continuous shot Face Detection You can display is in the same mode without having...
User Manual Ver.1.0 (English)
Page 21
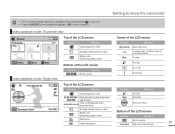
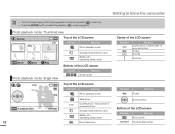
... Play Video playback mode: Single view Top of the LCD screen Indicator Meaning Video playback mode Storage media (memory card) Battery info (remaining battery level) Bottom of the LCD screen Indicator Meaning Button guide Center of the LCD screen Indicator 0:00:55 1/10 Meaning Recorded...00:00/0:00:55 Time code (elapsed recorded time) time / Protect Shortcut menu Thumbnail View 100-0001 Storage media (memory card) Battery info (remaining battery level) Bottom of the LCD screen Indicator Meaning PlayOption Video Resolution Button guide 17 100-0001 File name (file number)
... Play Video playback mode: Single view Top of the LCD screen Indicator Meaning Video playback mode Storage media (memory card) Battery info (remaining battery level) Bottom of the LCD screen Indicator Meaning Button guide Center of the LCD screen Indicator 0:00:55 1/10 Meaning Recorded...00:00/0:00:55 Time code (elapsed recorded time) time / Protect Shortcut menu Thumbnail View 100-0001 Storage media (memory card) Battery info (remaining battery level) Bottom of the LCD screen Indicator Meaning PlayOption Video Resolution Button guide 17 100-0001 File name (file number)
User Manual Ver.1.0 (English)
Page 22
... screen 1/10 Indicator Meaning Photo playback mode Movie Move Play Photo playback mode: Single view Storage media (memory card) Battery info (remaining battery level) Bottom of the LCD screen Indicator Meaning Button guide 1/10 Top of the LCD screen Indicator Meaning Photo playback ...mode Thumbnail View 18 100-0001 Slide Show 1/10 Current photo / total number of recorded photos Storage media (memory card) Battery info (remaining battery level) Photo Resolution Center of the LCD screen Indicator 1/10 Meaning Current photo / total number of recorded photos Protect Error...
... screen 1/10 Indicator Meaning Photo playback mode Movie Move Play Photo playback mode: Single view Storage media (memory card) Battery info (remaining battery level) Bottom of the LCD screen Indicator Meaning Button guide 1/10 Top of the LCD screen Indicator Meaning Photo playback ...mode Thumbnail View 18 100-0001 Slide Show 1/10 Current photo / total number of recorded photos Storage media (memory card) Battery info (remaining battery level) Photo Resolution Center of the LCD screen Indicator 1/10 Meaning Current photo / total number of recorded photos Protect Error...

User Manual Ver.1.0 (English)
Page 23
... (BATT.)] switch in the direction shown in the figure. Getting started INSERTING/EJECTING THE BATTERY To insert the battery Insert the battery into the battery slot until it softly clicks. • Make sure that the SAMSUNG logo on the battery is facing you when the camcorder is not in use of your camcorder. 19 Do not...
... (BATT.)] switch in the direction shown in the figure. Getting started INSERTING/EJECTING THE BATTERY To insert the battery Insert the battery into the battery slot until it softly clicks. • Make sure that the SAMSUNG logo on the battery is facing you when the camcorder is not in use of your camcorder. 19 Do not...

User Manual Ver.1.0 (English)
Page 24
.... We recommend you experience a malfunction while using the camcorder, separate the power adaptor immediately from your distributor. 20 Getting started CHARGING THE BATTERY You can damage the storage media or data. • When recording indoors with a wall outlet available, it is convenient to use the...using the USB cable and power adaptor. • The CHG (charge) indicator lights up and charging starts. Otherwise, you can charge the battery with an ambient temperature between furnishings. • Make sure to power the camcorder. • If you use the camcorder while you use ...
.... We recommend you experience a malfunction while using the camcorder, separate the power adaptor immediately from your distributor. 20 Getting started CHARGING THE BATTERY You can damage the storage media or data. • When recording indoors with a wall outlet available, it is convenient to use the...using the USB cable and power adaptor. • The CHG (charge) indicator lights up and charging starts. Otherwise, you can charge the battery with an ambient temperature between furnishings. • Make sure to power the camcorder. • If you use the camcorder while you use ...

User Manual Ver.1.0 (English)
Page 25
... will be forced to turn off after 3 seconds. Low battery The figures above are based on a fully charged battery at normal temperature. To check the charging state The color of battery power remaining in the battery. Change the battery as soon as possible. - - Low ambient temperature may ...affect the use time. 21 less than 5% - The device will soon turn off . Getting started Battery level display The battery level display shows the amount of the CHG lamp indicates the charging state. STBY [220Min] 9999 CARD Charging (CHG) lamp ...
... will be forced to turn off after 3 seconds. Low battery The figures above are based on a fully charged battery at normal temperature. To check the charging state The color of battery power remaining in the battery. Change the battery as soon as possible. - - Low ambient temperature may ...affect the use time. 21 less than 5% - The device will soon turn off . Getting started Battery level display The battery level display shows the amount of the CHG lamp indicates the charging state. STBY [220Min] 9999 CARD Charging (CHG) lamp ...

User Manual Ver.1.0 (English)
Page 26
..., and the playback functions. The connection is the same as that for battery charging. ¬page 20 • The charging time will vary depending on the amount of the times listed above are measured under Samsung's test conditions. Your times may discharge 1.5 times faster than this reference ... when you use the power adaptor to power the camcorder from a household AC outlet when recording and playing back the camcorder indoors. The battery may differ, depending on your camcorder in minutes required to a PC approx. 160 min. HD SD approx. 200 min. Getting started ...
..., and the playback functions. The connection is the same as that for battery charging. ¬page 20 • The charging time will vary depending on the amount of the times listed above are measured under Samsung's test conditions. Your times may discharge 1.5 times faster than this reference ... when you use the power adaptor to power the camcorder from a household AC outlet when recording and playing back the camcorder indoors. The battery may differ, depending on your camcorder in minutes required to a PC approx. 160 min. HD SD approx. 200 min. Getting started ...
User Manual Ver.1.0 (English)
Page 27
... its usage time and affect its function. A small amount of time. Battery capacity decreases over time and through repeated use . - Getting started About the battery • Battery properties A lithium-ion battery is affected by storage, and operating and environmental conditions. 23 Temperatures that are... too high or too low shorten the battery lifetime. - If the battery is not used for a long period of battery power is consumed when the battery is probably time to recharge it . - If decreased usage time between charges...
... its usage time and affect its function. A small amount of time. Battery capacity decreases over time and through repeated use . - Getting started About the battery • Battery properties A lithium-ion battery is affected by storage, and operating and environmental conditions. 23 Temperatures that are... too high or too low shorten the battery lifetime. - If the battery is not used for a long period of battery power is consumed when the battery is probably time to recharge it . - If decreased usage time between charges...
User Manual Ver.1.0 (English)
Page 28
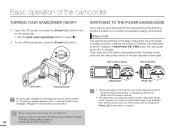
... back, or displaying a slide show. - Sleep mode The camcorder switches to the sleep mode when the LCD screen is opened. • The camcorder consumes less battery power in 5 minutes. SWITCHING TO THE POWER SAVING MODE If you need to use camcorder for more than 20 minutes, the camcorder turns off the...
... back, or displaying a slide show. - Sleep mode The camcorder switches to the sleep mode when the LCD screen is opened. • The camcorder consumes less battery power in 5 minutes. SWITCHING TO THE POWER SAVING MODE If you need to use camcorder for more than 20 minutes, the camcorder turns off the...
User Manual Ver.1.0 (English)
Page 29
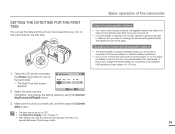
... depleted, the current date/time values are automatically recorded on a special data area of your camcorder is connected to the power adaptor or while the battery is correctly set, and then press the [Control (OK)] button. • The year can set again. SETTING THE DATE/TIME FOR THE FIRST TIME .... If this camcorder for the first time. 1 Open the LCD screen and press the [Power ( )] button to turn on this occurs, charge the internal battery by using the [Control (Up/Down/Left/Right)] button. 3 Make sure the clock is attached. • If you need to power adaptor or do not...
... depleted, the current date/time values are automatically recorded on a special data area of your camcorder is connected to the power adaptor or while the battery is correctly set, and then press the [Control (OK)] button. • The year can set again. SETTING THE DATE/TIME FOR THE FIRST TIME .... If this camcorder for the first time. 1 Open the LCD screen and press the [Power ( )] button to turn on this occurs, charge the internal battery by using the [Control (Up/Down/Left/Right)] button. 3 Make sure the clock is attached. • If you need to power adaptor or do not...
User Manual Ver.1.0 (English)
Page 33
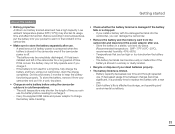
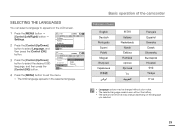
... Dansk Slovensky Hrvatski ѣᮽ Türkçe • Language options may be changed without prior notice. • The selected language remains even without the battery. • The date and time format may change depending on the LCD screen. 1 Press the [MENU] button p [Control (Left/Right)] button p Settings. 2 Press the [Control...
... Dansk Slovensky Hrvatski ѣᮽ Türkçe • Language options may be changed without prior notice. • The selected language remains even without the battery. • The date and time format may change depending on the LCD screen. 1 Press the [MENU] button p [Control (Left/Right)] button p Settings. 2 Press the [Control...


