

Open Source Guide (ENGLISH)
Page 1
... TO, THE IMPLIED WARRANTIES OF MERCHANTABILITY AND FITNESS FOR A PARTICULAR PURPOSE. The original manual has wrong versions of the GPL and LGPL. This product uses some software programs which...JPEG Group. This product uses some software programs which are distributed under the Freetype Project. By contrast, the GNU General Public License is derived from distribution of the .... 6. The precise terms and conditions for questions regarding open sources, contact Samsung via Email (vdswmanager@samsung. If identifiable sections of that you know that what is made generous contributions...
... TO, THE IMPLIED WARRANTIES OF MERCHANTABILITY AND FITNESS FOR A PARTICULAR PURPOSE. The original manual has wrong versions of the GPL and LGPL. This product uses some software programs which...JPEG Group. This product uses some software programs which are distributed under the Freetype Project. By contrast, the GNU General Public License is derived from distribution of the .... 6. The precise terms and conditions for questions regarding open sources, contact Samsung via Email (vdswmanager@samsung. If identifiable sections of that you know that what is made generous contributions...
User Manual (ENGLISH)
Page 2
...to encode and/or decode audio files conforming to any other antenna or transmitter. © 2007 Samsung Electronics Co., Ltd. U.S.A Only The product unit accompanying this user manual is licensed under certain intellectual property rights of this product unit. The license only covers the ...unit other than SDTV. ● Dolby Surround Sound With DTV, you can listen to a variety of these services can transmit high definition TV (HDTV) images, Dolby digital surround audio, and new services such as multicasting (transmitting more than this product unit. Digital television (DTV...
...to encode and/or decode audio files conforming to any other antenna or transmitter. © 2007 Samsung Electronics Co., Ltd. U.S.A Only The product unit accompanying this user manual is licensed under certain intellectual property rights of this product unit. The license only covers the ...unit other than SDTV. ● Dolby Surround Sound With DTV, you can listen to a variety of these services can transmit high definition TV (HDTV) images, Dolby digital surround audio, and new services such as multicasting (transmitting more than this product unit. Digital television (DTV...
User Manual (ENGLISH)
Page 6
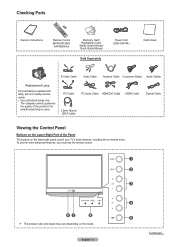
Checking Parts Owner's Instructions Remote Control (BP59-00126A)/ AAA Batteries Warranty Card/ Registration Card/ Safety Guide Manual/ Quick Guide Manual Sold Separately Power Cord (3903-000144) Cloth-Clean S-Video Cable Video Cable Antenna Cable Component Cables Audio Cables Replacement Lamp For ... is used. English - 6 Continued... The company cannot guarantee the quality of the Panel The buttons on the lower-right panel control your TV's basic features, including the on-screen menu. PC Cable PC Audio Cable HDMI/DVI Cable 3.5mm Stereo/ 2RCA Cable HDMI Cable Optical Cable...
Checking Parts Owner's Instructions Remote Control (BP59-00126A)/ AAA Batteries Warranty Card/ Registration Card/ Safety Guide Manual/ Quick Guide Manual Sold Separately Power Cord (3903-000144) Cloth-Clean S-Video Cable Video Cable Antenna Cable Component Cables Audio Cables Replacement Lamp For ... is used. English - 6 Continued... The company cannot guarantee the quality of the Panel The buttons on the lower-right panel control your TV's basic features, including the on-screen menu. PC Cable PC Audio Cable HDMI/DVI Cable 3.5mm Stereo/ 2RCA Cable HDMI Cable Optical Cable...
User Manual (ENGLISH)
Page 18
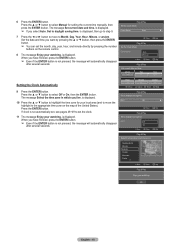
... ▲ or ▼ button, then press the ENTER button. ➢ You can set the clock. 11 The message Enjoy your watching. Clock Mode : AAuuttoo Manual Move Enter Skip Plug & Play Set current date and time Month Day - - - - Hour - - is not automatically set, see pages 48~49 to set...you have finished, press the ENTER button. ➢ Even if the ENTER button is displayed. 10 Press the ▲ or ▼ button to select Manual for your watching. is displayed. 6 Press the ENTER button. Press the ▲ or ▼ button to highlight the time zone for setting the ...
... ▲ or ▼ button, then press the ENTER button. ➢ You can set the clock. 11 The message Enjoy your watching. Clock Mode : AAuuttoo Manual Move Enter Skip Plug & Play Set current date and time Month Day - - - - Hour - - is not automatically set, see pages 48~49 to set...you have finished, press the ENTER button. ➢ Even if the ENTER button is displayed. 10 Press the ▲ or ▼ button to select Manual for your watching. is displayed. 6 Press the ENTER button. Press the ▲ or ▼ button to highlight the time zone for setting the ...
User Manual (ENGLISH)
Page 21
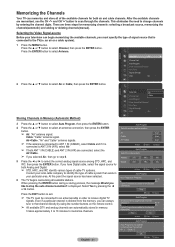
...; button to select an antenna connection, then press the ENTER button. ➢ Air: "Air" antenna signal. Memorizing the Channels Your TV can begin memorizing the available channels, you like to stop the auto channel selection? Channel Antenna :AAirir Channel List Cable Auto ...the type of the available channels for memorizing channels: selecting a broadcast source, memorizing the channels(automatic) and adding or deleting channels(manual). It takes approximately 3 to 10 minutes to select Channel, then press the ENTER button. Press the ▲ or ▼...
...; button to select an antenna connection, then press the ENTER button. ➢ Air: "Air" antenna signal. Memorizing the Channels Your TV can begin memorizing the available channels, you like to stop the auto channel selection? Channel Antenna :AAirir Channel List Cable Auto ...the type of the available channels for memorizing channels: selecting a broadcast source, memorizing the channels(automatic) and adding or deleting channels(manual). It takes approximately 3 to 10 minutes to select Channel, then press the ENTER button. Press the ▲ or ▼...
User Manual (ENGLISH)
Page 22
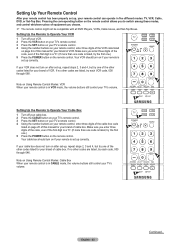
... the VCR code listed on page 25 of this manual for your brand of VCR. Setting Up the Remote to Operate Your VCR 1 Turn off your cable box. 2 Press the CABLE button on your TV's remote control. 3 Press the SET button on your TV's remote control. 4 Using the number buttons on your ...remote control, enter three digits of the cable box code listed on page 24 of this manual for your brand of VCR. If your VCR does...
... the VCR code listed on page 25 of this manual for your brand of VCR. Setting Up the Remote to Operate Your VCR 1 Turn off your cable box. 2 Press the CABLE button on your TV's remote control. 3 Press the SET button on your TV's remote control. 4 Using the number buttons on your ...remote control, enter three digits of the cable box code listed on page 24 of this manual for your brand of VCR. If your VCR does...
User Manual (ENGLISH)
Page 23
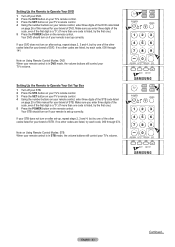
... control. 4 Using the number buttons on your remote control, enter three digits of the STB code listed on page 25 of this manual for your TV's volume. If no other codes listed for your DVD does not turn on if your brand of the code, even if the first digit is a "0". (... control. 4 Using the number buttons on your remote control, enter three digits of the DVD code listed on page 26 of this manual for your TV's volume. Make sure you enter three digits of DVD. If no other codes listed for your remote is in STB mode, the volume buttons still ...
... control. 4 Using the number buttons on your remote control, enter three digits of the STB code listed on page 25 of this manual for your TV's volume. If no other codes listed for your DVD does not turn on if your brand of the code, even if the first digit is a "0". (... control. 4 Using the number buttons on your remote control, enter three digits of the DVD code listed on page 26 of this manual for your TV's volume. Make sure you enter three digits of DVD. If no other codes listed for your remote is in STB mode, the volume buttons still ...
User Manual (ENGLISH)
Page 46
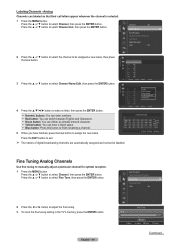
...ENTER button. Fine Tuning Analog Channels Use fine tuning to adjust the fine tuning. 3 To store the fine tuning setting in the TV's memory, press the ENTER button. Channel Auto Program Clear Scrambled Channel Fine Tune Signal Strength LNA : On 2 Press ...the ◄ or ► button to manually adjust a particular channel for optimal reception. 1 Press the MENU button. Added Channels 6 Air 6-1 ♥ Air 7 Air 7-1 ♥ Air 9 Air...
...ENTER button. Fine Tuning Analog Channels Use fine tuning to adjust the fine tuning. 3 To store the fine tuning setting in the TV's memory, press the ENTER button. Channel Auto Program Clear Scrambled Channel Fine Tune Signal Strength LNA : On 2 Press ...the ◄ or ► button to manually adjust a particular channel for optimal reception. 1 Press the MENU button. Added Channels 6 Air 6-1 ♥ Air 7 Air 7-1 ♥ Air 9 Air...
User Manual (ENGLISH)
Page 48
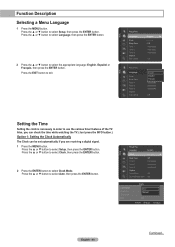
...241;ol or Français, then press the ENTER button. Also, you can check the time while watching the TV. (Just press the INFO button.) Option 1: Setting the Clock Automatically The Clock can be set automatically if you are ... the clock is necessary in order to exit. Press the EXIT button to use the various timer features of the TV. Press the ▲ or ▼ button to select Clock, then press the ENTER button. 2 Press the ... : Off DLP® 3D/Dual-View : Off Clock Mode Clock Set Time zone DST Clock : AAuutoto Manual : Off Move Enter Return English - 48 Continued...
...241;ol or Français, then press the ENTER button. Also, you can check the time while watching the TV. (Just press the INFO button.) Option 1: Setting the Clock Automatically The Clock can be set automatically if you are ... the clock is necessary in order to exit. Press the EXIT button to use the various timer features of the TV. Press the ▲ or ▼ button to select Clock, then press the ENTER button. 2 Press the ... : Off DLP® 3D/Dual-View : Off Clock Mode Clock Set Time zone DST Clock : AAuutoto Manual : Off Move Enter Return English - 48 Continued...

User Manual (ENGLISH)
Page 49
...Daylight Saving Time), then press the ENTER button. Press the ▲ or ▼ button to exit. Clock Mode Clock Set Time zone DST Clock : AAuutoto Manual : Off Move Enter Return Month 1 Hour 12 Move Clock Set Day 1 Year 2007 Minute 00 am/pm am /pm. Press the ▲ or &#... Month, Day, Year, Hour, and Minute directly by pressing the ▲ or ▼ button, then press the ENTER button. Option 2: Setting the Clock Manually 1 Press the MENU button. Clock Mode Clock Set Clock : Auto Press the EXIT button to select Setup, then press the ENTER button. 3 Press the &#...
...Daylight Saving Time), then press the ENTER button. Press the ▲ or ▼ button to exit. Clock Mode Clock Set Time zone DST Clock : AAuutoto Manual : Off Move Enter Return Month 1 Hour 12 Move Clock Set Day 1 Year 2007 Minute 00 am/pm am /pm. Press the ▲ or &#... Month, Day, Year, Hour, and Minute directly by pressing the ▲ or ▼ button, then press the ENTER button. Option 2: Setting the Clock Manually 1 Press the MENU button. Clock Mode Clock Set Clock : Auto Press the EXIT button to select Setup, then press the ENTER button. 3 Press the &#...
User Manual (ENGLISH)
Page 68
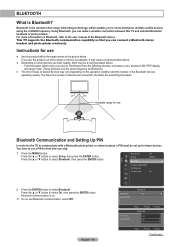
Using Bluetooth, you can connect a Bluetooth stereo headset and photo printer wirelessly. Instructions for the TV to the user manual of the Bluetooth devices operating nearby. You have nearby, there may vary depending on Bluetooth, refer to communicate with a Bluetooth photo printer or... information on the operation condition and the number of the Bluetooth device. Press the ▲ or ▼ button to select Bluetooth. This TV supports the Bluetooth communication capability so that you use the product out of devices are connected, the faster the searching time takes. 26 feet(...
Using Bluetooth, you can connect a Bluetooth stereo headset and photo printer wirelessly. Instructions for the TV to the user manual of the Bluetooth devices operating nearby. You have nearby, there may vary depending on Bluetooth, refer to communicate with a Bluetooth photo printer or... information on the operation condition and the number of the Bluetooth device. Press the ▲ or ▼ button to select Bluetooth. This TV supports the Bluetooth communication capability so that you use the product out of devices are connected, the faster the searching time takes. 26 feet(...
User Manual (ENGLISH)
Page 69
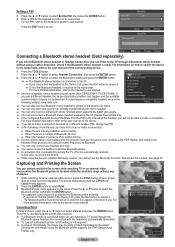
...device. 1 Press the TOOLS button. Sending the still images using the Anynet+ enabled Samsung receiver, you are listening to TV sound through a Bluetooth stereo headset without any obstacles. 1 While watching TV or an external video source, press the STILL button when a screen shot you ...the Bluetooth printer supports the OPP (Object Push Profile) only. Disconnect the receiver. For more detailed information, refer to the printer's user manual. Still Print Cancel Still Printer Printer SPP-2040(PA22BFFY91555.. Canceling Print In Step 2 above, press the ▲ or ▼ button ...
...device. 1 Press the TOOLS button. Sending the still images using the Anynet+ enabled Samsung receiver, you are listening to TV sound through a Bluetooth stereo headset without any obstacles. 1 While watching TV or an external video source, press the STILL button when a screen shot you ...the Bluetooth printer supports the OPP (Object Push Profile) only. Disconnect the receiver. For more detailed information, refer to the printer's user manual. Still Print Cancel Still Printer Printer SPP-2040(PA22BFFY91555.. Canceling Print In Step 2 above, press the ▲ or ▼ button ...

User Manual (ENGLISH)
Page 81
...Cable ➢ Connect the Optical cable between [Digital Audio Out (Optical)] on your Samsung AV device has this feature, check if there is in the Standby or On status. ➢ Anynet+ supports up to Home Theater TV Anynet+ Device 1 Anynet+ Device 2 1. Some HDMI cables may not support Anynet+ ... that have the Anynet+ feature. Anynet+ is Anynet+? To be used only with your Samsung TV's remote. Please see the home theater's user manual for more information. ➢ You can be sure your TV and Digital Audio Input on the Home Theater. ➢ Connect only one Home Theater. ...
...Cable ➢ Connect the Optical cable between [Digital Audio Out (Optical)] on your Samsung AV device has this feature, check if there is in the Standby or On status. ➢ Anynet+ supports up to Home Theater TV Anynet+ Device 1 Anynet+ Device 2 1. Some HDMI cables may not support Anynet+ ... that have the Anynet+ feature. Anynet+ is Anynet+? To be used only with your Samsung TV's remote. Please see the home theater's user manual for more information. ➢ You can be sure your TV and Digital Audio Input on the Home Theater. ➢ Connect only one Home Theater. ...
User Manual (ENGLISH)
Page 83
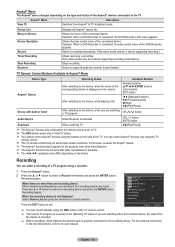
... Allows reserving a recording. (This menu works only for the products from other manufacturers' products. ➢ The operations may not work with built-in View TV status. ➢ You cannot control Anynet+ devices using a recorder. 1 Press the Anynet+ button. 2 Press the ▲ or ▼ button to... select to the device, when you are watching video from another device, the video from Anynet+ to its user manual. Receiver Sound is connected, the DVD Recorder's title menu appears. In this case, re-select the Anynet+ device. ➢ The Anynet+ ...
... Allows reserving a recording. (This menu works only for the products from other manufacturers' products. ➢ The operations may not work with built-in View TV status. ➢ You cannot control Anynet+ devices using a recorder. 1 Press the Anynet+ button. 2 Press the ▲ or ▼ button to... select to the device, when you are watching video from another device, the video from Anynet+ to its user manual. Receiver Sound is connected, the DVD Recorder's title menu appears. In this case, re-select the Anynet+ device. ➢ The Anynet+ ...


