User Manual (ENGLISH)
Page 2
...-user consumers for product features or functions that do not conform to the ISO/IEC 11172-3 or ISO/IEC 13818-3. © 2006 Samsung Electronics Co., Ltd. The license only covers the use of Dolby digital audio formats from Dolby Surround 2.0 to Dolby Digital 5.1 surround, using your... to ISO/IEC 11172-3 or ISO/IEC 13818-3 used or sold in widescreen, and offer much higher picture quality than SDTV. • Dolby Surround Sound With DTV, you can transmit high definition TV (HDTV) images, Dolby digital surround audio, and new services such as multicasting (transmitting more than this ...
...-user consumers for product features or functions that do not conform to the ISO/IEC 11172-3 or ISO/IEC 13818-3. © 2006 Samsung Electronics Co., Ltd. The license only covers the use of Dolby digital audio formats from Dolby Surround 2.0 to Dolby Digital 5.1 surround, using your... to ISO/IEC 11172-3 or ISO/IEC 13818-3 used or sold in widescreen, and offer much higher picture quality than SDTV. • Dolby Surround Sound With DTV, you can transmit high definition TV (HDTV) images, Dolby digital surround audio, and new services such as multicasting (transmitting more than this ...
User Manual (ENGLISH)
Page 5
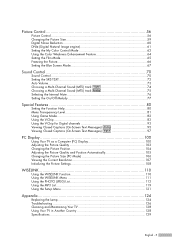
... 59 Digital Noise Reduction 60 DNIe (Digital Natural Image engine 61 Setting the My Color Control Mode 62 Using the Color Weakness Enhancement Feature 64 Setting the Film Mode 65 Freezing the Picture 66 Setting the Blue Screen Mode 67 Sound Control 70 Sound Control ... (On-Screen Text Messages) Digital 97 PC Display 100 Using Your TV as a Computer (PC) Display 100 Adjusting the Picture Quality 103 Changing the Picture Position 104 Adjusting the Picture Quality and Position Automatically 105 Changing the Picture Size (PC Mode 106 Viewing the Current Resolution 107 Initializing the...
... 59 Digital Noise Reduction 60 DNIe (Digital Natural Image engine 61 Setting the My Color Control Mode 62 Using the Color Weakness Enhancement Feature 64 Setting the Film Mode 65 Freezing the Picture 66 Setting the Blue Screen Mode 67 Sound Control 70 Sound Control ... (On-Screen Text Messages) Digital 97 PC Display 100 Using Your TV as a Computer (PC) Display 100 Adjusting the Picture Quality 103 Changing the Picture Position 104 Adjusting the Picture Quality and Position Automatically 105 Changing the Picture Size (PC Mode 106 Viewing the Current Resolution 107 Initializing the...
User Manual (ENGLISH)
Page 9
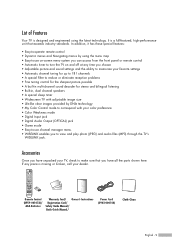
..., high-performance unit that you to view and play photo (JPEG) and audio files (MP3) through the TV's WISELINK jack. If any time you choose • Adjustable picture and sound settings and the ability to memorize your favorite settings • Automatic channel tuning for up to 181... channels • A special filter to reduce or eliminate reception problems • Fine tuning control for the sharpest picture possible • A built-in multi-channel sound decoder for stereo and bilingual listening • Built-in, dual channel speakers • A special...
..., high-performance unit that you to view and play photo (JPEG) and audio files (MP3) through the TV's WISELINK jack. If any time you choose • Adjustable picture and sound settings and the ability to memorize your favorite settings • Automatic channel tuning for up to 181... channels • A special filter to reduce or eliminate reception problems • Fine tuning control for the sharpest picture possible • A built-in multi-channel sound decoder for stereo and bilingual listening • Built-in, dual channel speakers • A special...
User Manual (ENGLISH)
Page 10
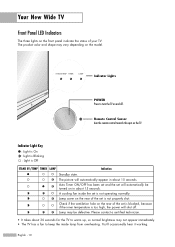
.... Please contact a certified technician. • It takes about 30 seconds for the TV to keep the inside the set will automatically be defective. Check if the ventilation hole on in about 15 seconds. The picture will shut off . You'll occasionally hear it working. Indicator Light Key : Light... if the inner temperature is not properly shut. Lamp cover on the rear of your TV. Lamp may not appear immediately. • The TV has a fan to warm up, so normal brightness may be turned on the rear of the set is too high, the power will automatically appear in about...
.... Please contact a certified technician. • It takes about 30 seconds for the TV to keep the inside the set will automatically be defective. Check if the ventilation hole on in about 15 seconds. The picture will shut off . You'll occasionally hear it working. Indicator Light Key : Light... if the inner temperature is not properly shut. Lamp cover on the rear of your TV. Lamp may not appear immediately. • The TV has a fan to warm up, so normal brightness may be turned on the rear of the set is too high, the power will automatically appear in about...
User Manual (ENGLISH)
Page 13
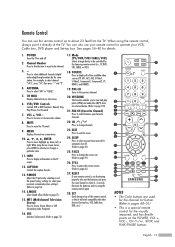
... HDMI2). 19. See pages 34~40 for automatic shut off . 2. Press to select additional channels (digital and analog) being broadcast by the Samsung remote control (i.e., TV, DVD, STB, CABLE, or VCR). 18. While using the remote control again. 28. Remote Control You can also use the remote control...71) 15. S.MODE Select Sound effect. (Refer to the previous channel. 20. You can use your remote control to operate your personal, customized picture settings.) (Refer to page 56) 14. SRS Activates TruSurround. (Refer to page 72) NOTES • The Color buttons are used for the...
... HDMI2). 19. See pages 34~40 for automatic shut off . 2. Press to select additional channels (digital and analog) being broadcast by the Samsung remote control (i.e., TV, DVD, STB, CABLE, or VCR). 18. While using the remote control again. 28. Remote Control You can also use the remote control...71) 15. S.MODE Select Sound effect. (Refer to the previous channel. 20. You can use your remote control to operate your personal, customized picture settings.) (Refer to page 56) 14. SRS Activates TruSurround. (Refer to page 72) NOTES • The Color buttons are used for the...
User Manual (ENGLISH)
Page 28
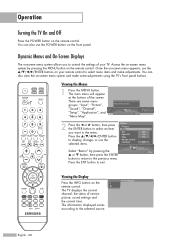
...allows you want in the menu. or † button, then press the ENTER button to return to exit. Picture Enter Viewing the Display Press the INFO button on your TV. Viewing the Menus 1 Press the MENU button. The main menu will appear at the bottom of your remote control... to select menu items and make some adjustments using the TV's front panel buttons. There are seven menu groups: "Input", "Picture", "Sound", "Channel", "Setup", "Application", and "Menu Map". Press the ENTER button to control the settings of the...
...allows you want in the menu. or † button, then press the ENTER button to return to exit. Picture Enter Viewing the Display Press the INFO button on your TV. Viewing the Menus 1 Press the MENU button. The main menu will appear at the bottom of your remote control... to select menu items and make some adjustments using the TV's front panel buttons. There are seven menu groups: "Input", "Picture", "Sound", "Channel", "Setup", "Application", and "Menu Map". Press the ENTER button to control the settings of the...
User Manual (ENGLISH)
Page 54
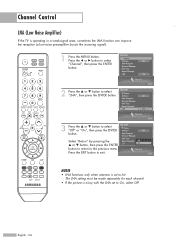
...Fine Tune Signal Strength LNA On Channel Enter 2 Press the ... The LNA setting must be made separately for each channel. • If the picture is noisy with the LNA set to Air. or † button, then press the ENTER LNA On button to return to select Channel Return...menu. Auto Program Channel Manager Fine Tune Select "Return" by pressing the Signal Strength Off ... Channel Control LNA (Low Noise Amplifier) If the TV is set to select "Channel", then press the ENTER button. or † button to exit. Channel Press the EXIT button to select Channel ...
...Fine Tune Signal Strength LNA On Channel Enter 2 Press the ... The LNA setting must be made separately for each channel. • If the picture is noisy with the LNA set to Air. or † button, then press the ENTER LNA On button to return to select Channel Return...menu. Auto Program Channel Manager Fine Tune Select "Return" by pressing the Signal Strength Off ... Channel Control LNA (Low Noise Amplifier) If the TV is set to select "Channel", then press the ENTER button. or † button to exit. Channel Press the EXIT button to select Channel ...
User Manual (ENGLISH)
Page 56
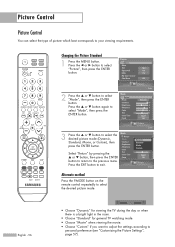
... Tone Reset Dynamic 100 45 75 55 R50 Cool1 OK Picture Enter 3 Press the ... or † button to personal preference (see "Customizing the Picture Settings", page 57). English - 56 Dynamic • Choose "Dynamic" for viewing the TV during the day or when there is a bright light ...in the room. • Choose "Standard" for general TV watching mode. • Choose "Movie" when viewing the...
... Tone Reset Dynamic 100 45 75 55 R50 Cool1 OK Picture Enter 3 Press the ... or † button to personal preference (see "Customizing the Picture Settings", page 57). English - 56 Dynamic • Choose "Dynamic" for viewing the TV during the day or when there is a bright light ...in the room. • Choose "Standard" for general TV watching mode. • Choose "Movie" when viewing the...

User Manual (ENGLISH)
Page 57
...button. Mode Return Mode Contrast Brightness Sharpness Color Tint Color Tone Reset DynaSmtaicndard Standard 80 Movie 50 Custom 50 50 G50 R50 Cool1 OK Picture Enter 4 Press the ... Press the œ or √ button to select a particular option (Contrast, Brightness, Sharpness, Color..., or Tint), then press the ENTER button. Mode Return Mode Contrast Brightness Sharpness Color Tint Color Tone Reset • While adjusting a picture option, you can use the on-screen menus to change the "Contrast", "Brightness", "Sharpness", "Color", "Tint", and "Color Tone" according...
...button. Mode Return Mode Contrast Brightness Sharpness Color Tint Color Tone Reset DynaSmtaicndard Standard 80 Movie 50 Custom 50 50 G50 R50 Cool1 OK Picture Enter 4 Press the ... Press the œ or √ button to select a particular option (Contrast, Brightness, Sharpness, Color..., or Tint), then press the ENTER button. Mode Return Mode Contrast Brightness Sharpness Color Tint Color Tone Reset • While adjusting a picture option, you can use the on-screen menus to change the "Contrast", "Brightness", "Sharpness", "Color", "Tint", and "Color Tone" according...

User Manual (ENGLISH)
Page 58
... 7 To return the factory defaults, select "Reset" by pressing the ... or † button to "Mode". Press the ... or † button. Picture Control 5 Press the ENTER button to return to select "Color Tone", then press the ENTER button. 6 Press the ... or † button, then ...Mode Return Mode Contrast Brightness Sharpness Color Tint Color Tone Reset Standard 80 Cool2 45 Cool1 75 Normal 55 G50Warm1 R50 Warm2Cool1 OK Picture Enter Resetting the Picture Settings to the factory defaults. or † button to the previous menu. Press the ... or † button to exit...
... 7 To return the factory defaults, select "Reset" by pressing the ... or † button to "Mode". Press the ... or † button. Picture Control 5 Press the ENTER button to return to select "Color Tone", then press the ENTER button. 6 Press the ... or † button, then ...Mode Return Mode Contrast Brightness Sharpness Color Tint Color Tone Reset Standard 80 Cool2 45 Cool1 75 Normal 55 G50Warm1 R50 Warm2Cool1 OK Picture Enter Resetting the Picture Settings to the factory defaults. or † button to the previous menu. Press the ... or † button to exit...
User Manual (ENGLISH)
Page 59
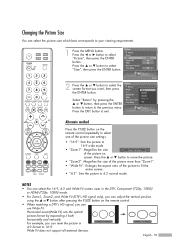
...:9 button. or† button after pressing the P.SIZE button on the remote control. • When watching a DTV's HD signal, you can reset the picture in the DTV, Component (720p, 1080i) or HDMI (720p, 1080i) mode. • For Zoom1, Zoom2, and Wide Fit (DTV's HD signal only...), you can select the picture size which best corresponds to 16:9. Changing the Picture Size You can use Wide Fit. Size Zoom14:3 Digital NR Zoom2On Select "Return" by expanding it both horizontally and vertically....
...:9 button. or† button after pressing the P.SIZE button on the remote control. • When watching a DTV's HD signal, you can reset the picture in the DTV, Component (720p, 1080i) or HDMI (720p, 1080i) mode. • For Zoom1, Zoom2, and Wide Fit (DTV's HD signal only...), you can select the picture size which best corresponds to 16:9. Changing the Picture Size You can use Wide Fit. Size Zoom14:3 Digital NR Zoom2On Select "Return" by expanding it both horizontally and vertically....
User Manual (ENGLISH)
Page 60
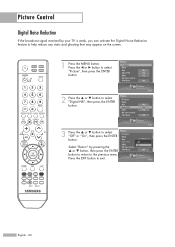
...Mode button. or † button to select "Picture", then press the ENTER button. Picture Press the EXIT button to select Picture "Off" or "On", then press the ENTER Return Mode button. Size Digital NR 16:9 Off On Select "Return" by your TV is weak, you can activate the Digital Noise ...Reduction feature to the previous menu. Picture Control Digital Noise Reduction If the broadcast signal received by pressing the DNIe On Off My Color ...
...Mode button. or † button to select "Picture", then press the ENTER button. Picture Press the EXIT button to select Picture "Off" or "On", then press the ENTER Return Mode button. Size Digital NR 16:9 Off On Select "Return" by your TV is weak, you can activate the Digital Noise ...Reduction feature to the previous menu. Picture Control Digital Noise Reduction If the broadcast signal received by pressing the DNIe On Off My Color ...
User Manual (ENGLISH)
Page 61
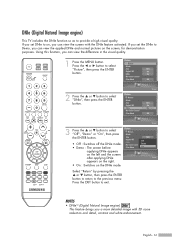
... return to select "Picture", then press the ENTER button. Press the œ or √ button to the previous menu. or † button to exit. Select "Return" by pressing the ... Using this function, you a more detailed image with the DNIe feature activated. English - 61 NOTES • DNIeTM...the EXIT button to select "DNIe", then press the ENTER button. DNIe (Digital Natural Image engine) This TV includes the DNIe function so as to select "Off", "Demo" or "On", then press Picture Return Mode the ENTER button. • Off : Switches off the DNIe mode. • Demo :...
... return to select "Picture", then press the ENTER button. Press the œ or √ button to the previous menu. or † button to exit. Select "Return" by pressing the ... Using this function, you a more detailed image with the DNIe feature activated. English - 61 NOTES • DNIeTM...the EXIT button to select "DNIe", then press the ENTER button. DNIe (Digital Natural Image engine) This TV includes the DNIe function so as to select "Off", "Demo" or "On", then press Picture Return Mode the ENTER button. • Off : Switches off the DNIe mode. • Demo :...
User Manual (ENGLISH)
Page 62
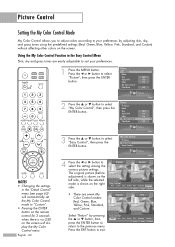
...grass tones using the predefined settings (Red, Green, Blue, Yellow, Pink, Standard, and Custom) without affecting other colors on the screen. The original picture (before adjustment) is shown on the left side, while the selected mode is no OSD on the right side. • There are easily adjustable to... select "Easy Control", then press the ENTER button. Picture Control Setting the My Color Control Mode My Color Control allows you to adjust colors according to select "My Color Control", then press the ...
...grass tones using the predefined settings (Red, Green, Blue, Yellow, Pink, Standard, and Custom) without affecting other colors on the screen. The original picture (before adjustment) is shown on the left side, while the selected mode is no OSD on the right side. • There are easily adjustable to... select "Easy Control", then press the ENTER button. Picture Control Setting the My Color Control Mode My Color Control allows you to adjust colors according to select "My Color Control", then press the ...

User Manual (ENGLISH)
Page 63
...defaults. or † button to select "Detail Control", then press the ENTER button. 4 Press the ... Picture Return Mode Size Digital NR DNIe My Color Control Film Mode 16:9 On On √ Off Picture Enter 3 Press the ... or † button to select "Reset", then press the ENTER Detail Control Return...8224; button to select the desired color and then press the ENTER or √ button. • The original picture (before adjustment) is shown on the left side, while the picture after adjustment is shown on the right side, and an adjustment bar is shown on the bottom of the screen...
...defaults. or † button to select "Detail Control", then press the ENTER button. 4 Press the ... Picture Return Mode Size Digital NR DNIe My Color Control Film Mode 16:9 On On √ Off Picture Enter 3 Press the ... or † button to select "Reset", then press the ENTER Detail Control Return...8224; button to select the desired color and then press the ENTER or √ button. • The original picture (before adjustment) is shown on the left side, while the picture after adjustment is shown on the right side, and an adjustment bar is shown on the bottom of the screen...
User Manual (ENGLISH)
Page 64
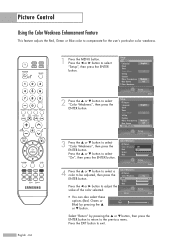
Picture Control Using the Color Weakness Enhancement Feature This feature adjusts the Red, Green or Blue color to select "Color Weakness", then press the ENTER button. ...
Picture Control Using the Color Weakness Enhancement Feature This feature adjusts the Red, Green or Blue color to select "Color Weakness", then press the ENTER button. ...

User Manual (ENGLISH)
Page 65
Setting the Film Mode You can only be set in AV modes (AV, S-Video, or Component) that support SD (Standard Definition) signals (480i) in analog TV mode. Size 16:9 Digital NR On Select "Return" by pressing the ... English - 65 Press the œ or √ button to select "Film Mode",... then press the ENTER Picture Return Mode button. or † button to select "Picture", then press the ENTER button. or † button, then press the ENTER DNIe Off My Color Control Off Film Mode On...
Setting the Film Mode You can only be set in AV modes (AV, S-Video, or Component) that support SD (Standard Definition) signals (480i) in analog TV mode. Size 16:9 Digital NR On Select "Return" by pressing the ... English - 65 Press the œ or √ button to select "Film Mode",... then press the ENTER Picture Return Mode button. or † button to select "Picture", then press the ENTER button. or † button, then press the ENTER DNIe Off My Color Control Off Film Mode On...
User Manual (ENGLISH)
Page 66
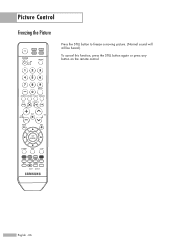
Picture Control Freezing the Picture Press the STILL button to freeze a moving picture. (Normal sound will still be heard.) To cancel this function, press the STILL button again or press any button on the remote control. English - 66
Picture Control Freezing the Picture Press the STILL button to freeze a moving picture. (Normal sound will still be heard.) To cancel this function, press the STILL button again or press any button on the remote control. English - 66

User Manual (ENGLISH)
Page 67
Setting the Blue Screen Mode If no signal is being received or the signal is very weak, a blue screen automatically replaces the noisy picture background. Clock Timer Select "Return" by pressing the Game Mode Off V-Chip ... or † button, then press the ENTER button to return to... Caption Menu Transparency Blue Screen † Color Weakness English Off Medium Off Setup Enter 3 Press the ... If you wish to continue viewing the poor picture, you must set the "Blue Screen" mode to select "Blue Screen", then press the ENTER button. Press the œ or √ button to...
Setting the Blue Screen Mode If no signal is being received or the signal is very weak, a blue screen automatically replaces the noisy picture background. Clock Timer Select "Return" by pressing the Game Mode Off V-Chip ... or † button, then press the ENTER button to return to... Caption Menu Transparency Blue Screen † Color Weakness English Off Medium Off Setup Enter 3 Press the ... If you wish to continue viewing the poor picture, you must set the "Blue Screen" mode to select "Blue Screen", then press the ENTER button. Press the œ or √ button to...
User Manual (ENGLISH)
Page 82
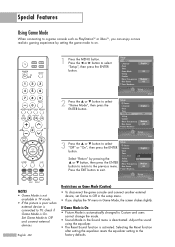
... Press the ... English - 82 Restrictions on . 1 Press the MENU button. Selecting the Reset function after setting the equalizer resets the equalizer setting to TV, check if Game Mode is On. Special Features Using Game Mode When connecting to a game console such as PlayStationTM or XboxTM, you can enjoy a.... Set Game Mode to Custom and users cannot change the mode. • Sound Mode in TV mode. • If the picture is poor when external device is deactivated. If Game Mode is On • Picture Mode is activated. Press the œ or √ button to select "Game Mode", then...
... Press the ... English - 82 Restrictions on . 1 Press the MENU button. Selecting the Reset function after setting the equalizer resets the equalizer setting to TV, check if Game Mode is On. Special Features Using Game Mode When connecting to a game console such as PlayStationTM or XboxTM, you can enjoy a.... Set Game Mode to Custom and users cannot change the mode. • Sound Mode in TV mode. • If the picture is poor when external device is deactivated. If Game Mode is On • Picture Mode is activated. Press the œ or √ button to select "Game Mode", then...


