Owner Instructions
Page 2
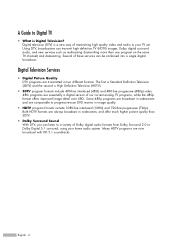
... audio formats from Dolby Surround 2.0 to progressive-scan DVD movies in widescreen and are comparable to Dolby Digital 5.1 surround, using your TV set. Some 480p programs are broadcast in image quality. • HDTV program formats include 1080-line interlaced (1080i) and 720-line...Both HDTV formats are essentially a digital version of transmitting high quality video and audio to Digital TV • What is Digital Television? Using DTV, broadcasters can transmit high definition TV (HDTV) images, Dolby digital surround audio, and new services such as multicasting (transmitting more ...
... audio formats from Dolby Surround 2.0 to progressive-scan DVD movies in widescreen and are comparable to Dolby Digital 5.1 surround, using your TV set. Some 480p programs are broadcast in image quality. • HDTV program formats include 1080-line interlaced (1080i) and 720-line...Both HDTV formats are essentially a digital version of transmitting high quality video and audio to Digital TV • What is Digital Television? Using DTV, broadcasters can transmit high definition TV (HDTV) images, Dolby digital surround audio, and new services such as multicasting (transmitting more ...
Owner Instructions
Page 3
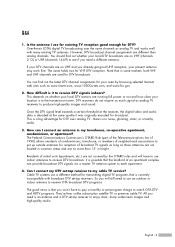
...sound. You can I connect my DTV set -top receiver to watch OTA DTV and HDTV programs. They're free, unlike subscription satellite TV or premium cable TV. If your location is an antenna and a DTV set -top receiver to the transmission tower. The same holds true for DTV over ...receive DTV signals indoors? How can find out whether your present antenna may work fine. DTV receivers do not require as much signal as analog TV and works well with broadcast DTV set-top receivers. Residents of rental units (apartments, etc.) are different than 12' in height. All you...
...sound. You can I connect my DTV set -top receiver to watch OTA DTV and HDTV programs. They're free, unlike subscription satellite TV or premium cable TV. If your location is an antenna and a DTV set -top receiver to the transmission tower. The same holds true for DTV over ...receive DTV signals indoors? How can find out whether your present antenna may work fine. DTV receivers do not require as much signal as analog TV and works well with broadcast DTV set-top receivers. Residents of rental units (apartments, etc.) are different than 12' in height. All you...
Owner Instructions
Page 4
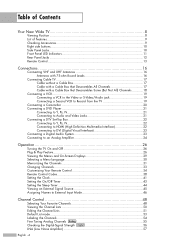
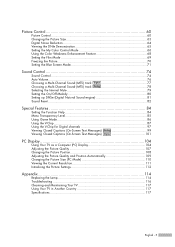
... Right side buttons 10 Side Panel Jacks 10 Front Panel LED Indicators 11 Rear Panel Jacks ...12 Remote Control...13 Connections 16 Connecting VHF and UHF Antennas 16 Antennas with 75-ohm Round Leads 16 Connecting Cable TV 17 Cable without a Cable Box 17 Cable with a Cable Box that ...Interface 22 Connecting to DVI (Digital Visual Interface 23 Connecting a Digital Audio System 23 Connecting to an Analog Amplifier 24 Operation 26 Turning the TV On and Off 26 Plug & Play Feature 26 Viewing the Menus and On-Screen Displays 29 Selecting a Menu Language 30 Memorizing the Channels...
... Right side buttons 10 Side Panel Jacks 10 Front Panel LED Indicators 11 Rear Panel Jacks ...12 Remote Control...13 Connections 16 Connecting VHF and UHF Antennas 16 Antennas with 75-ohm Round Leads 16 Connecting Cable TV 17 Cable without a Cable Box 17 Cable with a Cable Box that ...Interface 22 Connecting to DVI (Digital Visual Interface 23 Connecting a Digital Audio System 23 Connecting to an Analog Amplifier 24 Operation 26 Turning the TV On and Off 26 Plug & Play Feature 26 Viewing the Menus and On-Screen Displays 29 Selecting a Menu Language 30 Memorizing the Channels...
Owner Instructions
Page 5
...channels 97 Viewing Closed Captions (On-Screen Text Messages) Analog 99 Viewing Closed Captions (On-Screen Text Messages) Digital 101 PC Display 104 Using Your TV as a Computer (PC) Display 104 Adjusting the Picture Quality 107 Changing the Picture Position 108 Adjusting the Picture Quality and Position Automatically 109 Changing the...(PC Mode 110 Viewing the Current Resolution 111 Initializing the Picture Settings 112 Appendix 114 Replacing the Lamp 114 Troubleshooting 116 Cleaning and Maintaining Your TV 117 Using Your TV in Another Country 117 Specifications ...117 English - 5
...channels 97 Viewing Closed Captions (On-Screen Text Messages) Analog 99 Viewing Closed Captions (On-Screen Text Messages) Digital 101 PC Display 104 Using Your TV as a Computer (PC) Display 104 Adjusting the Picture Quality 107 Changing the Picture Position 108 Adjusting the Picture Quality and Position Automatically 109 Changing the...(PC Mode 110 Viewing the Current Resolution 111 Initializing the Picture Settings 112 Appendix 114 Replacing the Lamp 114 Troubleshooting 116 Cleaning and Maintaining Your TV 117 Using Your TV in Another Country 117 Specifications ...117 English - 5
Owner Instructions
Page 8
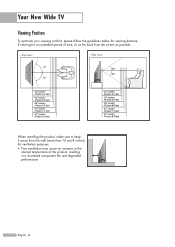
Your New Wide TV Viewing Position To optimize your viewing comfort, please follow the guidelines below for ventilation purposes. • Poor ventilation may cause an increase in a shortened component life and degraded performance. If viewing for an extended period of the product, resulting in the internal temperature of time, sit as possible. English - 8 When installing the product, make sure to keep it away from the screen as far back from the wall (more than 10 cm/4 inches) for viewing distance.
Your New Wide TV Viewing Position To optimize your viewing comfort, please follow the guidelines below for ventilation purposes. • Poor ventilation may cause an increase in a shortened component life and degraded performance. If viewing for an extended period of the product, resulting in the internal temperature of time, sit as possible. English - 8 When installing the product, make sure to keep it away from the screen as far back from the wall (more than 10 cm/4 inches) for viewing distance.
Owner Instructions
Page 9
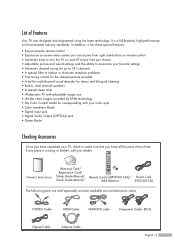
...that you can access from right side buttons or remote control • Automatic timer to turn the TV on and off at most electronics stores. It is missing or broken, call your TV, check to make sure that exceeds industry standards. In addition, it has these special features: ... built-in multi-channel sound decoder for stereo and bilingual listening • Built-in, dual channel speakers • A special sleep timer • Widescreen TV with adjustable image size • Life-like clear images provided by DNle technology • My Color Control Mode for up to 181 channels • A ...
...that you can access from right side buttons or remote control • Automatic timer to turn the TV on and off at most electronics stores. It is missing or broken, call your TV, check to make sure that exceeds industry standards. In addition, it has these special features: ... built-in multi-channel sound decoder for stereo and bilingual listening • Built-in, dual channel speakers • A special sleep timer • Widescreen TV with adjustable image size • Life-like clear images provided by DNle technology • My Color Control Mode for up to 181 channels • A ...
Owner Instructions
Page 10
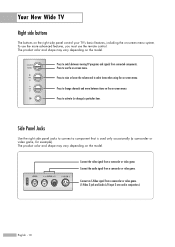
...occasionally (a camcorder or video game, for example). Press to see the on the model. Press to activate (or change channels and move between viewing TV programs and signals from a camcorder or video game. Press to change ) a particular item. Connect the audio signal from connected components. Side Panel ...Use the right side panel jacks to select items when using the on -screen menu. Your New Wide TV Right side buttons The buttons on the right side panel control your TV's basic features, including the on the model. The product color and shape may vary depending on -screen...
...occasionally (a camcorder or video game, for example). Press to see the on the model. Press to activate (or change channels and move between viewing TV programs and signals from a camcorder or video game. Press to change ) a particular item. Connect the audio signal from connected components. Side Panel ...Use the right side panel jacks to select items when using the on -screen menu. Your New Wide TV Right side buttons The buttons on the right side panel control your TV's basic features, including the on the model. The product color and shape may vary depending on -screen...
Owner Instructions
Page 11
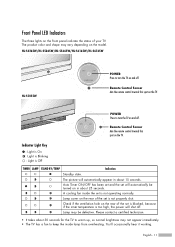
... color and shape may not appear immediately. • The TV has a fan to turn the TV on and off . Check if the ventilation hole on the TV. Front Panel LED Indicators The three lights on the TV. Lamp may be turned on the rear of your TV. The picture will automatically be defective. Lamp cover on...
... color and shape may not appear immediately. • The TV has a fan to turn the TV on and off . Check if the ventilation hole on the TV. Front Panel LED Indicators The three lights on the TV. Lamp may be turned on the rear of your TV. The picture will automatically be defective. Lamp cover on...
Owner Instructions
Page 12
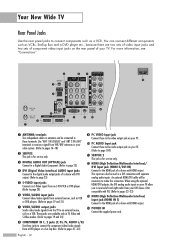
... can be used as a VCR. When using the optional HDMI/DVI adapter, the DVI analog audio inputs on your TV. English - 12 Your New Wide TV Rear Panel Jacks Use the rear panel jacks to make this connection. For more information, see "Connections". ΠANTENNA terminals Two independent cables or antennas... HDMI/DVI cable will be necessary to connect components such as VCRs, Set-Top Box and a DVD player etc., because there are available only in TV, Video and S-Video modes. (Refer to pages 19 and 24) " COMPONENT IN 1, 2 jacks (Y, PB, PR, AUDIO L/R) Use these to the HDMI jack...
... can be used as a VCR. When using the optional HDMI/DVI adapter, the DVI analog audio inputs on your TV. English - 12 Your New Wide TV Rear Panel Jacks Use the rear panel jacks to make this connection. For more information, see "Connections". ΠANTENNA terminals Two independent cables or antennas... HDMI/DVI cable will be necessary to connect components such as VCRs, Set-Top Box and a DVD player etc., because there are available only in TV, Video and S-Video modes. (Refer to pages 19 and 24) " COMPONENT IN 1, 2 jacks (Y, PB, PR, AUDIO L/R) Use these to the HDMI jack...
Owner Instructions
Page 13
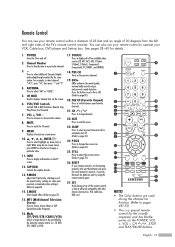
...top box, VCR, Cable box, DVD, etc.) 15. CAPTION Controls the caption decoder. 13. MTS (Multichannel Television Stereo) Press to mute the TV sound. 9. MUTE Press to choose Stereo, Mono or SAP (Secondary Audio Program). 16. EXIT Press to be controlled by selecting one of the ... and "3". 4. See pages 38~40 for about 2~3 seconds. For example, to switch between your favorite channels. 21. P.MODE Adjust the TV picture by the Samsung remote control (i.e., TV, DVD, STB, CABLE, or VCR). PRE-CH Tunes to page 60) 14. While using the remote control again. 27. SOURCE Press ...
...top box, VCR, Cable box, DVD, etc.) 15. CAPTION Controls the caption decoder. 13. MTS (Multichannel Television Stereo) Press to mute the TV sound. 9. MUTE Press to choose Stereo, Mono or SAP (Secondary Audio Program). 16. EXIT Press to be controlled by selecting one of the ... and "3". 4. See pages 38~40 for about 2~3 seconds. For example, to switch between your favorite channels. 21. P.MODE Adjust the TV picture by the Samsung remote control (i.e., TV, DVD, STB, CABLE, or VCR). PRE-CH Tunes to page 60) 14. While using the remote control again. 27. SOURCE Press ...
Owner Instructions
Page 14
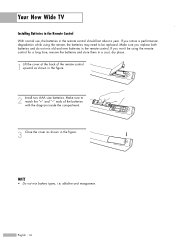
... the cover at the back of the batteries with the diagram inside the compartment. 3 Close the cover as shown in the figure. Your New Wide TV Installing Batteries in the Remote Control With normal use, the batteries in the remote control. NOTE • Do not mix battery types, i.e, alkaline and manganese...
... the cover at the back of the batteries with the diagram inside the compartment. 3 Close the cover as shown in the figure. Your New Wide TV Installing Batteries in the Remote Control With normal use, the batteries in the remote control. NOTE • Do not mix battery types, i.e, alkaline and manganese...

Owner Instructions
Page 16
English - 16 Connections Connecting VHF and UHF Antennas If you do not have a cable system, you will need to connect an antenna to your TV. Antennas with 75-ohm Round Leads If your antenna looks like this: it has 75-ohm round leads. 1 Plug the antenna lead into the ANT 2 IN (AIR) on the rear panel of your TV.
English - 16 Connections Connecting VHF and UHF Antennas If you do not have a cable system, you will need to connect an antenna to your TV. Antennas with 75-ohm Round Leads If your antenna looks like this: it has 75-ohm round leads. 1 Plug the antenna lead into the ANT 2 IN (AIR) on the rear panel of your TV.
Owner Instructions
Page 17
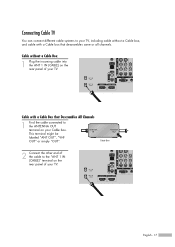
... cable without a Cable Box 1 Plug the incoming cable into the ANT 1 IN (CABLE) on your TV. Cable without a Cable box, and cable with a Cable Box that descrambles some or all channels. English - 17 This terminal might be labeled "ANT OUT", "VHF ...OUT" or simply "OUT". 2 Connect the other end of your TV. Cable with a Cable box that Descrambles All Channels 1 Find the cable connected to the "ANT 1 IN (CABLE)" terminal on the...
... cable without a Cable Box 1 Plug the incoming cable into the ANT 1 IN (CABLE) on your TV. Cable without a Cable box, and cable with a Cable Box that descrambles some or all channels. English - 17 This terminal might be labeled "ANT OUT", "VHF ...OUT" or simply "OUT". 2 Connect the other end of your TV. Cable with a Cable box that Descrambles All Channels 1 Find the cable connected to the "ANT 1 IN (CABLE)" terminal on the...
Owner Instructions
Page 18
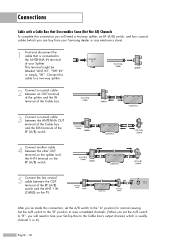
... the last coaxial cable between the OUT terminal of your Set-Top Box to the Cable box's output channel, which you can buy from your Samsung dealer or any electronics store). 1 Find and disconnect the cable that is usually channel 3 or 4.) English - 18 Set the A/B switch to the "B" position to view... RF (A/B) switch, and four coaxial cables (which is connected to the ANTENNA IN terminal of the RF (A/B) switch and the ANT 1 IN (CABLE) on the TV.
... the last coaxial cable between the OUT terminal of your Set-Top Box to the Cable box's output channel, which you can buy from your Samsung dealer or any electronics store). 1 Find and disconnect the cable that is usually channel 3 or 4.) English - 18 Set the A/B switch to the "B" position to view... RF (A/B) switch, and four coaxial cables (which is connected to the ANTENNA IN terminal of the RF (A/B) switch and the ANT 1 IN (CABLE) on the TV.

Owner Instructions
Page 19
... kind of connection. • Please be sure to match the color coded input terminals and cable jacks. TV Rear Panel 2 Connect a set of audio cables between the AUDIO IN (1 or 2) jacks on the TV and the AUDIO output jacks on the VCR. Incoming Cable or Antenna 1 Stereo VCR 2 2 English -... 19 TV Rear Panel 2 Connect a set of audio cables between the AUDIO OUT jacks on the TV and the AUDIO input jacks on the VCR. or 1 NOTES • For better video, use an S-Video cable. &#...
... kind of connection. • Please be sure to match the color coded input terminals and cable jacks. TV Rear Panel 2 Connect a set of audio cables between the AUDIO IN (1 or 2) jacks on the TV and the AUDIO output jacks on the VCR. Incoming Cable or Antenna 1 Stereo VCR 2 2 English -... 19 TV Rear Panel 2 Connect a set of audio cables between the AUDIO OUT jacks on the TV and the AUDIO input jacks on the VCR. or 1 NOTES • For better video, use an S-Video cable. &#...
Owner Instructions
Page 20
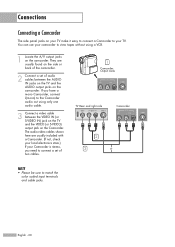
... on the Camcorder. They are usually included with a Camcorder. (If not, check your local electronics store.) If your TV make it easy to connect a Camcorder to connect a set of two cables. 1 Camcorder Output Jacks TV Rear and right side Camcorder 2 3 or NOTE • Please be sure to the Camcorder audio out using a VCR... usually found on the side or back of the camcorder. 2 Connect a set of audio cables between the VIDEO IN (or S-VIDEO IN) jack on the TV and the VIDEO (or S-VIDEO) output jack on the camcorder.
... on the Camcorder. They are usually included with a Camcorder. (If not, check your local electronics store.) If your TV make it easy to connect a Camcorder to connect a set of two cables. 1 Camcorder Output Jacks TV Rear and right side Camcorder 2 3 or NOTE • Please be sure to the Camcorder audio out using a VCR... usually found on the side or back of the camcorder. 2 Connect a set of audio cables between the VIDEO IN (or S-VIDEO IN) jack on the TV and the VIDEO (or S-VIDEO) output jack on the camcorder.
Owner Instructions
Page 21
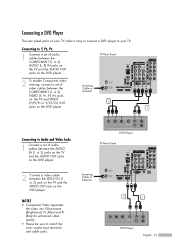
... cable jacks. Incoming Cable or Antenna 2 1 DVD Player English - 21 DVD Player TV Rear Panel 2 Connect a video cable between the COMPONENT (1 or 2) Incoming Cable or Antenna VIDEO (Y, PB, PR) IN jacks on the TV and VIDEO (Y/PB/PR or Y/CB/CR) OUT 2 jacks on the DVD player....Connect a set of audio cables between the COMPONENT (1 or 2) AUDIO (L, R) IN jacks on the TV and the AUDIO OUT jacks on the DVD player. Connecting a DVD Player The rear panel jacks on your TV. TV Rear Panel 2 To enable Component video viewing, connect a set of video cables between the VIDEO IN (1 or...
... cable jacks. Incoming Cable or Antenna 2 1 DVD Player English - 21 DVD Player TV Rear Panel 2 Connect a video cable between the COMPONENT (1 or 2) Incoming Cable or Antenna VIDEO (Y, PB, PR) IN jacks on the TV and VIDEO (Y/PB/PR or Y/CB/CR) OUT 2 jacks on the DVD player....Connect a set of audio cables between the COMPONENT (1 or 2) AUDIO (L, R) IN jacks on the TV and the AUDIO OUT jacks on the DVD player. Connecting a DVD Player The rear panel jacks on your TV. TV Rear Panel 2 To enable Component video viewing, connect a set of video cables between the VIDEO IN (1 or...
Owner Instructions
Page 22
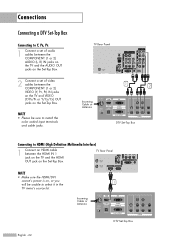
... the HDMI OUT jack on the Set-Top Box. Incoming Cable or Antenna English - 22 DTV Set-Top Box TV Rear Panel Incoming Cable or Antenna 1 2 DTV Set-Top Box Connecting to HDMI (High Definition Multimedia Interface) 1 Connect an HDMI cable between the COMPONENT (1 or 2) VIDEO (Y, ... VIDEO (Y/PB/PR or Y/CB/CR) OUT jacks on , or you will be sure to select it in the 1 TV menu's source list. TV Rear Panel NOTE • Make sure the HDMI/DVI source's power is on the Set-Top Box. NOTE • Please be unable to match the color ...
... the HDMI OUT jack on the Set-Top Box. Incoming Cable or Antenna English - 22 DTV Set-Top Box TV Rear Panel Incoming Cable or Antenna 1 2 DTV Set-Top Box Connecting to HDMI (High Definition Multimedia Interface) 1 Connect an HDMI cable between the COMPONENT (1 or 2) VIDEO (Y, ... VIDEO (Y/PB/PR or Y/CB/CR) OUT jacks on , or you will be sure to select it in the 1 TV menu's source list. TV Rear Panel NOTE • Make sure the HDMI/DVI source's power is on the Set-Top Box. NOTE • Please be unable to match the color ...
Owner Instructions
Page 23
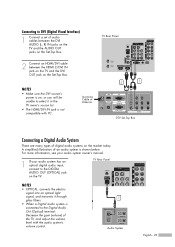
...-Top Box. NOTES • Make sure the DVI source's power is connected to the Digital Audio Out (Optical) terminal: Decrease the gain (volume) of the TV, and adjust the volume level with PC. TV Rear Panel NOTES • OPTICAL: converts the electric signal into an optical light signal, and transmits it in the.../DVI IN jack is shown below. Connecting to DVI (Digital Visual Interface) 1 Connect a set of audio cables between the HDMI 2/DVI IN jack on the TV and the DVI OUT jack on the Set-Top Box. TV Rear Panel 2 Connect an HDMI/DVI cable between the DVI AUDIO (L, R) IN jacks on the...
...-Top Box. NOTES • Make sure the DVI source's power is connected to the Digital Audio Out (Optical) terminal: Decrease the gain (volume) of the TV, and adjust the volume level with PC. TV Rear Panel NOTES • OPTICAL: converts the electric signal into an optical light signal, and transmits it in the.../DVI IN jack is shown below. Connecting to DVI (Digital Visual Interface) 1 Connect a set of audio cables between the HDMI 2/DVI IN jack on the TV and the DVI OUT jack on the Set-Top Box. TV Rear Panel 2 Connect an HDMI/DVI cable between the DVI AUDIO (L, R) IN jacks on the...
Owner Instructions
Page 24
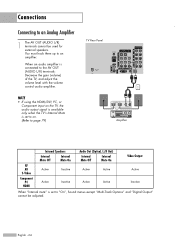
...an Analog Amplifier 1 The AV OUT (AUDIO L/R) terminals cannot be adjusted. When an audio amplifier is set to on. (Refer to page 79) TV Rear Panel 1 Amplifier RF AV S-Video Component PC HDMI Internal Speakers Internal Mute Off Internal Mute On Active Inactive Active Inactive Audio Out (Optical, L/R Out)...Active Video Output Active Inactive When "Internal mute" is connected to the AV OUT (AUDIO L/R) terminals: Decrease the gain (volume) of the TV, and adjust the volume level with the volume control audio amplifier. NOTE • If using the HDMI/DVI, PC, or Component input on ...
...an Analog Amplifier 1 The AV OUT (AUDIO L/R) terminals cannot be adjusted. When an audio amplifier is set to on. (Refer to page 79) TV Rear Panel 1 Amplifier RF AV S-Video Component PC HDMI Internal Speakers Internal Mute Off Internal Mute On Active Inactive Active Inactive Audio Out (Optical, L/R Out)...Active Video Output Active Inactive When "Internal mute" is connected to the AV OUT (AUDIO L/R) terminals: Decrease the gain (volume) of the TV, and adjust the volume level with the volume control audio amplifier. NOTE • If using the HDMI/DVI, PC, or Component input on ...


