
User Manual (ENGLISH)
Page 3
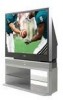
...rights are now broadcast with this product unit. Several of transmitting high quality video and audio to Dolby Digital 5.1 surround, using your TV set. Some 480p programs are granted under certain intellectual property rights of certain third parties. No rights are comparable to the ISO/IEC...a digital version of Dolby digital audio formats from Dolby Surround 2.0 to your home audio system. This license is limited to Digital TV • What is licensed under this license for product features or functions that do not conform to progressive-scan DVD movies in ...
...rights are now broadcast with this product unit. Several of transmitting high quality video and audio to Dolby Digital 5.1 surround, using your TV set. Some 480p programs are granted under certain intellectual property rights of certain third parties. No rights are comparable to the ISO/IEC...a digital version of Dolby digital audio formats from Dolby Surround 2.0 to your home audio system. This license is limited to Digital TV • What is licensed under this license for product features or functions that do not conform to progressive-scan DVD movies in ...

User Manual (ENGLISH)
Page 4
... modules called CableCARDs). These PCMCIA card modules or CableCARDs will show the message that copy protected content may display messages on the TV screen to help or give you insert CableCARD for the first time, this process the digital cable service provider or CableCARD may ...should be noted that CableCARD is inserted into the CableCARD slot of a Digital Cable Ready TV. When you further information. Digital Cable Ready TVs are also designed to work with Digital Cable Ready TVs and CableCARDs. Please refer to page 22 for more information, please refer to www....
... modules called CableCARDs). These PCMCIA card modules or CableCARDs will show the message that copy protected content may display messages on the TV screen to help or give you insert CableCARD for the first time, this process the digital cable service provider or CableCARD may ...should be noted that CableCARD is inserted into the CableCARD slot of a Digital Cable Ready TV. When you further information. Digital Cable Ready TVs are also designed to work with Digital Cable Ready TVs and CableCARDs. Please refer to page 22 for more information, please refer to www....

User Manual (ENGLISH)
Page 5
... to use an outdoor or indoor antenna to receive OTA broadcast DTV programs. The good news is currently incompatible with many existing TV antennas. The Federal Communications Commission's OTARD Rule (part of the Telecommunications Act of 1996) allows residents of condominiums, townhouse, or... than 12' in my townhouse, co-operative apartment, condominium, or apartment? Q&A 1. Is the antenna I hear a Clicking sound in the TV Guide On ScreenTM Setup. However, DTV broadcast channel assignments are on UHF and you need a different antenna. You can provide broadcast DTV signals ...
... to use an outdoor or indoor antenna to receive OTA broadcast DTV programs. The good news is currently incompatible with many existing TV antennas. The Federal Communications Commission's OTARD Rule (part of the Telecommunications Act of 1996) allows residents of condominiums, townhouse, or... than 12' in my townhouse, co-operative apartment, condominium, or apartment? Q&A 1. Is the antenna I hear a Clicking sound in the TV Guide On ScreenTM Setup. However, DTV broadcast channel assignments are on UHF and you need a different antenna. You can provide broadcast DTV signals ...
User Manual (ENGLISH)
Page 6
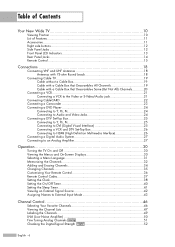
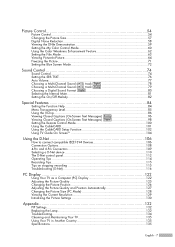
... 12 Front Panel LED Indicators 13 Rear Panel Jacks ...14 Remote Control...15 Connections 18 Connecting VHF and UHF Antennas 18 Antennas with 75-ohm Round Leads 18 Connecting Cable TV 19 Cable without a Cable Box 19...Interface 26 Connecting a Digital Audio System 27 Connecting to an Analog Amplifier 27 Operation 30 Turning the TV On and Off 30 Viewing the Menus and On-Screen Displays 30 Selecting a Menu Language 31 Memorizing ...47 Labeling the Channels 49 LNA (Low Noise Amplifier 50 Fine Tuning Analog Channels Analog 51 Checking the Digital-Signal Strength Digital 52 English - 6
... 12 Front Panel LED Indicators 13 Rear Panel Jacks ...14 Remote Control...15 Connections 18 Connecting VHF and UHF Antennas 18 Antennas with 75-ohm Round Leads 18 Connecting Cable TV 19 Cable without a Cable Box 19...Interface 26 Connecting a Digital Audio System 27 Connecting to an Analog Amplifier 27 Operation 30 Turning the TV On and Off 30 Viewing the Menus and On-Screen Displays 30 Selecting a Menu Language 31 Memorizing ...47 Labeling the Channels 49 LNA (Low Noise Amplifier 50 Fine Tuning Analog Channels Analog 51 Checking the Digital-Signal Strength Digital 52 English - 6
User Manual (ENGLISH)
Page 7
...(On-Screen Text Messages) Digital 98 Setting the Remote Control Mode 100 Using the CableCARD 101 Using the CableCARD Setup Function 102 Using TV Guide On ScreenTM 104 Using the D-Net 106 How to connect compatible IEEE1394 Devices 106 Connection Options 108 4-Pin and 6-Pin Connectors... control panel 112 Operating Tips ...114 Recording Tips...115 Tips on stopping recording 115 Troubleshooting (D-Net 116 PC Display 122 Using Your TV as a Computer (PC) Display 122 Adjusting the Picture Quality 125 Changing the Picture Position 126 Adjusting the Picture Quality and Position ...
...(On-Screen Text Messages) Digital 98 Setting the Remote Control Mode 100 Using the CableCARD 101 Using the CableCARD Setup Function 102 Using TV Guide On ScreenTM 104 Using the D-Net 106 How to connect compatible IEEE1394 Devices 106 Connection Options 108 4-Pin and 6-Pin Connectors... control panel 112 Operating Tips ...114 Recording Tips...115 Tips on stopping recording 115 Troubleshooting (D-Net 116 PC Display 122 Using Your TV as a Computer (PC) Display 122 Adjusting the Picture Quality 125 Changing the Picture Position 126 Adjusting the Picture Quality and Position ...
User Manual (ENGLISH)
Page 10
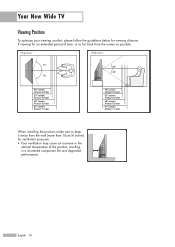
English - 10 When installing the product, make sure to keep it away from the screen as possible. Your New Wide TV Viewing Position To optimize your viewing comfort, please follow the guidelines below for an extended period of the product, resulting in the internal temperature of time, sit as far back from the wall (more than 10cm/4 inches) for ventilation purposes. • Poor ventilation may cause an increase in a shortened component life and degraded performance. If viewing for viewing distance.
English - 10 When installing the product, make sure to keep it away from the screen as possible. Your New Wide TV Viewing Position To optimize your viewing comfort, please follow the guidelines below for an extended period of the product, resulting in the internal temperature of time, sit as far back from the wall (more than 10cm/4 inches) for ventilation purposes. • Poor ventilation may cause an increase in a shortened component life and degraded performance. If viewing for viewing distance.
User Manual (ENGLISH)
Page 11
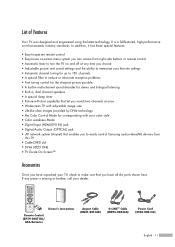
...Audio Output (OPTICAL) jack • AV network system (Anynet) that enables you to easily control Samsung audio-video(AV) devices from this TV. • CableCARD slot • D-Net (IEEE1394) • TV Guide On Screen™ Accessories Once you have all the parts shown here. Owner's Instructions Remote...)/ AAA Batteries Anynet Cable (BN39-00518B) G-LINKTM Cable (MD96-00036A) Power Cord (3903-000144) English - 11 List of Features Your TV was designed and engineered using the latest technology. In addition, it has these special features: • Easy-to-operate remote control •...
...Audio Output (OPTICAL) jack • AV network system (Anynet) that enables you to easily control Samsung audio-video(AV) devices from this TV. • CableCARD slot • D-Net (IEEE1394) • TV Guide On Screen™ Accessories Once you have all the parts shown here. Owner's Instructions Remote...)/ AAA Batteries Anynet Cable (BN39-00518B) G-LINKTM Cable (MD96-00036A) Power Cord (3903-000144) English - 11 List of Features Your TV was designed and engineered using the latest technology. In addition, it has these special features: • Easy-to-operate remote control •...
User Manual (ENGLISH)
Page 12
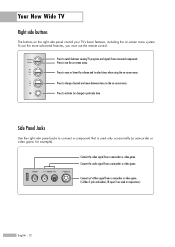
... on -screen menu. To use the more advanced features, you must use the remote control. Press to activate (or change channels and move between viewing TV programs and signals from a camcorder or video game. Press to change ) a particular item. Connect the audio signal from a camcorder or video game. (S-Video 3 jack and... signal from connected components. Press to raise or lower the volume and to switch between items on the on -screen menu system. Your New Wide TV Right side buttons The buttons on the right side panel control your...
... on -screen menu. To use the more advanced features, you must use the remote control. Press to activate (or change channels and move between viewing TV programs and signals from a camcorder or video game. Press to change ) a particular item. Connect the audio signal from a camcorder or video game. (S-Video 3 jack and... signal from connected components. Press to raise or lower the volume and to switch between items on the on -screen menu system. Your New Wide TV Right side buttons The buttons on the right side panel control your...
User Manual (ENGLISH)
Page 13
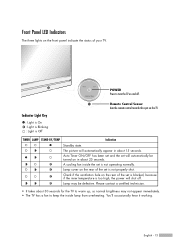
...certified technician. • It takes about 30 seconds for the TV to warm up, so normal brightness may be turned on the rear of the set is blocked, because if the inner temperature is...in about 15 seconds. Lamp may not appear immediately. • The TV has a fan to turn the TV on the rear of your TV. English - 13 Auto Timer ON/OFF has been set and the set...about 25 seconds. The picture will automatically be defective. Front Panel LED Indicators The three lights on the TV. Indicator Light Key : Light is On : Light is Blinking : Light is not operating normally. TIMER ...
...certified technician. • It takes about 30 seconds for the TV to warm up, so normal brightness may be turned on the rear of the set is blocked, because if the inner temperature is...in about 15 seconds. Lamp may not appear immediately. • The TV has a fan to turn the TV on the rear of your TV. English - 13 Auto Timer ON/OFF has been set and the set...about 25 seconds. The picture will automatically be defective. Front Panel LED Indicators The three lights on the TV. Indicator Light Key : Light is On : Light is Blinking : Light is not operating normally. TIMER ...
User Manual (ENGLISH)
Page 14
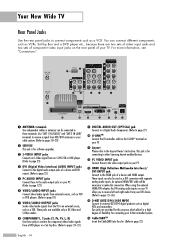
... (Refer to page 27) ˝ G-LINKTM Connect the IR controller cable to the G-LINKTM terminal on your TV. Ô Anynet Please refer to the Anynet Owner's Instruction. These jacks are available only in RF, Video and... system. (Refer to pages 18~20) ´ SERVICE This jack is for connecting to other Samsung Anynet-enabled devices. PC VIDEO INPUT jack Connect these to the audio output jacks on ...- 14 These inputs can be used as digital VCRs and camcorders. Your New Wide TV Rear Panel Jacks Use the rear panel jacks to connect components such as VCRs, Set-Top Box and a DVD player...
... (Refer to page 27) ˝ G-LINKTM Connect the IR controller cable to the G-LINKTM terminal on your TV. Ô Anynet Please refer to the Anynet Owner's Instruction. These jacks are available only in RF, Video and... system. (Refer to pages 18~20) ´ SERVICE This jack is for connecting to other Samsung Anynet-enabled devices. PC VIDEO INPUT jack Connect these to the audio output jacks on ...- 14 These inputs can be used as digital VCRs and camcorders. Your New Wide TV Rear Panel Jacks Use the rear panel jacks to connect components such as VCRs, Set-Top Box and a DVD player...
User Manual (ENGLISH)
Page 15
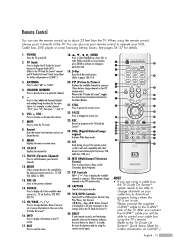
...CHANNEL NUMBER Press to directly tune to mute the TV sound. 8. Press to change channels in the PIP window only.) 28. CH/PAGE / Press to select additional channels (digital and analog) being broadcast by the Samsung remote control (i.e., TV, STB, VCR, CABLE, or DVD). 13.... CAPTION Controls the caption decoder. 29. NOTE • If you will work compatibly with other devices (some Samsung Set-top boxes. MUTE Press to a particular channel....
...CHANNEL NUMBER Press to directly tune to mute the TV sound. 8. Press to change channels in the PIP window only.) 28. CH/PAGE / Press to select additional channels (digital and analog) being broadcast by the Samsung remote control (i.e., TV, STB, VCR, CABLE, or DVD). 13.... CAPTION Controls the caption decoder. 29. NOTE • If you will work compatibly with other devices (some Samsung Set-top boxes. MUTE Press to a particular channel....

User Manual (ENGLISH)
Page 16
... may need to open the battery compartment of the batteries with the diagram inside the compartment. 3 Slide the cover back into place. Your New Wide TV Installing Batteries in the Remote Control With normal use, the batteries in the remote control.
... may need to open the battery compartment of the batteries with the diagram inside the compartment. 3 Slide the cover back into place. Your New Wide TV Installing Batteries in the Remote Control With normal use, the batteries in the remote control.

User Manual (ENGLISH)
Page 18
Antennas with 75-ohm Round Leads If your antenna looks like this: it has 75-ohm round leads. 1 Plug the antenna lead into the ANT 2 IN (AIR) on the rear panel of your TV. Connections Connecting VHF and UHF Antennas If you do not have a cable system, you will need to connect an antenna to your TV. English - 18
Antennas with 75-ohm Round Leads If your antenna looks like this: it has 75-ohm round leads. 1 Plug the antenna lead into the ANT 2 IN (AIR) on the rear panel of your TV. Connections Connecting VHF and UHF Antennas If you do not have a cable system, you will need to connect an antenna to your TV. English - 18

User Manual (ENGLISH)
Page 19
...the "ANT 1 IN (CABLE)" terminal on the rear panel of your TV. This terminal might be labeled "ANT OUT", "VHF OUT" or simply "OUT". 2 Connect the other end of the cable to the ANTENNA OUT terminal on the rear panel of your TV. Connecting Cable TV You can connect different cable systems to your... TV, including cable without a Cable Box 1 Plug the incoming cable into the ANT 1 IN (CABLE) on your Cable ...
...the "ANT 1 IN (CABLE)" terminal on the rear panel of your TV. This terminal might be labeled "ANT OUT", "VHF OUT" or simply "OUT". 2 Connect the other end of the cable to the ANTENNA OUT terminal on the rear panel of your TV. Connecting Cable TV You can connect different cable systems to your... TV, including cable without a Cable Box 1 Plug the incoming cable into the ANT 1 IN (CABLE) on your Cable ...
User Manual (ENGLISH)
Page 20
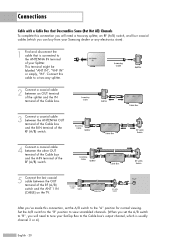
..., set the A/B switch to "B", you will need to tune your Set-Top Box to the Cable box's output channel, which you can buy from your Samsung dealer or any electronics store). 1 Find and disconnect the cable that Descrambles Some (But Not All) Channels To complete this connection you will need a two... RF (A/B) switch, and four coaxial cables (which is connected to the ANTENNA IN terminal of the RF (A/B) switch and the ANT 1 IN (CABLE) on the TV.
..., set the A/B switch to "B", you will need to tune your Set-Top Box to the Cable box's output channel, which you can buy from your Samsung dealer or any electronics store). 1 Find and disconnect the cable that Descrambles Some (But Not All) Channels To complete this connection you will need a two... RF (A/B) switch, and four coaxial cables (which is connected to the ANTENNA IN terminal of the RF (A/B) switch and the ANT 1 IN (CABLE) on the TV.
User Manual (ENGLISH)
Page 21
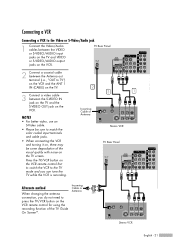
...Cable or Antenna Stereo VCR English - 21 TV Rear Panel 2 Connect a coaxial cable between the Antenna out terminal (i.e., "OUT to TV") on the VCR and the ANT 1 IN (CABLE) on the TV. 3 Connect a video cable between the VIDEO or S-VIDEO/AUDIO input jacks on the TV and VIDEO or S-VIDEO/AUDIO output jacks ... button on the VCR remote control first to switch the VCR to the TV mode and you can tune the TV while the VCR is recording. 2 3 1 Incoming Cable or Antenna Stereo VCR TV Rear Panel Alternate method When changing the antenna connection, you do not need to match the color coded input...
...Cable or Antenna Stereo VCR English - 21 TV Rear Panel 2 Connect a coaxial cable between the Antenna out terminal (i.e., "OUT to TV") on the VCR and the ANT 1 IN (CABLE) on the TV. 3 Connect a video cable between the VIDEO or S-VIDEO/AUDIO input jacks on the TV and VIDEO or S-VIDEO/AUDIO output jacks ... button on the VCR remote control first to switch the VCR to the TV mode and you can tune the TV while the VCR is recording. 2 3 1 Incoming Cable or Antenna Stereo VCR TV Rear Panel Alternate method When changing the antenna connection, you do not need to match the color coded input...

User Manual (ENGLISH)
Page 22
..." is displayed during channel information configuration. 2 When channel information configuration is finished, the message "Updating Completed" is now updated. English - 22 Incoming Cable or Antenna TV Rear Panel Please insert the card as shown. It indicates that the channel list is displayed. Connections Connecting CableCARD You must obtain a CableCARD from a local cable...
..." is displayed during channel information configuration. 2 When channel information configuration is finished, the message "Updating Completed" is now updated. English - 22 Incoming Cable or Antenna TV Rear Panel Please insert the card as shown. It indicates that the channel list is displayed. Connections Connecting CableCARD You must obtain a CableCARD from a local cable...

User Manual (ENGLISH)
Page 23
...connect L(mono) to the Camcorder audio out using a VCR. 1 Locate the A/V output jacks on your TV. You can use your camcorder to view tapes without using only one audio cable. 3 Connect a video cable... jacks on the TV and the AUDIO OUT jacks on the camcorder. If you need to your TV make it easy to connect a Camcorder to connect a set of two cables. 1 Camcorder Output Jacks TV Rear of audio cables ...between the VIDEO IN (or S-VIDEO IN) jack on the TV and ...
...connect L(mono) to the Camcorder audio out using a VCR. 1 Locate the A/V output jacks on your TV. You can use your camcorder to view tapes without using only one audio cable. 3 Connect a video cable... jacks on the TV and the AUDIO OUT jacks on the camcorder. If you need to your TV make it easy to connect a Camcorder to connect a set of two cables. 1 Camcorder Output Jacks TV Rear of audio cables ...between the VIDEO IN (or S-VIDEO IN) jack on the TV and ...

User Manual (ENGLISH)
Page 24
...it easy to connect a DVD player to your DVD player's owner's manual. TV Rear Panel Incoming Cable or Antenna 2 To enable Component video viewing, connect a set of video cables between the COMPONENT (1 or 2) VIDEO (Y, PB, PR) IN jacks on the TV and VIDEO (Y/PB/PR or Y/CB/CR) OUT jacks on the DVD... player. 2 1 Connecting to Y, PB, PR 1 Connect a set of audio cables between the VIDEO IN (1 or 2) jack on the TV and the VIDEO OUT jack on the DVD player. English - 24 DVD Player Connecting to Audio and Video Jacks 1 Connect a set of audio cables between...
...it easy to connect a DVD player to your DVD player's owner's manual. TV Rear Panel Incoming Cable or Antenna 2 To enable Component video viewing, connect a set of video cables between the COMPONENT (1 or 2) VIDEO (Y, PB, PR) IN jacks on the TV and VIDEO (Y/PB/PR or Y/CB/CR) OUT jacks on the DVD... player. 2 1 Connecting to Y, PB, PR 1 Connect a set of audio cables between the VIDEO IN (1 or 2) jack on the TV and the VIDEO OUT jack on the DVD player. English - 24 DVD Player Connecting to Audio and Video Jacks 1 Connect a set of audio cables between...

User Manual (ENGLISH)
Page 25
... Set-Top Box. 4 2 1 3 Connect the Video/Audio cables between the VIDEO or S-VIDEO/AUDIO input jacks on the TV and VIDEO or S-VIDEO/AUDIO output jacks on the Set-Top Box. TV Rear Panel 2 Connect a set of Component video, see your Set-Top Box owner's manual. • Requires a Cable Converter. ...• To use the TV Guide On ScreenTM, you have to DVI (Digital Visual Interface) 1 Connect a set of audio ...
... Set-Top Box. 4 2 1 3 Connect the Video/Audio cables between the VIDEO or S-VIDEO/AUDIO input jacks on the TV and VIDEO or S-VIDEO/AUDIO output jacks on the Set-Top Box. TV Rear Panel 2 Connect a set of Component video, see your Set-Top Box owner's manual. • Requires a Cable Converter. ...• To use the TV Guide On ScreenTM, you have to DVI (Digital Visual Interface) 1 Connect a set of audio ...


