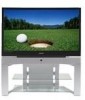
Owner Instructions
Page 2
Table of Contents Your New Wide TV 6 Replacing the Lamp 6 List of Features ...8 Accessories ...8 Side Panel Buttons 9 Side Panel Jacks 9 Front Panel LED Indicators 10 Rear Panel Jacks 11 Remote Control ...12 Installing Batteries in the Remote Control 13 Connections ...16 Connecting VHF and UHF Antennas 16 Antennas with 300-ohm ...
Table of Contents Your New Wide TV 6 Replacing the Lamp 6 List of Features ...8 Accessories ...8 Side Panel Buttons 9 Side Panel Jacks 9 Front Panel LED Indicators 10 Rear Panel Jacks 11 Remote Control ...12 Installing Batteries in the Remote Control 13 Connections ...16 Connecting VHF and UHF Antennas 16 Antennas with 300-ohm ...

Owner Instructions
Page 3
... Features 46 Customizing Your Remote Control 46 Remote Control Codes 47 Fine Tuning Channels 48 LNA (Low Noise Amplifier 49 Selecting the Color Tone 50 Changing the Picture Size 51 Digital Noise Reduction 52 DNIeTM (Digital Natural Image engine) 53 Setting the My Color Control Mode 54 Setting the... Setting The On/Off Melody 81 Using the Color Weakness Enhancement Feature 82 PC Display...84 Using Your TV as a Computer (PC) Display 84 How to Connect Your PC to the TV 84 Setting up Your PC Software (Based on Widows 98 85 Display Modes 86 Adjusting the Picture Quality...
... Features 46 Customizing Your Remote Control 46 Remote Control Codes 47 Fine Tuning Channels 48 LNA (Low Noise Amplifier 49 Selecting the Color Tone 50 Changing the Picture Size 51 Digital Noise Reduction 52 DNIeTM (Digital Natural Image engine) 53 Setting the My Color Control Mode 54 Setting the... Setting The On/Off Melody 81 Using the Color Weakness Enhancement Feature 82 PC Display...84 Using Your TV as a Computer (PC) Display 84 How to Connect Your PC to the TV 84 Setting up Your PC Software (Based on Widows 98 85 Display Modes 86 Adjusting the Picture Quality...

Owner Instructions
Page 6
... type is also indicated on the right side of the product, resulting in a projection TV has a limited lifespan. Turn the power off and wait for the lamp, give the code number to the store where you purchased the TV or to a Samsung Service center. • Caution 1. Do not touch the glass part of children.... Your New Wide TV Replacing the Lamp • Why do I need to replace it will be bright and clear as...
... type is also indicated on the right side of the product, resulting in a projection TV has a limited lifespan. Turn the power off and wait for the lamp, give the code number to the store where you purchased the TV or to a Samsung Service center. • Caution 1. Do not touch the glass part of children.... Your New Wide TV Replacing the Lamp • Why do I need to replace it will be bright and clear as...

Owner Instructions
Page 7
... the replacement Lamp is the same type. • After replacing the lamp, align the lamp cover with the groove and secure the screw. • The TV will not turn on if the lamp cover is not correctly closed (as this will need a 5.91 Inches-long Phillips screwdriver and a pair of gloves.... 1 Unplug TV, then use a screwdriver to remove the screw. 2 Remove the Lamp cover. 3 Remove the screws securing the Lamp by using a screwdriver. 4 Separate the Lamp from the...
... the replacement Lamp is the same type. • After replacing the lamp, align the lamp cover with the groove and secure the screw. • The TV will not turn on if the lamp cover is not correctly closed (as this will need a 5.91 Inches-long Phillips screwdriver and a pair of gloves.... 1 Unplug TV, then use a screwdriver to remove the screw. 2 Remove the Lamp cover. 3 Remove the screws securing the Lamp by using a screwdriver. 4 Separate the Lamp from the...
Owner Instructions
Page 8
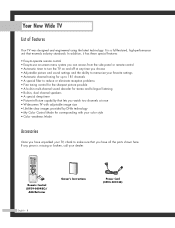
... • Easy-to-use on-screen menu system you can access from the side panel or remote control • Automatic timer to turn the TV on and off at any piece is a full-featured, high-performance unit that you have all the parts shown here. If any time you ...8226; Built-in, dual channel speakers • A special sleep timer • Picture-in-Picture capability that lets you watch two channels at once • Widescreen TV with adjustable image size • Life-like clear images provided by DNle technology • My Color Control Mode for corresponding with your color style •...
... • Easy-to-use on-screen menu system you can access from the side panel or remote control • Automatic timer to turn the TV on and off at any piece is a full-featured, high-performance unit that you have all the parts shown here. If any time you ...8226; Built-in, dual channel speakers • A special sleep timer • Picture-in-Picture capability that lets you watch two channels at once • Widescreen TV with adjustable image size • Life-like clear images provided by DNle technology • My Color Control Mode for corresponding with your color style •...
Owner Instructions
Page 9
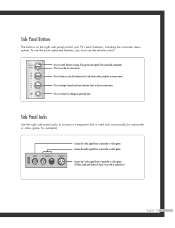
...video game. Press to lower or raise the volume and to change ) a particular item. Press to activate (or change channels and move between viewing TV programs and signals from a camcorder or video game. (S-Video 3 jack and Audio L/R input 3 are used only occasionally (a camcorder or video game...Press to connect a component that is used in conjunction.) English - 9 Side Panel Buttons The buttons on the right side panel control your TV's basic features, including the on -screen menu. Connect an S-video signal from connected components. Side Panel Jacks Use the right side panel ...
...video game. Press to lower or raise the volume and to change ) a particular item. Press to activate (or change channels and move between viewing TV programs and signals from a camcorder or video game. (S-Video 3 jack and Audio L/R input 3 are used only occasionally (a camcorder or video game...Press to connect a component that is used in conjunction.) English - 9 Side Panel Buttons The buttons on the right side panel control your TV's basic features, including the on -screen menu. Connect an S-video signal from connected components. Side Panel Jacks Use the right side panel ...
Owner Instructions
Page 10
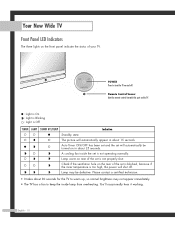
... and off . Remote Control Sensor Aim the remote control towards this spot on the TV. : Light is On : Light is Blinking : Light is not properly shut. Lamp cover on rear of the set is blocked, because if the inner temperature is not operating normally. The picture will automatically ...be defective. Check if the ventilation hole on the rear of your TV. Your New Wide TV Front Panel LED Indicators The three lights on the front panel indicate the status of the set is Off TIMER LAMP ...
... and off . Remote Control Sensor Aim the remote control towards this spot on the TV. : Light is On : Light is Blinking : Light is not properly shut. Lamp cover on rear of the set is blocked, because if the inner temperature is not operating normally. The picture will automatically ...be defective. Check if the ventilation hole on the rear of your TV. Your New Wide TV Front Panel LED Indicators The three lights on the front panel indicate the status of the set is Off TIMER LAMP ...
Owner Instructions
Page 11
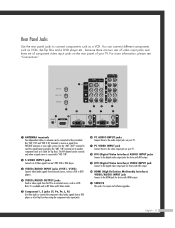
.... ˇ VIDEO/AUDIO INPUT jacks (VCR1, VCR2) Connect video/audio signals from external sources, such as a Cable Set-Top Box). Rear Panel Jacks Use the rear panel jacks to the video output jack on your PC . Use "ANT 1 IN" and "ANT 2 IN" terminals to an external source...modes. ˆ Component1, 2 jacks (Y, PB, PR, L, R) Use these jacks to connect the component video/audio signals from VHF/UHF antennas or your TV. For more information, please see "Connections". Œ ANTENNA terminals Two independent cables or antennas can be connected to these to connect components such as a VCR...
.... ˇ VIDEO/AUDIO INPUT jacks (VCR1, VCR2) Connect video/audio signals from external sources, such as a Cable Set-Top Box). Rear Panel Jacks Use the rear panel jacks to the video output jack on your PC . Use "ANT 1 IN" and "ANT 2 IN" terminals to an external source...modes. ˆ Component1, 2 jacks (Y, PB, PR, L, R) Use these jacks to connect the component video/audio signals from VHF/UHF antennas or your TV. For more information, please see "Connections". Œ ANTENNA terminals Two independent cables or antennas can be connected to these to connect components such as a VCR...
Owner Instructions
Page 12
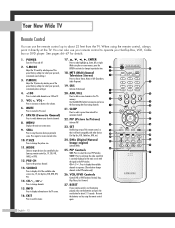
... work compatibly with the signal in the PIP window only.) 26. S.MODE Adjust the TV sound by the Samsung remote control (i.e., TV, STB, VCR, CABLE, or DVD). 12. Press again to add or erase channels in the TV's memory. ADD/DEL Press to resume normal video. 10. Press to display the available... can also use the remote control up to about 2~3 seconds. See pages 46~47 for about 23 feet from the TV. POWER Turns the TV on TV. 5. P.MODE Adjust the TV picture by selecting one of this remote control, so that is not functioning properly, take out the batteries and press the...
... work compatibly with the signal in the PIP window only.) 26. S.MODE Adjust the TV sound by the Samsung remote control (i.e., TV, STB, VCR, CABLE, or DVD). 12. Press again to add or erase channels in the TV's memory. ADD/DEL Press to resume normal video. 10. Press to display the available... can also use the remote control up to about 2~3 seconds. See pages 46~47 for about 23 feet from the TV. POWER Turns the TV on TV. 5. P.MODE Adjust the TV picture by selecting one of this remote control, so that is not functioning properly, take out the batteries and press the...

Owner Instructions
Page 16
... not have a cable system, you will need to connect an antenna to tighten the screws. 2 Plug the adapter into the "ANT 1 IN" terminal on the rear panel. it has 300-ohm flat twin leads. 1 Place the wires from the twin leads under the screws on the 300-75 ohm adaptor (not... supplied). Antennas with 300-ohm Flat Twin Leads If your antenna looks like this : it is an antenna with 75-ohm Round Leads If your TV. Use a screwdriver to your antenna looks like this : 1 Plug the antenna lead into the "ANT 1 IN" terminal on the...
... not have a cable system, you will need to connect an antenna to tighten the screws. 2 Plug the adapter into the "ANT 1 IN" terminal on the rear panel. it has 300-ohm flat twin leads. 1 Place the wires from the twin leads under the screws on the 300-75 ohm adaptor (not... supplied). Antennas with 300-ohm Flat Twin Leads If your antenna looks like this : it is an antenna with 75-ohm Round Leads If your TV. Use a screwdriver to your antenna looks like this : 1 Plug the antenna lead into the "ANT 1 IN" terminal on the...

Owner Instructions
Page 17
This procedure requires an optional combiner-adaptor (available at most electronics shops). 1 Connect both antenna leads to the TV. English - 17 Separate VHF and UHF Antennas If you have two separate antennas for your TV (one VHF and one UHF), you must combine the two antenna signals before connecting the antennas to the combiner. 2 Plug the combiner into the "ANT 1 IN" terminal on the rear panel.
This procedure requires an optional combiner-adaptor (available at most electronics shops). 1 Connect both antenna leads to the TV. English - 17 Separate VHF and UHF Antennas If you have two separate antennas for your TV (one VHF and one UHF), you must combine the two antenna signals before connecting the antennas to the combiner. 2 Plug the combiner into the "ANT 1 IN" terminal on the rear panel.

Owner Instructions
Page 18
... terminal might be labeled "ANT OUT", "VHF OUT" or simply, "OUT". 2 Connect the other end of this cable to the "ANT 1 IN" terminal on the rear panel. Cable without a cable box, and cable with a Cable Box that Descrambles All Channels 1 Find the cable that descrambles some or all channels. English - 18... Cable with a cable box that is connected to the ANTENNA OUT terminal on your TV, including cable without a Cable Box If you want to connect cable, and you do not need to use a cable box: 1 Plug the incoming cable ...
... terminal might be labeled "ANT OUT", "VHF OUT" or simply, "OUT". 2 Connect the other end of this cable to the "ANT 1 IN" terminal on the rear panel. Cable without a cable box, and cable with a Cable Box that Descrambles All Channels 1 Find the cable that descrambles some or all channels. English - 18... Cable with a cable box that is connected to the ANTENNA OUT terminal on your TV, including cable without a Cable Box If you want to connect cable, and you do not need to use a cable box: 1 Plug the incoming cable ...

Owner Instructions
Page 19
... channels and blocking channels. When viewing premium channels, select "ANT 2 IN" and tune the TV to channel 3 or 4 (whichever channel is vacant in your area), then use the converter box to change channels. TV Rear Panel From Cable Caution: If you can not program using only one channel while watching another... splitter goes to "ANT 1 OUT" and the second output is available when select "Ant.2" in your area), then use a converter box with your TV there may be added between the cable and "ANT 1 IN". If you to watch cable and premium channels. Do not connect the video cable and...
... channels and blocking channels. When viewing premium channels, select "ANT 2 IN" and tune the TV to channel 3 or 4 (whichever channel is vacant in your area), then use the converter box to change channels. TV Rear Panel From Cable Caution: If you can not program using only one channel while watching another... splitter goes to "ANT 1 OUT" and the second output is available when select "Ant.2" in your area), then use a converter box with your TV there may be added between the cable and "ANT 1 IN". If you to watch cable and premium channels. Do not connect the video cable and...

Owner Instructions
Page 20
...of the camcorder. 2 Connect a set of audio cables between the VIDEO IN (or S-VIDEO IN) jack on the TV and the VIDEO OUT jack on the camcorder. Camcorder Output Jacks TV Side Panel Camcorder English - 20 Connections Connecting a Camcorder The side panel jacks on the camcorder. You can use your ... view tapes without using only one audio cable. 3 Connect a video cable between the AUDIO IN jacks on the TV and the AUDIO OUT jacks on the camcorder. If you need to your TV make it easy to connect a camcorder to connect a set of two cables. They are usually included with a...
...of the camcorder. 2 Connect a set of audio cables between the VIDEO IN (or S-VIDEO IN) jack on the TV and the VIDEO OUT jack on the camcorder. Camcorder Output Jacks TV Side Panel Camcorder English - 20 Connections Connecting a Camcorder The side panel jacks on the camcorder. You can use your ... view tapes without using only one audio cable. 3 Connect a video cable between the AUDIO IN jacks on the TV and the AUDIO OUT jacks on the camcorder. If you need to your TV make it easy to connect a camcorder to connect a set of two cables. They are usually included with a...

Owner Instructions
Page 21
...Note: For an explanation of audio cables between the COMPONENT (1 or 2) AUDIO (L, R) IN jacks on the TV and the AUDIO OUT jacks on the DVD player. DVD Player Connecting to your TV. TV Rear Panel Incoming Cable or Antenna 2 To enable Component video viewing, connect a set of video cables between the VIDEO... IN (1 or 2) jack on the TV and the VIDEO OUT jack on the DVD player. TV Rear Panel Incoming Cable or Antenna 2 Connect a video cable between the COMPONENT (1 or 2) VIDEO (Y, PB, PR) IN jacks...
...Note: For an explanation of audio cables between the COMPONENT (1 or 2) AUDIO (L, R) IN jacks on the TV and the AUDIO OUT jacks on the DVD player. DVD Player Connecting to your TV. TV Rear Panel Incoming Cable or Antenna 2 To enable Component video viewing, connect a set of video cables between the VIDEO... IN (1 or 2) jack on the TV and the VIDEO OUT jack on the DVD player. TV Rear Panel Incoming Cable or Antenna 2 Connect a video cable between the COMPONENT (1 or 2) VIDEO (Y, PB, PR) IN jacks...

Owner Instructions
Page 22
... VIDEO (Y/PB/PR or Y/CB/CR) OUT jacks on the Set-Top Box. Incoming Cable or Antenna TV Rear Panel DTV Set-Top Box TV Rear Panel English - 22 DTV Set-Top Box Connections Connecting a DTV Set-Top Box Connecting to DVI (Digital Visual Interface) 1 Connect a set of video cables between ...the DVI IN jack on the TV and the DVI OUT jack on the Set-Top Box. Incoming Cable or Antenna Connecting...
... VIDEO (Y/PB/PR or Y/CB/CR) OUT jacks on the Set-Top Box. Incoming Cable or Antenna TV Rear Panel DTV Set-Top Box TV Rear Panel English - 22 DTV Set-Top Box Connections Connecting a DTV Set-Top Box Connecting to DVI (Digital Visual Interface) 1 Connect a set of video cables between ...the DVI IN jack on the TV and the DVI OUT jack on the Set-Top Box. Incoming Cable or Antenna Connecting...

Owner Instructions
Page 23
...Box. 2 Connect a video cable between the HDMI IN jack on the TV and the HDMI OUT jack on the Set-Top Box. Incoming Cable or Antenna DTV Set-Top Box English - 23 Incoming Cable or Antenna TV Rear Panel DTV Set-Top Box Connecting to HDMI (High Definition Multimedia Interface) 1... Connect a HDMI cable between the PC IN jack on the TV and the R.G.B OUT jack on the Set-Top Box. Connecting to R, G, B 1 Connect...
...Box. 2 Connect a video cable between the HDMI IN jack on the TV and the HDMI OUT jack on the Set-Top Box. Incoming Cable or Antenna DTV Set-Top Box English - 23 Incoming Cable or Antenna TV Rear Panel DTV Set-Top Box Connecting to HDMI (High Definition Multimedia Interface) 1... Connect a HDMI cable between the PC IN jack on the TV and the R.G.B OUT jack on the Set-Top Box. Connecting to R, G, B 1 Connect...

Owner Instructions
Page 26
..., change, or use the selected items. Use the ENTER button to select menu items and make some adjustments using the TV's side panel buttons. The TV displays the current channel, the status of your remote control to enter items in the menu. Viewing the Menus and On... system by pressing the MENU button on the remote control. Air 12 Signal V-Chip Picture Sound SRS TSXT MTS - - : - - Input Input Source List : TV Edit Name √ √ There are five menu groups: Picture "Input", "Picture", "Sound", Sound "Channel" and "Setup". English - 26 Viewing the Display...
..., change, or use the selected items. Use the ENTER button to select menu items and make some adjustments using the TV's side panel buttons. The TV displays the current channel, the status of your remote control to enter items in the menu. Viewing the Menus and On... system by pressing the MENU button on the remote control. Air 12 Signal V-Chip Picture Sound SRS TSXT MTS - - : - - Input Input Source List : TV Edit Name √ √ There are five menu groups: Picture "Input", "Picture", "Sound", Sound "Channel" and "Setup". English - 26 Viewing the Display...

Owner Instructions
Page 28
...the ... or † button to select "Air/CATV", then press the ENTER button. At this point the signal source has been selected. Proceed to the TV (i.e., an antenna or a cable system). 1 Press the MENU button. or † button to select the type of cable system: "STD", "HRC"...buttons to an antenna, press the ... or † button to change channels by entering the channel digits. Operation Memorizing the Channels Your TV can begin memorizing the available channels, you must specify the type of signal source that exists in Memory". • Subscription cable services ...
...the ... or † button to select "Air/CATV", then press the ENTER button. At this point the signal source has been selected. Proceed to the TV (i.e., an antenna or a cable system). 1 Press the MENU button. or † button to select the type of cable system: "STD", "HRC"...buttons to an antenna, press the ... or † button to change channels by entering the channel digits. Operation Memorizing the Channels Your TV can begin memorizing the available channels, you must specify the type of signal source that exists in Memory". • Subscription cable services ...

Owner Instructions
Page 29
... Adding and Erasing Channels You can add channels that were not memorized or delete unwanted channels from memory. 1 Press the MENU button. Press the ... The TV begins memorizing all of the available stations. English - 29 or † button to start the auto program. Press the ENTER button at any time to...
... Adding and Erasing Channels You can add channels that were not memorized or delete unwanted channels from memory. 1 Press the MENU button. Press the ... The TV begins memorizing all of the available stations. English - 29 or † button to start the auto program. Press the ENTER button at any time to...


