Owner Instructions
Page 2
Table of Contents Your New Wide TV 6 Replacing the Lamp 6 List of Features ...8 Accessories ...8 Side Panel Buttons 9 Side Panel Jacks 9 Front Panel LED Indicators 10 Rear Panel Jacks 11 Remote Control ...12 Installing Batteries in the Remote Control 13 Connections ...16 Connecting VHF and UHF Antennas 16 Antennas with 300-ohm ...
Table of Contents Your New Wide TV 6 Replacing the Lamp 6 List of Features ...8 Accessories ...8 Side Panel Buttons 9 Side Panel Jacks 9 Front Panel LED Indicators 10 Rear Panel Jacks 11 Remote Control ...12 Installing Batteries in the Remote Control 13 Connections ...16 Connecting VHF and UHF Antennas 16 Antennas with 300-ohm ...

Owner Instructions
Page 6
...projection TV has a limited lifespan. Do not place the old lamp near flammable objects or within the reach of the lamp with the correct code numbered lamp (BP96-00826A) to avoid damage to the TV. 2. The lamp used in the internal temperature of the TV. The lamp must be hot. 3. Your New Wide TV Replacing the Lamp...store where you purchased the TV or to a Samsung Service center. • Caution 1. When installing the product, make sure to replace the lamp? It is indicated on the front (Timer, Lamp, & Temp.) are flashing. • Check before replacing the lamp as new. • ...
...projection TV has a limited lifespan. Do not place the old lamp near flammable objects or within the reach of the lamp with the correct code numbered lamp (BP96-00826A) to avoid damage to the TV. 2. The lamp used in the internal temperature of the TV. The lamp must be hot. 3. Your New Wide TV Replacing the Lamp...store where you purchased the TV or to a Samsung Service center. • Caution 1. When installing the product, make sure to replace the lamp? It is indicated on the front (Timer, Lamp, & Temp.) are flashing. • Check before replacing the lamp as new. • ...

Owner Instructions
Page 7
NOTES • Be sure the replacement Lamp is the same type. • After replacing the lamp, align the lamp cover with the groove and secure the screw. • The TV will not turn on if the lamp cover is not correctly closed (as this will need a 5.91 Inches-long Phillips screwdriver ...and a pair of gloves. 1 Unplug TV, then use a screwdriver to remove the screw. 2 Remove the Lamp cover. 3 Remove the screws securing the Lamp by using a screwdriver. 4 Separate the Lamp from the engine by holding the handle and pulling it out. 5 To reinstall ...
NOTES • Be sure the replacement Lamp is the same type. • After replacing the lamp, align the lamp cover with the groove and secure the screw. • The TV will not turn on if the lamp cover is not correctly closed (as this will need a 5.91 Inches-long Phillips screwdriver ...and a pair of gloves. 1 Unplug TV, then use a screwdriver to remove the screw. 2 Remove the Lamp cover. 3 Remove the screws securing the Lamp by using a screwdriver. 4 Separate the Lamp from the engine by holding the handle and pulling it out. 5 To reinstall ...
Owner Instructions
Page 10
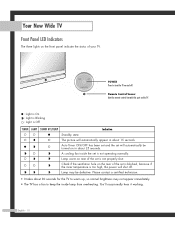
... Panel LED Indicators The three lights on the TV. : Light is On : Light is Blinking : Light is Off TIMER LAMP STAND BY/TEMP Indication Standby state. The picture will shut off . Check if the ventilation hole on rear of the set will automatically be defective. POWER Press to... keep the inside the set is not properly shut. A cooling fan inside lamp from overheating. Lamp cover on the rear of the set is too high, the power will automatically appear in about 25 seconds. Please contact a certified technician. •...
... Panel LED Indicators The three lights on the TV. : Light is On : Light is Blinking : Light is Off TIMER LAMP STAND BY/TEMP Indication Standby state. The picture will shut off . Check if the ventilation hole on rear of the set will automatically be defective. POWER Press to... keep the inside the set is not properly shut. A cooling fan inside lamp from overheating. Lamp cover on the rear of the set is too high, the power will automatically appear in about 25 seconds. Please contact a certified technician. •...


