Owner Instructions
Page 2
... Connecting a Cable Converter Box 19 Connecting a Cable Converter Box and a VCR 19 Connecting a Camcorder 20 Connecting a DVD Player 21 Connecting to Y, PB, PR 21 Connecting to Audio and Video Jacks 21 Connecting a DTV Set-Top Box 22 Connecting to Y, PB, PR 22 Connecting to DVI (Digital Visual Interface 22 Connecting to R, G, B 23 Connecting to HDMI (High Definition Multimedia Interface 23 Operation ...26 Turning the TV On and Off 26 Viewing the Menus and On-Screen Displays 26 Selecting the Menu Language 27 Selecting the Antenna Input...
... Connecting a Cable Converter Box 19 Connecting a Cable Converter Box and a VCR 19 Connecting a Camcorder 20 Connecting a DVD Player 21 Connecting to Y, PB, PR 21 Connecting to Audio and Video Jacks 21 Connecting a DTV Set-Top Box 22 Connecting to Y, PB, PR 22 Connecting to DVI (Digital Visual Interface 22 Connecting to R, G, B 23 Connecting to HDMI (High Definition Multimedia Interface 23 Operation ...26 Turning the TV On and Off 26 Viewing the Menus and On-Screen Displays 26 Selecting the Menu Language 27 Selecting the Antenna Input...

Owner Instructions
Page 3
...-Channel Sound (MTS) track 65 Auto Volume ...66 Enjoying the Sound of External Speakers 67 Using the V-Chip 68 Viewing Closed Caption Information 78 Setting the Blue Screen Mode 80 Setting The On/Off Melody 81 Using the Color Weakness Enhancement Feature 82 PC Display...84 Using Your TV as a Computer (PC) Display 84 How to Connect Your PC to the TV 84 Setting up Your PC Software (Based on Widows 98 85 Display Modes 86 Adjusting the Picture Quality 87 Changing...
...-Channel Sound (MTS) track 65 Auto Volume ...66 Enjoying the Sound of External Speakers 67 Using the V-Chip 68 Viewing Closed Caption Information 78 Setting the Blue Screen Mode 80 Setting The On/Off Melody 81 Using the Color Weakness Enhancement Feature 82 PC Display...84 Using Your TV as a Computer (PC) Display 84 How to Connect Your PC to the TV 84 Setting up Your PC Software (Based on Widows 98 85 Display Modes 86 Adjusting the Picture Quality 87 Changing...

Owner Instructions
Page 6
... keep it ? After replacing the lamp, the screen quality will be the same code number and type. 2. The lamp type is also indicated on the front (Timer, Lamp, & Temp.) are flashing. • Check before replacing the lamp as it will be replaced periodically. When installing the product, make sure to replace the lamp? After checking the code number for 30 minutes before lamp replacement 1. English - 6 Your New Wide TV Replacing the Lamp • Why do I need to a Samsung Service...
... keep it ? After replacing the lamp, the screen quality will be the same code number and type. 2. The lamp type is also indicated on the front (Timer, Lamp, & Temp.) are flashing. • Check before replacing the lamp as it will be replaced periodically. When installing the product, make sure to replace the lamp? After checking the code number for 30 minutes before lamp replacement 1. English - 6 Your New Wide TV Replacing the Lamp • Why do I need to a Samsung Service...
Owner Instructions
Page 8
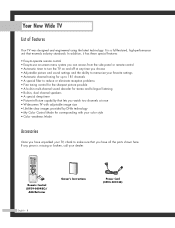
... have all the parts shown here. In addition, it has these special features: • Easy-to-operate remote control • Easy-to-use on-screen menu system you can access from the side panel or remote control • Automatic timer to turn the TV on and off at once • Widescreen TV with adjustable image size • Life-like clear images provided by DNle technology • My Color Control Mode for corresponding...
... have all the parts shown here. In addition, it has these special features: • Easy-to-operate remote control • Easy-to-use on-screen menu system you can access from the side panel or remote control • Automatic timer to turn the TV on and off at once • Widescreen TV with adjustable image size • Life-like clear images provided by DNle technology • My Color Control Mode for corresponding...
Owner Instructions
Page 11
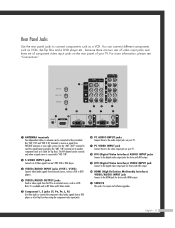
... cable system. Rear Panel Jacks Use the rear panel jacks to connect components such as a Cable Set-Top Box). For more information, please see "Connections". Œ ANTENNA terminals Two independent cables or antennas can connect different components such as a VCR or DVD players. ¨ VIDEO/AUDIO OUTPUT jacks Sends a video signal from VHF/UHF antennas or your TV. Note: It is for device with DVI output. ˝ HDMI (High Definition Multimedia Interface) VIDEO/AUDIO INPUT jack Connect to the HDMI jack for repair and software upgrades...
... cable system. Rear Panel Jacks Use the rear panel jacks to connect components such as a Cable Set-Top Box). For more information, please see "Connections". Œ ANTENNA terminals Two independent cables or antennas can connect different components such as a VCR or DVD players. ¨ VIDEO/AUDIO OUTPUT jacks Sends a video signal from VHF/UHF antennas or your TV. Note: It is for device with DVI output. ˝ HDMI (High Definition Multimedia Interface) VIDEO/AUDIO INPUT jack Connect to the HDMI jack for repair and software upgrades...
Owner Instructions
Page 12
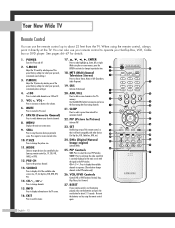
... display the available channels in the TV's memory. EXIT Press to exit the menu. 17 ENTER Press to select highlight up of the preset factory settings (or select your personal, customized sound settings.) 3. Re-insert the batteries and try using the on TV. 5. You can use your remote control to operate your remote control is currently displayed on -screen menu. 9. S.MODE Adjust the TV sound by the Samsung remote control (i.e., TV, STB, VCR, CABLE, or DVD). 12. PIP (Picture In Picture) Activates PIP...
... display the available channels in the TV's memory. EXIT Press to exit the menu. 17 ENTER Press to select highlight up of the preset factory settings (or select your personal, customized sound settings.) 3. Re-insert the batteries and try using the on TV. 5. You can use your remote control to operate your remote control is currently displayed on -screen menu. 9. S.MODE Adjust the TV sound by the Samsung remote control (i.e., TV, STB, VCR, CABLE, or DVD). 12. PIP (Picture In Picture) Activates PIP...

Owner Instructions
Page 21
... Antenna 2 Connect a video cable between the VIDEO IN (1 or 2) jack on the TV and the VIDEO OUT jack on your TV make it easy to connect a DVD player to audio and video jacks 1 Connect a set of Component video, see your TV. DVD Player English - 21 Note: For an explanation of audio cables between the AUDIO IN (1 or 2) jacks on the TV and the AUDIO OUT jacks on the DVD player. Connecting a DVD Player The rear panel jacks on the DVD player. DVD Player Connecting to your DVD player's owner's manual...
... Antenna 2 Connect a video cable between the VIDEO IN (1 or 2) jack on the TV and the VIDEO OUT jack on your TV make it easy to connect a DVD player to audio and video jacks 1 Connect a set of Component video, see your TV. DVD Player English - 21 Note: For an explanation of audio cables between the AUDIO IN (1 or 2) jacks on the TV and the AUDIO OUT jacks on the DVD player. Connecting a DVD Player The rear panel jacks on the DVD player. DVD Player Connecting to your DVD player's owner's manual...

Owner Instructions
Page 26
... on -screen menu appears, use the selected items. Use the ENTER button to an item you to control the settings of certain picture and sound settings and the current time. English - 26 Viewing the Display Press the INFO button on the remote control. am Mono Dynamic Standard Stereo Stereo Once the on your TV. Input Input Source List : TV Edit Name √ √ There are five menu groups: Picture "Input", "Picture", "Sound", Sound "Channel" and "Setup". Air 12 Signal V-Chip Picture Sound SRS...
... on -screen menu appears, use the selected items. Use the ENTER button to an item you to control the settings of certain picture and sound settings and the current time. English - 26 Viewing the Display Press the INFO button on the remote control. am Mono Dynamic Standard Stereo Stereo Once the on your TV. Input Input Source List : TV Edit Name √ √ There are five menu groups: Picture "Input", "Picture", "Sound", Sound "Channel" and "Setup". Air 12 Signal V-Chip Picture Sound SRS...

Owner Instructions
Page 28
... point the signal source has been selected. or † button to exit. Input Picture Sound Channel Setup Channel Antenna : AnAt.i1re Air/CATV : AirSTD Auto Program HRC Add/Delete IRC Favorite Channels Name Fine Tune ▼ More Move Enter Return Press the EXIT button to select "Air". or † button to change channels by entering the channel digits. Operation Memorizing the Channels Your TV can begin memorizing the available channels, you connected cable, press...
... point the signal source has been selected. or † button to exit. Input Picture Sound Channel Setup Channel Antenna : AnAt.i1re Air/CATV : AirSTD Auto Program HRC Add/Delete IRC Favorite Channels Name Fine Tune ▼ More Move Enter Return Press the EXIT button to select "Air". or † button to change channels by entering the channel digits. Operation Memorizing the Channels Your TV can begin memorizing the available channels, you connected cable, press...

Owner Instructions
Page 34
...90 Brightness 50 Sharpness 50 Color 50 Tint 50 50 Reset Move Enter Return English - 34 Input Picture Sound Channel Setup Picture Mode : Standard √ Color Tone : Warm1 √ Size : Wide √ Digital NR : Off √ DNIe : On √ My Color Control √ Film Mode : Off √ PIP √ Move Enter Return 2 Press the ENTER button to display the "Mode" menu. See next page.) Customizing the Picture 1 Press the MENU button. Operation Picture Control You can use the on-screen menus to change the "Contrast", "Brightness...
...90 Brightness 50 Sharpness 50 Color 50 Tint 50 50 Reset Move Enter Return English - 34 Input Picture Sound Channel Setup Picture Mode : Standard √ Color Tone : Warm1 √ Size : Wide √ Digital NR : Off √ DNIe : On √ My Color Control √ Film Mode : Off √ PIP √ Move Enter Return 2 Press the ENTER button to display the "Mode" menu. See next page.) Customizing the Picture 1 Press the MENU button. Operation Picture Control You can use the on-screen menus to change the "Contrast", "Brightness...

Owner Instructions
Page 35
... standard picture settings. English - 35 Press the ... Press the ... Input Picture Sound Channel Setup Mode Mode : SDtaynnadmaircd Contrast Standard 90 Brightness Cinema 50 Sharpness 50 Color 50 Tint 50 50 Reset Move Enter Return Alternate method Press the P.MODE button on the remote control repeatedly to select "Mode". You can select "Custom" which automatically recalls your personalized picture settings. 1 Press the MENU button. Using Automatic Picture Settings Your TV has automatic picture settings ("Dynamic", "Standard" and "Cinema") that are preset at the factory...
... standard picture settings. English - 35 Press the ... Press the ... Input Picture Sound Channel Setup Mode Mode : SDtaynnadmaircd Contrast Standard 90 Brightness Cinema 50 Sharpness 50 Color 50 Tint 50 50 Reset Move Enter Return Alternate method Press the P.MODE button on the remote control repeatedly to select "Mode". You can select "Custom" which automatically recalls your personalized picture settings. 1 Press the MENU button. Using Automatic Picture Settings Your TV has automatic picture settings ("Dynamic", "Standard" and "Cinema") that are preset at the factory...

Owner Instructions
Page 37
... "Movie" when watching movies. • Choose "Speech" when watching a show that are preset at the factory. Press the ... or † button to be changed. Input Picture Sound Channel Setup Sound Mode Equalizer SRS TSXT MTS Auto Volume Internal Mute : SSttannddaarrdd Music : OfMf ovie : SStepreeeoch : OCfuf stom : Off Move Enter Return Alternate method Press the S.MODE button on the remote control repeatedly to recall your personalized sound settings. 1 Press the MENU button.
... "Movie" when watching movies. • Choose "Speech" when watching a show that are preset at the factory. Press the ... or † button to be changed. Input Picture Sound Channel Setup Sound Mode Equalizer SRS TSXT MTS Auto Volume Internal Mute : SSttannddaarrdd Music : OfMf ovie : SStepreeeoch : OCfuf stom : Off Move Enter Return Alternate method Press the S.MODE button on the remote control repeatedly to recall your personalized sound settings. 1 Press the MENU button.

Owner Instructions
Page 38
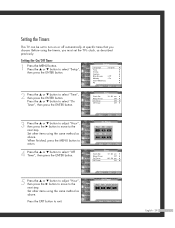
... Set". Press the ... or † button, then press the ENTER button. This function is turned on by timer. Absent Power Off When you set the timer "On", your TV left on holiday, for example). Set the clock you can check the time while watching the TV. (Just press the INFO button.) 1 Press the MENU button. Input Picture Sound Channel Setup Setup Language : English √ Time √ V-Chip √ Caption √ Blue Screen : Off √ Melody : On √ Color...
... Set". Press the ... or † button, then press the ENTER button. This function is turned on by timer. Absent Power Off When you set the timer "On", your TV left on holiday, for example). Set the clock you can check the time while watching the TV. (Just press the INFO button.) 1 Press the MENU button. Input Picture Sound Channel Setup Setup Language : English √ Time √ V-Chip √ Caption √ Blue Screen : Off √ Melody : On √ Color...
Owner Instructions
Page 39
..., press the MENU button to select "On Timer", then press the ENTER button. or † button to adjust "Hour", then press the √ button to move to the next step. Set other items using the same method as above . or † button to the next step. Press the ... Input Picture Sound Channel Setup Setup Language : English √ Time √ V-Chip √ Caption √ Blue Screen : Off √ Melody : On √ Color Weakness √...
..., press the MENU button to select "On Timer", then press the ENTER button. or † button to adjust "Hour", then press the √ button to move to the next step. Set other items using the same method as above . or † button to the next step. Press the ... Input Picture Sound Channel Setup Setup Language : English √ Time √ V-Chip √ Caption √ Blue Screen : Off √ Melody : On √ Color Weakness √...

Owner Instructions
Page 41
... ENTER button to the TV, you connect equipment to select "Input". English - 41 Viewing an External Signal Source Use the remote control to select a signal source, then press the ENTER button. or † button to switch between the following sets of jacks: "AV1", "AV2", "S-Video1", "S-Video2", "Component1", "Component2", "PC", "DVI" or "HDMI" on the TV's rear panel, and "AV3" or "S-Video3" on the AV1 remote control repeatedly to select "Source List". Input Picture Sound Channel Setup Input Source List : TV Edit...
... ENTER button to the TV, you connect equipment to select "Input". English - 41 Viewing an External Signal Source Use the remote control to select a signal source, then press the ENTER button. or † button to switch between the following sets of jacks: "AV1", "AV2", "S-Video1", "S-Video2", "Component1", "Component2", "PC", "DVI" or "HDMI" on the TV's rear panel, and "AV3" or "S-Video3" on the AV1 remote control repeatedly to select "Source List". Input Picture Sound Channel Setup Input Source List : TV Edit...

Owner Instructions
Page 54
... the blue Mediterranean sea. • "Green": Emphasizing Mild Greens. or † button to select "My Color Control", then press the ENTER button. Input Picture Sound Channel Setup Picture Mode : Standard √ Color Tone : Warm1 √ Size : Wide √ Digital NR : Off √ DNIe : On √ My Color Control √ Film Mode : Off √ PIP √ Move Enter Return NOTE • Changing the settings in the "Detail Control" menu (see next page) will automatically set the My Color Control mode...
... the blue Mediterranean sea. • "Green": Emphasizing Mild Greens. or † button to select "My Color Control", then press the ENTER button. Input Picture Sound Channel Setup Picture Mode : Standard √ Color Tone : Warm1 √ Size : Wide √ Digital NR : Off √ DNIe : On √ My Color Control √ Film Mode : Off √ PIP √ Move Enter Return NOTE • Changing the settings in the "Detail Control" menu (see next page) will automatically set the My Color Control mode...

Owner Instructions
Page 55
... ENTER button. Input Picture Sound Channel Setup Picture Mode : Standard √ Color Tone : Warm1 √ Size : Wide √ Digital NR : Off √ DNIe : On √ My Color Control √ Film Mode : Off √ PIP √ Move Enter Return 2 Press the ... Detail Control Input Pink 50 Green 50 Picture Blue 50 Reset Sound Channel Setup Move Enter Return English - 55 or † button to select "My Color Control", then press the ENTER button. Press the ... Changing the adjustment value will be reset to display the "Detail Control" menu...
... ENTER button. Input Picture Sound Channel Setup Picture Mode : Standard √ Color Tone : Warm1 √ Size : Wide √ Digital NR : Off √ DNIe : On √ My Color Control √ Film Mode : Off √ PIP √ Move Enter Return 2 Press the ... Detail Control Input Pink 50 Green 50 Picture Blue 50 Reset Sound Channel Setup Move Enter Return English - 55 or † button to select "My Color Control", then press the ENTER button. Press the ... Changing the adjustment value will be reset to display the "Detail Control" menu...
Owner Instructions
Page 68
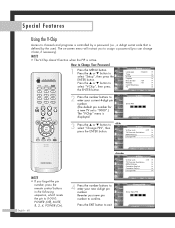
... ENTER button. Input Picture Sound Channel Change PIN Enter New PIN * Press the EXIT button to channels and programs is controlled by a password (i.e., a 4-digit secret code that is defined by the user). Special Features Using the V-Chip Access to exit. Picture Enter PIN (The default pin number for Sound * a new TV set is "0000".) The "V-Chip" menu is active. or † button to confirm. Setup 0 9 Enter PIN Return NOTE • The V-Chip doesn't function when the PIP is Channel displayed...
... ENTER button. Input Picture Sound Channel Change PIN Enter New PIN * Press the EXIT button to channels and programs is controlled by a password (i.e., a 4-digit secret code that is defined by the user). Special Features Using the V-Chip Access to exit. Picture Enter PIN (The default pin number for Sound * a new TV set is "0000".) The "V-Chip" menu is active. or † button to confirm. Setup 0 9 Enter PIN Return NOTE • The V-Chip doesn't function when the PIP is Channel displayed...
Owner Instructions
Page 94
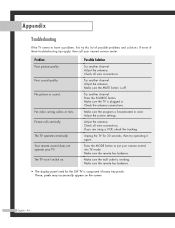
.... Your remote control does not operate your remote control into TV mode. Check all wire connections. Adjust the antenna. Make sure the TV is plugged in color. Make sure the program is composed of many tiny pixels. Check all wire connections. Picture rolls vertically. The TV won't switch on the screen. Press the SOURCE button. If you are using a VCR, check the tracking. Problem Poor picture quality. Try another channel. Adjust the picture settings. Adjust the antenna. Unplug the TV for the DLP TV is...
.... Your remote control does not operate your remote control into TV mode. Check all wire connections. Adjust the antenna. Make sure the TV is plugged in color. Make sure the program is composed of many tiny pixels. Check all wire connections. Picture rolls vertically. The TV won't switch on the screen. Press the SOURCE button. If you are using a VCR, check the tracking. Problem Poor picture quality. Try another channel. Adjust the picture settings. Adjust the antenna. Unplug the TV for the DLP TV is...
Owner Instructions
Page 95
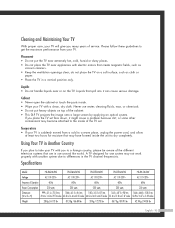
... of the cabinet. • This DLP TV projects the image onto a large screen by applying an optical system. Cabinet • Never open the cabinet or touch the parts inside. • Wipe your TV. If you place the TV set face down, it can cause serious damage. Temperature • If your TV is suddenly moved from your TV with a clean, dry cloth. Please follow these...
... of the cabinet. • This DLP TV projects the image onto a large screen by applying an optical system. Cabinet • Never open the cabinet or touch the parts inside. • Wipe your TV. If you place the TV set face down, it can cause serious damage. Temperature • If your TV is suddenly moved from your TV with a clean, dry cloth. Please follow these...


