
User Manual (ENGLISH)
Page 4
... Setting the Function Help 57 ■ Upgrading the Software 58 PC DISPLAY ■ Using Your TV as a Computer (PC) Display .......... 59 ■ Display Modes 60 ■ Setting up the TV with your PC 61 ■ Changing the Picture Size (PC Mode 63 ■ Setting the Home Theater PC 63... Analog 53 ■ Menu Transparency Level 54 ■ Setting the Blue Screen Mode 54 ■ Adjusting the Melody Sound 55 ■ Using the Color Weakness Enhancement Feature ... 55 ■ Setting the Light Effect 56 ■ Setting the HDMI Black Level 56 ■ Setting the Film Mode -...
... Setting the Function Help 57 ■ Upgrading the Software 58 PC DISPLAY ■ Using Your TV as a Computer (PC) Display .......... 59 ■ Display Modes 60 ■ Setting up the TV with your PC 61 ■ Changing the Picture Size (PC Mode 63 ■ Setting the Home Theater PC 63... Analog 53 ■ Menu Transparency Level 54 ■ Setting the Blue Screen Mode 54 ■ Adjusting the Melody Sound 55 ■ Using the Color Weakness Enhancement Feature ... 55 ■ Setting the Light Effect 56 ■ Setting the HDMI Black Level 56 ■ Setting the Film Mode -...

User Manual (ENGLISH)
Page 5
..., resulting in a shortened component life and degraded performance. 50˝ screen : At least 5.9 feet 56˝ screen : At least 6.6 feet 61˝ screen : At least 7.2 feet ➢ For optimal picture quality, do not place components on and off at any time you choose ●...use on-screen menu system you to view and play photo (JPEG) and audio files (MP3) through the TV's WISELINK jack. General Information Viewing Position To optimize your color preference ● Color Weakness mode ● Digital Input jack ● Digital Audio Output (OPTICAL) jack ● Theater Game Mode...
..., resulting in a shortened component life and degraded performance. 50˝ screen : At least 5.9 feet 56˝ screen : At least 6.6 feet 61˝ screen : At least 7.2 feet ➢ For optimal picture quality, do not place components on and off at any time you choose ●...use on-screen menu system you to view and play photo (JPEG) and audio files (MP3) through the TV's WISELINK jack. General Information Viewing Position To optimize your color preference ● Color Weakness mode ● Digital Input jack ● Digital Audio Output (OPTICAL) jack ● Theater Game Mode...

User Manual (ENGLISH)
Page 6
To use the more advanced features, you must use the remote control. ➢ The product color and shape may vary depending on the Lower-Right Part of the product if an unauthorized lamp is used. Checking Parts Owner's Instructions Remote Control (... service center. • Use authorized lamps only. The company cannot guarantee the quality of the Panel The buttons on the lower-right panel control your TV's basic features, including the on-screen menu. English - 6 Continued... D-Sub Cable PC Audio Cable HDMI/DVI Cable 1Stereo/2RCA Cable HDMI Cable Optical Cable Viewing...
To use the more advanced features, you must use the remote control. ➢ The product color and shape may vary depending on the Lower-Right Part of the product if an unauthorized lamp is used. Checking Parts Owner's Instructions Remote Control (... service center. • Use authorized lamps only. The company cannot guarantee the quality of the Panel The buttons on the lower-right panel control your TV's basic features, including the on-screen menu. English - 6 Continued... D-Sub Cable PC Audio Cable HDMI/DVI Cable 1Stereo/2RCA Cable HDMI Cable Optical Cable Viewing...

User Manual (ENGLISH)
Page 8
... optional HDMI/DVI cable will be necessary to make this connection. When using an optional HDMI/DVI adapter, the DVI analog audio inputs on your TV allow you to view photo files (JPEG) and play audio files (MP3). ! English - 8 This input can also be used as a Camcorder ...audio (L-AUDIO-R) component inputs. % POWER IN Connect the supplied power cord. For more information on connecting equipment, see pages 10~16. ➢ The product color and shape may vary depending on your DVI device. 4 RS232C For service only. 5 DIGITAL AUDIO OUT (OPTICAL) Connect to a Digital Audio component. 6 DVI...
... optional HDMI/DVI cable will be necessary to make this connection. When using an optional HDMI/DVI adapter, the DVI analog audio inputs on your TV allow you to view photo files (JPEG) and play audio files (MP3). ! English - 8 This input can also be used as a Camcorder ...audio (L-AUDIO-R) component inputs. % POWER IN Connect the supplied power cord. For more information on connecting equipment, see pages 10~16. ➢ The product color and shape may vary depending on your DVI device. 4 RS232C For service only. 5 DIGITAL AUDIO OUT (OPTICAL) Connect to a Digital Audio component. 6 DVI...

User Manual (ENGLISH)
Page 9
...to change channels. For example, to select channel "54-3", press "54", then press "-" and "3". 4 CH LIST Used to display Channel Lists on the TV screen. Stop - m SRS Selects SRS TruSurround XT mode. Press to select additional channels being broadcast by bright light. ➢ This is a special remote... a distance of the available video sources. ( Press to select the sound mode. ! c VCR/DVD Functions - h CAPTION Controls the caption decoder. k Color buttons Press to add or delete channels and to store channels to the favorite channel list in the Channel List menu. (See pages 38~41...
...to change channels. For example, to select channel "54-3", press "54", then press "-" and "3". 4 CH LIST Used to display Channel Lists on the TV screen. Stop - m SRS Selects SRS TruSurround XT mode. Press to select additional channels being broadcast by bright light. ➢ This is a special remote... a distance of the available video sources. ( Press to select the sound mode. ! c VCR/DVD Functions - h CAPTION Controls the caption decoder. k Color buttons Press to add or delete channels and to store channels to the favorite channel list in the Channel List menu. (See pages 38~41...

User Manual (ENGLISH)
Page 12
...VCR. ➢ If you have already connected your TV to an antenna or a cable TV system (according to the instructions on pages 10~11). If your TV. S-Video Connection Your Samsung TV can be displayed with a cut off picture when the TV is stereo, you have not yet connected to an...Audio Cable(Not supplied) 4 Video Cable(Not supplied) ➢ Each VCR has a different side panel configuration. ➢ When connecting a VCR, match the color of the connection terminal to the cable. ➢ Some games may be connected to the S-Video jack of a VCR. (This connection delivers a better picture ...
...VCR. ➢ If you have already connected your TV to an antenna or a cable TV system (according to the instructions on pages 10~11). If your TV. S-Video Connection Your Samsung TV can be displayed with a cut off picture when the TV is stereo, you have not yet connected to an...Audio Cable(Not supplied) 4 Video Cable(Not supplied) ➢ Each VCR has a different side panel configuration. ➢ When connecting a VCR, match the color of the connection terminal to the cable. ➢ Some games may be connected to the S-Video jack of a VCR. (This connection delivers a better picture ...
User Manual (ENGLISH)
Page 13
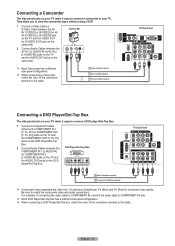
...panel configuration. ➢ When connecting a Camcorder, match the color of the connection terminal to connect a DVD player/Set-Top Box. 1 Connect a Component Cables between the COMPONENT IN 1 [Y, PB, PR] (or COMPONENT IN 2 [Y, PB, PR]) jacks on the TV and the COMPONENT OUT [Y, PB, PR] jacks on the... configuration. ➢ When connecting a DVD Player/Set-Top box, match the color of the connection terminal to the cable. 2 Audio Cable(Not supplied) 1 Video Cable(Not supplied) or 1 S-Video Cable(Not supplied) TV Side Panel Connecting a DVD Player/Set-Top Box The side panel jacks on ...
...panel configuration. ➢ When connecting a Camcorder, match the color of the connection terminal to connect a DVD player/Set-Top Box. 1 Connect a Component Cables between the COMPONENT IN 1 [Y, PB, PR] (or COMPONENT IN 2 [Y, PB, PR]) jacks on the TV and the COMPONENT OUT [Y, PB, PR] jacks on the... configuration. ➢ When connecting a DVD Player/Set-Top box, match the color of the connection terminal to the cable. 2 Audio Cable(Not supplied) 1 Video Cable(Not supplied) or 1 S-Video Cable(Not supplied) TV Side Panel Connecting a DVD Player/Set-Top Box The side panel jacks on ...
User Manual (ENGLISH)
Page 14
... on the DVD Player/Set-Top Box. DVD Player/Set-Top Box TV Side Panel ➢ Each DVD Player/Set-Top box has a different side panel configuration. ➢ When connecting a DVD Player/ Set-Top box, match the color of the connection terminal to HDMI3/DVI IN and DVI IN [R-AUDIO-L]... on the side panel of the TV. ➢ Part of lower versioned HDMI cables may not implement sound output for it especially because...
... on the DVD Player/Set-Top Box. DVD Player/Set-Top Box TV Side Panel ➢ Each DVD Player/Set-Top box has a different side panel configuration. ➢ When connecting a DVD Player/ Set-Top box, match the color of the connection terminal to HDMI3/DVI IN and DVI IN [R-AUDIO-L]... on the side panel of the TV. ➢ Part of lower versioned HDMI cables may not implement sound output for it especially because...

User Manual (ENGLISH)
Page 15
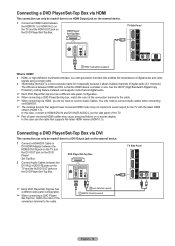
...of the TV, and adjust the volume level with the amplifier's volume control. Digital Audio System TV Side Panel ...TV is connected to an external device supporting 5.1CH. 1 Optical Cable (Not supplied) What is connected to your TV... make it through glass fibers. Analog 1 Connect Audio Cables between the DIGITAL AUDIO OUT (OPTICAL) jack on the TV...volume of the TV, and adjust the volume level with the audio ... on your TV. 1 Connect an Optical Cable between the AV OUT [L-AUDIO-R] jacks on the TV and AUDIO ...cable. 1 Audio Cable (Not supplied) TV Side Panel English - 15 Connecting an ...
...of the TV, and adjust the volume level with the amplifier's volume control. Digital Audio System TV Side Panel ...TV is connected to an external device supporting 5.1CH. 1 Optical Cable (Not supplied) What is connected to your TV... make it through glass fibers. Analog 1 Connect Audio Cables between the DIGITAL AUDIO OUT (OPTICAL) jack on the TV...volume of the TV, and adjust the volume level with the audio ... on your TV. 1 Connect an Optical Cable between the AV OUT [L-AUDIO-R] jacks on the TV and AUDIO ...cable. 1 Audio Cable (Not supplied) TV Side Panel English - 15 Connecting an ...

User Manual (ENGLISH)
Page 16
...Cable 1 Connect a HDMI/DVI Cable between the HDMI3/DVI IN jack on the TV and the PC output jack on your computer. 2 Connect a 1Stereo/2RCA Cable between the PC IN [AUDIO] jack... on the TV and the Audio Out jack of the sound card on the remote control. Using the HDMI/...has a different side panel configuration. ➢ When connecting a PC, match the color of the connection terminal to the cable. TV Side Panel TV Side Panel Operation Turning the TV On and Off Press the POWER button on your computer. Connecting a PC Using...
...Cable 1 Connect a HDMI/DVI Cable between the HDMI3/DVI IN jack on the TV and the PC output jack on your computer. 2 Connect a 1Stereo/2RCA Cable between the PC IN [AUDIO] jack... on the TV and the Audio Out jack of the sound card on the remote control. Using the HDMI/...has a different side panel configuration. ➢ When connecting a PC, match the color of the connection terminal to the cable. TV Side Panel TV Side Panel Operation Turning the TV On and Off Press the POWER button on your computer. Connecting a PC Using...

User Manual (ENGLISH)
Page 19
... the menu. Press the INFO button on , press the MENU button. Picture Enter Picture Return Mode Dynamic Contrast 100 Brightness 45 Sharpness 75 Color 55 Tint G50 R50 Color Tone Cool1 Detailed Settings Size 16:9 Picture Enter English - 19 The word Mute is displayed on the screen. 2 To turn mute off . Adjusting...
... the menu. Press the INFO button on , press the MENU button. Picture Enter Picture Return Mode Dynamic Contrast 100 Brightness 45 Sharpness 75 Color 55 Tint G50 R50 Color Tone Cool1 Detailed Settings Size 16:9 Picture Enter English - 19 The word Mute is displayed on the screen. 2 To turn mute off . Adjusting...

User Manual (ENGLISH)
Page 20
...channels(manual). Green button: Moves to the selected menu. ENTER button: Moves to the previous page. Memorizing the Channels Your TV can select any menu by entering the channel digits. There are memorized, use the selected items. Menu Map Picture Sound Channel... Setup 1/2 Mode І Contrast І Brightness І Shapness І Color І Tint Color Tone І Detailed Settings І Size І Digital NR І DNIe Active Color І Color Gamut І Position І Reset Mode І SRS TruSurround XT І Preferred Language ...
...channels(manual). Green button: Moves to the selected menu. ENTER button: Moves to the previous page. Memorizing the Channels Your TV can select any menu by entering the channel digits. There are memorized, use the selected items. Menu Map Picture Sound Channel... Setup 1/2 Mode І Contrast І Brightness І Shapness І Color І Tint Color Tone І Detailed Settings І Size І Digital NR І DNIe Active Color І Color Gamut І Position І Reset Mode І SRS TruSurround XT І Preferred Language ...
User Manual (ENGLISH)
Page 27
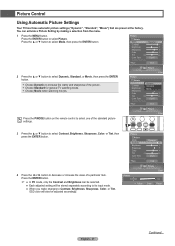
... ENTER button. 4 Press the ◄ or ► button to decrease or increase the value of the picture. Choose Standard for general TV watching mode. Choose Movie when watching movies. Press the ENTER button. ➢ ● In PC mode, only the Contrast and Brightness ... settings ("Dynamic", "Standard", "Movie") that are preset at the factory. Picture Return Mode Dynamic Contrast 100 Brightness 45 Sharpness 75 Color 55 Tint G50 R50 Color Tone Cool1 Detailed Settings Size 16:9 2 Press the ▲ or ▼ button to select Dynamic, Standard, or Movie, then...
... ENTER button. 4 Press the ◄ or ► button to decrease or increase the value of the picture. Choose Standard for general TV watching mode. Choose Movie when watching movies. Press the ENTER button. ➢ ● In PC mode, only the Contrast and Brightness ... settings ("Dynamic", "Standard", "Movie") that are preset at the factory. Picture Return Mode Dynamic Contrast 100 Brightness 45 Sharpness 75 Color 55 Tint G50 R50 Color Tone Cool1 Detailed Settings Size 16:9 2 Press the ▲ or ▼ button to select Dynamic, Standard, or Movie, then...

User Manual (ENGLISH)
Page 28
... Dynamic Contrast 100 Brightness 45 Sharpness 75 Color 55 Tint G50 R50 Color Tone Cool1 Detailed Settings Size 16:9 Picture Enter Picture Return Mode Dynamic Contrast 100 Brightness 45 Sharpness 75 Color Cool2 55 Tint G50Cool1 R50 Color Tone NormCaol ol1 Detailed SettingsWarm1OK Size Warm126:9...9650; or ▼ button to Dynamic or Standard, Warm1 and Warm2 cannot be reset. 5 Press the ▲ or ▼ button to select Color Tone, then press the ENTER button. 6 Press the ▲ or ▼ button to select Cool2, Cool1, Normal, Warm1, or Warm2, ...
... Dynamic Contrast 100 Brightness 45 Sharpness 75 Color 55 Tint G50 R50 Color Tone Cool1 Detailed Settings Size 16:9 Picture Enter Picture Return Mode Dynamic Contrast 100 Brightness 45 Sharpness 75 Color Cool2 55 Tint G50Cool1 R50 Color Tone NormCaol ol1 Detailed SettingsWarm1OK Size Warm126:9...9650; or ▼ button to Dynamic or Standard, Warm1 and Warm2 cannot be reset. 5 Press the ▲ or ▼ button to select Color Tone, then press the ENTER button. 6 Press the ▲ or ▼ button to select Cool2, Cool1, Normal, Warm1, or Warm2, ...
User Manual (ENGLISH)
Page 29
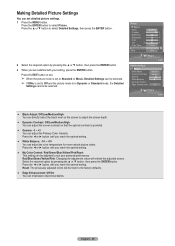
... or ▼ button to Standard or Movie, Detailed Settings can adjust the Primary Color Intensity. Picture Return Mode Standard Contrast 80 Brightness 50 Sharpness 50 Color 50 Tint G50 R50 Color Tone Cool1 Detailed Settings ► Size 16:9 Picture Enter Detailed Settings Return Black ...pressing the ▲ or ▼ button, then press the ENTER button. 3 When you reach the optimal setting. Reset: The previously adjusted colors will refresh the adjusted screen. Press the ◄ or ► button until you reach the optimal setting. ● White Balance: -10 ...
... or ▼ button to Standard or Movie, Detailed Settings can adjust the Primary Color Intensity. Picture Return Mode Standard Contrast 80 Brightness 50 Sharpness 50 Color 50 Tint G50 R50 Color Tone Cool1 Detailed Settings ► Size 16:9 Picture Enter Detailed Settings Return Black ...pressing the ▲ or ▼ button, then press the ENTER button. 3 When you reach the optimal setting. Reset: The previously adjusted colors will refresh the adjusted screen. Press the ◄ or ► button until you reach the optimal setting. ● White Balance: -10 ...
User Manual (ENGLISH)
Page 30
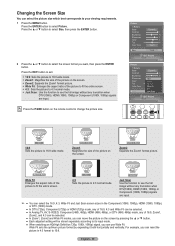
... Wide Fit sets the optimum picture format by pressing the ▲ or ▼ button. ● Each adjusted setting will be selected. ● In Analog TV, AV, S-VIDEO, Component (480i, 480p), HDMI (480i, 480p), or DTV (480i, 480p) mode, any truncation when DTV(1080i), HDMI (1080i, 1080p... picture size which best corresponds to select Picture. Picture Return Mode Dynamic Contrast 100 Brightness 45 Sharpness 75 Color 55 Tint G50 R50 Color Tone Cool1 Detailed Settings Size 16:9 Picture Enter Picture Return Mode Dynamic Contrast 100 Brightness 45 Sharpness 16:9 75...
... Wide Fit sets the optimum picture format by pressing the ▲ or ▼ button. ● Each adjusted setting will be selected. ● In Analog TV, AV, S-VIDEO, Component (480i, 480p), HDMI (480i, 480p), or DTV (480i, 480p) mode, any truncation when DTV(1080i), HDMI (1080i, 1080p... picture size which best corresponds to select Picture. Picture Return Mode Dynamic Contrast 100 Brightness 45 Sharpness 75 Color 55 Tint G50 R50 Color Tone Cool1 Detailed Settings Size 16:9 Picture Enter Picture Return Mode Dynamic Contrast 100 Brightness 45 Sharpness 16:9 75...

User Manual (ENGLISH)
Page 31
... Cool1 Detailed Settings Size 16:9 Digital NR DNIe Active Color Color Gamut Position Reset Off Low LowCooOl1n MediOumKOff High Normal AutoLow OK Picture Enter DNIe (Digital Natural Image engine) This TV includes the DNIe function so as to exit. Off: Switches off . Low: Sets ...Reset OK Picture Enter English - 31 Press the EXIT button to provide a high visual quality. Picture Tint G50 Color Tone Detailed Settings Size Digital NR DNIe Active Color Color Gamut Position Reset R50 Cool1 16:9 Auto On On Normal OK 2 Press the ▲ or ▼ button ...
... Cool1 Detailed Settings Size 16:9 Digital NR DNIe Active Color Color Gamut Position Reset Off Low LowCooOl1n MediOumKOff High Normal AutoLow OK Picture Enter DNIe (Digital Natural Image engine) This TV includes the DNIe function so as to exit. Off: Switches off . Low: Sets ...Reset OK Picture Enter English - 31 Press the EXIT button to provide a high visual quality. Picture Tint G50 Color Tone Detailed Settings Size Digital NR DNIe Active Color Color Gamut Position Reset R50 Cool1 16:9 Auto On On Normal OK 2 Press the ▲ or ▼ button ...

User Manual (ENGLISH)
Page 32
... sRGB OK Picture Enter English - 32 Press the EXIT button to exit. ➢ This function is not available in Picture Mode, the Active Color automatically changes to Off and it is activated regardless of the value of the sky and grass will be stronger and clearer for a more vivid... on this option, the colors of Picture Mode. Picture Tint G50 Color Tone Detailed Settings Size Digital NR DNIe Active Color Color Gamut Position Reset R50 Cool1 16:9 Auto On On Normal 0 OK 2 Press the ▲ or ▼...
... sRGB OK Picture Enter English - 32 Press the EXIT button to exit. ➢ This function is not available in Picture Mode, the Active Color automatically changes to Off and it is activated regardless of the value of the sky and grass will be stronger and clearer for a more vivid... on this option, the colors of Picture Mode. Picture Tint G50 Color Tone Detailed Settings Size Digital NR DNIe Active Color Color Gamut Position Reset R50 Cool1 16:9 Auto On On Normal 0 OK 2 Press the ▲ or ▼...
User Manual (ENGLISH)
Page 33
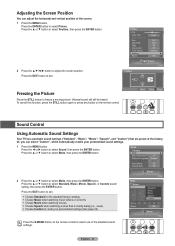
...Reset OK Sound Enter Press the S.MODE button on the remote control. ▼ Move Enter Return Sound Control Using Automatic Sound Settings Your TV has automatic sound settings ("Standard", "Music", "Movie", "Speech", and "Custom") that is mostly dialog (i.e., news). Choose Custom...you can adjust the horizontal and vertical position of the standard sound settings. English - 33 Picture Tint G50 Color Tone Detailed Settings Size Digital NR DNIe Active Color Color Gamut Position Reset R50 Cool1 16:9 Auto On On Normal ► OK Picture Enter Position ▲ ...
...Reset OK Sound Enter Press the S.MODE button on the remote control. ▼ Move Enter Return Sound Control Using Automatic Sound Settings Your TV has automatic sound settings ("Standard", "Music", "Movie", "Speech", and "Custom") that is mostly dialog (i.e., news). Choose Custom...you can adjust the horizontal and vertical position of the standard sound settings. English - 33 Picture Tint G50 Color Tone Detailed Settings Size Digital NR DNIe Active Color Color Gamut Position Reset R50 Cool1 16:9 Auto On On Normal ► OK Picture Enter Position ▲ ...

User Manual (ENGLISH)
Page 46
... PIN (personal ID number) before any of how to use the 3D/Dual-View Function, ● Please go to www.samsung.com → 'PRODUCTS' → 'HDTV' → 'DLP TV' ● Click "3D/Dual-View Information" Using the V-Chip U.S.A Only This product is covered by the following U.S. How ...3 The V-Chip menu is not available in HDMI or component mode. Setup V-Chip ► Caption Menu Transparency Medium Blue Screen Off Melody Medium Color Weakness PC Home Theater PC Off Light Effect In Watching HDMI Black Level Normal 2 Press the ▲ or ▼ button. To enable the ...
... PIN (personal ID number) before any of how to use the 3D/Dual-View Function, ● Please go to www.samsung.com → 'PRODUCTS' → 'HDTV' → 'DLP TV' ● Click "3D/Dual-View Information" Using the V-Chip U.S.A Only This product is covered by the following U.S. How ...3 The V-Chip menu is not available in HDMI or component mode. Setup V-Chip ► Caption Menu Transparency Medium Blue Screen Off Melody Medium Color Weakness PC Home Theater PC Off Light Effect In Watching HDMI Black Level Normal 2 Press the ▲ or ▼ button. To enable the ...


