Open Source Guide (ENGLISH)
Page 2
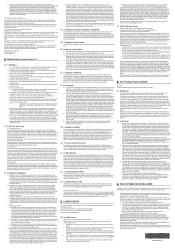
It is found. 16. To apply these terms (or, alternatively, under these terms, attach the following notices to the library. You can redistribute and change. and each file should have at least the "copyright" line and a pointer to where the full notice is safest to attach them to the start of each source file to most effectively convey the exclusion of the greatest possible use to be of warranty; IN NO EVENT UNLESS REQUIRED BY APPLICABLE LAW OR AGREED TO IN WRITING WILL ANY COPYRIGHT HOLDER, OR ANY OTHER PARTY WHO MAY MODIFY AND/OR REDISTRIBUTE THE LIBRARY AS PERMITTED ABOVE, BE ...
It is found. 16. To apply these terms (or, alternatively, under these terms, attach the following notices to the library. You can redistribute and change. and each file should have at least the "copyright" line and a pointer to where the full notice is safest to attach them to the start of each source file to most effectively convey the exclusion of the greatest possible use to be of warranty; IN NO EVENT UNLESS REQUIRED BY APPLICABLE LAW OR AGREED TO IN WRITING WILL ANY COPYRIGHT HOLDER, OR ANY OTHER PARTY WHO MAY MODIFY AND/OR REDISTRIBUTE THE LIBRARY AS PERMITTED ABOVE, BE ...
User Manual (ENGLISH)
Page 2
...and are granted for product features or functions that do not conform to the ISO/IEC 11172-3 or ISO/IEC 13818-3. © 2007 Samsung Electronics Co., Ltd. Some 480p programs are broadcast in image quality. ● HDTV program formats include 1080-line interlaced (1080i) and 720... (SDTV) and the second is a new way of Dolby digital audio formats from Dolby Surround 2.0 to Dolby Digital 5.1 surround, using your TV set. Many HDTV programs are essentially a digital version of certain third parties. U.S.A Only The product unit accompanying this product unit to encode and/or...
...and are granted for product features or functions that do not conform to the ISO/IEC 11172-3 or ISO/IEC 13818-3. © 2007 Samsung Electronics Co., Ltd. Some 480p programs are broadcast in image quality. ● HDTV program formats include 1080-line interlaced (1080i) and 720... (SDTV) and the second is a new way of Dolby digital audio formats from Dolby Surround 2.0 to Dolby Digital 5.1 surround, using your TV set. Many HDTV programs are essentially a digital version of certain third parties. U.S.A Only The product unit accompanying this product unit to encode and/or...

User Manual (ENGLISH)
Page 3
... Rule (part of the Telecommunications Act of 1996) allows residents of condominiums, townhouse, or members of broadcast TV signals as long as www.titantv. Can I connect my DTV set -top receiver to put up outside antennas for DTV broadcasts. You can find out whether your location is ...ghosting, static, or scratchy audio. 3. Over-the-air (OTA) digital TV broadcasting uses the same channels as analog TV receivers to receive OTA broadcast DTV programs. The good news is that is an antenna and a DTV set -top receiver to the transmission tower. Note that the landlord of rental...
... Rule (part of the Telecommunications Act of 1996) allows residents of condominiums, townhouse, or members of broadcast TV signals as long as www.titantv. Can I connect my DTV set -top receiver to put up outside antennas for DTV broadcasts. You can find out whether your location is ...ghosting, static, or scratchy audio. 3. Over-the-air (OTA) digital TV broadcasting uses the same channels as analog TV receivers to receive OTA broadcast DTV programs. The good news is that is an antenna and a DTV set -top receiver to the transmission tower. Note that the landlord of rental...
User Manual (ENGLISH)
Page 4
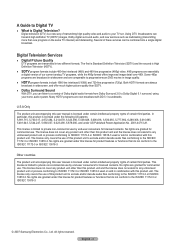
... 54 ■ Adjusting the Melody Sound 55 ■ Using the Color Weakness Enhancement Feature ... 55 ■ Setting the Light Effect 56 ■ Setting the HDMI Black Level 56 ■ Setting the Film Mode - Analog 36 ■ Automatic Volume Control 37 ■ Selecting the Internal Mute 37 CHANNEL...) - Digital 36 ■ Choosing a Multi-Channel Sound (MTS) Track - Analog 15 ■ Connecting a PC 16 OPERATION ■ Turning the TV On and Off 16 ■ Plug & Play Feature 17 ■ Changing Channels 18 ■ Adjusting the Volume 19 ■ Viewing the Display 19...
... 54 ■ Adjusting the Melody Sound 55 ■ Using the Color Weakness Enhancement Feature ... 55 ■ Setting the Light Effect 56 ■ Setting the HDMI Black Level 56 ■ Setting the Film Mode - Analog 36 ■ Automatic Volume Control 37 ■ Selecting the Internal Mute 37 CHANNEL...) - Digital 36 ■ Choosing a Multi-Channel Sound (MTS) Track - Analog 15 ■ Connecting a PC 16 OPERATION ■ Turning the TV On and Off 16 ■ Plug & Play Feature 17 ■ Changing Channels 18 ■ Adjusting the Volume 19 ■ Viewing the Display 19...
User Manual (ENGLISH)
Page 5
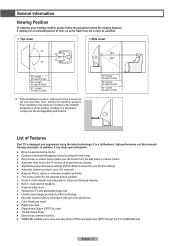
...access from the side panel or remote control ● Automatic timer to turn the TV on and off at any time you choose ● Adjustable picture and sound settings and the ability to memorize your favorite settings ● Automatic channel tuning for up to 181 channels ● A special ...-in multi-channel sound decoder for stereo and bilingual listening ● Built-in a shortened component life and degraded performance. 50˝ screen : At least 5.9 feet 56˝ screen : At least 6.6 feet 61˝ screen : At least 7.2 feet List of time, sit as possible. < Top view> < Side view> ...
...access from the side panel or remote control ● Automatic timer to turn the TV on and off at any time you choose ● Adjustable picture and sound settings and the ability to memorize your favorite settings ● Automatic channel tuning for up to 181 channels ● A special ...-in multi-channel sound decoder for stereo and bilingual listening ● Built-in a shortened component life and degraded performance. 50˝ screen : At least 5.9 feet 56˝ screen : At least 6.6 feet 61˝ screen : At least 7.2 feet List of time, sit as possible. < Top view> < Side view> ...
User Manual (ENGLISH)
Page 7
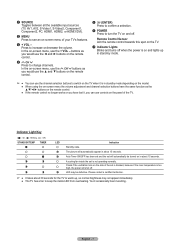
... the remote control towards this spot on in stand-by mode. ➢ ● You can use controls on the panel of the TV. In the on -screen menu of the set is on the remote control. 4 CH Press to change channels. Indicator Light Key ( : On, : Blinking, : Off) STAND BY/TEMP TIMER ...the model. ● When using the on and off when the power is not operating normally. LED may not appear immediately. ● The TV has a fan to keep the inside the set is blocked, because if the inner temperature is in about 15 seconds. 1 SOURCE Toggles between all the available input sources...
... the remote control towards this spot on in stand-by mode. ➢ ● You can use controls on the panel of the TV. In the on -screen menu of the set is on the remote control. 4 CH Press to change channels. Indicator Light Key ( : On, : Blinking, : Off) STAND BY/TEMP TIMER ...the model. ● When using the on and off when the power is not operating normally. LED may not appear immediately. ● The TV has a fan to keep the inside the set is blocked, because if the inner temperature is in about 15 seconds. 1 SOURCE Toggles between all the available input sources...
User Manual (ENGLISH)
Page 9
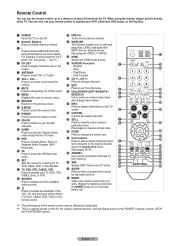
... the action during a particular scene. Remote Control You can also use your remote control to operate your VCR, Cable box, DVD player, or Set-Top Box. 1 POWER Turns the TV on the screen. 5 ANTENNA Press to select "Air" or "Cable". 6 VOL +, VOL - a WISELINK This function enables you to exit from ...choose Stereo, Mono or Separate Audio Program (SAP broadcast). % 3D Press to select the 3D/Dual-View mode. ^ SET Sets the remote to control your TV, VCR, Cable, DVD, or Set-Top Box. & TV, DVD, STB, CABLE, VCR Press to select on-screen menu items and change the screen size. f UP▲/...
... the action during a particular scene. Remote Control You can also use your remote control to operate your VCR, Cable box, DVD player, or Set-Top Box. 1 POWER Turns the TV on the screen. 5 ANTENNA Press to select "Air" or "Cable". 6 VOL +, VOL - a WISELINK This function enables you to exit from ...choose Stereo, Mono or Separate Audio Program (SAP broadcast). % 3D Press to select the 3D/Dual-View mode. ^ SET Sets the remote to control your TV, VCR, Cable, DVD, or Set-Top Box. & TV, DVD, STB, CABLE, VCR Press to select on-screen menu items and change the screen size. f UP▲/...
User Manual (ENGLISH)
Page 10
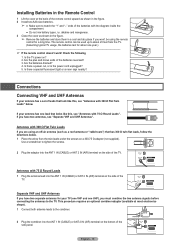
... batteries and store them in a cool and dry place if you have two antennas, see "Antennas with 75 Ω Round Leads". If your antenna has a set of leads that looks like this , see "Antennas with 300 Ω Flat Twin Leads" below . 1 Place the wires from the... and one UHF), you must combine the two antenna signals before connecting the antennas to the TV. Is there a power cut, or is the power cord unplugged? 5. Is the TV power on the side of the TV. Use a screwdriver to tighten the screws. 2 Plug the adaptor into the ANT 1 IN (CABLE) or ANT...
... batteries and store them in a cool and dry place if you have two antennas, see "Antennas with 75 Ω Round Leads". If your antenna has a set of leads that looks like this , see "Antennas with 300 Ω Flat Twin Leads" below . 1 Place the wires from the... and one UHF), you must combine the two antenna signals before connecting the antennas to the TV. Is there a power cut, or is the power cord unplugged? 5. Is the TV power on the side of the TV. Use a screwdriver to tighten the screws. 2 Plug the adaptor into the ANT 1 IN (CABLE) or ANT...

User Manual (ENGLISH)
Page 11
... A/B switch to the "B" position to view scrambled channels. (When you set the A/B switch to a Cable Box that Descrambles All Channels 1 Find the cable that Descrambles Some Channels If your TV to the cable box's output channel, which is usually channel 3 or 4.) English - 11 Incoming cable 4 Connect...another cable between an OUTPUT terminal on the splitter and the IN terminal on the side of the TV. ➢ Because this connection, set the A/B switch to "B", you have made this TV is cable-ready, you do not need to tune your cable box descrambles only some channels (such...
... A/B switch to the "B" position to view scrambled channels. (When you set the A/B switch to a Cable Box that Descrambles All Channels 1 Find the cable that Descrambles Some Channels If your TV to the cable box's output channel, which is usually channel 3 or 4.) English - 11 Incoming cable 4 Connect...another cable between an OUTPUT terminal on the splitter and the IN terminal on the side of the TV. ➢ Because this connection, set the A/B switch to "B", you have made this TV is cable-ready, you do not need to tune your cable box descrambles only some channels (such...
User Manual (ENGLISH)
Page 13
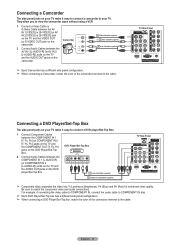
...video separates the video into Y (Luminance (brightness), PB (Blue) and PR (Red) for enhanced video quality. TV Side Panel Connecting a DVD Player/Set-Top Box The side panel jacks on your TV. Be sure to view the camcorder tapes without using a VCR 1 Connect a Video Cable or S-Video Cable ... VIDEO OUT (or S-VIDEO OUT) jack on the camcorder. Connecting a Camcorder The side panel jacks on your TV make it easy to connect a camcorder to your TV make it easy to connect a DVD player/Set-Top Box. 1 Connect Component Cables between the COMPONENT IN 1 [Y, PB, PR] (or COMPONENT IN 2...
...video separates the video into Y (Luminance (brightness), PB (Blue) and PR (Red) for enhanced video quality. TV Side Panel Connecting a DVD Player/Set-Top Box The side panel jacks on your TV. Be sure to view the camcorder tapes without using a VCR 1 Connect a Video Cable or S-Video Cable ... VIDEO OUT (or S-VIDEO OUT) jack on the camcorder. Connecting a Camcorder The side panel jacks on your TV make it easy to connect a camcorder to your TV make it easy to connect a DVD player/Set-Top Box. 1 Connect Component Cables between the COMPONENT IN 1 [Y, PB, PR] (or COMPONENT IN 2...
User Manual (ENGLISH)
Page 14
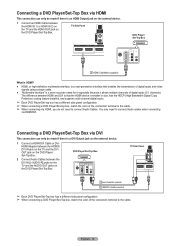
... terminal to connect Audio Cables. You only need to connect Audio cables when connecting via HDMI, you do not need to the cable. DVD Player/Set-Top Box TV Side Panel 2 Audio Cable(Not supplied) 1 HDMI/DVI Cable(Not supplied) ➢ Each DVD Player... Box. 2 Connect Audio Cables between the DVI IN [L-AUDIO-R] jacks on the TV and the AUDIO OUT jacks on the DVD Player/Set-Top Box. TV Side Panel DVD Player/ Set-Top Box 1 HDMI Cable(Not supplied) What is HDMI? ● HDMI, or high-definition multimedia interface, is a next-generation interface that the HDMI...
... terminal to connect Audio Cables. You only need to connect Audio cables when connecting via HDMI, you do not need to the cable. DVD Player/Set-Top Box TV Side Panel 2 Audio Cable(Not supplied) 1 HDMI/DVI Cable(Not supplied) ➢ Each DVD Player... Box. 2 Connect Audio Cables between the DVI IN [L-AUDIO-R] jacks on the TV and the AUDIO OUT jacks on the DVD Player/Set-Top Box. TV Side Panel DVD Player/ Set-Top Box 1 HDMI Cable(Not supplied) What is HDMI? ● HDMI, or high-definition multimedia interface, is a next-generation interface that the HDMI...
User Manual (ENGLISH)
Page 17
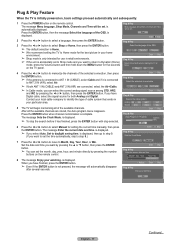
...the ◄ or ► button to memorize the channels of the OSD. ➢ The default selection is Home. ➢ We recommend setting the TV to select Manual for the best picture in Progress. After all of the OSD. is displayed. is displayed, then go to step 9. (... the current date and time. When you want to daylight saving time. Plug & Play Feature When the TV is initially powered on, basic settings proceed automatically and subsequently: 1 Press the POWER button on the TV panel. Month / Day / Year Hour / Min -- : -- -- is displayed. is complete. on...
...the ◄ or ► button to memorize the channels of the OSD. ➢ The default selection is Home. ➢ We recommend setting the TV to select Manual for the best picture in Progress. After all of the OSD. is displayed. is displayed, then go to step 9. (... the current date and time. When you want to daylight saving time. Plug & Play Feature When the TV is initially powered on, basic settings proceed automatically and subsequently: 1 Press the POWER button on the TV panel. Month / Day / Year Hour / Min -- : -- -- is displayed. is complete. on...
User Manual (ENGLISH)
Page 18
If you press the second number. For further details on the map of the United States). The TV will change channels. ➢ When you live . If clock is not automatically set the clock. 11 The message Enjoy your watching. Press the ◄ or ► button to select Setup, ...then press the ENTER button. 2 Press the ▲ or ▼ button to daylight saving time. Plug & Play Set to select Plug & Play, then press the ENTER button. Newfoundland Atlantic Eastern Central Mountain Pacific Alaska Hawaii Enter Skip Plug & Play Enjoy your local area...
If you press the second number. For further details on the map of the United States). The TV will change channels. ➢ When you live . If clock is not automatically set the clock. 11 The message Enjoy your watching. Press the ◄ or ► button to select Setup, ...then press the ENTER button. 2 Press the ▲ or ▼ button to daylight saving time. Plug & Play Set to select Plug & Play, then press the ENTER button. Newfoundland Atlantic Eastern Central Mountain Pacific Alaska Hawaii Enter Skip Plug & Play Enjoy your local area...
User Manual (ENGLISH)
Page 19
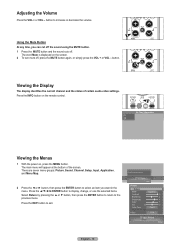
...Press the VOL + or VOL - Press the INFO button on , press the MENU button. Sets the picture options. The main menu will appear at the bottom of certain audio-video settings. Press the ENTER button to display, change, or use the selected items. Select Return by ... to return to exit. Picture Enter Picture Return Mode Dynamic Contrast 100 Brightness 45 Sharpness 75 Color 55 Tint G50 R50 Color Tone Cool1 Detailed Settings Size 16:9 Picture Enter English - 19 There are seven menu groups: Picture, Sound, Channel, Setup, Input, Application, and Menu Map. ...
...Press the VOL + or VOL - Press the INFO button on , press the MENU button. Sets the picture options. The main menu will appear at the bottom of certain audio-video settings. Press the ENTER button to display, change, or use the selected items. Select Return by ... to return to exit. Picture Enter Picture Return Mode Dynamic Contrast 100 Brightness 45 Sharpness 75 Color 55 Tint G50 R50 Color Tone Cool1 Detailed Settings Size 16:9 Picture Enter English - 19 There are seven menu groups: Picture, Sound, Channel, Setup, Input, Application, and Menu Map. ...
User Manual (ENGLISH)
Page 20
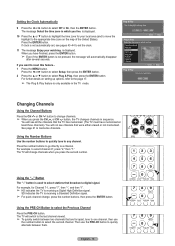
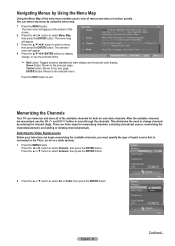
...Tune Signal Strength LNA On Channel 2 Press the ▲ or ▼ button to the previous page. Memorizing the Channels Your TV can begin memorizing the available channels, you to the next page. Selecting the Video Signal-source Before your television can memorize and ...items. Menu Map Picture Sound Channel Setup 1/2 Mode І Contrast І Brightness І Shapness І Color І Tint Color Tone І Detailed Settings І Size І Digital NR І DNIe Active Color І Color Gamut І Position І Reset Mode І SRS TruSurround XT &#...
...Tune Signal Strength LNA On Channel 2 Press the ▲ or ▼ button to the previous page. Memorizing the Channels Your TV can begin memorizing the available channels, you to the next page. Selecting the Video Signal-source Before your television can memorize and ...items. Menu Map Picture Sound Channel Setup 1/2 Mode І Contrast І Brightness І Shapness І Color І Tint Color Tone І Detailed Settings І Size І Digital NR І DNIe Active Color І Color Gamut І Position І Reset Mode І SRS TruSurround XT &#...
User Manual (ENGLISH)
Page 21
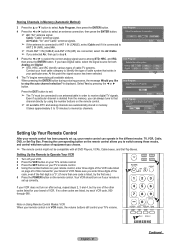
... the Remote to Operate Your VCR 1 Turn off your VCR. 2 Press the VCR button on your TV's remote control. 3 Press the SET button on your TV's remote control. 4 Using the number buttons on your remote control, enter three digits of the VCR code listed on page 23 of the other ...Remote Control Modes: VCR When your remote control is deleted from the memory, you to step 6. Note on after set up correctly. Storing Channels in VCR mode, the volume buttons still control your TV's volume. Cable: "Cable" antenna signal. If your local cable company to identify the type of equipment you selected...
... the Remote to Operate Your VCR 1 Turn off your VCR. 2 Press the VCR button on your TV's remote control. 3 Press the SET button on your TV's remote control. 4 Using the number buttons on your remote control, enter three digits of the VCR code listed on page 23 of the other ...Remote Control Modes: VCR When your remote control is deleted from the memory, you to step 6. Note on after set up correctly. Storing Channels in VCR mode, the volume buttons still control your TV's volume. Cable: "Cable" antenna signal. If your local cable company to identify the type of equipment you selected...
User Manual (ENGLISH)
Page 22
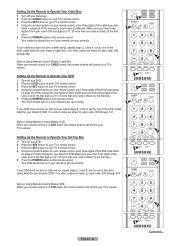
... code listed on page 24 of this manual for your remote is set up correctly. Setting Up the Remote to Operate Your DVD 1 Turn off your DVD. 2 Press the DVD button on your TV's remote control. 3 Press the SET button on your TV's remote control. 4 Using the number buttons on your remote control, enter... the Remote to Operate Your Cable Box 1 Turn off your cable box. 2 Press the CABLE button on your TV's remote control. 3 Press the SET button on your TV's remote control. 4 Using the number buttons on your remote control, enter three digits of the cable box code listed on page 24 of this...
... code listed on page 24 of this manual for your remote is set up correctly. Setting Up the Remote to Operate Your DVD 1 Turn off your DVD. 2 Press the DVD button on your TV's remote control. 3 Press the SET button on your TV's remote control. 4 Using the number buttons on your remote control, enter... the Remote to Operate Your Cable Box 1 Turn off your cable box. 2 Press the CABLE button on your TV's remote control. 3 Press the SET button on your TV's remote control. 4 Using the number buttons on your remote control, enter three digits of the cable box code listed on page 24 of this...

User Manual (ENGLISH)
Page 24
... 038 039 025 030 019 023 028 026 003 022 027 037 044 019 021 023 028 004 018 020 044 014 022 040 003 SAMSUNG SET-TOP BOX Product Ground wave STB Satellite STB CABLE STB STB DVD COMBO Satellite STB HDD COMBO Standard Code 001 002 003 004 008 009... MOTOROLA MACOM MITSUBISHI NEXT LEVEL PHILIPS PRIMESTAR PANASONIC PAYSAT PROSCAN RCA RADIOSHACK REALISTIC STS STAR TRAK SKY SKY LIFE SHACK STAR CHOICE SONY TOSHIBA ULTIMATE TV UNIDEN ZENITH Code 044 073 016 021 036 038 039 040 041 042 016 064 018 015 047 048 064 015 016 017 021 033...
... 038 039 025 030 019 023 028 026 003 022 027 037 044 019 021 023 028 004 018 020 044 014 022 040 003 SAMSUNG SET-TOP BOX Product Ground wave STB Satellite STB CABLE STB STB DVD COMBO Satellite STB HDD COMBO Standard Code 001 002 003 004 008 009... MOTOROLA MACOM MITSUBISHI NEXT LEVEL PHILIPS PRIMESTAR PANASONIC PAYSAT PROSCAN RCA RADIOSHACK REALISTIC STS STAR TRAK SKY SKY LIFE SHACK STAR CHOICE SONY TOSHIBA ULTIMATE TV UNIDEN ZENITH Code 044 073 016 021 036 038 039 040 041 042 016 064 018 015 047 048 064 015 016 017 021 033...

User Manual (ENGLISH)
Page 26
... the ▲ or ▼ button to make your input source selection easier. 1 Press the MENU button. Press the EXIT button to select TV or other external input sources such as DVD players, VCRs, etc. Edit Name Return AV1 AV2 S-Video1 S-Video2 Component1 Component2 PC HDMI1 HDMI2 English... a signal source, then press the ENTER button. ➢ You can choose between the following sets of jacks: TV, AV1, AV2, S-Video1, S-Video2, Component1, Component2, PC, HDMI1, HDMI2, or HDMI3/DVI on the TV's side panel. ➢ HDMI1, HDMI2, or HDMI3/DVI input can choose only those external devices...
... the ▲ or ▼ button to make your input source selection easier. 1 Press the MENU button. Press the EXIT button to select TV or other external input sources such as DVD players, VCRs, etc. Edit Name Return AV1 AV2 S-Video1 S-Video2 Component1 Component2 PC HDMI1 HDMI2 English... a signal source, then press the ENTER button. ➢ You can choose between the following sets of jacks: TV, AV1, AV2, S-Video1, S-Video2, Component1, Component2, PC, HDMI1, HDMI2, or HDMI3/DVI on the TV's side panel. ➢ HDMI1, HDMI2, or HDMI3/DVI input can choose only those external devices...
User Manual (ENGLISH)
Page 27
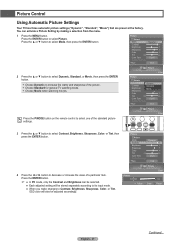
...the MENU button. You can be selected. ● Each adjusted setting will be stored separately according to its input mode. ● When you make changes to decrease or increase the value of the picture. Choose Standard for general TV watching mode. Choose Movie when watching movies. Press the...; or ► button to Contrast, Brightness, Sharpness, Color, or Tint, OSD color will also be adjusted accordingly. Picture Control Using Automatic Picture Settings Your TV has three automatic picture settings ("Dynamic", "Standard", "Movie") that are preset at the factory.
...the MENU button. You can be selected. ● Each adjusted setting will be stored separately according to its input mode. ● When you make changes to decrease or increase the value of the picture. Choose Standard for general TV watching mode. Choose Movie when watching movies. Press the...; or ► button to Contrast, Brightness, Sharpness, Color, or Tint, OSD color will also be adjusted accordingly. Picture Control Using Automatic Picture Settings Your TV has three automatic picture settings ("Dynamic", "Standard", "Movie") that are preset at the factory.


