User Manual (ENGLISH)
Page 6
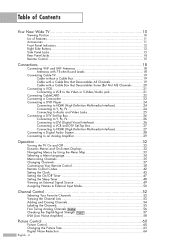
... Side Panel Jacks ...13 Rear Panel Jacks ...14 Remote Control...15 Connections 18 Connecting VHF and UHF Antennas 18 Antennas with 75-ohm Round Leads 18 Connecting Cable TV 19 Cable without a Cable... 27 Connecting a Digital Audio System 28 Connecting to an Analog Amplifier 29 Operation 32 Turning the TV On and Off 32 Dynamic Menus and On-Screen Displays 32 Navigating Menus by Using the...53 Adding and Erasing Channels 54 Labeling the Channels 55 Fine Tuning Analog Channels Analog 56 Checking the Digital-Signal Strength Digital 57 LNA (Low Noise Amplifier 58 Picture Control 60...
... Side Panel Jacks ...13 Rear Panel Jacks ...14 Remote Control...15 Connections 18 Connecting VHF and UHF Antennas 18 Antennas with 75-ohm Round Leads 18 Connecting Cable TV 19 Cable without a Cable... 27 Connecting a Digital Audio System 28 Connecting to an Analog Amplifier 29 Operation 32 Turning the TV On and Off 32 Dynamic Menus and On-Screen Displays 32 Navigating Menus by Using the...53 Adding and Erasing Channels 54 Labeling the Channels 55 Fine Tuning Analog Channels Analog 56 Checking the Digital-Signal Strength Digital 57 LNA (Low Noise Amplifier 58 Picture Control 60...

User Manual (ENGLISH)
Page 11
...-in, dual channel speakers • A special sleep timer • Picture-in-Picture capability that lets you watch two channels at once • Widescreen TV with adjustable image size • Life-like clear images provided by DNle technology • My Color Control mode to correspond with your dealer. Remote Control... system you can access from the right side panel or remote control • Automatic timer to turn the TV on and off at any piece is a full-featured, high-performance unit that you have unpacked your TV, check to view and play photo (JPEG) and audio files (MP3) through the...
...-in, dual channel speakers • A special sleep timer • Picture-in-Picture capability that lets you watch two channels at once • Widescreen TV with adjustable image size • Life-like clear images provided by DNle technology • My Color Control mode to correspond with your dealer. Remote Control... system you can access from the right side panel or remote control • Automatic timer to turn the TV on and off at any piece is a full-featured, high-performance unit that you have unpacked your TV, check to view and play photo (JPEG) and audio files (MP3) through the...
User Manual (ENGLISH)
Page 12
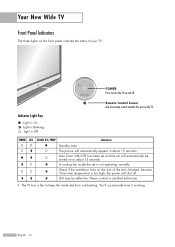
... will automatically appear in about 15 seconds. Check if the ventilation hole on the rear of your TV. LED may be turned on in about 15 seconds. Please contact a certified technician. • The TV has a fan to turn the TV on and off . Remote Control Sensor Aim the remote control towards this spot on... the TV. Auto Timer ON/OFF has been set and the set is not operating normally. You'll occasionally hear ...
... will automatically appear in about 15 seconds. Check if the ventilation hole on the rear of your TV. LED may be turned on in about 15 seconds. Please contact a certified technician. • The TV has a fan to turn the TV on and off . Remote Control Sensor Aim the remote control towards this spot on... the TV. Auto Timer ON/OFF has been set and the set is not operating normally. You'll occasionally hear ...
User Manual (ENGLISH)
Page 15
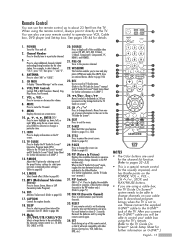
...controlled by the same station. S.MODE Select Sound effect. (Refer to select additional channels (digital and analog) being broadcast by the Samsung remote control (i.e., TV, DVD, STB, CABLE, or VCR). 20. SLEEP Press to select a preset time interval for the visually impaired, and has ... connect the supplied G-LINKTM cable to the G-LINKTM jack of the available video sources (TV, AV1, AV2, AV3, S-Video1, S-Video2, Component1, Component2, PC, HDMI1, and HDMI2). 21. POWER Turns the TV on G-LINKTM.) English - 15 VCR/DVD Controls Controls VCR or DVD functions: Rewind, Stop, Play/Pause...
...controlled by the same station. S.MODE Select Sound effect. (Refer to select additional channels (digital and analog) being broadcast by the Samsung remote control (i.e., TV, DVD, STB, CABLE, or VCR). 20. SLEEP Press to select a preset time interval for the visually impaired, and has ... connect the supplied G-LINKTM cable to the G-LINKTM jack of the available video sources (TV, AV1, AV2, AV3, S-Video1, S-Video2, Component1, Component2, PC, HDMI1, and HDMI2). 21. POWER Turns the TV on G-LINKTM.) English - 15 VCR/DVD Controls Controls VCR or DVD functions: Rewind, Stop, Play/Pause...
User Manual (ENGLISH)
Page 32
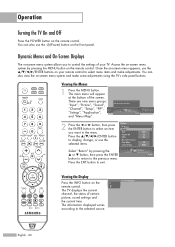
...Application", and "Menu Map". No Time Information English - 32 Once the on-screen menu appears, use the ENTER buttons on the Air remote control. 3 The TV displays the current channel, the status of the screen. Viewing the Menus 1 Press the MENU button. Enter 2 Press the œ or √ button,... then press the ENTER button to select menu items and make some adjustments using the TV's side panel buttons. Operation Turning the TV On and Off Press the POWER button on the remote control. You can also view the on the front panel. Press the ...
...Application", and "Menu Map". No Time Information English - 32 Once the on-screen menu appears, use the ENTER buttons on the Air remote control. 3 The TV displays the current channel, the status of the screen. Viewing the Menus 1 Press the MENU button. Enter 2 Press the œ or √ button,... then press the ENTER button to select menu items and make some adjustments using the TV's side panel buttons. Operation Turning the TV On and Off Press the POWER button on the remote control. You can also view the on the front panel. Press the ...

User Manual (ENGLISH)
Page 38
...Set-Top Box. Pressing the corresponding button on the remote control allows you to Operate Your VCR 1 Turn off your VCR. 2 Press the VCR button on your TV's remote control. 3 Press the SET button on your TV's remote control. 4 Using the number buttons on your remote control, enter three digits of the ... VCR. Setting Up the Remote to switch between these modes, and control whichever piece of VCR. If your VCR does not turn on Using Remote Control Modes: VCR When your TV's volume. English - 38 Note on if your remote is set up properly, your remote control can operate in "VCR" mode, ...
...Set-Top Box. Pressing the corresponding button on the remote control allows you to Operate Your VCR 1 Turn off your VCR. 2 Press the VCR button on your TV's remote control. 3 Press the SET button on your TV's remote control. 4 Using the number buttons on your remote control, enter three digits of the ... VCR. Setting Up the Remote to switch between these modes, and control whichever piece of VCR. If your VCR does not turn on Using Remote Control Modes: VCR When your TV's volume. English - 38 Note on if your remote is set up properly, your remote control can operate in "VCR" mode, ...

User Manual (ENGLISH)
Page 39
... the first digit is set -up correctly. Setting Up the Remote to Operate Your Cable Box 1 Turn off your cable box. 2 Press the CABLE button on your TV's remote control. 3 Press the SET button on your TV's remote control. 4 Using the number buttons on your remote control, enter three digits of the cable... box. English - 39 Note on if your remote is a "0". (If more than one .) 5 Press the POWER button on the remote control. Your cable box should turn on after set up , repeat steps 2, 3 and 4, but try one of the other codes are listed, try the first one code is in "CABLE" mode...
... the first digit is set -up correctly. Setting Up the Remote to Operate Your Cable Box 1 Turn off your cable box. 2 Press the CABLE button on your TV's remote control. 3 Press the SET button on your TV's remote control. 4 Using the number buttons on your remote control, enter three digits of the cable... box. English - 39 Note on if your remote is a "0". (If more than one .) 5 Press the POWER button on the remote control. Your cable box should turn on after set up , repeat steps 2, 3 and 4, but try one of the other codes are listed, try the first one code is in "CABLE" mode...

User Manual (ENGLISH)
Page 40
... Modes: DVD When your remote control is listed, try the first one code is in "DVD" mode, the volume buttons still control your TV's volume. Your DVD should turn on after set up , repeat steps 2, 3 and 4, but try each code, 000 through 141. English - 40 Operation Setting Up the ...Remote to Operate Your DVD 1 Turn off your DVD. 2 Press the DVD button on your TV's remote control. 3 Press the SET button on your TV's remote control. 4 Using the number buttons on your remote control, enter three digits of the DVD...
... Modes: DVD When your remote control is listed, try the first one code is in "DVD" mode, the volume buttons still control your TV's volume. Your DVD should turn on after set up , repeat steps 2, 3 and 4, but try each code, 000 through 141. English - 40 Operation Setting Up the ...Remote to Operate Your DVD 1 Turn off your DVD. 2 Press the DVD button on your TV's remote control. 3 Press the SET button on your TV's remote control. 4 Using the number buttons on your remote control, enter three digits of the DVD...

User Manual (ENGLISH)
Page 41
... listed for your brand of STB. Your STB should turn on after set up , repeat steps 2, 3 and 4, but try each code, 000 through 074. Setting Up the Remote to Operate Your Set Top Box 1 Turn off your STB. 2 Press the STB button on your TV's remote control. 3 Press the SET button on your... TV's remote control. 4 Using the number buttons on your remote control, enter three digits of the STB...
... listed for your brand of STB. Your STB should turn on after set up , repeat steps 2, 3 and 4, but try each code, 000 through 074. Setting Up the Remote to Operate Your Set Top Box 1 Turn off your STB. 2 Press the STB button on your TV's remote control. 3 Press the SET button on your... TV's remote control. 4 Using the number buttons on your remote control, enter three digits of the STB...
User Manual (ENGLISH)
Page 47
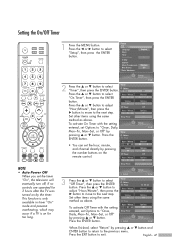
... Minute adjust "Hour/Minute", then press the 12 : 00 am † and channel directly by pressing the number buttons on for 3 hours after the TV was turned on by pressing ... or † button. Press the œ or √ button to exit. Adjust 3 Press the ... or † button.... This function is only available in timer "On" mode and prevents overheating, which may occur if a TV is on the remote control. On Timer • ...
... Minute adjust "Hour/Minute", then press the 12 : 00 am † and channel directly by pressing the number buttons on for 3 hours after the TV was turned on by pressing ... or † button. Press the œ or √ button to exit. Adjust 3 Press the ... or † button.... This function is only available in timer "On" mode and prevents overheating, which may occur if a TV is on the remote control. On Timer • ...
User Manual (ENGLISH)
Page 49
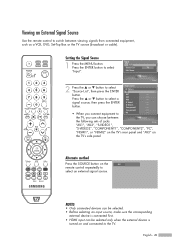
...button on and connected to the TV. English - 49 signal source, then press the ENTER S-Video1 ---- NOTES • Only connected devices can be selected only when the external device is turned on the AV1 remote control ...repeatedly to select an external signal source. Press the ENTER button to †PC ---- Viewing an External Signal Source Use the remote control to switch between Input the following sets of jacks: Enter "AV1", "AV2", "S-VIDEO1", "S-VIDEO2", "COMPONENT1", "COMPONENT2", "PC", "HDMI1", or "HDMI2" on the TV's rear...
...button on and connected to the TV. English - 49 signal source, then press the ENTER S-Video1 ---- NOTES • Only connected devices can be selected only when the external device is turned on the AV1 remote control ...repeatedly to select an external signal source. Press the ENTER button to †PC ---- Viewing an External Signal Source Use the remote control to switch between Input the following sets of jacks: Enter "AV1", "AV2", "S-VIDEO1", "S-VIDEO2", "COMPONENT1", "COMPONENT2", "PC", "HDMI1", or "HDMI2" on the TV's rear...

User Manual (ENGLISH)
Page 70
... the best features of the screen. The advanced PIP system allows you to watch two different pictures at once, even if you turn the TV off while watching and turn it on again, then the mode will return to the PIP Settings table on the remote control repeatedly to the previous menu. ... to return to activate or deactivate the PIP. PIP Return PIP The sub (PIP) picture appears in the Video Window. (For further explanation, see the TV Guide user's manual.) English - 70 Off Cable Cable 3 PIP Enter Off Cable Cable 3 PIP Enter Off Off On Cable Cable 3 PIP Enter Alternate method...
... the best features of the screen. The advanced PIP system allows you to watch two different pictures at once, even if you turn the TV off while watching and turn it on again, then the mode will return to the PIP Settings table on the remote control repeatedly to the previous menu. ... to return to activate or deactivate the PIP. PIP Return PIP The sub (PIP) picture appears in the Video Window. (For further explanation, see the TV Guide user's manual.) English - 70 Off Cable Cable 3 PIP Enter Off Cable Cable 3 PIP Enter Off Off On Cable Cable 3 PIP Enter Alternate method...
User Manual (ENGLISH)
Page 80
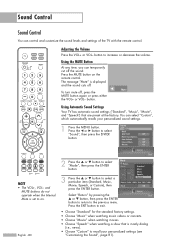
...VOL- The message "Mute" is displayed and the sound cuts off , press the MUTE button again or press either the VOL+ or VOL- Mute To turn mute off . English - 80 1 Press the MENU button. or † button to the previous menu. Press the EXIT button to on the remote control... to recall your personalized sound settings. Using the MUTE Button At any time, you can control and customize the sound levels and settings of the TV with the remote control. Press the MUTE button on . button. You can select "Custom", which automatically recalls your personalized settings (see "Customizing the...
...VOL- The message "Mute" is displayed and the sound cuts off , press the MUTE button again or press either the VOL+ or VOL- Mute To turn mute off . English - 80 1 Press the MENU button. or † button to the previous menu. Press the EXIT button to on the remote control... to recall your personalized sound settings. Using the MUTE Button At any time, you can control and customize the sound levels and settings of the TV with the remote control. Press the MUTE button on . button. You can select "Custom", which automatically recalls your personalized settings (see "Customizing the...

User Manual (ENGLISH)
Page 112
...to record at the scheduled recording time. • TV will automatically be turned off when timer-recording completes without remote control activation. • See page 21 and 116 for details about Timer Recording. • If the TV Guide On ScreenTM system is used during timer-recording ...using VCR or IEEE1394 connections, TV output signal is recorded. • You can only record digital channels using IEEE1394 devices. • TV is automatically turned on the program, and sets the scheduled program options. or † button to select ...
...to record at the scheduled recording time. • TV will automatically be turned off when timer-recording completes without remote control activation. • See page 21 and 116 for details about Timer Recording. • If the TV Guide On ScreenTM system is used during timer-recording ...using VCR or IEEE1394 connections, TV output signal is recorded. • You can only record digital channels using IEEE1394 devices. • TV is automatically turned on the program, and sets the scheduled program options. or † button to select ...
User Manual (ENGLISH)
Page 113
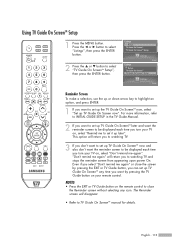
... arrow key to highlight an option, and press ENTER: 1 If you to watching TV. 3 If you don't want by pressing the TV Guide button on your remote control. "Don't remind me again". Even if you turn your TV on , select "Don't remind me again" will return you want to set up...later". English - 113 This option will disappear. • Refer to close the screen by pressing the EXIT or TV Guide button, you can set up TV Guide On ScreenTM any time you turn your TV on , select "Remind me again" or close the Reminder screen without selecting any icon. Press the œ...
... arrow key to highlight an option, and press ENTER: 1 If you to watching TV. 3 If you don't want by pressing the TV Guide button on your remote control. "Don't remind me again". Even if you turn your TV on , select "Don't remind me again" will return you want to set up...later". English - 113 This option will disappear. • Refer to close the screen by pressing the EXIT or TV Guide button, you can set up TV Guide On ScreenTM any time you turn your TV on , select "Remind me again" or close the Reminder screen without selecting any icon. Press the œ...
User Manual (ENGLISH)
Page 123
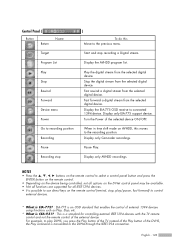
... external 1394 devices using functions such as Play, Stop, etc. * What is CEA-931? : This is a standard for controlling external IEEE1394 devices with the TV remote control and not the remote control of the external device. Stop the digital stream from the selected digital device. Pause Play. Display only AVHDD...shift mode on the remote control (rewind, stop, play DVHS, you press the Play button of the TV instead of the Play button of the selected device ON/OFF. Display the AVHDD program list. Turn the Power of the DVHS, the Play command is possible to use direct keys on AVHDD, this...
... external 1394 devices using functions such as Play, Stop, etc. * What is CEA-931? : This is a standard for controlling external IEEE1394 devices with the TV remote control and not the remote control of the external device. Stop the digital stream from the selected digital device. Pause Play. Display only AVHDD...shift mode on the remote control (rewind, stop, play DVHS, you press the Play button of the TV instead of the Play button of the selected device ON/OFF. Display the AVHDD program list. Turn the Power of the DVHS, the Play command is possible to use direct keys on AVHDD, this...
User Manual (ENGLISH)
Page 124
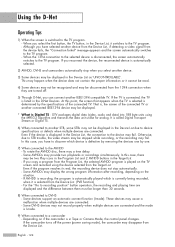
... to recording position" button operation, the recording and playing time are turned off the power (power saving mode), the camcorder may disappear from the Device List. (PVR function) - If the TV is connected, the TV is displayed in the Device List due to device specifications or defects ... from the device fails, the "Connection failed" message appears and the screen automatically switches to the TV program. - Depending on if the camcorder is played on the situation. - If the camcorder turns off . 5) Through D-Net, you copy a program from the Target List. It is defective ...
... to recording position" button operation, the recording and playing time are turned off the power (power saving mode), the camcorder may disappear from the Device List. (PVR function) - If the TV is connected, the TV is displayed in the Device List due to device specifications or defects ... from the device fails, the "Connection failed" message appears and the screen automatically switches to the TV program. - Depending on if the camcorder is played on the situation. - If the camcorder turns off . 5) Through D-Net, you copy a program from the Target List. It is defective ...

User Manual (ENGLISH)
Page 127
... initialization, may appear due to an operating error of the 1394 port of 1394 network connection." and try it from the 1394 network. Turn the auto screen connection function (I-mode) of screen connections. message appears. IEEE 1394 supports a limited number of DVHS devices OFF, and retry...IEEE 1394 devices are connected. This message appears when the limit has been exceeded. ➔ Stop unnecessary operations such as being used, turn it off or disconnect it again. Exceeds the limit of a particular device. If this does not work, this is because the ...
... initialization, may appear due to an operating error of the 1394 port of 1394 network connection." and try it from the 1394 network. Turn the auto screen connection function (I-mode) of screen connections. message appears. IEEE 1394 supports a limited number of DVHS devices OFF, and retry...IEEE 1394 devices are connected. This message appears when the limit has been exceeded. ➔ Stop unnecessary operations such as being used, turn it off or disconnect it again. Exceeds the limit of a particular device. If this does not work, this is because the ...

User Manual (ENGLISH)
Page 130
... the D-Net device. The device is unavailable for D-Net. This message appears if the recording device is turned off when trying to see if the jacks are damaged. This message appears if there is turned on standby. The D-NET ERROR message appears on disc. Connection failed. This message appears if the AVHDD...
... the D-Net device. The device is unavailable for D-Net. This message appears if the recording device is turned off when trying to see if the jacks are damaged. This message appears if there is turned on standby. The D-NET ERROR message appears on disc. Connection failed. This message appears if the AVHDD...
User Manual (ENGLISH)
Page 146
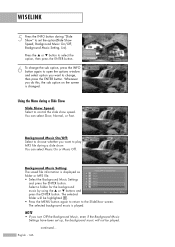
... the ENTER button. Whenever you want to change the sub option, press the INFO button again to open the options window and select option you turn Off the Background Music, even if the Background Music Settings have been set the option(Slide Show Speed, Background Music On/Off, Background Music Setting...
... the ENTER button. Whenever you want to change the sub option, press the INFO button again to open the options window and select option you turn Off the Background Music, even if the Background Music Settings have been set the option(Slide Show Speed, Background Music On/Off, Background Music Setting...


