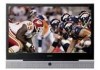
Owner Instructions
Page 2
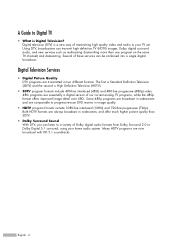
... in image quality. • HDTV program formats include 1080-line interlaced (1080i) and 720-line progressive (720p). Both HDTV formats are transmitted in widescreen, and offer much higher picture quality than one program on the same TV channel) and datacasting. Digital Television Services • Digital Picture Quality DTV programs are always broadcast in two different formats. English - 2 Digital television (DTV) is Digital Television? Using DTV, broadcasters can transmit high definition TV (HDTV) images, Dolby digital surround audio...
... in image quality. • HDTV program formats include 1080-line interlaced (1080i) and 720-line progressive (720p). Both HDTV formats are transmitted in widescreen, and offer much higher picture quality than one program on the same TV channel) and datacasting. Digital Television Services • Digital Picture Quality DTV programs are always broadcast in two different formats. English - 2 Digital television (DTV) is Digital Television? Using DTV, broadcasters can transmit high definition TV (HDTV) images, Dolby digital surround audio...
Owner Instructions
Page 3
... at the receiver, the digital video and audio data is a big advantage for reception of rental units (apartments, etc.) are running full power or not and how close your present antenna may work fine. Can I connect an antenna in height. Over-the-air (OTA) digital TV broadcasting uses the same channels as those antennas are not located in some markets, both VHF and UHF channels are no noise, ghosting...
... at the receiver, the digital video and audio data is a big advantage for reception of rental units (apartments, etc.) are running full power or not and how close your present antenna may work fine. Can I connect an antenna in height. Over-the-air (OTA) digital TV broadcasting uses the same channels as those antennas are not located in some markets, both VHF and UHF channels are no noise, ghosting...
Owner Instructions
Page 4
...-Screen Displays 29 Selecting a Menu Language 30 Memorizing the Channels 31 Changing Channels 33 Customizing Your Remote Control 34 Remote Control Codes 38 Setting the Clock...41 Setting the On/Off Timer 43 Setting the Sleep Timer 44 Viewing an External Signal Source 45 Assigning Names to External Input Mode 46 Channel Control 48 Selecting Your Favorite Channels 48 Viewing the Channel Lists 50 Editing the Channel Lists 51 Default List mode 53 Labeling the Channels 54 Fine Tuning Analog Channels Analog 55 Checking the Digital-Signal Strength Digital...
...-Screen Displays 29 Selecting a Menu Language 30 Memorizing the Channels 31 Changing Channels 33 Customizing Your Remote Control 34 Remote Control Codes 38 Setting the Clock...41 Setting the On/Off Timer 43 Setting the Sleep Timer 44 Viewing an External Signal Source 45 Assigning Names to External Input Mode 46 Channel Control 48 Selecting Your Favorite Channels 48 Viewing the Channel Lists 50 Editing the Channel Lists 51 Default List mode 53 Labeling the Channels 54 Fine Tuning Analog Channels Analog 55 Checking the Digital-Signal Strength Digital...
Owner Instructions
Page 5
... Picture 70 Setting the Blue Screen Mode 71 Sound Control 74 Sound Control ...74 Auto Volume...76 Choosing a Multi-Channel Sound (MTS) track Digital 77 Choosing a Multi-Channel Sound (MTS) track Analog 78 Selecting the Internal Mute 79 Setting the On/Off Melody 80 Setting up DNSe (Digital Natural Sound engine 81 Sound Reset ...82 Special Features 84 Setting the Function Help 84 Menu Transparency Level 85 Using Game Mode 86 Using the V-Chip...87 Using the V-Chip for Digital channels 97 Viewing Closed Captions (On-Screen...
... Picture 70 Setting the Blue Screen Mode 71 Sound Control 74 Sound Control ...74 Auto Volume...76 Choosing a Multi-Channel Sound (MTS) track Digital 77 Choosing a Multi-Channel Sound (MTS) track Analog 78 Selecting the Internal Mute 79 Setting the On/Off Melody 80 Setting up DNSe (Digital Natural Sound engine 81 Sound Reset ...82 Special Features 84 Setting the Function Help 84 Menu Transparency Level 85 Using Game Mode 86 Using the V-Chip...87 Using the V-Chip for Digital channels 97 Viewing Closed Captions (On-Screen...
Owner Instructions
Page 9
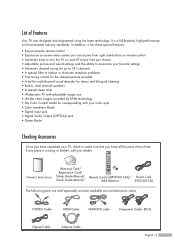
..., dual channel speakers • A special sleep timer • Widescreen TV with adjustable image size • Life-like clear images provided by DNle technology • My Color Control Mode for corresponding with your color style • Color weakness Mode • Digital Input jack • Digital Audio Output (OPTICAL) jack • Game Mode Checking Accessories Once you have unpacked your dealer. Owner's Instructions Warranty Card/ Registration Card/ Safety Guide Manual/ Quick Guide Manual/ Remote Control (BP59-00116A)/ Power Cord AAA Batteries 3903-000144 The following parts are...
..., dual channel speakers • A special sleep timer • Widescreen TV with adjustable image size • Life-like clear images provided by DNle technology • My Color Control Mode for corresponding with your color style • Color weakness Mode • Digital Input jack • Digital Audio Output (OPTICAL) jack • Game Mode Checking Accessories Once you have unpacked your dealer. Owner's Instructions Warranty Card/ Registration Card/ Safety Guide Manual/ Quick Guide Manual/ Remote Control (BP59-00116A)/ Power Cord AAA Batteries 3903-000144 The following parts are...
Owner Instructions
Page 11
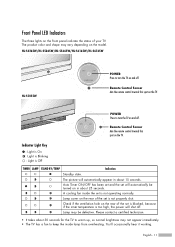
... TV. English - 11 Remote Control Sensor Aim the remote control towards this spot on the rear of your TV. Indicator Light Key : Light is On : Light is Blinking : Light is not operating normally. Auto Timer ON/OFF has been set and the set is Off TIMER LAMP STAND BY/TEMP Indication Standby state. A cooling fan inside lamp from overheating. Please contact a certified technician. • It takes about 25 seconds. HL-S4265W/HL-S5065W/HL-S5665W/HL-S6165W/HL-S6765W HL-S5055W POWER Press to turn...
... TV. English - 11 Remote Control Sensor Aim the remote control towards this spot on the rear of your TV. Indicator Light Key : Light is On : Light is Blinking : Light is not operating normally. Auto Timer ON/OFF has been set and the set is Off TIMER LAMP STAND BY/TEMP Indication Standby state. A cooling fan inside lamp from overheating. Please contact a certified technician. • It takes about 25 seconds. HL-S4265W/HL-S5065W/HL-S5665W/HL-S6165W/HL-S6765W HL-S5055W POWER Press to turn...
Owner Instructions
Page 12
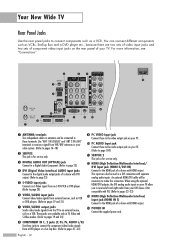
... the digital audio output jacks of a device with DVI output. (Refer to page 23) ˆ S-VIDEO input jacks Connects an S-Video signal from an S-VHS VCR or DVD player. (Refer to page 20) Ø VIDEO/AUDIO input jacks Connect video/audio signals from external sources, such as a VCR. This input can be connected to these to connect components such as a DVI connection with HDMI output. Ú POWER IN Connect the supplied power cord. For more information, see "Connections". Œ ANTENNA terminals Two independent cables or antennas...
... the digital audio output jacks of a device with DVI output. (Refer to page 23) ˆ S-VIDEO input jacks Connects an S-Video signal from an S-VHS VCR or DVD player. (Refer to page 20) Ø VIDEO/AUDIO input jacks Connect video/audio signals from external sources, such as a VCR. This input can be connected to these to connect components such as a DVI connection with HDMI output. Ú POWER IN Connect the supplied power cord. For more information, see "Connections". Œ ANTENNA terminals Two independent cables or antennas...
Owner Instructions
Page 13
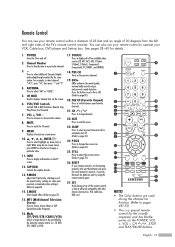
... • The Color buttons are used during set it will work compatibly with other devices (Set-top box, VCR, Cable box, DVD, etc.) 15. ANTENNA Press to exit the menu. 23. CAPTION Controls the caption decoder. 13. CH / Press to choose Stereo, Mono or SAP (Secondary Audio Program). 16. MTS (Multichannel Television Stereo) Press to change channels. 22. English - 13 Channel Number Press to directly tune to the previous channel. 19. MENU Displays the main...
... • The Color buttons are used during set it will work compatibly with other devices (Set-top box, VCR, Cable box, DVD, etc.) 15. ANTENNA Press to exit the menu. 23. CAPTION Controls the caption decoder. 13. CH / Press to choose Stereo, Mono or SAP (Secondary Audio Program). 16. MTS (Multichannel Television Stereo) Press to change channels. 22. English - 13 Channel Number Press to directly tune to the previous channel. 19. MENU Displays the main...
Owner Instructions
Page 21
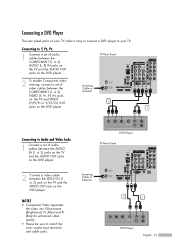
... the color coded input terminals and cable jacks. Connecting a DVD Player The rear panel jacks on your TV. NOTES • Component Video separates the video into Y(Luminance (Brightness)), PB (Blue) and PR (Red) for enhanced video quality. • Please be sure to Audio and Video Jacks 1 Connect a set of audio cables between the AUDIO IN (1 or 2) jacks on the TV and the AUDIO OUT jacks on the DVD player. Incoming Cable or Antenna 2 1 DVD Player English - 21 TV Rear Panel 2 To enable Component video viewing, connect a set of video cables...
... the color coded input terminals and cable jacks. Connecting a DVD Player The rear panel jacks on your TV. NOTES • Component Video separates the video into Y(Luminance (Brightness)), PB (Blue) and PR (Red) for enhanced video quality. • Please be sure to Audio and Video Jacks 1 Connect a set of audio cables between the AUDIO IN (1 or 2) jacks on the TV and the AUDIO OUT jacks on the DVD player. Incoming Cable or Antenna 2 1 DVD Player English - 21 TV Rear Panel 2 To enable Component video viewing, connect a set of video cables...
Owner Instructions
Page 23
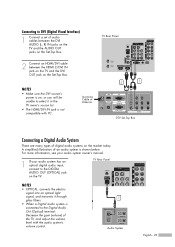
... the audio system's volume control. 1 Audio System English - 23 TV Rear Panel NOTES • OPTICAL: converts the electric signal into an optical light signal, and transmits it in the TV menu's source list. • The HDMI/DVI IN jack is connected to the Digital Audio Out (Optical) terminal: Decrease the gain (volume) of the TV, and adjust the volume level with PC. A simplified illustration of digital audio systems on the market today. Connecting to DVI (Digital Visual Interface) 1 Connect a set of audio cables between the HDMI 2/DVI...
... the audio system's volume control. 1 Audio System English - 23 TV Rear Panel NOTES • OPTICAL: converts the electric signal into an optical light signal, and transmits it in the TV menu's source list. • The HDMI/DVI IN jack is connected to the Digital Audio Out (Optical) terminal: Decrease the gain (volume) of the TV, and adjust the volume level with PC. A simplified illustration of digital audio systems on the market today. Connecting to DVI (Digital Visual Interface) 1 Connect a set of audio cables between the HDMI 2/DVI...
Owner Instructions
Page 24
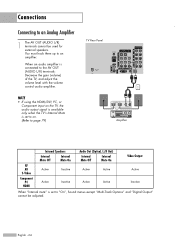
... an audio amplifier is set to on the TV, the audio output signal is available only when the TV's Internal Mute is set to the AV OUT (AUDIO L/R) terminals: Decrease the gain (volume) of the TV, and adjust the volume level with the volume control audio amplifier. NOTE • If using the HDMI/DVI, PC, or Component input on . (Refer to page 79) TV Rear Panel 1 Amplifier RF AV S-Video Component PC HDMI Internal Speakers Internal...
... an audio amplifier is set to on the TV, the audio output signal is available only when the TV's Internal Mute is set to the AV OUT (AUDIO L/R) terminals: Decrease the gain (volume) of the TV, and adjust the volume level with the volume control audio amplifier. NOTE • If using the HDMI/DVI, PC, or Component input on . (Refer to page 79) TV Rear Panel 1 Amplifier RF AV S-Video Component PC HDMI Internal Speakers Internal...

Owner Instructions
Page 26
... the "Air + Cable". i Menu language, Channels and Time will be set ." NOTE • The Plug & Play function operates after several seconds, even if the ENTER button is displayed. Operation Turning the TV On and Off Press the POWER button on the front panel. menu is automatically displayed. • The message to check the connected status of the antenna is connected to memorize the channels of the OSD. Air Cable Air+Cable Start Start...
... the "Air + Cable". i Menu language, Channels and Time will be set ." NOTE • The Plug & Play function operates after several seconds, even if the ENTER button is displayed. Operation Turning the TV On and Off Press the POWER button on the front panel. menu is automatically displayed. • The message to check the connected status of the antenna is connected to memorize the channels of the OSD. Air Cable Air+Cable Start Start...

Owner Instructions
Page 29
.... Use the ENTER button to control the settings of certain picture, sound settings and the current time. You can also view the on-screen menu system and make adjustments. There are five menu groups: "Input", "Picture", "Sound", "Channel", and "Setup". 2 Press the ... Press the œ, √ or ENTER button to select menu items and make some adjustments using the TV's side panel buttons. The TV displays the current channel, the status of your remote control to display, change, or use the ENTER buttons on -screen menu...
.... Use the ENTER button to control the settings of certain picture, sound settings and the current time. You can also view the on-screen menu system and make adjustments. There are five menu groups: "Input", "Picture", "Sound", "Channel", and "Setup". 2 Press the ... Press the œ, √ or ENTER button to select menu items and make some adjustments using the TV's side panel buttons. The TV displays the current channel, the status of your remote control to display, change, or use the ENTER buttons on -screen menu...
Owner Instructions
Page 43
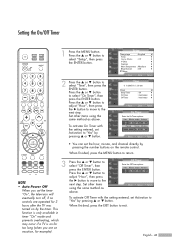
...; Time √ Game Mode : Off √ V-Chip √ Caption √ Menu Transparency : Medium √ Blue Screen : Off √ † More Move Enter Return Time 1/ 1/2005/ 12 : 00 am Air ▼ Channel Volume Activation 3 10 No Move Adjust Return • You can set the timer "On", the television will eventually turn off, if no controls are on for too long (when you are operated for example). Set other items using...
...; Time √ Game Mode : Off √ V-Chip √ Caption √ Menu Transparency : Medium √ Blue Screen : Off √ † More Move Enter Return Time 1/ 1/2005/ 12 : 00 am Air ▼ Channel Volume Activation 3 10 No Move Adjust Return • You can set the timer "On", the television will eventually turn off, if no controls are on for too long (when you are operated for example). Set other items using...

Owner Instructions
Page 66
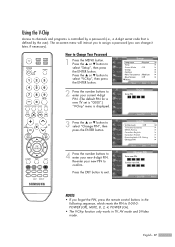
... of the screen. NOTES • Changing the settings in the "Detail Control" menu (see next page) will display the My Color Control menu. or † button to select "My Color Control", then press the ENTER button. Move Enter Return Picture Mode : Dynamic √ Size : 16:9 √ Digital NR : On √ DNIe : On √ My Color Control √ Film Mode : Off √ 3 Press the ENTER button to exit. The original picture (before adjustment) is...
... of the screen. NOTES • Changing the settings in the "Detail Control" menu (see next page) will display the My Color Control menu. or † button to select "My Color Control", then press the ENTER button. Move Enter Return Picture Mode : Dynamic √ Size : 16:9 √ Digital NR : On √ DNIe : On √ My Color Control √ Film Mode : Off √ 3 Press the ENTER button to exit. The original picture (before adjustment) is...

Owner Instructions
Page 86
... console and connect another external device, set Game to Off in the setup menu. • If you display the TV menu in the Sound menu is deactivated. Setup Language : English √ Time √ Game Mode : Off √ V-Chip √ Caption √ Menu Transparency : Medium √ Blue Screen : Off √ † More Move Enter Return Setup Language : English √ Time √ Game Mode : Off √ V-Chip √ Caption √ Menu Transparency : Medium √ Blue Screen : Off √...
... console and connect another external device, set Game to Off in the setup menu. • If you display the TV menu in the Sound menu is deactivated. Setup Language : English √ Time √ Game Mode : Off √ V-Chip √ Caption √ Menu Transparency : Medium √ Blue Screen : Off √ † More Move Enter Return Setup Language : English √ Time √ Game Mode : Off √ V-Chip √ Caption √ Menu Transparency : Medium √ Blue Screen : Off √...
Owner Instructions
Page 87
... button to select "Setup", then press the ENTER button. Press the ... Press the ... Using the V-Chip Access to channels and programs is controlled by the user). The on-screen menu will instruct you to assign a password (you forget the PIN, press the remote control buttons in the following sequence, which resets the PIN to 0-0-0-0: POWER (Off), MUTE, 8, 2, 4, POWER (On). • The V-Chip function only works in TV, AV mode and S-Video mode. or † button to select "Change...
... button to select "Setup", then press the ENTER button. Press the ... Press the ... Using the V-Chip Access to channels and programs is controlled by the user). The on-screen menu will instruct you to assign a password (you forget the PIN, press the remote control buttons in the following sequence, which resets the PIN to 0-0-0-0: POWER (Off), MUTE, 8, 2, 4, POWER (On). • The V-Chip function only works in TV, AV mode and S-Video mode. or † button to select "Change...

Owner Instructions
Page 108
... ENTER button. or † button to select "Setup", then press the ENTER button. 3 Press the ... Input Picture Sound Channel Setup Listings ▼ Move Enter Return Position ▲ ▼ ▼ Move Enter Return English - 108 PC Display Changing the Picture Position After connecting the TV to your PC, adjust the position of picture by pressing the button. Press the ... Move Enter Return PC Image Lock √ Position √ Auto Adjustment Image Reset Resolution : 1024x768 @75Hz 5 Adjust the...
... ENTER button. or † button to select "Setup", then press the ENTER button. 3 Press the ... Input Picture Sound Channel Setup Listings ▼ Move Enter Return Position ▲ ▼ ▼ Move Enter Return English - 108 PC Display Changing the Picture Position After connecting the TV to your PC, adjust the position of picture by pressing the button. Press the ... Move Enter Return PC Image Lock √ Position √ Auto Adjustment Image Reset Resolution : 1024x768 @75Hz 5 Adjust the...
Owner Instructions
Page 116
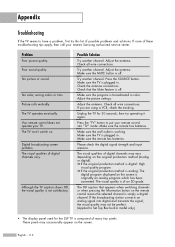
... in model only.) • The display panel used for 30 seconds, then try this list of digital channels may occasionally appear on . Digital broadcasting screen problem. Make sure the remote has batteries. If none of digital channels vary. Problem Poor picture quality. The TV won't switch on the screen. If you are using a VCR, check the tracking. Please check the digital signal strength and input antenna. Make sure the TV is off . Picture rolls vertically. Adjust the antenna. No picture or sound.
... in model only.) • The display panel used for 30 seconds, then try this list of digital channels may occasionally appear on . Digital broadcasting screen problem. Make sure the remote has batteries. If none of digital channels vary. Problem Poor picture quality. The TV won't switch on the screen. If you are using a VCR, check the tracking. Please check the digital signal strength and input antenna. Make sure the TV is off . Picture rolls vertically. Adjust the antenna. No picture or sound.
Owner Instructions
Page 117
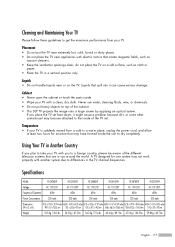
... parts inside. • Wipe your TV with another system due to dry completely. Specifications Model HL-S4265W HL-S5065W HL-S5665W HL-S6165W HL-S6765W HL-S5055W Voltage AC 110-120V AC 110-120V AC 110-120V AC 110-120V AC 110-120V AC 110-120V Frequency of the cabinet. • This DLP TV projects the image onto a large screen by applying an optical system. Cleaning and Maintaining Your TV...
... parts inside. • Wipe your TV with another system due to dry completely. Specifications Model HL-S4265W HL-S5065W HL-S5665W HL-S6165W HL-S6765W HL-S5055W Voltage AC 110-120V AC 110-120V AC 110-120V AC 110-120V AC 110-120V AC 110-120V Frequency of the cabinet. • This DLP TV projects the image onto a large screen by applying an optical system. Cleaning and Maintaining Your TV...


