
Quick Guide (easy Manual) (ver.1.0) (English)
Page 6
... S-Video/Audio jack 21 Connecting CableCARD 22 Connecting a Camcorder 23 Connecting a DVD Player 24 Connecting to Y, PB, PR 24 Connecting to Audio and Video Jacks 24 Connecting a DTV Set-Top Box 25 Connecting to Y, PB, PR 25 Connecting to DVI (Digital Visual Interface 25 Connecting to HDMI (High Definition Multimedia Interface 26 Connecting a Digital Audio System 27 Connecting to an Analog Amplifier...
... S-Video/Audio jack 21 Connecting CableCARD 22 Connecting a Camcorder 23 Connecting a DVD Player 24 Connecting to Y, PB, PR 24 Connecting to Audio and Video Jacks 24 Connecting a DTV Set-Top Box 25 Connecting to Y, PB, PR 25 Connecting to DVI (Digital Visual Interface 25 Connecting to HDMI (High Definition Multimedia Interface 26 Connecting a Digital Audio System 27 Connecting to an Analog Amplifier...
Quick Guide (easy Manual) (ver.1.0) (English)
Page 14
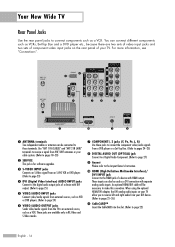
... to pages 25~26) Ô CableCARDTM Insert the CableCARD into the slot. (Refer to the HDMI jack of a device with DVI output. (Refer to page 25) ˆ VIDEO/AUDIO INPUT jacks Connect video/audio signals from external sources, such as VCR or DVD players. (Refer to page 24)...; ANTENNA terminals Two independent cables or antennas can be necessary to make this connection. These inputs can connect different components such as a VCR. An optional HDMI/DVI cable will be connected to these jacks to connect the component video/audio signals from a DVD player or a Set-Top Box. (Refer to pages...
... to pages 25~26) Ô CableCARDTM Insert the CableCARD into the slot. (Refer to the HDMI jack of a device with DVI output. (Refer to page 25) ˆ VIDEO/AUDIO INPUT jacks Connect video/audio signals from external sources, such as VCR or DVD players. (Refer to page 24)...; ANTENNA terminals Two independent cables or antennas can be necessary to make this connection. These inputs can connect different components such as a VCR. An optional HDMI/DVI cable will be connected to these jacks to connect the component video/audio signals from a DVD player or a Set-Top Box. (Refer to pages...

Quick Guide (easy Manual) (ver.1.0) (English)
Page 25
DTV Set-Top Box TV Rear Panel 2 Connect an HDMI/DVI video cable between the HDMI/DVI IN jack on the TV and the DVI OUT jack on the Set... on the TV and VIDEO (Y/PB/PR or Y/CB/CR) OUT jacks on the Set-Top Box. TV Rear Panel 2 Connect a set of Component video, see your Set-Top Box owner's manual. • Requires a Cable Converter. Incoming Cable or ...Antenna DTV Set-Top Box English - 25 Incoming Cable or Antenna 1 2 Connecting to Y, PB, PR 1 Connect a set of audio cables between the DVI AUDIO (L, R) IN jacks on the TV and the AUDIO OUT jacks...
DTV Set-Top Box TV Rear Panel 2 Connect an HDMI/DVI video cable between the HDMI/DVI IN jack on the TV and the DVI OUT jack on the Set... on the TV and VIDEO (Y/PB/PR or Y/CB/CR) OUT jacks on the Set-Top Box. TV Rear Panel 2 Connect a set of Component video, see your Set-Top Box owner's manual. • Requires a Cable Converter. Incoming Cable or ...Antenna DTV Set-Top Box English - 25 Incoming Cable or Antenna 1 2 Connecting to Y, PB, PR 1 Connect a set of audio cables between the DVI AUDIO (L, R) IN jacks on the TV and the AUDIO OUT jacks...
Quick Guide (easy Manual) (ver.1.0) (English)
Page 26
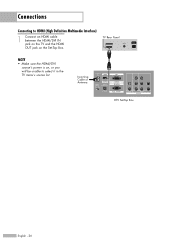
Connections Connecting to HDMI (High Definition Multimedia Interface) 1 Connect an HDMI cable between the HDMI/DVI IN jack on the TV and the HDMI OUT jack on , or you will be unable to select it in the TV menu's source list. TV Rear Panel NOTE • Make sure the HDMI/DVI source's power is on the Set-Top Box. Incoming Cable or Antenna DTV Set-Top Box English - 26
Connections Connecting to HDMI (High Definition Multimedia Interface) 1 Connect an HDMI cable between the HDMI/DVI IN jack on the TV and the HDMI OUT jack on , or you will be unable to select it in the TV menu's source list. TV Rear Panel NOTE • Make sure the HDMI/DVI source's power is on the Set-Top Box. Incoming Cable or Antenna DTV Set-Top Box English - 26
Quick Guide (easy Manual) (ver.1.0) (English)
Page 27
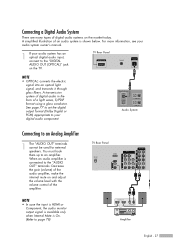
Connecting a Digital Audio System There are many types of a light wave, S/PDIF format using a glass conductor. TV Rear Panel NOTE •... the "DIGITAL AUDIO OUT (OPTICAL)" jack on the TV. A simplified illustration of the amplifier. Audio System Connecting to an amplifier. NOTE • In case the input is HDMI or Component, the audio monitor output signal is available only when Internal Mute is On. (Refer to the "...of digital audio systems on and adjust the volume level with the volume control of an audio system is connected to page 78) TV Rear Panel Amplifier English - 27
Connecting a Digital Audio System There are many types of a light wave, S/PDIF format using a glass conductor. TV Rear Panel NOTE •... the "DIGITAL AUDIO OUT (OPTICAL)" jack on the TV. A simplified illustration of the amplifier. Audio System Connecting to an amplifier. NOTE • In case the input is HDMI or Component, the audio monitor output signal is available only when Internal Mute is On. (Refer to the "...of digital audio systems on and adjust the volume level with the volume control of an audio system is connected to page 78) TV Rear Panel Amplifier English - 27

Quick Guide (easy Manual) (ver.1.0) (English)
Page 42
...Enter √ √ Return 2 Press the ENTER button to select an external signal source. Alternate method Press the SOURCE button on and connected to the TV. Press the ... Setting the Signal Source 1 Press the MENU button. English - 42 Operation Viewing an External Signal Source Use...following sets of jacks: "AV1", "AV2", "S-VIDEO1", "S-VIDEO2", "COMPONENT1", "COMPONENT2", or "HDMI/DVI" on the TV's rear panel and "AV3" or "S-VIDEO3" on the TV's side panel. • HDMI input can be selected only when the external device is turned on the AV1 remote control repeatedly...
...Enter √ √ Return 2 Press the ENTER button to select an external signal source. Alternate method Press the SOURCE button on and connected to the TV. Press the ... Setting the Signal Source 1 Press the MENU button. English - 42 Operation Viewing an External Signal Source Use...following sets of jacks: "AV1", "AV2", "S-VIDEO1", "S-VIDEO2", "COMPONENT1", "COMPONENT2", or "HDMI/DVI" on the TV's rear panel and "AV3" or "S-VIDEO3" on the TV's side panel. • HDMI input can be selected only when the external device is turned on the AV1 remote control repeatedly...

Quick Guide (easy Manual) (ver.1.0) (English)
Page 43
... Component1 ▼ More Move Enter Return 4 Press the ... or † button to select "Input". Set other signal sources (AV2, AV3, S-Video1, S-Video2, S-Video3, Component1, Component2, HDMI) using the same method as listed above. Press the ENTER button to select the external device : VCR, DVD, D-VHS, Cable STB, HD STB, Satellite STB... Name Picture Anynet Sound Channel Setup Guide Move Enter √ √ Return 2 Press the ... Assigning Names to External Input Mode This feature enables you have connected. 1 Press the MENU button.
... Component1 ▼ More Move Enter Return 4 Press the ... or † button to select "Input". Set other signal sources (AV2, AV3, S-Video1, S-Video2, S-Video3, Component1, Component2, HDMI) using the same method as listed above. Press the ENTER button to select the external device : VCR, DVD, D-VHS, Cable STB, HD STB, Satellite STB... Name Picture Anynet Sound Channel Setup Guide Move Enter √ √ Return 2 Press the ... Assigning Names to External Input Mode This feature enables you have connected. 1 Press the MENU button.
Quick Guide (easy Manual) (ver.1.0) (English)
Page 104
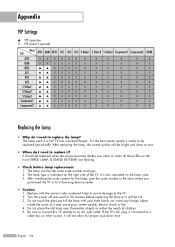
...needs to a Samsung Service center. &#... LEDs on the right side of the TV. It is connected to a cable box or other source, it ? English ... part of children. 5. Appendix PIP Settings ▲ : PIP operates X : PIP doesn't operate Sub Main ATSC QAM NTSC AV1 AV2 AV3 S-Video1 S-Video2 S-Video3 Component1 Component2 HDMI ATSC X X X XXX X X X X X X QAM X X X XXX X X X X NTSC ▲▲ X X X X X X X X X X X X AV1 ▲▲ X X X X X X X X AV2 ▲▲ X X X X X X X X AV3 ▲▲ X X X X X X X X S-Video1 ▲ ▲ X...
...needs to a Samsung Service center. &#... LEDs on the right side of the TV. It is connected to a cable box or other source, it ? English ... part of children. 5. Appendix PIP Settings ▲ : PIP operates X : PIP doesn't operate Sub Main ATSC QAM NTSC AV1 AV2 AV3 S-Video1 S-Video2 S-Video3 Component1 Component2 HDMI ATSC X X X XXX X X X X X X QAM X X X XXX X X X X NTSC ▲▲ X X X X X X X X X X X X AV1 ▲▲ X X X X X X X X AV2 ▲▲ X X X X X X X X AV3 ▲▲ X X X X X X X X S-Video1 ▲ ▲ X...


