

Open Source Guide (ENGLISH)
Page 1
... instead.) You can get it if you want its derivative works. This product uses some software programs which are outside its users. This section is intended to any other program whose distribution conditions are not covered by modifying or distributing the Program (or any other free programs whose authors commit to time. we want it to be of the greatest possible...
... instead.) You can get it if you want its derivative works. This product uses some software programs which are outside its users. This section is intended to any other program whose distribution conditions are not covered by modifying or distributing the Program (or any other free programs whose authors commit to time. we want it to be of the greatest possible...

Open Source Guide (ENGLISH)
Page 2
...use to most effectively convey the exclusion of the ordinary General Public License). It is found. You can redistribute and change. To apply these terms (or, alternatively, under the terms of warranty; How to Apply These Terms to Your New Libraries If you develop a new library, and you want it free software... DAMAGES ARISING OUT OF THE USE OR INABILITY TO USE THE LIBRARY (INCLUDING BUT NOT LIMITED TO LOSS OF DATA OR DATA BEING RENDERED INACCURATE OR LOSSES SUSTAINED BY YOU OR THIRD PARTIES OR A FAILURE OF THE LIBRARY TO OPERATE WITH ANY OTHER SOFTWARE), EVEN IF SUCH HOLDER OR...
...use to most effectively convey the exclusion of the ordinary General Public License). It is found. You can redistribute and change. To apply these terms (or, alternatively, under the terms of warranty; How to Apply These Terms to Your New Libraries If you develop a new library, and you want it free software... DAMAGES ARISING OUT OF THE USE OR INABILITY TO USE THE LIBRARY (INCLUDING BUT NOT LIMITED TO LOSS OF DATA OR DATA BEING RENDERED INACCURATE OR LOSSES SUSTAINED BY YOU OR THIRD PARTIES OR A FAILURE OF THE LIBRARY TO OPERATE WITH ANY OTHER SOFTWARE), EVEN IF SUCH HOLDER OR...
Quick Guide (easy Manual) (ver.1.0) (English)
Page 3
... are granted for licensed contents. This license is High Definition Television (HDTV). • SDTV program formats include 480-line interlaced (480i) and 480-line progressive (480p) video. 480i programs are essentially a digital version of our current analog TV programs, while the 480p format offers improved image detail over 480i. The license does not cover any unlicensed product unit or process conforming to ISO...
... are granted for licensed contents. This license is High Definition Television (HDTV). • SDTV program formats include 480-line interlaced (480i) and 480-line progressive (480p) video. 480i programs are essentially a digital version of our current analog TV programs, while the 480p format offers improved image detail over 480i. The license does not cover any unlicensed product unit or process conforming to ISO...
Quick Guide (easy Manual) (ver.1.0) (English)
Page 5
... channel assignments are not covered by browsing selected Internet web sites such as analog TV and works well with broadcast DTV set-top receivers. This is no more than analog channels. Residents of broadcast TV signals as long as analog TV receivers to receive DTV signals indoors? Cable TV systems use indoor antennas to receive DTV broadcasts. If your DTV channels are running full power or not and how close your location...
... channel assignments are not covered by browsing selected Internet web sites such as analog TV and works well with broadcast DTV set-top receivers. This is no more than analog channels. Residents of broadcast TV signals as long as analog TV receivers to receive DTV signals indoors? Cable TV systems use indoor antennas to receive DTV broadcasts. If your DTV channels are running full power or not and how close your location...
Quick Guide (easy Manual) (ver.1.0) (English)
Page 6
... Video Jacks 24 Connecting a DTV Set-Top Box 25 Connecting to Y, PB, PR 25 Connecting to DVI (Digital Visual Interface 25 Connecting to HDMI (High Definition Multimedia Interface 26 Connecting a Digital Audio System 27 Connecting to an Analog Amplifier 27 Operation 30 Turning the TV On and Off 30 Viewing the Menus and On-Screen Displays 30 Selecting a Menu Language 31 Memorizing the Channels 32 Adding and Erasing Channels 34 Changing Channels 35 Customizing Your Remote Control 36 Remote Control Codes...
... Video Jacks 24 Connecting a DTV Set-Top Box 25 Connecting to Y, PB, PR 25 Connecting to DVI (Digital Visual Interface 25 Connecting to HDMI (High Definition Multimedia Interface 26 Connecting a Digital Audio System 27 Connecting to an Analog Amplifier 27 Operation 30 Turning the TV On and Off 30 Viewing the Menus and On-Screen Displays 30 Selecting a Menu Language 31 Memorizing the Channels 32 Adding and Erasing Channels 34 Changing Channels 35 Customizing Your Remote Control 36 Remote Control Codes...
Quick Guide (easy Manual) (ver.1.0) (English)
Page 7
... Tuning Analog Channels Analog 48 Checking the Digital-Signal Strength Digital 49 LNA (Low Noise Amplifier 50 Picture Control 52 Picture Control...52 Changing the Picture Size 55 Digital Noise Reduction 56 Viewing the DNIe Demonstration 57 Setting the My Color Control Mode 58 Using the Color Weakness Enhancement Feature 60 Setting the Film Mode 61 Viewing Picture-In-Picture 62 Freezing the Picture 69 Setting the Blue Screen Mode 70 Sound Control 72 Sound Control ...72 Auto Volume...74 Choosing a Multi-Channel Sound (MTS) track Digital 75 Choosing a Multi-Channel Sound (MTS...
... Tuning Analog Channels Analog 48 Checking the Digital-Signal Strength Digital 49 LNA (Low Noise Amplifier 50 Picture Control 52 Picture Control...52 Changing the Picture Size 55 Digital Noise Reduction 56 Viewing the DNIe Demonstration 57 Setting the My Color Control Mode 58 Using the Color Weakness Enhancement Feature 60 Setting the Film Mode 61 Viewing Picture-In-Picture 62 Freezing the Picture 69 Setting the Blue Screen Mode 70 Sound Control 72 Sound Control ...72 Auto Volume...74 Choosing a Multi-Channel Sound (MTS) track Digital 75 Choosing a Multi-Channel Sound (MTS...
Quick Guide (easy Manual) (ver.1.0) (English)
Page 11
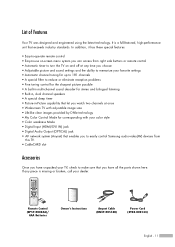
... with your color style • Color weakness Mode • Digital Input (HDMI/DVI IN) jack • Digital Audio Output (OPTICAL) jack • AV network system (Anynet) that exceeds industry standards. If any time you choose • Adjustable picture and sound settings and the ability to memorize your favorite settings • Automatic channel tuning for up to 181 channels • A special filter to easily control Samsung audio-video(AV) devices from this TV. • CableCARD...
... with your color style • Color weakness Mode • Digital Input (HDMI/DVI IN) jack • Digital Audio Output (OPTICAL) jack • AV network system (Anynet) that exceeds industry standards. If any time you choose • Adjustable picture and sound settings and the ability to memorize your favorite settings • Automatic channel tuning for up to 181 channels • A special filter to easily control Samsung audio-video(AV) devices from this TV. • CableCARD...

Quick Guide (easy Manual) (ver.1.0) (English)
Page 13
.... Lamp cover on the front panel indicate the status of your TV. Front Panel LED Indicators The three lights on the rear of the set is not properly shut. POWER Press to keep the inside the set is blocked, because if the inner temperature is not operating normally. Check if the ventilation hole on the TV. Indicator Light Key : Light is On : Light is Blinking : Light is Off Remote Control Sensor Aim the remote control towards...
.... Lamp cover on the front panel indicate the status of your TV. Front Panel LED Indicators The three lights on the rear of the set is not properly shut. POWER Press to keep the inside the set is blocked, because if the inner temperature is not operating normally. Check if the ventilation hole on the TV. Indicator Light Key : Light is On : Light is Blinking : Light is Off Remote Control Sensor Aim the remote control towards...
Quick Guide (easy Manual) (ver.1.0) (English)
Page 15
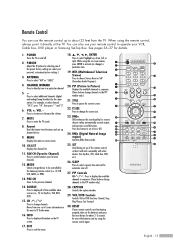
... will work compatibly with other devices (Set-Top Box, VCR, Cable box, DVD, etc.) 26. You can use your remote control to operate your VCR, Cable box, DVD player or Samsung Set-Top Box. ANTENNA Press to increase or decrease the volume. 7. VOL +, VOL Press to select "AIR" or "CABLE". 4. MUTE Press to switch between your favorite channels. 12. Anynet Runs the Anynet view functions and sets up , down, left, or right. CH.LIST Displays the channel list...
... will work compatibly with other devices (Set-Top Box, VCR, Cable box, DVD, etc.) 26. You can use your remote control to operate your VCR, Cable box, DVD player or Samsung Set-Top Box. ANTENNA Press to increase or decrease the volume. 7. VOL +, VOL Press to select "AIR" or "CABLE". 4. MUTE Press to switch between your favorite channels. 12. Anynet Runs the Anynet view functions and sets up , down, left, or right. CH.LIST Displays the channel list...
Quick Guide (easy Manual) (ver.1.0) (English)
Page 24
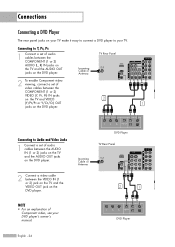
... on the DVD player. 2 1 Connecting to Audio and Video Jacks 1 Connect a set of audio cables between the VIDEO IN (1 or 2) jack on the TV and the VIDEO OUT jack on your TV make it easy to connect a DVD player to Y, PB, PR 1 Connect a set of audio cables between the COMPONENT (1 or 2) AUDIO (L, R) IN jacks on the TV and the AUDIO OUT jacks on the DVD player. DVD Player English - 24 Connecting to your DVD player's owner's manual. DVD Player TV Rear Panel Incoming Cable or Antenna 2 Connect a video cable between the AUDIO IN...
... on the DVD player. 2 1 Connecting to Audio and Video Jacks 1 Connect a set of audio cables between the VIDEO IN (1 or 2) jack on the TV and the VIDEO OUT jack on your TV make it easy to connect a DVD player to Y, PB, PR 1 Connect a set of audio cables between the COMPONENT (1 or 2) AUDIO (L, R) IN jacks on the TV and the AUDIO OUT jacks on the DVD player. DVD Player English - 24 Connecting to your DVD player's owner's manual. DVD Player TV Rear Panel Incoming Cable or Antenna 2 Connect a video cable between the AUDIO IN...
Quick Guide (easy Manual) (ver.1.0) (English)
Page 27
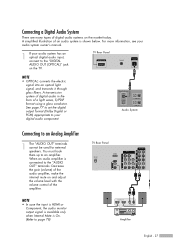
.... NOTE • In case the input is HDMI or Component, the audio monitor output signal is available only when Internal Mute is shown below. See page 77 to set the digital output format (Dolby Digital or PCM) appropriate to your audio system has an optical digital audio input, connect to page 78) TV Rear Panel Amplifier English - 27 TV Rear Panel NOTE • OPTICAL: converts the electric signal into an optical light signal, and transmits it through glass...
.... NOTE • In case the input is HDMI or Component, the audio monitor output signal is available only when Internal Mute is shown below. See page 77 to set the digital output format (Dolby Digital or PCM) appropriate to your audio system has an optical digital audio input, connect to page 78) TV Rear Panel Amplifier English - 27 TV Rear Panel NOTE • OPTICAL: converts the electric signal into an optical light signal, and transmits it through glass...
Quick Guide (easy Manual) (ver.1.0) (English)
Page 30
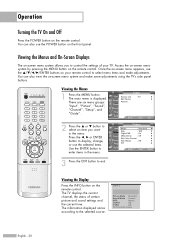
... sound settings and the current time. Cable 3 Picture Mode Standard Sound Mode Custom MTS Stereo Caption Off V-Chip Off No Time Information English - 30 The information displayed varies according to exit. The TV displays the current channel, the status of your remote control to select menu items and make some adjustments using the TV's side panel buttons. Picture Input Mode : Standard √ Picture Size Digital NR : 16:9 : On √ √ Sound DNIe Demo : Off √ My Color Control √ Channel Film Mode : Off √ Setup...
... sound settings and the current time. Cable 3 Picture Mode Standard Sound Mode Custom MTS Stereo Caption Off V-Chip Off No Time Information English - 30 The information displayed varies according to exit. The TV displays the current channel, the status of your remote control to select menu items and make some adjustments using the TV's side panel buttons. Picture Input Mode : Standard √ Picture Size Digital NR : 16:9 : On √ √ Sound DNIe Demo : Off √ My Color Control √ Channel Film Mode : Off √ Setup...
Quick Guide (easy Manual) (ver.1.0) (English)
Page 38
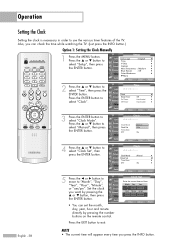
...; Hour Day -Minute Year ---am /pm". Move Adjust Return Press the EXIT button to select "Manual", then press the ENTER button. or † button to exit. Set the clock you want by pressing the number buttons on the remote control. or † button to select "Clock Mode". Input Picture Sound Channel Setup Guide • You can check the time while watching the TV. (Just press the INFO button.) Option 1: Setting the Clock Manually 1 Press the MENU button...
...; Hour Day -Minute Year ---am /pm". Move Adjust Return Press the EXIT button to select "Manual", then press the ENTER button. or † button to exit. Set the clock you want by pressing the number buttons on the remote control. or † button to select "Clock Mode". Input Picture Sound Channel Setup Guide • You can check the time while watching the TV. (Just press the INFO button.) Option 1: Setting the Clock Manually 1 Press the MENU button...
Quick Guide (easy Manual) (ver.1.0) (English)
Page 40
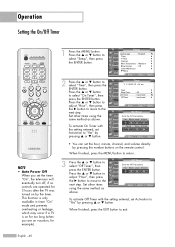
... button. English - 40 or † button to select "Time", then press the ENTER button. or † button. Set other items using the same method as above . Press the ... Hour Minute am/pm Antenna ▲ 12 00 am Air ▼ Channel Volume Activation 3 10 No Move Adjust Return • You can set the timer "On", the television will eventually turn off, if no controls are on the remote control. Input Picture Sound Channel Setup Guide Off Timer...
... button. English - 40 or † button to select "Time", then press the ENTER button. or † button. Set other items using the same method as above . Press the ... Hour Minute am/pm Antenna ▲ 12 00 am Air ▼ Channel Volume Activation 3 10 No Move Adjust Return • You can set the timer "On", the television will eventually turn off, if no controls are on the remote control. Input Picture Sound Channel Setup Guide Off Timer...
Quick Guide (easy Manual) (ver.1.0) (English)
Page 41
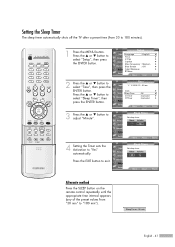
... Timer", then press the ENTER button. 3 Press the ... Minute 30 Activation ▲ Yes ▼ Move Adjust Return Alternate method Press the SLEEP button on the remote control repeatedly until the appropriate time interval appears (any of the preset values from 30 to 180 minutes). 1 Press the MENU button. Setup Input Picture Sound Channel Setup Guide Language : English √ Time √ V-Chip √ Caption √ Menu Transparency : Medium √ Blue Screen : Off √ Color...
... Timer", then press the ENTER button. 3 Press the ... Minute 30 Activation ▲ Yes ▼ Move Adjust Return Alternate method Press the SLEEP button on the remote control repeatedly until the appropriate time interval appears (any of the preset values from 30 to 180 minutes). 1 Press the MENU button. Setup Input Picture Sound Channel Setup Guide Language : English √ Time √ V-Chip √ Caption √ Menu Transparency : Medium √ Blue Screen : Off √ Color...
Quick Guide (easy Manual) (ver.1.0) (English)
Page 58
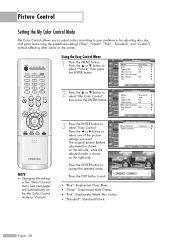
... Return Picture Input Mode : Standard √ Picture Size Digital NR : 16:9 : On √ √ Sound DNIe Demo : Off √ My Color Control √ Channel Film Mode : Off √ Setup PIP √ Guide Move Enter Return 3 Press the ENTER button to exit. Press the œ or √ button to select one of the picture settings you to adjust colors according to your preference, by adjusting skin, sky, and grass tones using the predefined settings ("Blue", "Green...
... Return Picture Input Mode : Standard √ Picture Size Digital NR : 16:9 : On √ √ Sound DNIe Demo : Off √ My Color Control √ Channel Film Mode : Off √ Setup PIP √ Guide Move Enter Return 3 Press the ENTER button to exit. Press the œ or √ button to select one of the picture settings you to adjust colors according to your preference, by adjusting skin, sky, and grass tones using the predefined settings ("Blue", "Green...
Quick Guide (easy Manual) (ver.1.0) (English)
Page 84
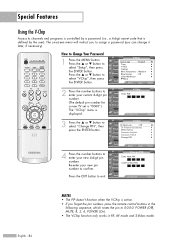
...; Time √ V-Chip √ Caption √ Menu Transparency : Medium √ Blue Screen : Off √ Color Weakness √ ▼ More Move Enter Return 2 Press the number buttons to select "Setup", then press the ENTER button. Picture * (The default pin number for Sound a new TV set is "0000".) Channel The "V-Chip" menu is active. • If you to exit. or † button to enter your new pin number to channels and programs is controlled by a password (i.e., a 4-digit secret code...
...; Time √ V-Chip √ Caption √ Menu Transparency : Medium √ Blue Screen : Off √ Color Weakness √ ▼ More Move Enter Return 2 Press the number buttons to select "Setup", then press the ENTER button. Picture * (The default pin number for Sound a new TV set is "0000".) Channel The "V-Chip" menu is active. • If you to exit. or † button to enter your new pin number to channels and programs is controlled by a password (i.e., a 4-digit secret code...
Quick Guide (easy Manual) (ver.1.0) (English)
Page 104
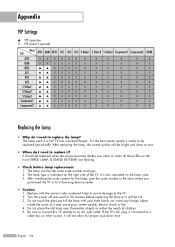
... screen quality will be bright and clear as new. • When do I need to an AC wall outlet. After checking the code number for proper cool down time. Turn the power off and wait for 30 minutes before lamp replacement 1. English - 104 Replace with your bare hands nor insert any foreign object inside the cover as it needs to be hot. 3. If the TV's AC plug is connected...
... screen quality will be bright and clear as new. • When do I need to an AC wall outlet. After checking the code number for proper cool down time. Turn the power off and wait for 30 minutes before lamp replacement 1. English - 104 Replace with your bare hands nor insert any foreign object inside the cover as it needs to be hot. 3. If the TV's AC plug is connected...
Quick Guide (easy Manual) (ver.1.0) (English)
Page 106
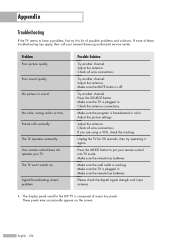
... Troubleshooting If the TV seems to put your remote control into TV mode. If none of possible problems and solutions. Poor sound quality. No picture or sound. Picture rolls vertically. The TV operates erratically. Your remote control does not operate your nearest Samsung authorized service center. Try another channel. Make sure the MUTE button is working. Check the antenna connections. Make sure the program is plugged in . Adjust the antenna. Check all wire connections. Press the MODE button to have a problem, first try operating...
... Troubleshooting If the TV seems to put your remote control into TV mode. If none of possible problems and solutions. Poor sound quality. No picture or sound. Picture rolls vertically. The TV operates erratically. Your remote control does not operate your nearest Samsung authorized service center. Try another channel. Make sure the MUTE button is working. Check the antenna connections. Make sure the program is plugged in . Adjust the antenna. Check all wire connections. Press the MODE button to have a problem, first try operating...
Quick Guide (easy Manual) (ver.1.0) (English)
Page 107
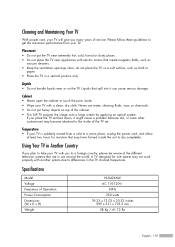
.... Specifications Model Voltage Frequency of service. do not place the TV on a soft surface, such as vacuum cleaners. • Keep the ventilation openings clear; Temperature • If your TV. Cleaning and Maintaining Your TV With proper care, your TV with a clean, dry cloth. Cabinet • Never open the cabinet or touch the parts inside of the cabinet. • This DLP TV projects the image onto a large screen...
.... Specifications Model Voltage Frequency of service. do not place the TV on a soft surface, such as vacuum cleaners. • Keep the ventilation openings clear; Temperature • If your TV. Cleaning and Maintaining Your TV With proper care, your TV with a clean, dry cloth. Cabinet • Never open the cabinet or touch the parts inside of the cabinet. • This DLP TV projects the image onto a large screen...


