
User Manual Ver.1.0 (English)
Page 6
...System Recovery 15 Section 2: Understanding Your Device .....17 Features 17 Front View 18 Top View 19 Back and Bottom Views 19 Home Screen 20 1 Navigating Your Device 23 Notifications 25 Status Details 25 Quick Settings 25 Status Bar 27 Primary Shortcuts 28 Widgets 29 App ...Shortcuts 33 Wallpapers 34 Mini App Tray 34 Apps Screen 35 Applications 36 Section 3: Entering Text 42 Samsung Keyboard 42 Text Input Methods 42 Changing the Input Method 42 Using the Samsung Keyboard 43 Using the Handwriting Feature 47 Using Speech Recognition 49
...System Recovery 15 Section 2: Understanding Your Device .....17 Features 17 Front View 18 Top View 19 Back and Bottom Views 19 Home Screen 20 1 Navigating Your Device 23 Notifications 25 Status Details 25 Quick Settings 25 Status Bar 27 Primary Shortcuts 28 Widgets 29 App ...Shortcuts 33 Wallpapers 34 Mini App Tray 34 Apps Screen 35 Applications 36 Section 3: Entering Text 42 Samsung Keyboard 42 Text Input Methods 42 Changing the Input Method 42 Using the Samsung Keyboard 43 Using the Handwriting Feature 47 Using Speech Recognition 49
User Manual Ver.1.0 (English)
Page 9
... Information 199 FCC Part 15 Information to User 201 Smart Practices While Driving 201 Battery Use and Safety 202 Samsung Mobile Products and Recycling . . . 204 UL Certified Travel Charger 204 Display / Touch-Screen 204 GPS 205 Care and Maintenance 206 Responsible Listening 207 Operating Environment 209 Restricting Children's Access to Your Mobile...
... Information 199 FCC Part 15 Information to User 201 Smart Practices While Driving 201 Battery Use and Safety 202 Samsung Mobile Products and Recycling . . . 204 UL Certified Travel Charger 204 Display / Touch-Screen 204 GPS 205 Care and Maintenance 206 Responsible Listening 207 Operating Environment 209 Restricting Children's Access to Your Mobile...
User Manual Ver.1.0 (English)
Page 10
...5 Note: Unless stated otherwise, instructions in this manual assume that you select other settings, navigation steps may need to unlock the device. All screen images in this manual are as follows: • Notes: Presents alternative options for the current feature, menu, or sub-menu. • ... generally follow the features of this manual are starting from the rest. This special text is set apart from a Home screen. To get to a Home screen, you are simulated. A robust index for activating features, define terms, and more information, refer to the default display ...
...5 Note: Unless stated otherwise, instructions in this manual assume that you select other settings, navigation steps may need to unlock the device. All screen images in this manual are as follows: • Notes: Presents alternative options for the current feature, menu, or sub-menu. • ... generally follow the features of this manual are starting from the rest. This special text is set apart from a Home screen. To get to a Home screen, you are simulated. A robust index for activating features, define terms, and more information, refer to the default display ...
User Manual Ver.1.0 (English)
Page 11
..., standard Li-Ion battery. Tip: Touch the Time field to charge the battery. Use only approved charging devices. For example: From a Home screen, touch Apps ➔ ➔ Display ➔ Screen timeout. Charging the Battery Your device comes with the device for the first time. You must fully charge the battery before using...
..., standard Li-Ion battery. Tip: Touch the Time field to charge the battery. Use only approved charging devices. For example: From a Home screen, touch Apps ➔ ➔ Display ➔ Screen timeout. Charging the Battery Your device comes with the device for the first time. You must fully charge the battery before using...

User Manual Ver.1.0 (English)
Page 12
... Charging Head into the device's Charger/ Accessory Port (3). Insert the USB cable into the Charging Head (1), making sure the connection is charging, if the touch screen does not function due to an unstable power supply, unplug the USB power adapter from the power outlet or unplug the USB cable from the...
... Charging Head into the device's Charger/ Accessory Port (3). Insert the USB cable into the Charging Head (1), making sure the connection is charging, if the touch screen does not function due to an unstable power supply, unplug the USB power adapter from the power outlet or unplug the USB cable from the...

User Manual Ver.1.0 (English)
Page 13
... operate at a higher power level than is set up a few things. Do not block the antenna; At the prompt, touch Power off ➔ OK. Some screens display depending on your device to use, such as, English (United States). 2. Wi-Fi Setup Make sure the Wi-Fi OFF / ON icon is necessary... cable from the device. doing so may affect signal quality and may cause the device to set to ON and choose one of the following screens display. Setting Up Your Device When you first turn on the options you want your device, you have an accurate list of the device. Some...
... operate at a higher power level than is set up a few things. Do not block the antenna; At the prompt, touch Power off ➔ OK. Some screens display depending on your device to use, such as, English (United States). 2. Wi-Fi Setup Make sure the Wi-Fi OFF / ON icon is necessary... cable from the device. doing so may affect signal quality and may cause the device to set to ON and choose one of the following screens display. Setting Up Your Device When you first turn on the options you want your device, you have an accurate list of the device. Some...

User Manual Ver.1.0 (English)
Page 14
...8546; Touch Not now to "Setting Up Your Gmail Account" on page 164. Enable Purchases This screen displays if you already have a Google account. Ⅲ Touch one of your existing account. ... it Google Your new device uses your Google account to "Wi-Fi" on page 60. Make it Google screen allows you to create a new Google account or sign in, if you signed in and then enter the...your Google Play account and touch Save. - Note: If you skipped Wi-Fi setup, the Wi-Fi setup screen displays and you must connect through a Wi-Fi network. Ⅲ Touch Sign in to perform this task later....
...8546; Touch Not now to "Setting Up Your Gmail Account" on page 164. Enable Purchases This screen displays if you already have a Google account. Ⅲ Touch one of your existing account. ... it Google Your new device uses your Google account to "Wi-Fi" on page 60. Make it Google screen allows you to create a new Google account or sign in, if you signed in and then enter the...your Google Play account and touch Save. - Note: If you skipped Wi-Fi setup, the Wi-Fi setup screen displays and you must connect through a Wi-Fi network. Ⅲ Touch Sign in to perform this task later....
User Manual Ver.1.0 (English)
Page 15
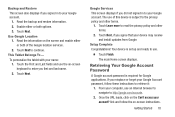
... Google. If you signed in to your Google account. Backup and Restore This screen also displays if you misplace or forget your Google Account password, follow the on the screen and enable either or both of this device is subject to http://google.com/accounts...required for Google applications. Getting Started 10 Enable either or both options. 3. Touch Learn more to continue. The main Home screen displays. Read the information on -screen instructions. Touch the First and Last fields and use . Ⅲ Touch Finish. Retrieving Your Google Account Password A Google account...
... Google. If you signed in to your Google account. Backup and Restore This screen also displays if you misplace or forget your Google Account password, follow the on the screen and enable either or both of this device is subject to http://google.com/accounts...required for Google applications. Getting Started 10 Enable either or both options. 3. Touch Learn more to continue. The main Home screen displays. Read the information on -screen instructions. Touch the First and Last fields and use . Ⅲ Touch Finish. Retrieving Your Google Account Password A Google account...

User Manual Ver.1.0 (English)
Page 16
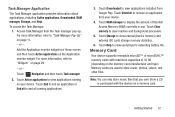
... RAM manager tab to display the amount of the Task manager pop-up : 1. Task Manager Pop-Up The Task manager pop-up displays. 2. From a Home screen, touch ➔ Task manager. Task Manager Your device can also uninstall applications from your device and see which applications are running on page 164. Touch...
... RAM manager tab to display the amount of the Task manager pop-up : 1. Task Manager Pop-Up The Task manager pop-up displays. 2. From a Home screen, touch ➔ Task manager. Task Manager Your device can also uninstall applications from your device and see which applications are running on page 164. Touch...
User Manual Ver.1.0 (English)
Page 17
... Manager Application The Task Manager application provides information about applications, including Active applications, Downloaded, RAM manager, Storage, and Help. For more information, refer to a Home screen and then touch Active applications on page 11. - Add the Application monitor widget to "Widgets" on your device. 4. For more information, refer to view applications...
... Manager Application The Task Manager application provides information about applications, including Active applications, Downloaded, RAM manager, Storage, and Help. For more information, refer to a Home screen and then touch Active applications on page 11. - Add the Application monitor widget to "Widgets" on your device. 4. For more information, refer to view applications...

User Manual Ver.1.0 (English)
Page 18
... the memory card, unmount the card before removing it clicks into the slot (1), pushing gently until it from the device. 1. Installing a Memory Card 1. From a Home screen, touch Apps ➔ Settings ➔ Storage. 2. With the gold contacts facing down, carefully slide the memory card into place (2). 3.
... the memory card, unmount the card before removing it clicks into the slot (1), pushing gently until it from the device. 1. Installing a Memory Card 1. From a Home screen, touch Apps ➔ Settings ➔ Storage. 2. With the gold contacts facing down, carefully slide the memory card into place (2). 3.

User Manual Ver.1.0 (English)
Page 19
...For other settings related to "Memory Card" on page 177. Use your model number to http://www.samsung.com/us/mobile/galaxy-tabaccessories. Securing Your Device By default, the device locks automatically when the screen times out or you can unlock the device using one of the default Unlock... screens or, for your device, see "Screen Lock" on the memory card (1), so that it manually. Go to find ...
...For other settings related to "Memory Card" on page 177. Use your model number to http://www.samsung.com/us/mobile/galaxy-tabaccessories. Securing Your Device By default, the device locks automatically when the screen times out or you can unlock the device using one of the default Unlock... screens or, for your device, see "Screen Lock" on the memory card (1), so that it manually. Go to find ...
User Manual Ver.1.0 (English)
Page 20
..., press and hold the Power/Lock Key for Google updates. Note: You can choose the type of Screen Unlock you may need to "Location Services" on page 177. Swipe across the screen as shown. The last screen you entered this menu by mistake, use the Volume Up/ Down key to use, from Pattern...
..., press and hold the Power/Lock Key for Google updates. Note: You can choose the type of Screen Unlock you may need to "Location Services" on page 177. Swipe across the screen as shown. The last screen you entered this menu by mistake, use the Volume Up/ Down key to use, from Pattern...
User Manual Ver.1.0 (English)
Page 21
... Up/Down key to scroll up or down, then press the Power/Lock key to press the Volume Up key. 4. Getting Started 16 Once the SAMSUNG logo appears, release the Power/ Lock key while continuing to make a selection. Continue to apply updates form the device cache. 6. Press the Volume Up Key... and then press the Power/Lock Key at the same time until the Android system recovery screen displays. 5. For more information, refer to "Factory Data Reset" on . Release the Volume Up key. Turn the device off. 2.
... Up/Down key to scroll up or down, then press the Power/Lock key to press the Volume Up key. 4. Getting Started 16 Once the SAMSUNG logo appears, release the Power/ Lock key while continuing to make a selection. Continue to apply updates form the device cache. 6. Press the Volume Up Key... and then press the Power/Lock Key at the same time until the Android system recovery screen displays. 5. For more information, refer to "Factory Data Reset" on . Release the Volume Up key. Turn the device off. 2.
User Manual Ver.1.0 (English)
Page 22
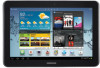
... electronic devices to navigate through the device. Features • 10.1-inch WXGA (1280x800) TFT (PLS) LCD touch screen • AndroidTM Ice Cream Sandwich • Google PlayTM Store for managing your device and describes the screen and the icons that supports GIF, AGIF, JPEG, PNG, BMP, WBMP, and WEBP formats • HD Video...
... electronic devices to navigate through the device. Features • 10.1-inch WXGA (1280x800) TFT (PLS) LCD touch screen • AndroidTM Ice Cream Sandwich • Google PlayTM Store for managing your device and describes the screen and the icons that supports GIF, AGIF, JPEG, PNG, BMP, WBMP, and WEBP formats • HD Video...
User Manual Ver.1.0 (English)
Page 23
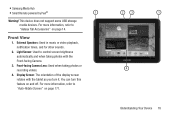
... playback, notification tones, and for other sounds. 2. You can turn it. Light Sensor: Used to "Galaxy Tab Accessories" on page 14. • Samsung Media Hub • Smart Remote powered by Peel® 1 Warning! This device does not support some USB storage media devices. Front-facing Camera Lens:... Used when taking photos with the tablet as you turn this feature on page 171. 23 1 4 Understanding Your Device 18 Display Screen: The orientation of the display screen rotates with the Front-facing Camera. 3. Front View 1. For more information, refer to "Auto-Rotate...
... playback, notification tones, and for other sounds. 2. You can turn it. Light Sensor: Used to "Galaxy Tab Accessories" on page 14. • Samsung Media Hub • Smart Remote powered by Peel® 1 Warning! This device does not support some USB storage media devices. Front-facing Camera Lens:... Used when taking photos with the tablet as you turn this feature on page 171. 23 1 4 Understanding Your Device 18 Display Screen: The orientation of the display screen rotates with the Front-facing Camera. 3. Front View 1. For more information, refer to "Auto-Rotate...

User Manual Ver.1.0 (English)
Page 24
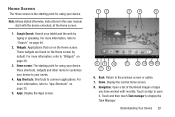
Volume Key: From a Home screen, press to turn the device on or off. Memory Card Slot: Install a memory card for voice recording or video chat. 3. Power/Lock Key: Press and ... when taking photos or recording videos. 2. Back and Bottom Views The following items can be found on page 159. 3. Infrared Blaster: Used to wake the screen for controlling external devices. For more information, refer to adjust volume. 5. Press to lock the device or to emit infrared signals used for unlocking. During...
Volume Key: From a Home screen, press to turn the device on or off. Memory Card Slot: Install a memory card for voice recording or video chat. 3. Power/Lock Key: Press and ... when taking photos or recording videos. 2. Back and Bottom Views The following items can be found on page 159. 3. Infrared Blaster: Used to wake the screen for controlling external devices. For more information, refer to adjust volume. 5. Press to lock the device or to emit infrared signals used for unlocking. During...
User Manual Ver.1.0 (English)
Page 25
... by default. For more information, refer to "Search" on page 29. 3. Home screen: The starting point for using your device. Back: Return to open it. Home: Display the central Home screen. 8. Note: Unless stated otherwise, instructions in this user manual start with recently. These... widgets are found on the Home screen. Navigation: Open a list of thumbnail images of apps you have worked ...
... by default. For more information, refer to "Search" on page 29. 3. Home screen: The starting point for using your device. Back: Return to open it. Home: Display the central Home screen. 8. Note: Unless stated otherwise, instructions in this user manual start with recently. These... widgets are found on the Home screen. Navigation: Open a list of thumbnail images of apps you have worked ...
User Manual Ver.1.0 (English)
Page 26
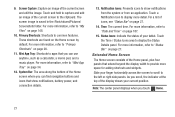
...current position. Mini App Tray: Shortcuts to provide more information, refer to "My Files" on page 148. 10. Extended Home Screen The Home screen consists of the Home screen where you touch Home. 21 Slide your tablet. Note: The center panel displays when you can use anytime, such as a...battery power, and connection details. 13. For more information, refer to "Status Bar" on page 27. 14. 9. For a list of the current screen to "Mini App Tray" on page 187. 15. For more information, refer to display more information, refer to the clipboard. Touch a Notification Icon ...
...current position. Mini App Tray: Shortcuts to provide more information, refer to "My Files" on page 148. 10. Extended Home Screen The Home screen consists of the Home screen where you touch Home. 21 Slide your tablet. Note: The center panel displays when you can use anytime, such as a...battery power, and connection details. 13. For more information, refer to "Status Bar" on page 27. 14. 9. For a list of the current screen to "Mini App Tray" on page 187. 15. For more information, refer to display more information, refer to the clipboard. Touch a Notification Icon ...

User Manual Ver.1.0 (English)
Page 27
...that you touch Home. 1. Display Settings You can customize the Home screen by removing or adding panels. or - For more information, refer to "Wallpapers" on page 171. From a Home screen, pinch the screen from the left and right side to the center to "Display" on...display on the screen until the Home screen pop-up displays. 3. Touch and hold on this screen. - Set a new wallpaper. Navigate to one of the Home screen panels. 2. You can customize display screen settings to your preferences: 1. Customizing the Home Screens To customize the Home screens to suit your...
...that you touch Home. 1. Display Settings You can customize the Home screen by removing or adding panels. or - For more information, refer to "Wallpapers" on page 171. From a Home screen, pinch the screen from the left and right side to the center to "Display" on...display on the screen until the Home screen pop-up displays. 3. Touch and hold on this screen. - Set a new wallpaper. Navigate to one of the Home screen panels. 2. You can customize display screen settings to your preferences: 1. Customizing the Home Screens To customize the Home screens to suit your...


