Owner Instructions
Page 4
... - Digital....50 ■ Viewing Closed Captions (On-Screen Text Messages) - Digital.. 35 ■ Choosing a Multi-Channel Sound (MTS) Track - Analog.. 51 ■ Menu Transparency Level 52 ■ Setting the Light Effect 52 ■ Using the Energy Saving Feature 53 ■ Preventing Screen Burn-in the Remote Control 9 CONNECTIONS ■ Connecting VHF and UHF Antennas 9 ■ Connecting Cable TV 10 ■ Connecting a VCR 11 ■ Connecting an S-VHS VCR 11 ■ Connecting a Camcorder 12 ■ Connecting a DVD Player/Cable Box/Satellite receiver (Set...
... - Digital....50 ■ Viewing Closed Captions (On-Screen Text Messages) - Digital.. 35 ■ Choosing a Multi-Channel Sound (MTS) Track - Analog.. 51 ■ Menu Transparency Level 52 ■ Setting the Light Effect 52 ■ Using the Energy Saving Feature 53 ■ Preventing Screen Burn-in the Remote Control 9 CONNECTIONS ■ Connecting VHF and UHF Antennas 9 ■ Connecting Cable TV 10 ■ Connecting a VCR 11 ■ Connecting an S-VHS VCR 11 ■ Connecting a Camcorder 12 ■ Connecting a DVD Player/Cable Box/Satellite receiver (Set...
Owner Instructions
Page 5
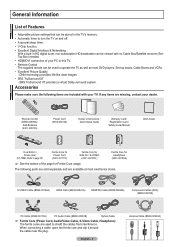
... broadcasts can be viewed with your TV. If any items are available at most DVD players, Set-top boxes, Cable Boxes and VCRs. • Excellent Picture Quality - S-VIDEO Cable (BN39-00149A) HDMI Cable (BN39-00641A) HDMI/DVI cable (BN39-00643A) Component Cables (RCA) (BN39-00279A) PC Cable (BN39-00115A) PC Audio Cable (BN39-00061B) Optical Cable ➢ Ferrite Core (Power Cord, Audio/Video Cable, S-Video Cable, Headphone) The ferrite cores are included with no Cable Box/Satellite receiver (SetTop Box) needed. • HDMI/DVI connection of the...
... broadcasts can be viewed with your TV. If any items are available at most DVD players, Set-top boxes, Cable Boxes and VCRs. • Excellent Picture Quality - S-VIDEO Cable (BN39-00149A) HDMI Cable (BN39-00641A) HDMI/DVI cable (BN39-00643A) Component Cables (RCA) (BN39-00279A) PC Cable (BN39-00115A) PC Audio Cable (BN39-00061B) Optical Cable ➢ Ferrite Core (Power Cord, Audio/Video Cable, S-Video Cable, Headphone) The ferrite cores are included with no Cable Box/Satellite receiver (SetTop Box) needed. • HDMI/DVI connection of the...

Owner Instructions
Page 7
... TV allow you to adjust the TV viewing angle using an optional HDMI/DVI adapter, the DVI analog audio inputs on the optional wall mount bracket. This will be connected continuously, such as VCR or DVD players. This input can connect a set of a device with an HDMI output. (HDMI 1 supports HDMI-DVI IN and connection from your remote control. ➢ The model FP-T6374 cannot be used only occasionally, such as a camcorder or video game. When using your DVI device. 8 ANT 1 IN(AIR)/ANT 2 IN(CABLE) Uses...
... TV allow you to adjust the TV viewing angle using an optional HDMI/DVI adapter, the DVI analog audio inputs on the optional wall mount bracket. This will be connected continuously, such as VCR or DVD players. This input can connect a set of a device with an HDMI output. (HDMI 1 supports HDMI-DVI IN and connection from your remote control. ➢ The model FP-T6374 cannot be used only occasionally, such as a camcorder or video game. When using your DVI device. 8 ANT 1 IN(AIR)/ANT 2 IN(CABLE) Uses...

Owner Instructions
Page 8
... channel. n RESET When your remote does not work, change channels. j P.SIZE Press to change channels in the PIP window only.) m MTS Press to select "AIR" or "CABLE". 6 VCR/DVD Functions - k PIP Picture-in sequence. (These buttons change the screen size. You can be affected by the same station. For example, to select channel "54-3", press "54", then press "-" and "3". 4 CH LIST Used to display Channel Lists on -screen menu. 0 S.MODE Press to operate your VCR, Cable box, DVD player, or Set-Top Box. Play...
... channel. n RESET When your remote does not work, change channels. j P.SIZE Press to change channels in the PIP window only.) m MTS Press to select "AIR" or "CABLE". 6 VCR/DVD Functions - k PIP Picture-in sequence. (These buttons change the screen size. You can be affected by the same station. For example, to select channel "54-3", press "54", then press "-" and "3". 4 CH LIST Used to display Channel Lists on -screen menu. 0 S.MODE Press to operate your VCR, Cable box, DVD player, or Set-Top Box. Play...
Owner Instructions
Page 13
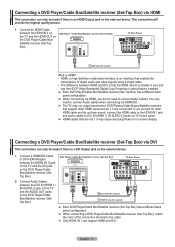
... DVI This connection can support HDMI and DVI. DVD Player / Cable Box/Satellite receiver (Set-Top Box) TV Rear Panel 2 Connect Audio Cables between the DVI IN (HDMI 1) [R-AUDIO-L] jack on the TV and the AUDIO OUT jacks on the DVD Player/Cable Box/Satellite receiver (SetTop Box). 2 Audio Cable (Not supplied) 1 HDMI/DVI Cable (Not supplied) ➢ Each DVD Player/Cable Box/Satellite receiver (Set-Top Box) has a different back panel configuration. ➢ When connecting a DVD Player/Cable Box/Satellite receiver (Set-Top Box), match the color of digital audio and video signals using...
... DVI This connection can support HDMI and DVI. DVD Player / Cable Box/Satellite receiver (Set-Top Box) TV Rear Panel 2 Connect Audio Cables between the DVI IN (HDMI 1) [R-AUDIO-L] jack on the TV and the AUDIO OUT jacks on the DVD Player/Cable Box/Satellite receiver (SetTop Box). 2 Audio Cable (Not supplied) 1 HDMI/DVI Cable (Not supplied) ➢ Each DVD Player/Cable Box/Satellite receiver (Set-Top Box) has a different back panel configuration. ➢ When connecting a DVD Player/Cable Box/Satellite receiver (Set-Top Box), match the color of digital audio and video signals using...

Owner Instructions
Page 14
...'s volume control. What is connected to an external device supporting 5.1CH. ➢ Each Digital Audio System has a different back panel configuration. ➢ When the COMPONENT IN or HDMI IN jacks are connected, the Optical jack on the TV does not output audio. Amplifier/DVD Home Theater TV Rear Panel When an audio amplifier is connected to the "DIGITAL AUDIO OUT (OPTICAL)" jack: Decrease the gain (volume) Optical Cable (Not supplied) of the sound card on your computer. Using the D-Sub Cable 1 Connect...
...'s volume control. What is connected to an external device supporting 5.1CH. ➢ Each Digital Audio System has a different back panel configuration. ➢ When the COMPONENT IN or HDMI IN jacks are connected, the Optical jack on the TV does not output audio. Amplifier/DVD Home Theater TV Rear Panel When an audio amplifier is connected to the "DIGITAL AUDIO OUT (OPTICAL)" jack: Decrease the gain (volume) Optical Cable (Not supplied) of the sound card on your computer. Using the D-Sub Cable 1 Connect...
Owner Instructions
Page 28
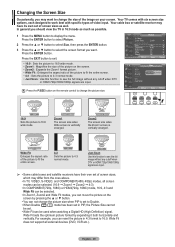
... TV in PIP, the Picture Size cannot be set of the picture to fit the entire screen. 4:3 Sets the picture to display the menu. Wide Fit sets the optimum picture format by pressing the ▲ or ▼ button. • You can not change the picture size. English - 28 Your TV comes with six screen size options, each designed to 16:9 wide mode. T V Picture ▲ More Color Tone : Cool1 Detailed Settings Size : 16:9 Digital NR : Auto Active Color : On DNIe : On Reset...
... TV in PIP, the Picture Size cannot be set of the picture to fit the entire screen. 4:3 Sets the picture to display the menu. Wide Fit sets the optimum picture format by pressing the ▲ or ▼ button. • You can not change the picture size. English - 28 Your TV comes with six screen size options, each designed to 16:9 wide mode. T V Picture ▲ More Color Tone : Cool1 Detailed Settings Size : 16:9 Digital NR : Auto Active Color : On DNIe : On Reset...
Owner Instructions
Page 29
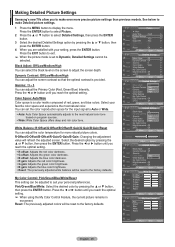
... factory defaults. My Color Control: Pink/Green/Blue/White/Reset This setting can set to Dynamic, Detailed Settings cannot be adjusted to adjust the screen depth. Press the ◄ or ► button until you reach the optimal setting. Reset: The previously adjusted colors will be reset to the factory defaults. Making Detailed Picture Settings Samsung's new TVs allow you to make Detailed picture settings. 1 Press the MENU button to display the menu. Gamma: -3 ~ 3 You can select the black level on program sources. • Wide: Wide Color...
... factory defaults. My Color Control: Pink/Green/Blue/White/Reset This setting can set to Dynamic, Detailed Settings cannot be adjusted to adjust the screen depth. Press the ◄ or ► button until you reach the optimal setting. Reset: The previously adjusted colors will be reset to the factory defaults. Making Detailed Picture Settings Samsung's new TVs allow you to make Detailed picture settings. 1 Press the MENU button to display the menu. Gamma: -3 ~ 3 You can select the black level on program sources. • Wide: Wide Color...
Owner Instructions
Page 30
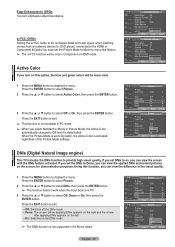
... turn on this option, the blue and green colors will be more vivid. 1 Press the MENU button to select Off, Demo or On, then press the ENTER button. Using this feature. ➢ The xvYCC function works only in Picture Mode, the Active Color automatically changes to select Off or On, then press the ENTER button. DVD player) connected to the HDMI or Component IN jacks.You must set DNIe to display...
... turn on this option, the blue and green colors will be more vivid. 1 Press the MENU button to select Off, Demo or On, then press the ENTER button. Using this feature. ➢ The xvYCC function works only in Picture Mode, the Active Color automatically changes to select Off or On, then press the ENTER button. DVD player) connected to the HDMI or Component IN jacks.You must set DNIe to display...
Owner Instructions
Page 31
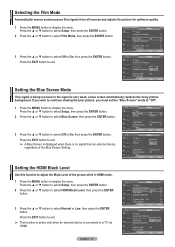
... : Off Light Effect : In Watching TV Energy Saving : Off ▼ More Move Enter Return Setting the HDMI Black Level Use this function to adjust the Black Level of the Blue Screen Setting. Press the EXIT button to display the menu. English - 31 T V Setup ▲ More Screen Burn Protection HDMI Black Level : Normal Film Mode : Off Wall-Mount Adjustment PIP Function Help : On SW Upgrade Move Enter Return T V Setup ▲ More Screen Burn Protection HDMI Black Level : NNoormrmaal l Film Mode : OLfof w Wall-Mount Adjustment PIP Function...
... : Off Light Effect : In Watching TV Energy Saving : Off ▼ More Move Enter Return Setting the HDMI Black Level Use this function to adjust the Black Level of the Blue Screen Setting. Press the EXIT button to display the menu. English - 31 T V Setup ▲ More Screen Burn Protection HDMI Black Level : Normal Film Mode : Off Wall-Mount Adjustment PIP Function Help : On SW Upgrade Move Enter Return T V Setup ▲ More Screen Burn Protection HDMI Black Level : NNoormrmaal l Film Mode : OLfof w Wall-Mount Adjustment PIP Function...

Owner Instructions
Page 32
... HDMI 1, 2, 3 jacks on the remote control to activate or deactivate the PIP. ➢ Analog TV signals can use the main picture to select Setup, then press the ENTER button. T V Setup ▲ More Screen Burn Protection ► HDMI Black Level : Normal ► Film Mode : Off ► Wall-Mount Adjustment ► PIP ► Function Help : On ► SW Upgrade ► Move Enter Return T V PIP Size Position Channel PIP : OOfff : On : : DTV Air 3 - 0 Press the PIP button on the main screen...
... HDMI 1, 2, 3 jacks on the remote control to activate or deactivate the PIP. ➢ Analog TV signals can use the main picture to select Setup, then press the ENTER button. T V Setup ▲ More Screen Burn Protection ► HDMI Black Level : Normal ► Film Mode : Off ► Wall-Mount Adjustment ► PIP ► Function Help : On ► SW Upgrade ► Move Enter Return T V PIP Size Position Channel PIP : OOfff : On : : DTV Air 3 - 0 Press the PIP button on the main screen...
Owner Instructions
Page 43
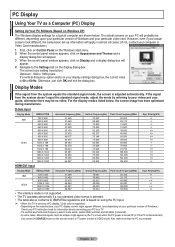
... your videocard user guide; PC Display Using Your TV as a Computer (PC) Display Setting Up Your PC Software (Based on Windows XP) The Windows display-settings for information about connecting your PC will probably be no video. The correct size setting (resolution) Optimum: 1920 x 1080 pixels If a vertical-frequency option exists on your computer or Video Card manufacturer.) 1 First, click on Control Panel on the Windows start menu. 2 When the control panel window appears...
... your videocard user guide; PC Display Using Your TV as a Computer (PC) Display Setting Up Your PC Software (Based on Windows XP) The Windows display-settings for information about connecting your PC will probably be no video. The correct size setting (resolution) Optimum: 1920 x 1080 pixels If a vertical-frequency option exists on your computer or Video Card manufacturer.) 1 First, click on Control Panel on the Windows start menu. 2 When the control panel window appears...

Owner Instructions
Page 49
... source. ➢ If Game Mode is On • The Picture Mode is automatically changed to select Setup, then press the ENTER button. T V Setup Plug & Play ► Language Time : English ► ► Game Mode : Off ► V-Chip ► Caption ► Menu Transparency : Medium ► ▼ More Move Enter Return T V Setup Plug & Play Language Time Game Mode V-Chip Caption : EEnngglislishh Español : OFffrançais Menu Transparency : Medium ▼ More Move Enter Return Using the Game Mode When connecting...
... source. ➢ If Game Mode is On • The Picture Mode is automatically changed to select Setup, then press the ENTER button. T V Setup Plug & Play ► Language Time : English ► ► Game Mode : Off ► V-Chip ► Caption ► Menu Transparency : Medium ► ▼ More Move Enter Return T V Setup Plug & Play Language Time Game Mode V-Chip Caption : EEnngglislishh Español : OFffrançais Menu Transparency : Medium ▼ More Move Enter Return Using the Game Mode When connecting...

Owner Instructions
Page 61
...; button to version XXXX ? T V Setup ▲ More Screen Burn Protection ► HDMI Black Level : Normal ► Film Mode : Off ► Wall-Mount Adjustment ► PIP ► Function Help : On ► SW Upgrade ► Move Enter Return T V USB SW Upgrade ► Move Enter SW Upgrade Scanning for USB... The system would be possible by connecting a USB drive to the USB port located on the side of your TV. 1 Insert a USB drive containing the firmware upgrade into the USB Upgrade Port...
...; button to version XXXX ? T V Setup ▲ More Screen Burn Protection ► HDMI Black Level : Normal ► Film Mode : Off ► Wall-Mount Adjustment ► PIP ► Function Help : On ► SW Upgrade ► Move Enter Return T V USB SW Upgrade ► Move Enter SW Upgrade Scanning for USB... The system would be possible by connecting a USB drive to the USB port located on the side of your TV. 1 Insert a USB drive containing the firmware upgrade into the USB Upgrade Port...

Owner Instructions
Page 62
... apply strong shock to WISELINK Mode. Compatibility problems may not be recognized when the TV is used as follows: "filename...+.jpg" or "filename...+.mp3". ➢ The file system supports FAT16/32, not NTFS. ➢ Certain types of USB Digital camera and audio devices may occur when using a USB hub. ➢ We recommended using the sequential JPEG format. TV Side Panel Insert a USB device containing JPEG and...
... apply strong shock to WISELINK Mode. Compatibility problems may not be recognized when the TV is used as follows: "filename...+.jpg" or "filename...+.mp3". ➢ The file system supports FAT16/32, not NTFS. ➢ Certain types of USB Digital camera and audio devices may occur when using a USB hub. ➢ We recommended using the sequential JPEG format. TV Side Panel Insert a USB device containing JPEG and...

Owner Instructions
Page 72
... 5.1 channel audio, connect the DIGITAL AUDIO OUT (OPTICAL) jack on the TV and the HDMI OUT jack of the corresponding Anynet+ device using an HDMI cable. 2. Connecting Anynet+ Devices The Anynet+ system can connect up to 12 AV devices in the Standby or On status. ➢ Anynet+ supports up to control all connected Samsung devices that have the Anynet+ feature. Connect the [HDMI 1], [HDMI 2] or [HDMI 3] jack on the DVD player or Cable/Satellite Box (ie...
... 5.1 channel audio, connect the DIGITAL AUDIO OUT (OPTICAL) jack on the TV and the HDMI OUT jack of the corresponding Anynet+ device using an HDMI cable. 2. Connecting Anynet+ Devices The Anynet+ system can connect up to 12 AV devices in the Standby or On status. ➢ Anynet+ supports up to control all connected Samsung devices that have the Anynet+ feature. Connect the [HDMI 1], [HDMI 2] or [HDMI 3] jack on the DVD player or Cable/Satellite Box (ie...

Owner Instructions
Page 74
... built-in Tuner Audio Device Operating Status After switching to the recording devices users manual. Press the REC button. Record (Device_Name) Menu (Device_Name) Operation Connect (Device_Name) Receiver Setup Starts a recording. (This menu works only for using the TV remote control. ➢ The TV remote control may differ depending on the device. You can make a recording of a TV program using the buttons on the side of the DVD Recorder appears. You can record the source streams...
... built-in Tuner Audio Device Operating Status After switching to the recording devices users manual. Press the REC button. Record (Device_Name) Menu (Device_Name) Operation Connect (Device_Name) Receiver Setup Starts a recording. (This menu works only for using the TV remote control. ➢ The TV remote control may differ depending on the device. You can make a recording of a TV program using the buttons on the side of the DVD Recorder appears. You can record the source streams...
Owner Instructions
Page 75
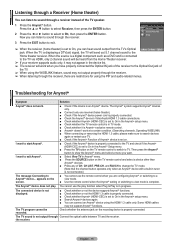
...+ setup menu. ■ Check whether the TV remote control is complete. Some HDMI cables may not output properly through the receiver. ➢ When listening through the receiver, there are configuring Anynet+ or switching to a view mode. ■ Use the remote control when the Anynet+ setting or switching to the Optical Out jack of the TV speaker. 1 Press the Anynet+ button. The TV sound is displaying a DTV(air) signal, the TV will work . TV Air 28 Recevier: On Connect Recorder Setup ➢...
...+ setup menu. ■ Check whether the TV remote control is complete. Some HDMI cables may not output properly through the receiver. ➢ When listening through the receiver, there are configuring Anynet+ or switching to a view mode. ■ Use the remote control when the Anynet+ setting or switching to the Optical Out jack of the TV speaker. 1 Press the Anynet+ button. The TV sound is displaying a DTV(air) signal, the TV will work . TV Air 28 Recevier: On Connect Recorder Setup ➢...
Owner Instructions
Page 76
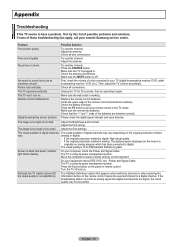
... the TV mode. Remote control malfunctions Digital broadcasting screen problem. Try another channel. Make sure the TV is too low at maximum volume. Then, adjust the TV volume accordingly. Check that appears when switching channels or when pressing the Information button on the original production method vary. (analog or digital). - Adjust the Brightness and Contrast. If the original production method is analog: The digital program displayed on the screen is black and power indicator light blinks...
... the TV mode. Remote control malfunctions Digital broadcasting screen problem. Try another channel. Make sure the TV is too low at maximum volume. Then, adjust the TV volume accordingly. Check that appears when switching channels or when pressing the Information button on the original production method vary. (analog or digital). - Adjust the Brightness and Contrast. If the original production method is analog: The digital program displayed on the screen is black and power indicator light blinks...
Owner Instructions
Page 79
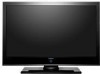
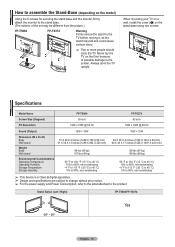
... screen. Always store the TV upright. When mounting your TV on a wall, install the cover (1) on the floor because of the set may be different from the picture.) FP-T5084 FP-T6374 Warning Firmly secure the stand to the product. Specifications Model Name Screen Size (Diagonal) PC Resolution FP-T5084 50 inch 1920 x 1080 @ 60 Hz FP-T6374 63 inch 1920 x 1080 @ 60 Hz Sound (Output) 15W + 15W Dimension (W x H x D) Body With stand Weight...
... screen. Always store the TV upright. When mounting your TV on a wall, install the cover (1) on the floor because of the set may be different from the picture.) FP-T5084 FP-T6374 Warning Firmly secure the stand to the product. Specifications Model Name Screen Size (Diagonal) PC Resolution FP-T5084 50 inch 1920 x 1080 @ 60 Hz FP-T6374 63 inch 1920 x 1080 @ 60 Hz Sound (Output) 15W + 15W Dimension (W x H x D) Body With stand Weight...


