

User Manual (user Manual) (ver.1.1) (English)
Page 5
Playback/Editing 53 Learn how to error messages, specifications, and maintenance tips. 4 Shooting options 35 Learn about your camera's layout, icons, and basic functions for shooting. You will also learn how to connect your camera to your camera's settings. Appendixes 81 Refer to play back photos, videos, or voice memos and edit photos or videos. Copyright information • Microsoft Windows and the Windows logo are registered trademarks of the Microsoft...
Playback/Editing 53 Learn how to error messages, specifications, and maintenance tips. 4 Shooting options 35 Learn about your camera's layout, icons, and basic functions for shooting. You will also learn how to connect your camera to your camera's settings. Appendixes 81 Refer to play back photos, videos, or voice memos and edit photos or videos. Copyright information • Microsoft Windows and the Windows logo are registered trademarks of the Microsoft...
User Manual (user Manual) (ver.1.1) (English)
Page 6
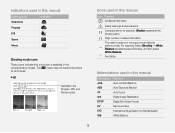
... Contrast Balance AEB Auto Exposure Bracket AF Auto Focus DIS Digital Image Stabilization DPOF Digital Print Order Format EV Exposure Value ISO International Organization for example: [Shutter] represents the shutter button. ( ) Page number of related information The order of options or menus you must select to → perform a step. Indications used in this manual Icon Function Additional information Safety warnings and precautions [] Camera buttons; e.g.) Available in the Program, DIS, and Movie modes Icons used in this manual Shooting mode Smart Auto Indication...
... Contrast Balance AEB Auto Exposure Bracket AF Auto Focus DIS Digital Image Stabilization DPOF Digital Print Order Format EV Exposure Value ISO International Organization for example: [Shutter] represents the shutter button. ( ) Page number of related information The order of options or menus you must select to → perform a step. Indications used in this manual Icon Function Additional information Safety warnings and precautions [] Camera buttons; e.g.) Available in the Program, DIS, and Movie modes Icons used in this manual Shooting mode Smart Auto Indication...

User Manual (user Manual) (ver.1.1) (English)
Page 9
... • Deleting all files on the memory card 57 • Viewing files as a slide show 58 • Viewing files on a TV 66 • Connecting your camera to a computer 67 • Adjusting sound and volume 77 • Adjusting the brightness of the display 77 • Changing the display language 78 • Setting the date and time 78 • Formatting the memory card 78 • Troubleshooting 91...
... • Deleting all files on the memory card 57 • Viewing files as a slide show 58 • Viewing files on a TV 66 • Connecting your camera to a computer 67 • Adjusting sound and volume 77 • Adjusting the brightness of the display 77 • Changing the display language 78 • Setting the date and time 78 • Formatting the memory card 78 • Troubleshooting 91...
User Manual (user Manual) (ver.1.1) (English)
Page 10
... red-eye 39 Using the flash 39 Adjusting the ISO speed 40 Changing the camera's focus 41 Using macro 41 Using auto focus 41 Using tracking auto focus 42 Adjusting the focus area 43 Using face detection 44 Detecting faces 44 Taking a self-portrait shot 45 Taking a smile shot 45 Detecting eye blinking 46 Adjusting brightness and color 47 Adjusting the exposure manually (EV 47 Compensating for backlighting (ACB 47 Changing the metering option 48 Selecting a light source (White balance 48 Using burst modes 50 Improving your photos 51 Applying photo...
... red-eye 39 Using the flash 39 Adjusting the ISO speed 40 Changing the camera's focus 41 Using macro 41 Using auto focus 41 Using tracking auto focus 42 Adjusting the focus area 43 Using face detection 44 Detecting faces 44 Taking a self-portrait shot 45 Taking a smile shot 45 Detecting eye blinking 46 Adjusting brightness and color 47 Adjusting the exposure manually (EV 47 Compensating for backlighting (ACB 47 Changing the metering option 48 Selecting a light source (White balance 48 Using burst modes 50 Improving your photos 51 Applying photo...

User Manual (user Manual) (ver.1.1) (English)
Page 11
... 67 Transferring files using Intelli-studio 69 Transferring files by connecting the camera as a removable disk 71 Disconnecting the camera (for Windows XP 72 Transferring files to your Mac computer 73 Printing photos with a PictBridge photo printer .......... 74 Settings 75 Camera settings menu 76 Accessing the settings menu 76 Sound 77 Display 77 Settings 78 Appendixes 81 Error messages 82 Camera maintenance 83 Cleaning your camera 83 Using or storing the camera 84 About memory cards 85 About the battery 87 Before contacting a service center 91 Camera specifications 94...
... 67 Transferring files using Intelli-studio 69 Transferring files by connecting the camera as a removable disk 71 Disconnecting the camera (for Windows XP 72 Transferring files to your Mac computer 73 Printing photos with a PictBridge photo printer .......... 74 Settings 75 Camera settings menu 76 Accessing the settings menu 76 Sound 77 Display 77 Settings 78 Appendixes 81 Error messages 82 Camera maintenance 83 Cleaning your camera 83 Using or storing the camera 84 About memory cards 85 About the battery 87 Before contacting a service center 91 Camera specifications 94...

User Manual (user Manual) (ver.1.1) (English)
Page 12
Basic functions Learn about your camera 16 Performing the initial setup 17 Learning icons 18 Selecting options 19 Setting the display and sound 21 Changing the display type 21 Setting the sound 21 Taking photos 22 Zooming 23 Tips for shooting. Unpacking 12 Camera layout 13 Inserting the battery and memory card ... ... 15 Charging the battery and turning your camera on 16 Charging the battery 16 Turning on your camera's layout, icons, and basic functions for getting a clearer photo 24
Basic functions Learn about your camera 16 Performing the initial setup 17 Learning icons 18 Selecting options 19 Setting the display and sound 21 Changing the display type 21 Setting the sound 21 Taking photos 22 Zooming 23 Tips for shooting. Unpacking 12 Camera layout 13 Inserting the battery and memory card ... ... 15 Charging the battery and turning your camera on 16 Charging the battery 16 Turning on your camera's layout, icons, and basic functions for getting a clearer photo 24

User Manual (user Manual) (ver.1.1) (English)
Page 25
Reducing camera shake • Select the mode to Fill in red. When shooting in the dark, avoid setting the flash option to take the photo if the focus frame appears in green. • Change the composition and halfpress [Shutter] again if the focus frame appears in . (p. 40) • Set ISO speed options. (p. 40) Basic functions 24 Focus frame • Press [Shutter] to Slow Sync or Off. The aperture remains open longer and...
Reducing camera shake • Select the mode to Fill in red. When shooting in the dark, avoid setting the flash option to take the photo if the focus frame appears in green. • Change the composition and halfpress [Shutter] again if the focus frame appears in . (p. 40) • Set ISO speed options. (p. 40) Basic functions 24 Focus frame • Press [Shutter] to Slow Sync or Off. The aperture remains open longer and...

User Manual (user Manual) (ver.1.1) (English)
Page 29
... half-press [Shutter] to focus. 4 Press [Shutter] to take the photo. Shooting modes 4 Half-press [Shutter] to focus. 5 Press [Shutter] to take the photo. • If the camera does not recognize a proper scene mode, and the camera uses default settings. Extended functions 28 Beauty Shot Frame Guide Night Portrait Children Landscape Close Up This mode is appropriate for a specific scene. 1 In Shooting mode, press [ ]. 2 Select Scene → a scene. appears • Even if it changes settings often to...
... half-press [Shutter] to focus. 4 Press [Shutter] to take the photo. Shooting modes 4 Half-press [Shutter] to focus. 5 Press [Shutter] to take the photo. • If the camera does not recognize a proper scene mode, and the camera uses default settings. Extended functions 28 Beauty Shot Frame Guide Night Portrait Children Landscape Close Up This mode is appropriate for a specific scene. 1 In Shooting mode, press [ ]. 2 Select Scene → a scene. appears • Even if it changes settings often to...
User Manual (user Manual) (ver.1.1) (English)
Page 33
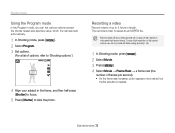
... Movie → Frame Rate → a frame rate (the number of frames per second). • As the frame rate increases, action appears more natural, but the file size also increases. Recording a video Record videos of options, refer to take the photo. The recorded video is saved as an MJPEG file. Shooting modes Using the Program mode In the Program mode, you can set various options except the shutter speed and aperture value, which the camera sets...
... Movie → Frame Rate → a frame rate (the number of frames per second). • As the frame rate increases, action appears more natural, but the file size also increases. Recording a video Record videos of options, refer to take the photo. The recorded video is saved as an MJPEG file. Shooting modes Using the Program mode In the Program mode, you can set various options except the shutter speed and aperture value, which the camera sets...

User Manual (user Manual) (ver.1.1) (English)
Page 36
... 36 Selecting image quality 36 Using the timer 37 Shooting in shooting mode. Shooting options Learn about the options you can set in the dark 39 Preventing red-eye 39 Using the flash 39 Adjusting the ISO speed 40 Changing the camera's focus 41 Using macro 41 Using auto focus 41 Using tracking auto focus 42 Adjusting the focus area 43 Using face detection 44 Detecting faces 44 Taking a self-portrait shot 45 Taking a smile shot 45 Detecting eye blinking 46 Adjusting brightness and color 47 Adjusting the exposure manually (EV...
... 36 Selecting image quality 36 Using the timer 37 Shooting in shooting mode. Shooting options Learn about the options you can set in the dark 39 Preventing red-eye 39 Using the flash 39 Adjusting the ISO speed 40 Changing the camera's focus 41 Using macro 41 Using auto focus 41 Using tracking auto focus 42 Adjusting the focus area 43 Using face detection 44 Detecting faces 44 Taking a self-portrait shot 45 Taking a smile shot 45 Detecting eye blinking 46 Adjusting brightness and color 47 Adjusting the exposure manually (EV...

User Manual (user Manual) (ver.1.1) (English)
Page 41
... shutter stays open longer. • Select this when you want to capture ambient light to reveal more details in the background. • Use a tripod to light as defined by the International Organization for Standardization (ISO). Auto: The flash fires automatically when the subject or background is dark. • The camera reduces red-eyes. With a higher ISO speed, you can get a better photo without using the flash. 1 In Shooting mode...
... shutter stays open longer. • Select this when you want to capture ambient light to reveal more details in the background. • Use a tripod to light as defined by the International Organization for Standardization (ISO). Auto: The flash fires automatically when the subject or background is dark. • The camera reduces red-eyes. With a higher ISO speed, you can get a better photo without using the flash. 1 In Shooting mode...
User Manual (user Manual) (ver.1.1) (English)
Page 67
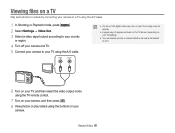
... connected to your camera. Viewing files on a TV Play back photos or videos by connecting your camera to a TV using the A/V cable. 1 In Shooting or Playback mode, press [ ]. 2 Select Settings → Video Out. 3 Select a video signal output according to your country or region. 4 Turn off your camera and TV. 5 Connect your camera to a TV. 6 Turn on your TV, and then select the video output mode using the TV remote control. 7 Turn on your camera, and then press [ ]. 8 View photos or play videos using the A/V cable...
... connected to your camera. Viewing files on a TV Play back photos or videos by connecting your camera to a TV using the A/V cable. 1 In Shooting or Playback mode, press [ ]. 2 Select Settings → Video Out. 3 Select a video signal output according to your country or region. 4 Turn off your camera and TV. 5 Connect your camera to a TV. 6 Turn on your TV, and then select the video output mode using the TV remote control. 7 Turn on your camera, and then press [ ]. 8 View photos or play videos using the A/V cable...
User Manual (user Manual) (ver.1.1) (English)
Page 69
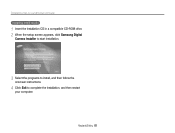
Transferring files to your Windows computer Installing Intelli-studio 1 Insert the installation CD in a compatible CD-ROM drive. 2 When the setup screen appears, click Samsung Digital Camera Installer to start installation. 3 Select the programs to install, and then follow the onscreen instructions. 4 Click Exit to complete the installation, and then restart your computer. Playback/Editing 68
Transferring files to your Windows computer Installing Intelli-studio 1 Insert the installation CD in a compatible CD-ROM drive. 2 When the setup screen appears, click Samsung Digital Camera Installer to start installation. 3 Select the programs to install, and then follow the onscreen instructions. 4 Click Exit to complete the installation, and then restart your computer. Playback/Editing 68

User Manual (user Manual) (ver.1.1) (English)
Page 72
Transferring files to your Windows computer Icon 1 2 3 4 5 6 7 8 9 10 11 12 13 14 15 Description Open menus Display files in the selected folder Change to the Photo edit mode Change to the Video edit mode Change to the Sharing mode (You can send files by email or upload files to websites, such as Flickr or YouTube.) Enlarge or reduce the thumbnails in My Folder, or register faces Transferring files by connecting the camera as a removable disk You can...
Transferring files to your Windows computer Icon 1 2 3 4 5 6 7 8 9 10 11 12 13 14 15 Description Open menus Display files in the selected folder Change to the Photo edit mode Change to the Video edit mode Change to the Sharing mode (You can send files by email or upload files to websites, such as Flickr or YouTube.) Enlarge or reduce the thumbnails in My Folder, or register faces Transferring files by connecting the camera as a removable disk You can...

User Manual (user Manual) (ver.1.1) (English)
Page 79
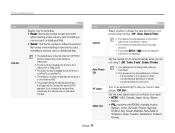
... Date/Time Set Date Type Select a region and set the daylight-saving time (DST). Camera settings menu Item Power Save * Default Description If you perform no operations for the display text. Format deletes all files, including protected files. (Yes, No) If you perform no operations for 30 seconds, the camera automatically switches to Power save mode (press any button to deactivate the Power save mode). (Off*, On) If the Power save mode is deactivated, the main display will dim to save battery life when you use a memory card used with cameras...
... Date/Time Set Date Type Select a region and set the daylight-saving time (DST). Camera settings menu Item Power Save * Default Description If you perform no operations for the display text. Format deletes all files, including protected files. (Yes, No) If you perform no operations for 30 seconds, the camera automatically switches to Power save mode (press any button to deactivate the Power save mode). (Off*, On) If the Power save mode is deactivated, the main display will dim to save battery life when you use a memory card used with cameras...
User Manual (user Manual) (ver.1.1) (English)
Page 80
... Lamp Video Out * Default Description Select whether to display the date and time on your photos when printing. (Off*, Date, Date & Time) • The date and time is displayed on an assistant light to help you select Text in mode, the date and time will not automatically turn off when: -- Camera settings menu Item File No. * Default Description Specify how to name files. • Reset: Set the file number to start from 0001 when inserting a new memory card, formatting a memory card, or deleting all files. • Series*: Set the file number...
... Lamp Video Out * Default Description Select whether to display the date and time on your photos when printing. (Off*, Date, Date & Time) • The date and time is displayed on an assistant light to help you select Text in mode, the date and time will not automatically turn off when: -- Camera settings menu Item File No. * Default Description Specify how to name files. • Reset: Set the file number to start from 0001 when inserting a new memory card, formatting a memory card, or deleting all files. • Series*: Set the file number...
User Manual (user Manual) (ver.1.1) (English)
Page 92
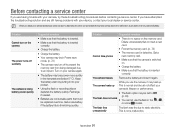
... switched on the memory card. If you have attempted the troubleshooting solution and are consumable parts that must be sure to also leave the other components that the battery is diminishing quickly. Situation Suggested remedies Cannot take photos • There is no space on . • Charge the battery. • Make sure that may be set to Off. (p. 39) The flash does not work • You cannot use...
... switched on the memory card. If you have attempted the troubleshooting solution and are consumable parts that must be sure to also leave the other components that the battery is diminishing quickly. Situation Suggested remedies Cannot take photos • There is no space on . • Charge the battery. • Make sure that may be set to Off. (p. 39) The flash does not work • You cannot use...
User Manual (user Manual) (ver.1.1) (English)
Page 93
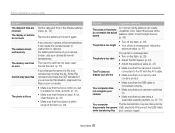
... camera screen to malfunction or discolor. Disconnect the USB cable while transferring files and connect it can create The colors in the display settings menu. (p. 78) Remove the battery and insert it again. The memory card has not been reset. Select the proper white balance option to the TV with the A/V cable. • Make sure that your camera at low temperatures, it again. Format the card. (p. 78) If you change the name of your camera screen, use...
... camera screen to malfunction or discolor. Disconnect the USB cable while transferring files and connect it can create The colors in the display settings menu. (p. 78) Remove the battery and insert it again. The memory card has not been reset. Select the proper white balance option to the TV with the A/V cable. • Make sure that your camera at low temperatures, it again. Format the card. (p. 78) If you change the name of your camera screen, use...
User Manual (user Manual) (ver.1.1) (English)
Page 103
... Playback mode 64 in Shooting mode 52 Saturation in Playback mode 64 in Shooting mode 52 Sharpness 52 AF Lamp 79 AF Sound 77 Aperture 31 Auto Contrast Balance (ACB) 47 Specifications 87 Beauty Shot mode 29 Blink detection 46 Burst Auto Exposure Bracket (AEB) 50 Continuous 50 Motion capture 50 C Camera shake 24 Capturing an image from a video 60 Cleaning Body 83 Display 83 Lens 83 B Battery Charging 88 Life 87 D Date/Time Set 78 Date Type 78 Deleting files 57 Digital Image...
... Playback mode 64 in Shooting mode 52 Saturation in Playback mode 64 in Shooting mode 52 Sharpness 52 AF Lamp 79 AF Sound 77 Aperture 31 Auto Contrast Balance (ACB) 47 Specifications 87 Beauty Shot mode 29 Blink detection 46 Burst Auto Exposure Bracket (AEB) 50 Continuous 50 Motion capture 50 C Camera shake 24 Capturing an image from a video 60 Cleaning Body 83 Display 83 Lens 83 B Battery Charging 88 Life 87 D Date/Time Set 78 Date Type 78 Deleting files 57 Digital Image...
User Manual (user Manual) (ver.1.1) (English)
Page 105
Index S Scene mode 28 Self-Portrait 45 Service center 91 Settings Accessing 76 Camera 78 Display 77 Sound 77 Shooting mode DIS 31 Movie 32 Program 32 Scene 28 Smart Auto 27 Shutter speed 30 Slide show 58 Smart Album 55 Smart Auto mode 27 Smile shot 45 Start image 62, 77 T Timer 37 Tracking focus 43 Transferring files for Mac 73 for Windows 67 V Video Playing 59 Recording 32 Video Out 79 Viewing files as thumbnails 56 by category 55 on TV 66 Slide show 58 Voice memo Playing 60 Recording 34 Volume 77 W White Balance 48 Z Zoom button 14 Zooming 23 Appendixes 104
Index S Scene mode 28 Self-Portrait 45 Service center 91 Settings Accessing 76 Camera 78 Display 77 Sound 77 Shooting mode DIS 31 Movie 32 Program 32 Scene 28 Smart Auto 27 Shutter speed 30 Slide show 58 Smart Album 55 Smart Auto mode 27 Smile shot 45 Start image 62, 77 T Timer 37 Tracking focus 43 Transferring files for Mac 73 for Windows 67 V Video Playing 59 Recording 32 Video Out 79 Viewing files as thumbnails 56 by category 55 on TV 66 Slide show 58 Voice memo Playing 60 Recording 34 Volume 77 W White Balance 48 Z Zoom button 14 Zooming 23 Appendixes 104


