
User Manual
Page 1
ENGLISH User's Manual Thank you through using the camera, including capturing images, downloading images and using your new camera. Please read this manual carefully before using the software applications. This manual will guide you for buying a Samsung Camera.
ENGLISH User's Manual Thank you through using the camera, including capturing images, downloading images and using your new camera. Please read this manual carefully before using the software applications. This manual will guide you for buying a Samsung Camera.
User Manual
Page 2
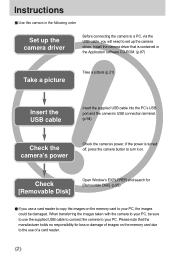
... USB cable into the PC's USB port and the camera's USB connection terminal. (p.94) Check the camera's power Check the camera's power. If the power is contained in the following order Set up the camera driver. When transferring the images taken with the camera to your PC, be damaged. Please note that is... that the manufacturer holds no responsibility for [Removable Disk]. (p.95) If you will need to set up the camera driver Before connecting the camera to a PC, via the USB cable, you use a card reader to copy the images on the memory card to your PC, the images could...
... USB cable into the PC's USB port and the camera's USB connection terminal. (p.94) Check the camera's power Check the camera's power. If the power is contained in the following order Set up the camera driver. When transferring the images taken with the camera to your PC, be damaged. Please note that is... that the manufacturer holds no responsibility for [Removable Disk]. (p.95) If you will need to set up the camera driver Before connecting the camera to a PC, via the USB cable, you use a card reader to copy the images on the memory card to your PC, the images could...

User Manual
Page 3
... switch 11 Connecting to a Power Source 13 Using the AC power adapter (3.3V 2.0A) 13 Using the batteries 14 Instructions on how to adjust the camera 23 POWER button 23 SHUTTER button 23 ZOOM W/ T button 23 Voice memo / UP button 25 Macro / Down button (Focusing) 26 Focus lock 27 ...Left button 28 Self-timer / Right button 30 MENU / OK button 31 +/- button 32 LCD button 35 Using the LCD monitor to adjust the camera settings 36 How to use the memory card 15 Maintenance of the memory card 15 Preserving the memory card data 15 Inserting the memory card...
... switch 11 Connecting to a Power Source 13 Using the AC power adapter (3.3V 2.0A) 13 Using the batteries 14 Instructions on how to adjust the camera 23 POWER button 23 SHUTTER button 23 ZOOM W/ T button 23 Voice memo / UP button 25 Macro / Down button (Focusing) 26 Focus lock 27 ...Left button 28 Self-timer / Right button 30 MENU / OK button 31 +/- button 32 LCD button 35 Using the LCD monitor to adjust the camera settings 36 How to use the memory card 15 Maintenance of the memory card 15 Preserving the memory card data 15 Inserting the memory card...
User Manual
Page 4
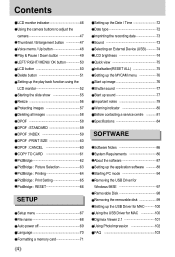
Contents LCD monitor indicator 46 Using the camera buttons to adjust the camera 47 Thumbnail / Enlargement button 47 Voice memo / Up button 48 Play & Pause / Down button 49 LEFT/ RIGHT/ MENU/ OK button 50 LCD button 50 Delete ... 98SE 97 Removable Disk 98 Removing the removable disk 99 Setting up the USB Driver for MAC 100 Using the USB Driver for MAC 100 Digimax Viewer 2.1 101 Using PhotoImpression 102 FAQ 103
Contents LCD monitor indicator 46 Using the camera buttons to adjust the camera 47 Thumbnail / Enlargement button 47 Voice memo / Up button 48 Play & Pause / Down button 49 LEFT/ RIGHT/ MENU/ OK button 50 LCD button 50 Delete ... 98SE 97 Removable Disk 98 Removing the removable disk 99 Setting up the USB Driver for MAC 100 Using the USB Driver for MAC 100 Digimax Viewer 2.1 101 Using PhotoImpression 102 FAQ 103
User Manual
Page 5
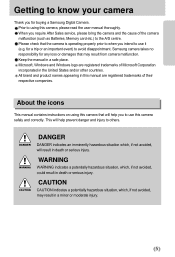
... in a minor or moderate injury. 5 for a trip or an important event) to others. This will help you to using this camera safely and correctly. Samsung camera takes no responsibility for buying a Samsung Digital Camera. CAUTION CAUTION indicates a potentially hazardous situation, which , if not avoided, will help prevent danger and injury to avoid disappointment. When you...
... in a minor or moderate injury. 5 for a trip or an important event) to others. This will help you to using this camera safely and correctly. Samsung camera takes no responsibility for buying a Samsung Digital Camera. CAUTION CAUTION indicates a potentially hazardous situation, which , if not avoided, will help prevent danger and injury to avoid disappointment. When you...

User Manual
Page 6
...inspection, maintenance and repairs should occur, please consult a doctor immediately. Please do not use the camera as this may result in temperature. You must contact your dealer or Samsung Camera Service Centre. Do not continue to use this product in close proximity to flammable or explosive gases,...be carried out by your dealer or Samsung Camera Service Centre. When taking photographs, never point the lens of electric shock. For safety reasons keep this camera with wet hands. Do not recharge non rechargeable batteries. Do not leave this camera in fire, injury, electric shock or...
...inspection, maintenance and repairs should occur, please consult a doctor immediately. Please do not use the camera as this may result in temperature. You must contact your dealer or Samsung Camera Service Centre. Do not continue to use this product in close proximity to flammable or explosive gases,...be carried out by your dealer or Samsung Camera Service Centre. When taking photographs, never point the lens of electric shock. For safety reasons keep this camera with wet hands. Do not recharge non rechargeable batteries. Do not leave this camera in fire, injury, electric shock or...
User Manual
Page 7
...from the wall socket. Changes or modifications not expressly approved by the party responsible for compliance could result in commercial installation. Do not move the camera while it continuously. Should any interference occur when this device is however, no guarantee that any aerial. Change the location and direction of its ...been tested in fire. There is in operation, please try one or more of batteries in accordance with the reverse polarities. Increase distance between the camera and the affected device. Please contact a Samsung agent or a radio/TV engineer.
...from the wall socket. Changes or modifications not expressly approved by the party responsible for compliance could result in commercial installation. Do not move the camera while it continuously. Should any interference occur when this device is however, no guarantee that any aerial. Change the location and direction of its ...been tested in fire. There is in operation, please try one or more of batteries in accordance with the reverse polarities. Increase distance between the camera and the affected device. Please contact a Samsung agent or a radio/TV engineer.
User Manual
Page 8
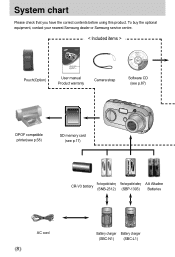
System chart Please check that you have the correct contents before using this product. To buy the optional equipment, contact your nearest Samsung dealer or Samsung service centre. < Included items > Pouch(Option) User manual Product warranty Camera strap Software CD (see p.87) DPOF compatible printer(see p.58) SD memory card (see p.17) CR-V3 battery Rechargeable battery (SNB-2312) Rechargeable battery (SBP-1303) AA Alkaline Batteries AC cord 8 Battery charger Battery charger (SBC-N1) (SBC-L1)
System chart Please check that you have the correct contents before using this product. To buy the optional equipment, contact your nearest Samsung dealer or Samsung service centre. < Included items > Pouch(Option) User manual Product warranty Camera strap Software CD (see p.87) DPOF compatible printer(see p.58) SD memory card (see p.17) CR-V3 battery Rechargeable battery (SNB-2312) Rechargeable battery (SBP-1303) AA Alkaline Batteries AC cord 8 Battery charger Battery charger (SBC-N1) (SBC-L1)
User Manual
Page 9
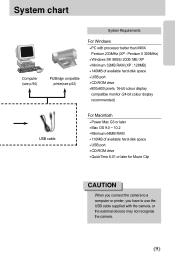
... 64MB RAM 110MB of available hard-disk space USB port CD-ROM drive QuickTime 6.01 or later for Movie Clip CAUTION When you connect the camera to a computer or printer, you have to use the USB cable supplied with the...
... 64MB RAM 110MB of available hard-disk space USB port CD-ROM drive QuickTime 6.01 or later for Movie Clip CAUTION When you connect the camera to a computer or printer, you have to use the USB cable supplied with the...

User Manual
Page 10
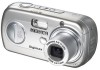
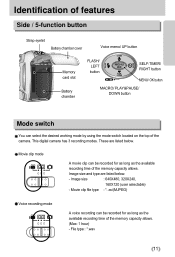
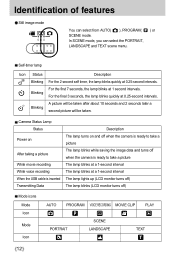
Identification of features Front & Top Mode switch Shutter button Flash Power button Speaker Self-timer lamp Lens Microphone Back & Bottom Camera status lamp LCD monitor +/-, DELETE button LCD button Play mode button Tripod socket Zoom W button (Thumbnail) Zoom T button (Digital zoom) 5-function button USB connection port DC input connection port 10
Identification of features Front & Top Mode switch Shutter button Flash Power button Speaker Self-timer lamp Lens Microphone Back & Bottom Camera status lamp LCD monitor +/-, DELETE button LCD button Play mode button Tripod socket Zoom W button (Thumbnail) Zoom T button (Digital zoom) 5-function button USB connection port DC input connection port 10
User Manual
Page 11
... selectable) - avi(MJPEG) Voice recording mode A voice recording can select the desired working mode by using the mode switch located on the top of the camera. Movie clip file type : *. File type : *.wav 11 This digital...
... selectable) - avi(MJPEG) Voice recording mode A voice recording can select the desired working mode by using the mode switch located on the top of the camera. Movie clip file type : *. File type : *.wav 11 This digital...
User Manual
Page 12
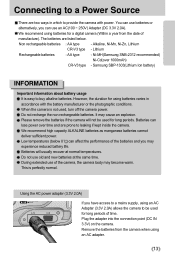
...later a Blinking second picture will be taken. Identification of features Still image mode You can select the PORTRAIT, LANDSCAPE and TEXT scene menu. Camera Status Lamp Status Power on After taking a picture While movie recording While voice recording When the USB cable is inserted Transmitting Data Description The ...lamp turns on and off when the camera is ready to take a picture The lamp blinks while saving the image data and turns off when the camera is ready to take a picture The lamp blinks at a 1-second interval The lamp...
...later a Blinking second picture will be taken. Identification of features Still image mode You can select the PORTRAIT, LANDSCAPE and TEXT scene menu. Camera Status Lamp Status Power on After taking a picture While movie recording While voice recording When the USB cable is inserted Transmitting Data Description The ...lamp turns on and off when the camera is ready to take a picture The lamp blinks while saving the image data and turns off when the camera is ready to take a picture The lamp blinks at a 1-second interval The lamp...
User Manual
Page 13
...become warm. Please remove the batteries if the camera will usually recover at the same time. Lithium Rechargeable batteries : AA type - During extended use of the camera, the camera body may cause an explosion. Samsung SBP-1303(Lithium Ion battery) INFORMATION Important ...information about battery usage It is easy to leaking if kept inside the camera. When the camera is perfectly normal. We recommend high...
...become warm. Please remove the batteries if the camera will usually recover at the same time. Lithium Rechargeable batteries : AA type - During extended use of the camera, the camera body may cause an explosion. Samsung SBP-1303(Lithium Ion battery) INFORMATION Important ...information about battery usage It is easy to leaking if kept inside the camera. When the camera is perfectly normal. We recommend high...
User Manual
Page 14
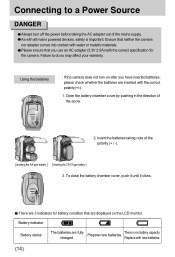
... adapter comes into contact with new batteries. 14 Please ensure that are fully charged. Using the batteries : If the camera does not turn off the power before taking note of the arrow. 2. Battery indicator Battery status The batteries are displayed on...close the battery chamber cover, push it until it clicks. Connecting to do so may affect your warranty. There are 3 indicators for the camera. There is important. As with the correct specification for battery condition that you have inserted batteries, please check whether the batteries are inserted with...
... adapter comes into contact with new batteries. 14 Please ensure that are fully charged. Using the batteries : If the camera does not turn off the power before taking note of the arrow. 2. Battery indicator Battery status The batteries are displayed on...close the battery chamber cover, push it until it clicks. Connecting to do so may affect your warranty. There are 3 indicators for the camera. There is important. As with the correct specification for battery condition that you have inserted batteries, please check whether the batteries are inserted with...
User Manual
Page 15
... if it contains images captured with a soft cloth. Turn off or the memory card is not covered by another digital camera. Repeated use a memory card formatted by the Samsung warranty. Do not bend, drop or subject the memory card to purchase a new memory card. Do not store the memory... card in another digital camera or memory card reader. Do not allow the memory card to become corrupted : - During and after periods of extended use . When the memory card is insufficient memory available : If you press the shutter button for lost data. Samsung cannot be the case, ...
... if it contains images captured with a soft cloth. Turn off or the memory card is not covered by another digital camera. Repeated use a memory card formatted by the Samsung warranty. Do not bend, drop or subject the memory card to purchase a new memory card. Do not store the memory... card in another digital camera or memory card reader. Do not allow the memory card to become corrupted : - During and after periods of extended use . When the memory card is insufficient memory available : If you press the shutter button for lost data. Samsung cannot be the case, ...

User Manual
Page 16
... bottom of the SD memory card, the data will be as follows. Mode Quality / Size 2272 SUPER FINE 5 FINE 11 NORMAL 17 24FPS - 15FPS - The camera can be affected by variables such as subject matter. Slide the switch to data in the memory card. STILL IMAGE mode 2048 1600 1024 6 11... deleted or formatted. These figures are approximate as image capacities can use the memory card INFORMATION If you open the battery chamber cover when the camera power is blinking as this may cause damage to the top of the SD memory card, the data protection will turn off automatically.
... bottom of the SD memory card, the data will be as follows. Mode Quality / Size 2272 SUPER FINE 5 FINE 11 NORMAL 17 24FPS - 15FPS - The camera can be affected by variables such as subject matter. Slide the switch to data in the memory card. STILL IMAGE mode 2048 1600 1024 6 11... deleted or formatted. These figures are approximate as image capacities can use the memory card INFORMATION If you open the battery chamber cover when the camera power is blinking as this may cause damage to the top of the SD memory card, the data protection will turn off automatically.
User Manual
Page 17
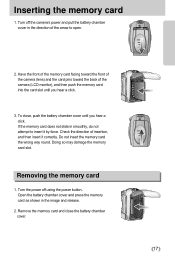
... the power button. Do not insert the memory card the wrong way round. Turn the power off the camera's power and pull the battery chamber cover in the direction of the arrow to insert it correctly. If the... release. 2. Have the front of the memory card facing toward the front of the camera (lens) and the card pins toward the back of insertion, and then insert it by force. Check the... direction of the camera (LCD monitor), and then push the memory card into the card slot until you hear a click....
... the power button. Do not insert the memory card the wrong way round. Turn the power off the camera's power and pull the battery chamber cover in the direction of the arrow to insert it correctly. If the... release. 2. Have the front of the memory card facing toward the front of the camera (lens) and the card pins toward the back of insertion, and then insert it by force. Check the... direction of the camera (LCD monitor), and then push the memory card into the card slot until you hear a click....

User Manual
Page 18
LCD monitor indicator The LCD monitor displays information about the shooting functions and selections. [ Image & Full Status ] No. Description 1 Battery Icons 2 Recording mode 3 Flash 4 Self-timer 5 Macro 6 Metering 7 Memory in use indicator 8 Auto focus frame 9 Camera shake warning 10 Date/ Time 11 Exposure compensation 12 White Balance 13 ISO 18 2004/12/01 01:00 PM Page p.14 p.11~12 p.38 p.28 p.30 p.26 p.41 p.22 p.34 p.32 p.33
LCD monitor indicator The LCD monitor displays information about the shooting functions and selections. [ Image & Full Status ] No. Description 1 Battery Icons 2 Recording mode 3 Flash 4 Self-timer 5 Macro 6 Metering 7 Memory in use indicator 8 Auto focus frame 9 Camera shake warning 10 Date/ Time 11 Exposure compensation 12 White Balance 13 ISO 18 2004/12/01 01:00 PM Page p.14 p.11~12 p.38 p.28 p.30 p.26 p.41 p.22 p.34 p.32 p.33

User Manual
Page 19
... mode If the memory card is released. Press the shutter button once and movie clips are listed below. - Movie clips will be stored on the camera. 5. Select the MOVIE CLIP( ) mode by using the LCD monitor. 7. Close the battery chamber cover. 4. Recording a Movie clip 1. Insert the ...memory card. (p.17) As this camera has a 16MB internal memory, you wish to insert the memory card. If the memory card is not inserted in the internal memory. Image size ...
... mode If the memory card is released. Press the shutter button once and movie clips are listed below. - Movie clips will be stored on the camera. 5. Select the MOVIE CLIP( ) mode by using the LCD monitor. 7. Close the battery chamber cover. 4. Recording a Movie clip 1. Insert the ...memory card. (p.17) As this camera has a 16MB internal memory, you wish to insert the memory card. If the memory card is not inserted in the internal memory. Image size ...
User Manual
Page 20
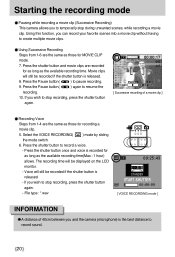
...the recording. 10. If you wish to stop recording, press the shutter button again. [ Successive recording of 40cm between you and the camera (microphone) is released. - The recording time will still be recorded if the shutter button is the best distance to record sound. 20... Starting the recording mode Pausing while recording a movie clip (Successive Recording) This camera allows you to temporarily stop recording, press the shutter button again. - Select the VOICE RECORDING( ) mode by sliding the mode switch....
...the recording. 10. If you wish to stop recording, press the shutter button again. [ Successive recording of 40cm between you and the camera (microphone) is released. - The recording time will still be recorded if the shutter button is the best distance to record sound. 20... Starting the recording mode Pausing while recording a movie clip (Successive Recording) This camera allows you to temporarily stop recording, press the shutter button again. - Select the VOICE RECORDING( ) mode by sliding the mode switch....


