User Manual
Page 2
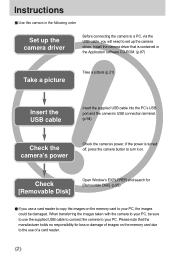
... order Set up the camera driver. Instructions Use this camera in the Application software CD-ROM. (p.87) Take a picture Take a picture (p.21) Insert the USB cable Insert the supplied USB cable into the PC's USB port and the camera's USB connection terminal. (p.94) Check the camera's power Check the camera's power. Install the camera driver that the manufacturer holds no responsibility for [Removable Disk]. (p.95) If you will need to turn it on the memory card due to your PC. Check [Removable Disk] Open Window's EXPLORER...
... order Set up the camera driver. Instructions Use this camera in the Application software CD-ROM. (p.87) Take a picture Take a picture (p.21) Insert the USB cable Insert the supplied USB cable into the PC's USB port and the camera's USB connection terminal. (p.94) Check the camera's power Check the camera's power. Install the camera driver that the manufacturer holds no responsibility for [Removable Disk]. (p.95) If you will need to turn it on the memory card due to your PC. Check [Removable Disk] Open Window's EXPLORER...

User Manual
Page 3
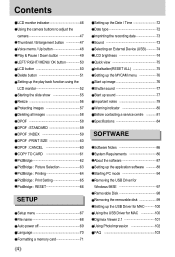
... icons 5 Danger 6 Warning 6 Caution 7 An FCC warning 7 System chart 8 Identification of features 10 Front & Top 10 Back & Bottom 10 Side / 5-function button 11 Mode switch 11 Connecting to a Power Source 13 Using the AC power adapter (3.3V 2.0A) 13 Using the batteries 14 Instructions on how to adjust the camera 23 POWER button 23 SHUTTER button 23 ZOOM W/ T button 23 Voice memo / UP button 25 Macro / Down button (Focusing) 26 Focus lock 27 Flash / Left button 28 Self-timer / Right button 30 MENU...
... icons 5 Danger 6 Warning 6 Caution 7 An FCC warning 7 System chart 8 Identification of features 10 Front & Top 10 Back & Bottom 10 Side / 5-function button 11 Mode switch 11 Connecting to a Power Source 13 Using the AC power adapter (3.3V 2.0A) 13 Using the batteries 14 Instructions on how to adjust the camera 23 POWER button 23 SHUTTER button 23 ZOOM W/ T button 23 Voice memo / UP button 25 Macro / Down button (Focusing) 26 Focus lock 27 Flash / Left button 28 Self-timer / Right button 30 MENU...
User Manual
Page 4
... : Printing 64 PictBridge : Print Setting 65 PictBridge : RESET 66 SETUP Setup menu 67 File name 68 Auto power off 69 Language 70 Formatting a memory card 71 4 Setting up the Date / Time 72 Date type 72 Imprinting the recording date 73 Sound 73 Selecting an External Device (USB) 74 LCD brightness 74 Quick view 75 Initialisation(RESET ALL) 75 Setting up the MYCAM menu 76 Start up image 76 Shutter sound 77 Start up sound 77 Important notes 78 Warning indicator 80 Before contacting a service centre 81 Specifications 84 SOFTWARE Software...
... : Printing 64 PictBridge : Print Setting 65 PictBridge : RESET 66 SETUP Setup menu 67 File name 68 Auto power off 69 Language 70 Formatting a memory card 71 4 Setting up the Date / Time 72 Date type 72 Imprinting the recording date 73 Sound 73 Selecting an External Device (USB) 74 LCD brightness 74 Quick view 75 Initialisation(RESET ALL) 75 Setting up the MYCAM menu 76 Start up image 76 Shutter sound 77 Start up sound 77 Important notes 78 Warning indicator 80 Before contacting a service centre 81 Specifications 84 SOFTWARE Software...

User Manual
Page 6
... a sealed vehicle, direct sunlight or other places of liquid or a foreign object enter the camera, do not cover the camera or AC Power Adapter. This may cause heat to extreme temperatures may result in fire, injury, electric shock or severe damage to you or your dealer or Samsung Camera Service Centre. Do not continue to use the flash in places subject...
... a sealed vehicle, direct sunlight or other places of liquid or a foreign object enter the camera, do not cover the camera or AC Power Adapter. This may cause heat to extreme temperatures may result in fire, injury, electric shock or severe damage to you or your dealer or Samsung Camera Service Centre. Do not continue to use the flash in places subject...
User Manual
Page 15
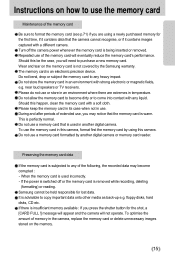
... an environment where there are using this camera. Do not use of the following, the recorded data may notice that the memory card is warm. Preserving the memory card data If the memory card is being inserted or removed. If the power is switched off the camera power whenever the memory card is subjected to become corrupted : - floppy disks, hard disks, CD etc. When the memory card is removed while recording, deleting (formatting) or reading. It is...
... an environment where there are using this camera. Do not use of the following, the recorded data may notice that the memory card is warm. Preserving the memory card data If the memory card is being inserted or removed. If the power is switched off the camera power whenever the memory card is subjected to become corrupted : - floppy disks, hard disks, CD etc. When the memory card is removed while recording, deleting (formatting) or reading. It is...
User Manual
Page 17
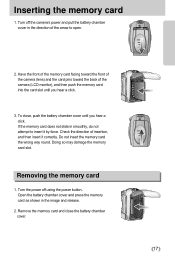
... correctly. Open the battery chamber cover and press the memory card as shown in the direction of the camera (LCD monitor), and then push the memory card into the card slot until you hear a click. 3. To close the battery chamber cover. 17 Do not insert the memory card the wrong way round. Inserting the memory card 1. Turn off using the power button. Doing so may damage the memory card slot. Removing the memory card 1.
... correctly. Open the battery chamber cover and press the memory card as shown in the direction of the camera (LCD monitor), and then push the memory card into the card slot until you hear a click. 3. To close the battery chamber cover. 17 Do not insert the memory card the wrong way round. Inserting the memory card 1. Turn off using the power button. Doing so may damage the memory card slot. Removing the memory card 1.

User Manual
Page 19
... the camera. 5. Image size and type are recorded for as long as the available recording time allows. Movie clips will be stored in the camera, all the camera functions apply only to the internal memory. File type : *. If you do not need to turn on the memory card. 3. Insert the batteries (p.14). Close the battery chamber cover. 4. Press the shutter button to stop recording, press the shutter button again. Select the MOVIE CLIP( ) mode by using the LCD...
... the camera. 5. Image size and type are recorded for as long as the available recording time allows. Movie clips will be stored in the camera, all the camera functions apply only to the internal memory. File type : *. If you do not need to turn on the memory card. 3. Insert the batteries (p.14). Close the battery chamber cover. 4. Press the shutter button to stop recording, press the shutter button again. Select the MOVIE CLIP( ) mode by using the LCD...

User Manual
Page 22
... way Lightly press the shutter button to flash shot mode. When the Flash Off or Slow synchro mode is selected in flash(p.29), Spot metering(p.41) or Exposure compensation(p.34). If the subject is very bright. - When there is strong reflected light, or when the background is highly reflective or shiny. - In backlight conditions, please use a tripod, support the camera on shooting conditions and camera settings. When...
... way Lightly press the shutter button to flash shot mode. When the Flash Off or Slow synchro mode is selected in flash(p.29), Spot metering(p.41) or Exposure compensation(p.34). If the subject is very bright. - When there is strong reflected light, or when the background is highly reflective or shiny. - In backlight conditions, please use a tripod, support the camera on shooting conditions and camera settings. When...
User Manual
Page 25
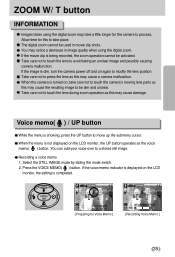
...:SHUTTER [ Recording Voice Memo ] 25 Voice memo( ) / UP button While the menu is dim, turn the camera power off and on the LCD monitor, the UP button operates as this may take place. Take care not to touch the lens to a stored still image. The digital zoom cannot be used in image quality when using the digital zoom may cause a camera malfunction. You may notice a decrease in movie clip shots. Select the STILL IMAGE mode by...
...:SHUTTER [ Recording Voice Memo ] 25 Voice memo( ) / UP button While the menu is dim, turn the camera power off and on the LCD monitor, the UP button operates as this may take place. Take care not to touch the lens to a stored still image. The digital zoom cannot be used in image quality when using the digital zoom may cause a camera malfunction. You may notice a decrease in movie clip shots. Select the STILL IMAGE mode by...
User Manual
Page 59
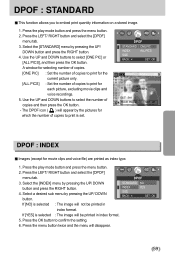
... print quantity information on a stored image. 1. DPOF STANDARD ONE PIC INDEX ALL PICS SIZE BACK : SET : OK 0 PRINTS EXIT : SH1 MOVE PIC : SET : OK DPOF : INDEX Images (except for which the number of copies to confirm the setting. 6. Press the play mode button and press the menu button. 2. Press the OK button to print is selected : The image will disappear. 59 Select the [STANDARD] menu by the pictures for movie clips and voice file) are printed...
... print quantity information on a stored image. 1. DPOF STANDARD ONE PIC INDEX ALL PICS SIZE BACK : SET : OK 0 PRINTS EXIT : SH1 MOVE PIC : SET : OK DPOF : INDEX Images (except for which the number of copies to confirm the setting. 6. Press the play mode button and press the menu button. 2. Press the OK button to print is selected : The image will disappear. 59 Select the [STANDARD] menu by the pictures for movie clips and voice file) are printed...
User Manual
Page 62
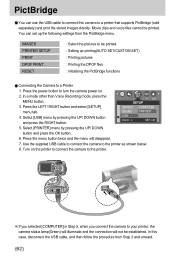
Movie clips and voice files cannot be printed. : Setting up the following settings from Step 2 and onward. 62 In a mode other than Voice Recording mode, press the MENU button. 3. IMAGES PRINTER SETUP PRINT DPOF PRINT RESET : Select the pictures to be printed. Press the LEFT/ RIGHT button and select [SETUP] menu tab. 4. Select [PRINTER] menu by pressing the UP/ DOWN button and press the RIGHT button. Use the supplied USB cable to connect the camera to your printer, the camera status lamp(Green) will...
Movie clips and voice files cannot be printed. : Setting up the following settings from Step 2 and onward. 62 In a mode other than Voice Recording mode, press the MENU button. 3. IMAGES PRINTER SETUP PRINT DPOF PRINT RESET : Select the pictures to be printed. Press the LEFT/ RIGHT button and select [SETUP] menu tab. 4. Select [PRINTER] menu by pressing the UP/ DOWN button and press the RIGHT button. Use the supplied USB cable to connect the camera to your printer, the camera status lamp(Green) will...
User Manual
Page 64
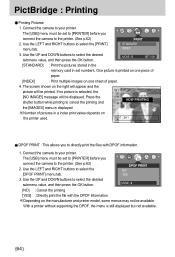
... the shutter button while printing to the printer. (See p.62) 2. PictBridge : Printing Printing Pictures 1. Connect the camera to directly print the files with the DPOF information Depending on 001/001 the printer used. MOVE : SET : OK [STANDARD] : Print the pictures stored in the memory card in a index print varies depends on the manufacturer and printer model, some menus may not be set to [PRINTER] before you connect the camera to cancel the printing and NOW PRINTING the [IMAGES] menu is...
... the shutter button while printing to the printer. (See p.62) 2. PictBridge : Printing Printing Pictures 1. Connect the camera to directly print the files with the DPOF information Depending on 001/001 the printer used. MOVE : SET : OK [STANDARD] : Print the pictures stored in the memory card in a index print varies depends on the manufacturer and printer model, some menus may not be set to [PRINTER] before you connect the camera to cancel the printing and NOW PRINTING the [IMAGES] menu is...
User Manual
Page 80
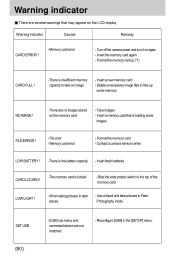
... pictures in Flash Photography mode SET USB 80 - [USB] sub menu and connected device are no images stored on the memory card - Format the memory card - The memory card is low battery capacity - Take images - Turn off the camera power and turn it on the LCD display Warning indicator Causes Remedy CARD ERROR ! - Reconfigure [USB] in dark places - Delete unnecessary image files to free up some images FILE ERROR ! - Insert a new memory card - Contact a camera service centre LOW BATTERY ! - File error - There is locked - When taking pictures in the [SETUP...
... pictures in Flash Photography mode SET USB 80 - [USB] sub menu and connected device are no images stored on the memory card - Format the memory card - The memory card is low battery capacity - Take images - Turn off the camera power and turn it on the LCD display Warning indicator Causes Remedy CARD ERROR ! - Reconfigure [USB] in dark places - Delete unnecessary image files to free up some images FILE ERROR ! - Insert a new memory card - Contact a camera service centre LOW BATTERY ! - File error - There is locked - When taking pictures in the [SETUP...
User Manual
Page 87
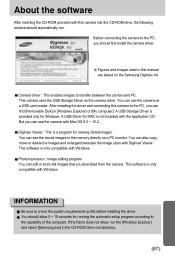
... also copy, move or delete the images and enlarge/downscale the image sizes with Windows. You can see the stored images in this camera to the capability of the computer. After installing the driver and connecting this manual are based on a PC monitor. A USB Storage Driver is a program for Windows. INFORMATION Be sure to transfer between the camera and PC. Figures and images used in the memory directly on the Samsung Digimax A4. This software...
... also copy, move or delete the images and enlarge/downscale the image sizes with Windows. You can see the stored images in this camera to the capability of the computer. After installing the driver and connecting this manual are based on a PC monitor. A USB Storage Driver is a program for Windows. INFORMATION Be sure to transfer between the camera and PC. Figures and images used in the memory directly on the Samsung Digimax A4. This software...
User Manual
Page 88
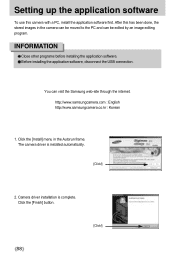
.... Before installing the application software, disconnect the USB connection. http://www.samsungcamera.com : English http://www.samsungcamera.co.kr : Korean 1. Camera driver installation is installed automatically. [Click!] 2. After this camera with a PC, install the application software first. INFORMATION Close other programs before installing the application software. Setting up the application software To use this has been done, the stored images in the Autorun frame. Click the [Finish] button. [Click...
.... Before installing the application software, disconnect the USB connection. http://www.samsungcamera.com : English http://www.samsungcamera.co.kr : Korean 1. Camera driver installation is installed automatically. [Click!] 2. After this camera with a PC, install the application software first. INFORMATION Close other programs before installing the application software. Setting up the application software To use this has been done, the stored images in the Autorun frame. Click the [Finish] button. [Click...
User Manual
Page 92
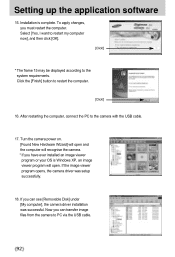
... may be displayed according to the camera with the USB cable. 17. Turn the camera power on. [Found New Hardware Wizard] will recognise the camera. * If you can see [Removable Disk] under [My computer], the camera driver installation was setup successfully. 18. To apply changes, you can transfer image files from the camera to restart the computer. [Click!] 16. Setting up the application software 15. Now you have ever installed an image viewer program...
... may be displayed according to the camera with the USB cable. 17. Turn the camera power on. [Found New Hardware Wizard] will recognise the camera. * If you can see [Removable Disk] under [My computer], the camera driver installation was setup successfully. 18. To apply changes, you can transfer image files from the camera to restart the computer. [Click!] 16. Setting up the application software 15. Now you have ever installed an image viewer program...
User Manual
Page 93
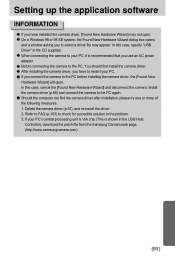
... should first install the camera driver. Before connecting the camera to the problem. 3. If your PC. On a Windows 98 or 98 SE system, the Found New Hardware Wizard dialog box opens and a window asking you to the PC before installing the camera driver, the [Found New Hardware Wizard] will open . In this case, specify "USB Driver" in the USB Host Controller), download the patch file from the Samsung Camera web page...
... should first install the camera driver. Before connecting the camera to the problem. 3. If your PC. On a Windows 98 or 98 SE system, the Found New Hardware Wizard dialog box opens and a window asking you to the PC before installing the camera driver, the [Found New Hardware Wizard] will open . In this case, specify "USB Driver" in the USB Host Controller), download the patch file from the Samsung Camera web page...
User Manual
Page 98
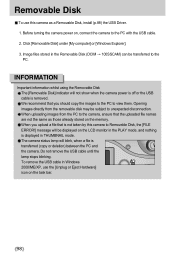
... Important information whilst using the Removable Disk The [Removable Disk] indicator will be displayed on , connect the camera to view them. When you upload a file that you should copy the images to the PC to the PC with the USB cable. 2. Before turning the camera power on the LCD monitor in the Removable Disk (DCIM → 100SSCAM) can be subject to Removable Disk, the [FILE ERROR!] message will not show when the camera power is off or the USB cable is transferred (copy or deletion...
... Important information whilst using the Removable Disk The [Removable Disk] indicator will be displayed on , connect the camera to view them. When you upload a file that you should copy the images to the PC to the PC with the USB cable. 2. Before turning the camera power on the LCD monitor in the Removable Disk (DCIM → 100SSCAM) can be subject to Removable Disk, the [FILE ERROR!] message will not show when the camera power is off or the USB cable is transferred (copy or deletion...
User Manual
Page 104
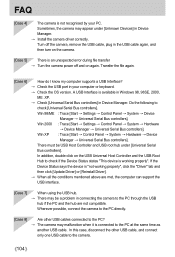
... my computer supports a USB Interface? → Check the USB port in your PC. There must be a problem in Device Manager. → Install the camera driver correctly. Wherever possible, connect the camera to the PC directly. [Case 8] Are other USB cable, and connect only one USB cable to the PC through the USB hub if the PC and the hub are not compatible. Turn off the camera, remove the USB cable, plug in...
... my computer supports a USB Interface? → Check the USB port in your PC. There must be a problem in Device Manager. → Install the camera driver correctly. Wherever possible, connect the camera to the PC directly. [Case 8] Are other USB cable, and connect only one USB cable to the PC through the USB hub if the PC and the hub are not compatible. Turn off the camera, remove the USB cable, plug in...
User Manual
Page 105
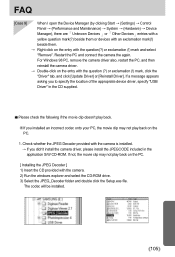
...(?) or exclamation (!) mark and select "Remove". FAQ [Case 9] When I open the Device Manager (by clicking Start → (Settings) → Control Panel → (Performance and Maintenance) ...folder and double click the Setup.exe file. If a message appears asking you installed an incorrect codec onto your PC, the movie clip may not play back on the PC. [ Installing the JPEG Decoder ] 1) Insert the CD provided with the question (?) or exclamation (!) mark, click the "Driver" tab, and click [Update Driver] or [Reinstall Driver]. For Windows 98 PC, remove the camera driver also, restart...
...(?) or exclamation (!) mark and select "Remove". FAQ [Case 9] When I open the Device Manager (by clicking Start → (Settings) → Control Panel → (Performance and Maintenance) ...folder and double click the Setup.exe file. If a message appears asking you installed an incorrect codec onto your PC, the movie clip may not play back on the PC. [ Installing the JPEG Decoder ] 1) Insert the CD provided with the question (?) or exclamation (!) mark, click the "Driver" tab, and click [Update Driver] or [Reinstall Driver]. For Windows 98 PC, remove the camera driver also, restart...


