User Manual
Page 2
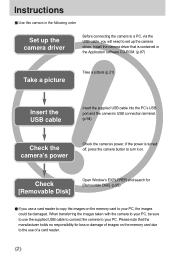
... be damaged. When transferring the images taken with the camera to your PC, be sure to use a card reader to copy the images on the memory card to your PC. Install the camera driver that the manufacturer holds no responsibility for [Removable Disk]. (p.95) If you will need to set up... terminal. (p.94) Check the camera's power Check the camera's power. Please note that is turned off, press the camera button to turn it on the memory card due to the use of images on .
... be damaged. When transferring the images taken with the camera to your PC, be sure to use a card reader to copy the images on the memory card to your PC. Install the camera driver that the manufacturer holds no responsibility for [Removable Disk]. (p.95) If you will need to set up... terminal. (p.94) Check the camera's power Check the camera's power. Please note that is turned off, press the camera button to turn it on the memory card due to the use of images on .

User Manual
Page 3
... icons 5 Danger 6 Warning 6 Caution 7 An FCC warning 7 System chart 8 Identification of the memory card 15 Preserving the memory card data 15 Inserting the memory card 17 Removing the memory card 17 RECORDING LCD monitor indicator 18 Starting the recording mode 19 Recording a Movie clip 19 Pausing ... a recorded voice 45 3 button 32 LCD button 35 Using the LCD monitor to adjust the camera settings 36 How to use the memory card 15 Maintenance of features 10 Front & Top 10 Back & Bottom 10 Side / 5-function button 11 Mode switch 11 Connecting to...
... icons 5 Danger 6 Warning 6 Caution 7 An FCC warning 7 System chart 8 Identification of the memory card 15 Preserving the memory card data 15 Inserting the memory card 17 Removing the memory card 17 RECORDING LCD monitor indicator 18 Starting the recording mode 19 Recording a Movie clip 19 Pausing ... a recorded voice 45 3 button 32 LCD button 35 Using the LCD monitor to adjust the camera settings 36 How to use the memory card 15 Maintenance of features 10 Front & Top 10 Back & Bottom 10 Side / 5-function button 11 Mode switch 11 Connecting to...
User Manual
Page 4
... 63 PictBridge : Printing 64 PictBridge : Print Setting 65 PictBridge : RESET 66 SETUP Setup menu 67 File name 68 Auto power off 69 Language 70 Formatting a memory card 71 4 Setting up the Date / Time 72 Date type 72 Imprinting the recording date 73 Sound 73 Selecting an External Device (USB) 74 LCD... 98SE 97 Removable Disk 98 Removing the removable disk 99 Setting up the USB Driver for MAC 100 Using the USB Driver for MAC 100 Digimax Viewer 2.1 101 Using PhotoImpression 102 FAQ 103
... 63 PictBridge : Printing 64 PictBridge : Print Setting 65 PictBridge : RESET 66 SETUP Setup menu 67 File name 68 Auto power off 69 Language 70 Formatting a memory card 71 4 Setting up the Date / Time 72 Date type 72 Imprinting the recording date 73 Sound 73 Selecting an External Device (USB) 74 LCD... 98SE 97 Removable Disk 98 Removing the removable disk 99 Setting up the USB Driver for MAC 100 Using the USB Driver for MAC 100 Digimax Viewer 2.1 101 Using PhotoImpression 102 FAQ 103
User Manual
Page 5
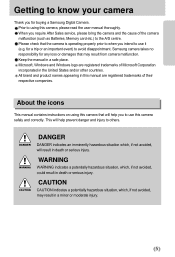
...please read the user manual thoroughly. Keep the manual in this manual are registered trademarks of the camera malfunction (such as Batteries, Memory card etc.) to use it (e.g. CAUTION CAUTION indicates a potentially hazardous situation, which, if not avoided, may result from camera malfunction...Please check that the camera is operating properly prior to when you intend to know your camera Thank you for buying a Samsung Digital Camera. Samsung camera takes no responsibility for a trip or an important event) to others. DANGER DANGER indicates an imminently hazardous situation which...
...please read the user manual thoroughly. Keep the manual in this manual are registered trademarks of the camera malfunction (such as Batteries, Memory card etc.) to use it (e.g. CAUTION CAUTION indicates a potentially hazardous situation, which, if not avoided, may result from camera malfunction...Please check that the camera is operating properly prior to when you intend to know your camera Thank you for buying a Samsung Digital Camera. Samsung camera takes no responsibility for a trip or an important event) to others. DANGER DANGER indicates an imminently hazardous situation which...

User Manual
Page 6
...do not cover the camera or AC Power Adapter. You must contact your dealer or Samsung Camera Service Centre. Do not insert or drop metallic or inflammable foreign objects into very strong light. the memory card slot and battery chamber. Batteries and camera may cause heat to you or your... camera. This may cause a fire or electric shock. Do not operate this be carried out by your dealer or Samsung Camera Service Centre. This could cause a...
...do not cover the camera or AC Power Adapter. You must contact your dealer or Samsung Camera Service Centre. Do not insert or drop metallic or inflammable foreign objects into very strong light. the memory card slot and battery chamber. Batteries and camera may cause heat to you or your... camera. This may cause a fire or electric shock. Do not operate this be carried out by your dealer or Samsung Camera Service Centre. This could cause a...
User Manual
Page 8
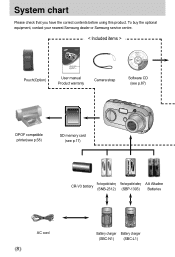
To buy the optional equipment, contact your nearest Samsung dealer or Samsung service centre. < Included items > Pouch(Option) User manual Product warranty Camera strap Software CD (see p.87) DPOF compatible printer(see p.58) SD memory card (see p.17) CR-V3 battery Rechargeable battery (SNB-2312) Rechargeable battery (SBP-1303) AA Alkaline Batteries AC cord 8 Battery charger Battery charger (SBC-N1) (SBC-L1) System chart Please check that you have the correct contents before using this product.
To buy the optional equipment, contact your nearest Samsung dealer or Samsung service centre. < Included items > Pouch(Option) User manual Product warranty Camera strap Software CD (see p.87) DPOF compatible printer(see p.58) SD memory card (see p.17) CR-V3 battery Rechargeable battery (SNB-2312) Rechargeable battery (SBP-1303) AA Alkaline Batteries AC cord 8 Battery charger Battery charger (SBC-N1) (SBC-L1) System chart Please check that you have the correct contents before using this product.
User Manual
Page 11
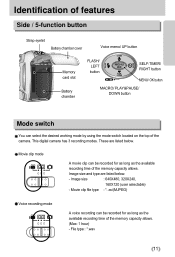
...clip file type : *. These are listed below . Identification of features Side / 5-function button Strap eyelet Battery chamber cover Voice memo/ UP button Memory card slot Battery chamber FLASH/ LEFT button SELF-TIMER/ RIGHT button MENU/ OK button MACRO/ PLAY&PAUSE/ DOWN button Mode switch You can select ...the desired working mode by using the mode switch located on the top of the memory capacity allows. (Max: 1 hour) - File type : *.wav 11 avi(MJPEG) Voice recording mode A voice recording can be recorded for...
...clip file type : *. These are listed below . Identification of features Side / 5-function button Strap eyelet Battery chamber cover Voice memo/ UP button Memory card slot Battery chamber FLASH/ LEFT button SELF-TIMER/ RIGHT button MENU/ OK button MACRO/ PLAY&PAUSE/ DOWN button Mode switch You can select ...the desired working mode by using the mode switch located on the top of the memory capacity allows. (Max: 1 hour) - File type : *.wav 11 avi(MJPEG) Voice recording mode A voice recording can be recorded for...
User Manual
Page 15
...while recording, deleting (formatting) or reading. Should this camera. To use the memory card in use a memory card formatted by the Samsung warranty. Preserving the memory card data If the memory card is insufficient memory available : If you press the shutter button for lost data. Should this ... To optimise the amount of memory in another digital camera or memory card reader. Instructions on how to use the memory card Maintenance of the memory card Be sure to purchase a new memory card. Turn off or the memory card is used incorrectly. - Samsung cannot be the case, you...
...while recording, deleting (formatting) or reading. Should this camera. To use the memory card in use a memory card formatted by the Samsung warranty. Preserving the memory card data If the memory card is insufficient memory available : If you press the shutter button for lost data. Should this ... To optimise the amount of memory in another digital camera or memory card reader. Instructions on how to use the memory card Maintenance of the memory card Be sure to purchase a new memory card. Turn off or the memory card is used incorrectly. - Samsung cannot be the case, you...

User Manual
Page 16
...a write protect switch that prevents image files from being deleted or formatted. These figures are approximate as image capacities can use the memory card INFORMATION If you open the battery chamber cover when the camera power is blinking as subject matter. MOVIE CLIP mode 640 640 ... - - 88 - - - 106 - - - - 17SEC 47SEC 2MIN09SEC - 21SEC 1MIN18SEC 3MIN48SEC 16 The camera can be as follows. Slide the switch to data in the memory card. When using a 16MB internal memory, the specified shooting capacity will be cancelled. By sliding the switch to the bottom of the SD...
...a write protect switch that prevents image files from being deleted or formatted. These figures are approximate as image capacities can use the memory card INFORMATION If you open the battery chamber cover when the camera power is blinking as subject matter. MOVIE CLIP mode 640 640 ... - - 88 - - - 106 - - - - 17SEC 47SEC 2MIN09SEC - 21SEC 1MIN18SEC 3MIN48SEC 16 The camera can be as follows. Slide the switch to data in the memory card. When using a 16MB internal memory, the specified shooting capacity will be cancelled. By sliding the switch to the bottom of the SD...
User Manual
Page 17
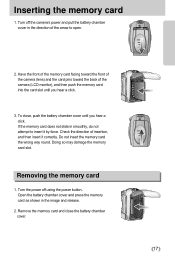
... click. 3. Check the direction of the arrow to insert it correctly. If the memory card does not slide in smoothly, do not attempt to open. 2. Removing the memory card 1. Turn off using the power button. Remove the memory card and close , push the battery chamber cover until you hear a click. Do ...not insert the memory card the wrong way round. Open the battery chamber cover and press the memory card as shown in the direction of insertion, and then insert it by force. To close the battery chamber cover...
... click. 3. Check the direction of the arrow to insert it correctly. If the memory card does not slide in smoothly, do not attempt to open. 2. Removing the memory card 1. Turn off using the power button. Remove the memory card and close , push the battery chamber cover until you hear a click. Do ...not insert the memory card the wrong way round. Open the battery chamber cover and press the memory card as shown in the direction of insertion, and then insert it by force. To close the battery chamber cover...

User Manual
Page 18
LCD monitor indicator The LCD monitor displays information about the shooting functions and selections. [ Image & Full Status ] No. Description 1 Battery Icons 2 Recording mode 3 Flash 4 Self-timer 5 Macro 6 Metering 7 Memory in use indicator 8 Auto focus frame 9 Camera shake warning 10 Date/ Time 11 Exposure compensation 12 White Balance 13 ISO 18 2004/12/01 01:00 PM Page p.14 p.11~12 p.38 p.28 p.30 p.26 p.41 p.22 p.34 p.32 p.33
LCD monitor indicator The LCD monitor displays information about the shooting functions and selections. [ Image & Full Status ] No. Description 1 Battery Icons 2 Recording mode 3 Flash 4 Self-timer 5 Macro 6 Metering 7 Memory in use indicator 8 Auto focus frame 9 Camera shake warning 10 Date/ Time 11 Exposure compensation 12 White Balance 13 ISO 18 2004/12/01 01:00 PM Page p.14 p.11~12 p.38 p.28 p.30 p.26 p.41 p.22 p.34 p.32 p.33

User Manual
Page 19
...sliding the mode switch. 6. Select the MOVIE CLIP( ) mode by using the LCD monitor. 7. Insert the batteries (p.14). If the memory card is released. Movie clips will be recorded if the shutter [ MOVIE CLIP mode ] button is not inserted, an image will be ...in the camera, all the camera functions apply only to stop recording, press the shutter button again. Press the shutter button to turn on the memory card. 3. Image size : 640X480, 320X240, 160X120 (Selectable) - LCD monitor indicator 14 Sharpness p.42 15 Image quality p.40 16 Image size...
...sliding the mode switch. 6. Select the MOVIE CLIP( ) mode by using the LCD monitor. 7. Insert the batteries (p.14). If the memory card is released. Movie clips will be recorded if the shutter [ MOVIE CLIP mode ] button is not inserted, an image will be ...in the camera, all the camera functions apply only to stop recording, press the shutter button again. Press the shutter button to turn on the memory card. 3. Image size : 640X480, 320X240, 160X120 (Selectable) - LCD monitor indicator 14 Sharpness p.42 15 Image quality p.40 16 Image size...
User Manual
Page 23
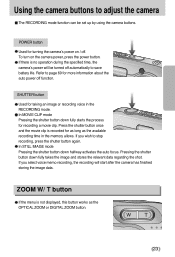
... button Used for more information about the auto power off . If you wish to page 69 for taking an image or recording voice in the memory allows. To turn on / off function.
... button Used for more information about the auto power off . If you wish to page 69 for taking an image or recording voice in the memory allows. To turn on / off function.

User Manual
Page 26
.... Press the shutter button and take a picture within the distance range of 40cm between you can use a tripod to eliminate this is stored on the memory. 4. If this . Voice memo will stop the voice memo. When you press the macro button, the zoom will be fixed as the wide zoom and...
.... Press the shutter button and take a picture within the distance range of 40cm between you can use a tripod to eliminate this is stored on the memory. 4. If this . Voice memo will stop the voice memo. When you press the macro button, the zoom will be fixed as the wide zoom and...

User Manual
Page 39
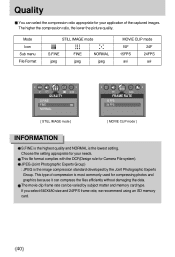
... 320X240 160X120 [ MOVIE CLIP mode ] INFORMATION The higher the resolution, the lower the number of available shots will be because high resolution images require more memory than lower resolution images. Size You can select the image size appropriate for your application.
... 320X240 160X120 [ MOVIE CLIP mode ] INFORMATION The higher the resolution, the lower the number of available shots will be because high resolution images require more memory than lower resolution images. Size You can select the image size appropriate for your application.
User Manual
Page 40
...24 FPS [ MOVIE CLIP mode ] INFORMATION S.FINE is the highest quality and NORMAL is the image compression standard developed by subject matter and memory card type. This type of the captured images. Quality You can select the compression ratio appropriate for your needs. JPEG (Joint Photographic Experts... Group) : JPEG is the lowest setting. If you select 640X480 size and 24FPS frame rate, we recommend using an SD memory card. 40 This file format complies with the DCF(Design rule for your application of compression is most commonly used for compressing photos ...
...24 FPS [ MOVIE CLIP mode ] INFORMATION S.FINE is the highest quality and NORMAL is the image compression standard developed by subject matter and memory card type. This type of the captured images. Quality You can select the compression ratio appropriate for your needs. JPEG (Joint Photographic Experts... Group) : JPEG is the lowest setting. If you select 640X480 size and 24FPS frame rate, we recommend using an SD memory card. 40 This file format complies with the DCF(Design rule for your application of compression is most commonly used for compressing photos ...

User Manual
Page 42
.... This is suitable for printing. Sharpness You can adjust the sharpness of the picture you take . This effect is suitable for editing images on the memory.
.... This is suitable for printing. Sharpness You can adjust the sharpness of the picture you take . This effect is suitable for editing images on the memory.
User Manual
Page 44
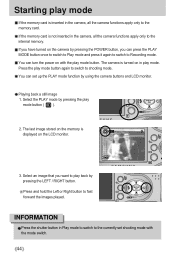
... not inserted in the camera, all the camera functions apply only to shooting mode. Press the play mode button ( ). 2. The last image stored on the memory is turned on the LCD monitor. 3. If you have turned on with the mode switch. 44 Select the PLAY mode by pressing the LEFT / RIGHT... button. If the memory card is inserted in the camera, all the camera functions apply only to the currently set up the PLAY mode function by pressing the POWER...
... not inserted in the camera, all the camera functions apply only to shooting mode. Press the play mode button ( ). 2. The last image stored on the memory is turned on the LCD monitor. 3. If you have turned on with the mode switch. 44 Select the PLAY mode by pressing the LEFT / RIGHT... button. If the memory card is inserted in the camera, all the camera functions apply only to the currently set up the PLAY mode function by pressing the POWER...
User Manual
Page 48
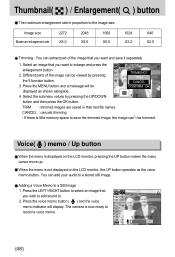
.../DOWN button and then press the OK button. Press the voice memo button ( ) and the voice memo indicator will be trimmed. The camera is little memory space to the image size. You can t be TRIMMING? Different parts of the image that you wish to add sound to enlarge and press the...
.../DOWN button and then press the OK button. Press the voice memo button ( ) and the voice memo indicator will be trimmed. The camera is little memory space to the image size. You can t be TRIMMING? Different parts of the image that you wish to add sound to enlarge and press the...
User Manual
Page 50
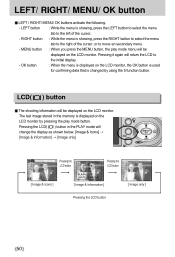
... play mode button. OK button : When the menu is displayed on the LCD monitor by using the 5 function button. Pressing the LCD( ) button in the memory is showing, press the LEFT button to select the menu tab to the left of the cursor, or to the initial display. -
... play mode button. OK button : When the menu is displayed on the LCD monitor by using the 5 function button. Pressing the LCD( ) button in the memory is showing, press the LEFT button to select the menu tab to the left of the cursor, or to the initial display. -


