
User Manual
Page 1
Click a topic Basic troubleshooting Quick reference Contents Basic functions Extended functions Shooting options Playback/Editing Settings Appendixes Index DV90/DV100/DV101 This user manual includes detailed usage instructions for your camera. Please read this manual thoroughly.
Click a topic Basic troubleshooting Quick reference Contents Basic functions Extended functions Shooting options Playback/Editing Settings Appendixes Index DV90/DV100/DV101 This user manual includes detailed usage instructions for your camera. Please read this manual thoroughly.
User Manual
Page 5
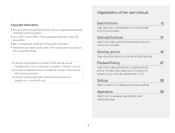
...45 Learn about your camera's layout, icons, and basic functions for shooting. Also, learn how to connect your camera to your camera's settings. Settings 90 Refer to options to configure your computer, photo printer, or TV. Copyright information • Microsoft Windows and the Windows logo are ... video. Appendixes 96 Refer to reuse or distribute any part of the user manual Basic functions 12 Learn about the options you can set in this manual are the property of their respective owners. • Camera specifications or contents of this camera responsibly and adhere to ...
...45 Learn about your camera's layout, icons, and basic functions for shooting. Also, learn how to connect your camera to your camera's settings. Settings 90 Refer to options to configure your computer, photo printer, or TV. Copyright information • Microsoft Windows and the Windows logo are ... video. Appendixes 96 Refer to reuse or distribute any part of the user manual Basic functions 12 Learn about the options you can set in this manual are the property of their respective owners. • Camera specifications or contents of this camera responsibly and adhere to ...
User Manual
Page 8
... light conditions or hold the camera incorrectly. Subjects come out shaded. • Avoid shooting with the sun behind your camera from the camera flash. • Set the flash option to let in more light, the shutter speed slows. When the light source is behind the subject or when there is a high... difficult to steady the camera and may result in camera shake. • Select Night in the mode. (p. 36) • Turn on the flash. (p. 49) • Set ISO speed options. (p. 50) • Use a tripod to prevent your subject. • Select Backlight in the mode. (p. 34) •...
... light conditions or hold the camera incorrectly. Subjects come out shaded. • Avoid shooting with the sun behind your camera from the camera flash. • Set the flash option to let in more light, the shutter speed slows. When the light source is behind the subject or when there is a high... difficult to steady the camera and may result in camera shake. • Select Night in the mode. (p. 36) • Turn on the flash. (p. 49) • Set ISO speed options. (p. 50) • Use a tripod to prevent your subject. • Select Backlight in the mode. (p. 34) •...
User Manual
Page 9
...; 83 • Adjusting sound and volume 92 • Adjusting the brightness of the display 93 • Changing the display language 94 • Setting the date and time 94 • Formatting the memory card 94 • Troubleshooting 106 8
...; 83 • Adjusting sound and volume 92 • Adjusting the brightness of the display 93 • Changing the display language 94 • Setting the date and time 94 • Formatting the memory card 94 • Troubleshooting 106 8
User Manual
Page 10
... battery 17 Turning on your camera 17 Performing the initial setup 18 Learning icons 20 Selecting options or menus 21 Setting the display and sound 23 Changing the display type 23 Setting the sound 23 Taking photos 24 Turning on the front display 25 Zooming 26 Reducing camera shake (DIS 28 Tips...
... battery 17 Turning on your camera 17 Performing the initial setup 18 Learning icons 20 Selecting options or menus 21 Setting the display and sound 23 Changing the display type 23 Setting the sound 23 Taking photos 24 Turning on the front display 25 Zooming 26 Reducing camera shake (DIS 28 Tips...
User Manual
Page 12
... Windows XP 87 Transferring files to your Mac computer 88 Printing photos with a PictBridge photo printer .......... 89 Settings 90 Camera settings menu 91 Accessing the settings menu 91 Sound 92 Front Display Settings 92 Display 93 Settings 94 Appendixes 96 Error messages 97 Camera maintenance 98 Cleaning your camera 98 Using or storing the camera...
... Windows XP 87 Transferring files to your Mac computer 88 Printing photos with a PictBridge photo printer .......... 89 Settings 90 Camera settings menu 91 Accessing the settings menu 91 Sound 92 Front Display Settings 92 Display 93 Settings 94 Appendixes 96 Error messages 97 Camera maintenance 98 Cleaning your camera 98 Using or storing the camera...
User Manual
Page 13
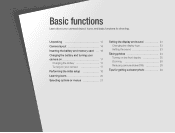
Basic functions Learn about your camera 17 Performing the initial setup 18 Learning icons 20 Selecting options or menus 21 Setting the display and sound 23 Changing the display type 23 Setting the sound 23 Taking photos 24 Turning on your camera's layout, icons, and basic functions for getting a clearer photo 29 Unpacking 13 Camera layout 14 Inserting the battery and memory card ... ... 16 Charging the battery and turning your camera on 17 Charging the battery 17 Turning on the front display 25 Zooming 26 Reducing camera shake (DIS 28 Tips for shooting.
Basic functions Learn about your camera 17 Performing the initial setup 18 Learning icons 20 Selecting options or menus 21 Setting the display and sound 23 Changing the display type 23 Setting the sound 23 Taking photos 24 Turning on your camera's layout, icons, and basic functions for getting a clearer photo 29 Unpacking 13 Camera layout 14 Inserting the battery and memory card ... ... 16 Charging the battery and turning your camera on 17 Charging the battery 17 Turning on the front display 25 Zooming 26 Reducing camera shake (DIS 28 Tips for shooting.
User Manual
Page 16
.... Description Smart Auto: Capture a photo with a scene mode setting selected automatically by a computer or printer, or when the image is out of a photo or view files as thumbnails, or adjust volume Attaching the strap ...
.... Description Smart Auto: Capture a photo with a scene mode setting selected automatically by a computer or printer, or when the image is out of a photo or view files as thumbnails, or adjust volume Attaching the strap ...

User Manual
Page 19
Basic functions 18 Performing the initial setup The initial setup screen appears to allow you to configure the camera's basic settings. 1 Press [ ]. • The initial setup screen appears when you turn on the camera for the first time. 2 Press [ ] to select Language and press [ ] ...or [ ]. 5 Press [ ] or [ ] to select a time zone and press [ ]. • To set the daylight-saving time, press [ ]. 3 Press [ 4 Press [ [ ] or [ ] or [ ] to select a language and press [ ]. ] or [ ] to scroll to Time Zone and ...
Basic functions 18 Performing the initial setup The initial setup screen appears to allow you to configure the camera's basic settings. 1 Press [ ]. • The initial setup screen appears when you turn on the camera for the first time. 2 Press [ ] to select Language and press [ ] ...or [ ]. 5 Press [ ] or [ ] to select a time zone and press [ ]. • To set the daylight-saving time, press [ ]. 3 Press [ 4 Press [ [ ] or [ ] or [ ] to select a language and press [ ]. ] or [ ] to scroll to Time Zone and ...

User Manual
Page 20
Performing the initial setup 8 Press [ ] or [ ] to set the date and time and press [ ]. 9 Press [ ] or [ ] to select Date Type and press [ ] or [ ]. 10 Press [ 11 Press [ ] or [ ] to select a date format and press [ ]. ] to switch to the Shooting mode. Basic functions 19
Performing the initial setup 8 Press [ ] or [ ] to set the date and time and press [ ]. 9 Press [ ] or [ ] to select Date Type and press [ ] or [ ]. 10 Press [ 11 Press [ ] or [ ] to select a date format and press [ ]. ] to switch to the Shooting mode. Basic functions 19
User Manual
Page 21
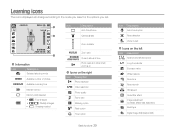
Learning icons The icons displayed will change according to the mode you select or the options you set. 1 Icon Description Auto focus frame 2 Camera shake Zoom indicator 3 1 Information Icon Description Selected shooting mode Available number of photos Available recording time Internal memory Memory ...
Learning icons The icons displayed will change according to the mode you select or the options you set. 1 Icon Description Auto focus frame 2 Camera shake Zoom indicator 3 1 Information Icon Description Selected shooting mode Available number of photos Available recording time Internal memory Memory ...
User Manual
Page 23
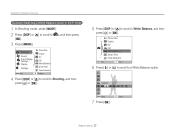
Shooting Sound Front Display Settings Display Settings Exit Photo Size Quality EV ISO White Balance Smart Filter Face Detection Change 4 Press [ ] or [ ] to scroll to Shooting, and then press [ ] or [ ]. 5 Press [ ] or [ ] ...
Shooting Sound Front Display Settings Display Settings Exit Photo Size Quality EV ISO White Balance Smart Filter Face Detection Change 4 Press [ ] or [ ] to scroll to Shooting, and then press [ ] or [ ]. 5 Press [ ] or [ ] ...
User Manual
Page 24
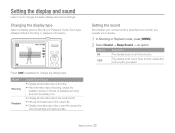
...photos (or available recording time) and the battery icon • Display all information about the current file, except the shooting settings and captured date Setting the sound Set whether your camera. 1 In Shooting or Playback mode, press [ ]. 2 Select Sound → Beep Sound → an... about the current photo • Hide all photographic information. Press [ ] repeatedly to change the display type. Setting the display and sound Learn how to change the basic display and sound settings. Changing the display type Select a display type for Shooting or Playback mode.
...photos (or available recording time) and the battery icon • Display all information about the current file, except the shooting settings and captured date Setting the sound Set whether your camera. 1 In Shooting or Playback mode, press [ ]. 2 Select Sound → Beep Sound → an... about the current photo • Hide all photographic information. Press [ ] repeatedly to change the display type. Setting the display and sound Learn how to change the basic display and sound settings. Changing the display type Select a display type for Shooting or Playback mode.
User Manual
Page 26
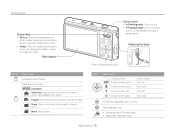
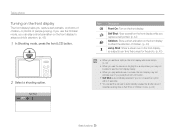
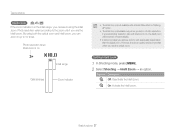
... animation on the front display to attract the attention of people jumping. Taking photos Turning on the front display The front display helps you can set the camera to attract a child's attention. (p. 43) 1 In Shooting mode, press the front LCD button. 2 Select a shooting option. If you use the Children mode,...children. (p. 43) Jump Shot: Show a visual cue on the front display, so subjects can time their jumps for the photo. (p. 43) • When you set timer options, the front display will remain active. (p. 48) • When you use the camera in brightly lit or sunny areas, you may not be...
... animation on the front display to attract the attention of people jumping. Taking photos Turning on the front display The front display helps you can set the camera to attract a child's attention. (p. 43) 1 In Shooting mode, press the front LCD button. 2 Select a shooting option. If you use the Children mode,...children. (p. 43) Jump Shot: Show a visual cue on the front display, so subjects can time their jumps for the photo. (p. 43) • When you set timer options, the front display will remain active. (p. 48) • When you use the camera in brightly lit or sunny areas, you may not be...
User Manual
Page 28
... zoom helps you capture a photo with a Smart Filter effect or Tracking AF option. • The Intelli zoom is available only when you set a 4:3 ratio resolution. Setting Intelli zoom 1 In Shooting mode, press [ ]. 2 Select Shooting → Intelli Zoom → an option. Basic functions 27 By using... Activate the Intelli zoom. Options Description Off: Deactivate the Intelli zoom. Photo resolution varies according to 10 times. If you set another resolution ratio with Intelli zoom on Intelli range Optical range Zoom indicator • The Intelli zoom is not available with ...
... zoom helps you capture a photo with a Smart Filter effect or Tracking AF option. • The Intelli zoom is available only when you set a 4:3 ratio resolution. Setting Intelli zoom 1 In Shooting mode, press [ ]. 2 Select Shooting → Intelli Zoom → an option. Basic functions 27 By using... Activate the Intelli zoom. Options Description Off: Deactivate the Intelli zoom. Photo resolution varies according to 10 times. If you set another resolution ratio with Intelli zoom on Intelli range Optical range Zoom indicator • The Intelli zoom is not available with ...
User Manual
Page 30
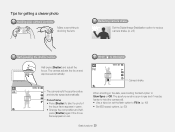
.... (p. 50) Basic functions 29 The camera adjusts the focus and exposure automatically. Focus frame • Press [Shutter] to Fill in the dark, avoid setting the flash option to reduce camera shake. (p. 28) Half-pressing the shutter button Half-press [Shutter] and adjust the focus. The aperture remains open longer... and it may be harder to hold the camera still. • Use a tripod or set the flash option to take the photo if the focus frame appears in red. Tips for getting a clearer photo Holding your camera correctly Make sure...
.... (p. 50) Basic functions 29 The camera adjusts the focus and exposure automatically. Focus frame • Press [Shutter] to Fill in the dark, avoid setting the flash option to reduce camera shake. (p. 28) Half-pressing the shutter button Half-press [Shutter] and adjust the focus. The aperture remains open longer... and it may be harder to hold the camera still. • Use a tripod or set the flash option to take the photo if the focus frame appears in red. Tips for getting a clearer photo Holding your camera correctly Make sure...
User Manual
Page 33
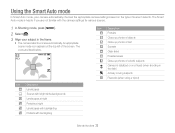
... functions 32 An appropriate scene mode icon appears at night Landscapes with backlighting Portraits with the camera settings for various scenes. 1 In Shooting mode, press [ ]. 2 Select . 3 Align your camera automatically chooses the appropriate camera settings based on a tripod (when shooting in the dark) Actively moving subjects Fireworks (when using a tripod) Icon Description...
... functions 32 An appropriate scene mode icon appears at night Landscapes with backlighting Portraits with the camera settings for various scenes. 1 In Shooting mode, press [ ]. 2 Select . 3 Align your camera automatically chooses the appropriate camera settings based on a tripod (when shooting in the dark) Actively moving subjects Fireworks (when using a tripod) Icon Description...

User Manual
Page 34
... half-press [Shutter]. 5 Press [Shutter] to take the photo. • If the camera does not recognize a proper scene mode, appears and the camera uses default settings. • Even if it detects a face, the camera may not select a portrait mode depending on the subject's position or lighting. • The camera may not... a tripod, the camera may not detect the mode depending on the subject's movement. • In mode, the camera consumes more battery power, because it changes settings often to select appropriate scenes. Extended functions 33
... half-press [Shutter]. 5 Press [Shutter] to take the photo. • If the camera does not recognize a proper scene mode, appears and the camera uses default settings. • Even if it detects a face, the camera may not select a portrait mode depending on the subject's position or lighting. • The camera may not... a tripod, the camera may not detect the mode depending on the subject's movement. • In mode, the camera consumes more battery power, because it changes settings often to select appropriate scenes. Extended functions 33
User Manual
Page 36
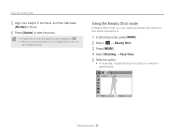
...press [ ]. 2 Select → Beauty Shot. 3 Press [ ]. 4 Select Shooting → Face Tone. 5 Select an option. • For example, increase the face tone setting to a TV in the frame, and then half-press [Shutter] to focus. 6 Press [Shutter] to take the photo. • In Magic Frame mode, the resolution... is automatically set to . • When you cannot capture photos. Level 2 Back Move Extended functions 35 Using the Scene mode 5 Align your subject in Magic ...
...press [ ]. 2 Select → Beauty Shot. 3 Press [ ]. 4 Select Shooting → Face Tone. 5 Select an option. • For example, increase the face tone setting to a TV in the frame, and then half-press [Shutter] to focus. 6 Press [Shutter] to take the photo. • In Magic Frame mode, the resolution... is automatically set to . • When you cannot capture photos. Level 2 Back Move Extended functions 35 Using the Scene mode 5 Align your subject in Magic ...
User Manual
Page 37
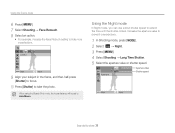
... to hide more imperfections. Using the Scene mode 6 Press [ ]. 7 Select Shooting → Face Retouch. 8 Select an option. • For example, increase the Face Retouch setting to prevent overexposure. 1 In Shooting mode, press [ ]. 2 Select → Night. 3 Press [ ]. 4 Select Shooting → Long Time Shutter. 5 Select the aperture ...half-press [Shutter] to focus. 10 Press [Shutter] to Auto Macro. When using the Beauty Shot mode, the focus distance will be set to take the photo. Using the Night mode In Night mode, you can use a slow shutter speed to extend the time until the...
... to hide more imperfections. Using the Scene mode 6 Press [ ]. 7 Select Shooting → Face Retouch. 8 Select an option. • For example, increase the Face Retouch setting to prevent overexposure. 1 In Shooting mode, press [ ]. 2 Select → Night. 3 Press [ ]. 4 Select Shooting → Long Time Shutter. 5 Select the aperture ...half-press [Shutter] to focus. 10 Press [Shutter] to Auto Macro. When using the Beauty Shot mode, the focus distance will be set to take the photo. Using the Night mode In Night mode, you can use a slow shutter speed to extend the time until the...


