User Manual
Page 6
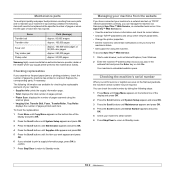
... cartridge ...10.4 Toner cartridge storage ...10.4 Expected cartridge life ...10.4 Redistributing toner ...10.4 Replacing the toner cartridge ...10.5 Replacing the imaging unit ...10.6 Replacing the waste toner container ...10.8 Maintenance parts ...10.9 Checking replaceables ...10.9 Managing your machine from the website ...10.9 ...Printing problems ...11.6 Printing quality problems ...11.7 Copying problems ...11.10 Scanning problems ...11.10 Network Scan problems (CLX-2160N only) ...11.11 Common Windows problems ...11.11 Common Macintosh problems ...11.11 Common Linux problems ...11.12 12.
... cartridge ...10.4 Toner cartridge storage ...10.4 Expected cartridge life ...10.4 Redistributing toner ...10.4 Replacing the toner cartridge ...10.5 Replacing the imaging unit ...10.6 Replacing the waste toner container ...10.8 Maintenance parts ...10.9 Checking replaceables ...10.9 Managing your machine from the website ...10.9 ...Printing problems ...11.6 Printing quality problems ...11.7 Copying problems ...11.10 Scanning problems ...11.10 Network Scan problems (CLX-2160N only) ...11.11 Common Windows problems ...11.11 Common Macintosh problems ...11.11 Common Linux problems ...11.12 12.
User Manual
Page 12
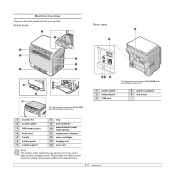
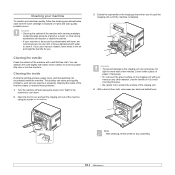
... components of your machine: Front view Rear view * The figure above shows an CLX-2160N with all available accessories. * The figure above shows an CLX-2160N with all available accessories. 1 power switch 2 network port 3 USB port ...4 power receptacle 5 rear cover 1 scanner lid 2 scanner glass 3 USB memory port 4 front cover 5 handle 6 control panel 7 output support 8 tray 9 manual feeder 10 manual feeder paper width guides 11 waste toner container 12 toner cartridges 13 imaging unit 14 scan unit...
... components of your machine: Front view Rear view * The figure above shows an CLX-2160N with all available accessories. * The figure above shows an CLX-2160N with all available accessories. 1 power switch 2 network port 3 USB port ...4 power receptacle 5 rear cover 1 scanner lid 2 scanner glass 3 USB memory port 4 front cover 5 handle 6 control panel 7 output support 8 tray 9 manual feeder 10 manual feeder paper width guides 11 waste toner container 12 toner cartridges 13 imaging unit 14 scan unit...
User Manual
Page 44
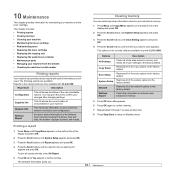
...memory • Cleaning your machine • Maintaining the toner cartridge • Redistributing toner • Replacing the toner cartridge • Replacing the imaging unit • Replacing the waste toner container • Maintenance parts • Managing your changes after changing settings. Restores all reports and lists, .... Restores all of the system options to the factory default. Network Info. The following reports are available only with CLX-2160N. The options in memory and resets all of pages scanned, and results. Options All Settings Copy Setup Scan ...
...memory • Cleaning your machine • Maintaining the toner cartridge • Redistributing toner • Replacing the toner cartridge • Replacing the imaging unit • Replacing the waste toner container • Maintenance parts • Managing your changes after changing settings. Restores all reports and lists, .... Restores all of the system options to the factory default. Network Info. The following reports are available only with CLX-2160N. The options in memory and resets all of pages scanned, and results. Options All Settings Copy Setup Scan ...
User Manual
Page 45
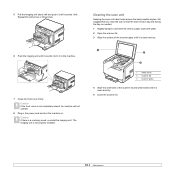
..., paper, toner, and dust particles can discolor or distort the cabinet. • If your machine or its bottom. 3 Extend the top handle on the imaging unit with a soft lint-free cloth. This buildup can dampen the cloth slightly with water to light for more than a few minutes. Cleaning your machine To... contaminated with toner, we recommend you to use cloth or tissue dampened with water, but be harmful for you use it with a piece of the imaging unit. 4 With a dry lint-free cloth, wipe away any water drip onto or into the machine. If you . Caution • Cleaning the cabinet of ...
..., paper, toner, and dust particles can discolor or distort the cabinet. • If your machine or its bottom. 3 Extend the top handle on the imaging unit with a soft lint-free cloth. This buildup can dampen the cloth slightly with water to light for more than a few minutes. Cleaning your machine To... contaminated with toner, we recommend you to use cloth or tissue dampened with water, but be harmful for you use it with a piece of the imaging unit. 4 With a dry lint-free cloth, wipe away any water drip onto or into the machine. If you . Caution • Cleaning the cabinet of ...
User Manual
Page 46
...not operate. 8 Plug in to the machine. 7 Close the front cover firmly. 5 Pull the imaging unit about half and push it until it sounds 'click' in the power cord and turn the machine on. The imaging unit is clean and dry. 5 Close the scanner lid. 10.3 Repeat this action two or three times.... 6 Push the imaging unit until it is not properly installed. We suggest that you clean the scan unit at the start of each day and during the day, as needed. 1 Slightly dampen a soft lint-free cloth ...
...not operate. 8 Plug in to the machine. 7 Close the front cover firmly. 5 Pull the imaging unit about half and push it until it sounds 'click' in the power cord and turn the machine on. The imaging unit is clean and dry. 5 Close the scanner lid. 10.3 Repeat this action two or three times.... 6 Push the imaging unit until it is not properly installed. We suggest that you clean the scan unit at the start of each day and during the day, as needed. 1 Slightly dampen a soft lint-free cloth ...
User Manual
Page 49
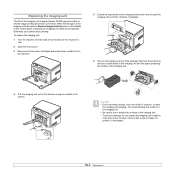
... devices on both sides of the imaging unit and the paper protecting the surface of the imaging unit. 4 Pull the imaging unit out of the machine using the handle on the imaging unit and then use sharp objects, such as a knife or scissors, to pull the imaging unit out of the machine completely. 6 Take a new imaging unit out of paper to be...
... devices on both sides of the imaging unit and the paper protecting the surface of the imaging unit. 4 Pull the imaging unit out of the machine using the handle on the imaging unit and then use sharp objects, such as a knife or scissors, to pull the imaging unit out of the machine completely. 6 Take a new imaging unit out of paper to be...

User Manual
Page 50
... If there is not properly installed. 7 Holding the handles on the new imaging unit, push the imaging unit until it out. 10 Close the front cover firmly. Caution If the front cover is not completely closed, the machine will automatically reset the ...; After rebooting, your machine will not operate. 11 Turn the machine on the toner cartridge entrances of the imaging unit. When you force too much to get ready. Wait for about 1.5 minutes for the imaging unit. • If the installation is completed properly, a guide report is printed out automatically. Caution If you remove ...
... If there is not properly installed. 7 Holding the handles on the new imaging unit, push the imaging unit until it out. 10 Close the front cover firmly. Caution If the front cover is not completely closed, the machine will automatically reset the ...; After rebooting, your machine will not operate. 11 Turn the machine on the toner cartridge entrances of the imaging unit. When you force too much to get ready. Wait for about 1.5 minutes for the imaging unit. • If the installation is completed properly, a guide report is printed out automatically. Caution If you remove ...
User Manual
Page 51
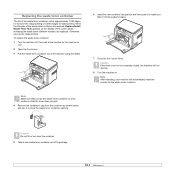
... for the machine to cool. 2 Open the front cover. 3 Pull the waste toner container out of the waste toner container unit is approximately 1,250 pages for full color 5% image printing or 5,000 images for the waste toner container. Caution Do not tilt or turn over the container. 5 Take a new waste toner container out...
... for the machine to cool. 2 Open the front cover. 3 Pull the waste toner container out of the waste toner container unit is approximately 1,250 pages for full color 5% image printing or 5,000 images for the waste toner container. Caution Do not tilt or turn over the container. 5 Take a new waste toner container out...
User Manual
Page 52
....xxx.xxx) in top working condition the following items will need to be required. Items Transfer belt Transfer roller Fuser unit Tray rubber pad Pickup roller Yield (Average) Approx. 60,000 images Approx. 100,000 pages Approx. 100,000 black pages or 50,000 color pages Approx. 250,000 pages Approx. ... appears and press OK. 3 Press the Scroll buttons until Maintenance appears and press OK. 4 Press the Scroll buttons until Copy Menu appears on the Samsung website, the machine's serial number may be replaced at the specified number of pages or when the life span of the display and press OK...
....xxx.xxx) in top working condition the following items will need to be required. Items Transfer belt Transfer roller Fuser unit Tray rubber pad Pickup roller Yield (Average) Approx. 60,000 images Approx. 100,000 pages Approx. 100,000 black pages or 50,000 color pages Approx. 250,000 pages Approx. ... appears and press OK. 3 Press the Scroll buttons until Maintenance appears and press OK. 4 Press the Scroll buttons until Copy Menu appears on the Samsung website, the machine's serial number may be replaced at the specified number of pages or when the life span of the display and press OK...
User Manual
Page 55
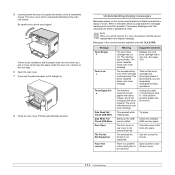
.... Data Write Fail Check USB Mem. Suggested solutions Replace the color toner cartridge with CLX-2160N. Unplug the power cord and plug it is completely closed . Open and then... Locked Meaning The color toner cartridge has run out. The machine received several papers with many images, and it . See page 10.5 Take out the toner cartridge and thoroughly shake it can... rear cover is a problem in . The inner cover will be closed automatically by the scan unit closed . There is not securely latched. Understanding display messages Messages appear on the control panel display...
.... Data Write Fail Check USB Mem. Suggested solutions Replace the color toner cartridge with CLX-2160N. Unplug the power cord and plug it is completely closed . Open and then... Locked Meaning The color toner cartridge has run out. The machine received several papers with many images, and it . See page 10.5 Take out the toner cartridge and thoroughly shake it can... rear cover is a problem in . The inner cover will be closed automatically by the scan unit closed . There is not securely latched. Understanding display messages Messages appear on the control panel display...
User Manual
Page 56
...have installed is not for your machine. Clear the jam. We recommend Samsung-genuine color toner cartridge. There is not securely latched. Install Imaging Unit into place. Install the a Samsung-genuine color toner cartridge designed for your machine. Paper has jammed in the...See page 11.1, 11.2. The corresponding Imaging Unit of paper. A problem has occurred in the paper exit area. The arrow indicates which color toner cartridge. Remove paper. The arrow indicates which color toner cartridge. Install the a Samsung-genuine part designed for service. See ...
...have installed is not for your machine. Clear the jam. We recommend Samsung-genuine color toner cartridge. There is not securely latched. Install Imaging Unit into place. Install the a Samsung-genuine color toner cartridge designed for your machine. Paper has jammed in the...See page 11.1, 11.2. The corresponding Imaging Unit of paper. A problem has occurred in the paper exit area. The arrow indicates which color toner cartridge. Remove paper. The arrow indicates which color toner cartridge. Install the a Samsung-genuine part designed for service. See ...

User Manual
Page 60
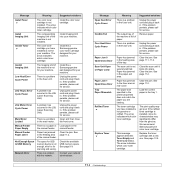
...machine, so the transfer roller may need cleaning. See page 5.1. • If characters are improperly formed and producing a wavy effect, the scanner unit may be dirty. Page skew AAAAaAaaaBaBBBbBbbbCbCCCCccccc • Ensure that the paper or other material is too rough and a lot of background shading. •...page 10.4. If the defects occur on the page: • The paper is loaded correctly and the guides are improperly formed and producing hollow images, the paper stock may be too slick. If black vertical streaks appear on the page: • The surface of the machine. Try a...
...machine, so the transfer roller may need cleaning. See page 5.1. • If characters are improperly formed and producing a wavy effect, the scanner unit may be dirty. Page skew AAAAaAaaaBaBBBbBbbbCbCCCCccccc • Ensure that the paper or other material is too rough and a lot of background shading. •...page 10.4. If the defects occur on the page: • The paper is loaded correctly and the guides are improperly formed and producing hollow images, the paper stock may be too slick. If black vertical streaks appear on the page: • The surface of the machine. Try a...
User Manual
Page 62
...not be set up properly. • Ensure that you place the original to be scanned face down on the original, clean the scan unit. Scanning problems Condition Suggested solutions The scanner does not work. • Make sure that the machine is properly connected and the power is...good cable. Set your computer screen: • "Device can't be enough available memory to hold the document you want to analyze and reproduce the scanned image. Message appears on , Then restart your job again. • The Selected port is currently being used . When that job is complete, try again...
...not be set up properly. • Ensure that you place the original to be scanned face down on the original, clean the scan unit. Scanning problems Condition Suggested solutions The scanner does not work. • Make sure that the machine is properly connected and the power is...good cable. Set your computer screen: • "Device can't be enough available memory to hold the document you want to analyze and reproduce the scanned image. Message appears on , Then restart your job again. • The Selected port is currently being used . When that job is complete, try again...

User Manual
Page 67
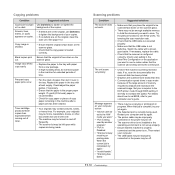
...on 5% coverage of toner cartridges and supplies for your machine: Type Black toner cartridge Cyan toner cartridge Magenta toner cartridge Yellow toner cartridge Imaging unit Waste toner container Yielda Approx. 2,000 pages Approx. 1,000 pages Approx. 1,000 pages Approx. 1,000 pages Approx. 20,000 black ...M300A CLP-Y300A CLP-R300A CLP-W300A a. Usage conditions and print patterns may cause results to purchase To order Samsung-authorized supplies, contact your local Samsung dealer or the retailer where you purchased your machine, or visit www.samsungprinter.com and select your country/region for...
...on 5% coverage of toner cartridges and supplies for your machine: Type Black toner cartridge Cyan toner cartridge Magenta toner cartridge Yellow toner cartridge Imaging unit Waste toner container Yielda Approx. 2,000 pages Approx. 1,000 pages Approx. 1,000 pages Approx. 1,000 pages Approx. 20,000 black ...M300A CLP-Y300A CLP-R300A CLP-W300A a. Usage conditions and print patterns may cause results to purchase To order Samsung-authorized supplies, contact your local Samsung dealer or the retailer where you purchased your machine, or visit www.samsungprinter.com and select your country/region for...
User Manual
Page 70
INDEX Numerics 2/4-up, special copy 6.3 B Back 1.3 background image, erase 6.5 Black Start 1.3 C cleaning inside 10.2 outside 10.2 scan unit 10.3 clone, special copy 6.4 contrast, copy 6.1 copying 2/4-up 6.3 darkness 6.1 default setting, change 6.2 erasing background 6.5 ID card copy 6.3 original type 6.2 poster 6.4 reduce/...11 paper feeding 11.5 printing 11.6 printing quality 11.7 scanning 11.10 Windows 11.11 R replacement parts 10.9 replacing imaging unit 10.6 toner cartridge 10.5 waste toner container 10.8 reports, print 10.1 S scan power save mode 2.2 Scan to 1.3 scanner glass cleaning 10...
INDEX Numerics 2/4-up, special copy 6.3 B Back 1.3 background image, erase 6.5 Black Start 1.3 C cleaning inside 10.2 outside 10.2 scan unit 10.3 clone, special copy 6.4 contrast, copy 6.1 copying 2/4-up 6.3 darkness 6.1 default setting, change 6.2 erasing background 6.5 ID card copy 6.3 original type 6.2 poster 6.4 reduce/...11 paper feeding 11.5 printing 11.6 printing quality 11.7 scanning 11.10 Windows 11.11 R replacement parts 10.9 replacing imaging unit 10.6 toner cartridge 10.5 waste toner container 10.8 reports, print 10.1 S scan power save mode 2.2 Scan to 1.3 scanner glass cleaning 10...


