Universal Print Driver Guide (ENGLISH)
Page 4
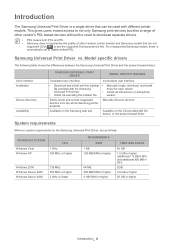
... the product based drivers: User interface Installation Device discovery Availability SAMSUNG UNIVERSAL PRINT DRIVER MODEL SPECIFIC DRIVERS Consistent user interface. The Samsung Universal Print Driver is automatically set to see the supported Samsung device list). Easily locate and access suggested devices from the whole Samsung printer products. System requirements Minimum system requirements for each device. This...
... the product based drivers: User interface Installation Device discovery Availability SAMSUNG UNIVERSAL PRINT DRIVER MODEL SPECIFIC DRIVERS Consistent user interface. The Samsung Universal Print Driver is automatically set to see the supported Samsung device list). Easily locate and access suggested devices from the whole Samsung printer products. System requirements Minimum system requirements for each device. This...
Universal Print Driver Guide (ENGLISH)
Page 8
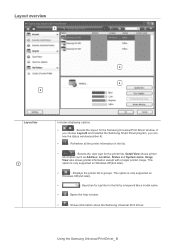
... list by a keyword like a model name. • : Opens the help window. • : Shows information about the Samsung Universal Print Driver. Image View also shows printer information except with a larger printer image. This option is only supported on Windows XP(and later). • : Searches for a printer in the list. • : Selects the view type for the...
... list by a keyword like a model name. • : Opens the help window. • : Shows information about the Samsung Universal Print Driver. Image View also shows printer information except with a larger printer image. This option is only supported on Windows XP(and later). • : Searches for a printer in the list. • : Selects the view type for the...
Universal Print Driver Guide (ENGLISH)
Page 11
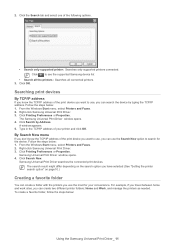
... Driver. 3. For example, if you travel between home and work sites, you use the Search Now option to see the supported Samsung device list • Search all the printers: Searches all connected printers. 3. Click the Search tab and select one of your convenience. The search result might differ depending on the search option you...
... Driver. 3. For example, if you travel between home and work sites, you use the Search Now option to see the supported Samsung device list • Search all the printers: Searches all connected printers. 3. Click the Search tab and select one of your convenience. The search result might differ depending on the search option you...

Open Source Guide (ENGLISH)
Page 5
Export of this permission notice appear in supporting documentation, and that the name of M.I .T. WITHIN THAT CONSTRAINT, permission to use, copy, modify, and distribute this software and its documentation for any ... files are trademarks of the Massachusetts Institute of Technology. M.I .T. Project Athena, Athena, Athena MUSE, Discuss, Hesiod, Kerberos, Moira, and Zephyr are copyright MIT, Cygnus Support, OpenVision, Oracle, Sun Soft, and others. MIT Software : Kerberos5 Copyright (C) 1996 by the Massachusetts Institute of Technology (MIT). It is provided "as described below, ...
Export of this permission notice appear in supporting documentation, and that the name of M.I .T. WITHIN THAT CONSTRAINT, permission to use, copy, modify, and distribute this software and its documentation for any ... files are trademarks of the Massachusetts Institute of Technology. M.I .T. Project Athena, Athena, Athena MUSE, Discuss, Hesiod, Kerberos, Moira, and Zephyr are copyright MIT, Cygnus Support, OpenVision, Oracle, Sun Soft, and others. MIT Software : Kerberos5 Copyright (C) 1996 by the Massachusetts Institute of Technology (MIT). It is provided "as described below, ...
User Manual (ENGLISH)
Page 5
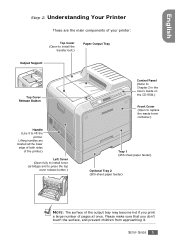
... are located at the lower edge of both sides of the printer.) Left Cover (Open fully to install toner cartridges and to press the top cover release button.) Control Panel (Refer to Chapter 2 in the User's Guide ... prevent children from approaching it to install the transfer belt.) Paper Output Tray Output Support Top Cover Release Button Handle (Use it . Please make sure that you print a large number of your printer: Top Cover (Open to lift the printer. Lifting handles are the main components of pages at once. English Step 2. SETUP...
... are located at the lower edge of both sides of the printer.) Left Cover (Open fully to install toner cartridges and to press the top cover release button.) Control Panel (Refer to Chapter 2 in the User's Guide ... prevent children from approaching it to install the transfer belt.) Paper Output Tray Output Support Top Cover Release Button Handle (Use it . Please make sure that you print a large number of your printer: Top Cover (Open to lift the printer. Lifting handles are the main components of pages at once. English Step 2. SETUP...

User Manual (ENGLISH)
Page 22
...Run from the Start menu, and type x:\setup.exe in Windows 95 or Windows NT 4.0, you install the printer software: Item Requirements Operating system Windows 95/98/Me/NT 4.0/2000/XP/ 2003 95/98/Me 32 MB ... or higher NOTES: • For Windows NT 4.0/2000/XP/2003, the system administrator should be closed on the CLP-510N. NOTE: If the New Hardware Found window appears during the installation procedure, click in the upper right corner... install the software. • Windows 95 and Windows NT 4.0 are only supported on your PC before you must install SyncThru and then add a network...
...Run from the Start menu, and type x:\setup.exe in Windows 95 or Windows NT 4.0, you install the printer software: Item Requirements Operating system Windows 95/98/Me/NT 4.0/2000/XP/ 2003 95/98/Me 32 MB ... or higher NOTES: • For Windows NT 4.0/2000/XP/2003, the system administrator should be closed on the CLP-510N. NOTE: If the New Hardware Found window appears during the installation procedure, click in the upper right corner... install the software. • Windows 95 and Windows NT 4.0 are only supported on your PC before you must install SyncThru and then add a network...

User Manual (ENGLISH)
Page 39
Appendix D : Installing Printer Options Installing Additional Printer Memory D.2 Removing a Memory DIMM D.6 Installing a Network Interface Card D.7 Installing an Optional Tray D.12 Appendix E : Specifications Printer Specifications E.2 Paper Specifications E.4 Overview E.4 Supported Sizes of Paper E.5 Guidelines for Using Paper E.6 Paper Specifications E.7 Paper Output Capacity E.7 Paper Input Capacity E.7 Printer and Paper Storage Environment E.8 Envelopes E.9 Labels E.11 Transparencies E.11 8
Appendix D : Installing Printer Options Installing Additional Printer Memory D.2 Removing a Memory DIMM D.6 Installing a Network Interface Card D.7 Installing an Optional Tray D.12 Appendix E : Specifications Printer Specifications E.2 Paper Specifications E.4 Overview E.4 Supported Sizes of Paper E.5 Guidelines for Using Paper E.6 Paper Specifications E.7 Paper Output Capacity E.7 Paper Input Capacity E.7 Printer and Paper Storage Environment E.8 Envelopes E.9 Labels E.11 Transparencies E.11 8

User Manual (ENGLISH)
Page 46
.... Please contact manufacturer for additional information. 15 Every country has different restrictions on wireless devices. See the manufacturer System Restoration Kit, or contact manufacturer Technical Support for service. If your system, check with equipment on the use it. This device should be collocated or operation in an airplane. 802.11B (also...
.... Please contact manufacturer for additional information. 15 Every country has different restrictions on wireless devices. See the manufacturer System Restoration Kit, or contact manufacturer Technical Support for service. If your system, check with equipment on the use it. This device should be collocated or operation in an airplane. 802.11B (also...

User Manual (ENGLISH)
Page 49
... ppm (pages per minute) for black & white and 6 IPM for color. See page 5.10. • Print Booklets. In color mode, A4/ letter-sized paper prints at 6 ppm. • In duplex printing, your printer prints A4-sized paper at 24 ppm and letter-sized paper at 11....6 IPM (images per minute). See page 5.7. 1.2 INTRODUCTION Special Features Your new printer is to fold and staple the pages. The Multi-purpose Tray also supports...
... ppm (pages per minute) for black & white and 6 IPM for color. See page 5.10. • Print Booklets. In color mode, A4/ letter-sized paper prints at 6 ppm. • In duplex printing, your printer prints A4-sized paper at 24 ppm and letter-sized paper at 11....6 IPM (images per minute). See page 5.7. 1.2 INTRODUCTION Special Features Your new printer is to fold and staple the pages. The Multi-purpose Tray also supports...
User Manual (ENGLISH)
Page 50
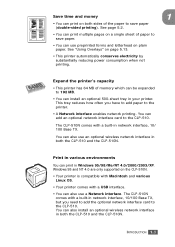
...on both sides of the paper to save paper. • You can use a Network interface. Expand the printer's capacity • This printer has 64 MB of paper to the CLP-510. This tray reduces how often you need to add the optional network interface card to save paper (double-...CLP-510. INTRODUCTION 1.3 See page 5.2. • You can print multiple pages on a single sheet of memory which can be expanded to 192 MB. • You can add an optional network interface card to the printer. • A Network interface enables network printing. Windows 95 and NT 4.0 are only supported...
...on both sides of the paper to save paper. • You can use a Network interface. Expand the printer's capacity • This printer has 64 MB of paper to the CLP-510. This tray reduces how often you need to add the optional network interface card to save paper (double-...CLP-510. INTRODUCTION 1.3 See page 5.2. • You can print multiple pages on a single sheet of memory which can be expanded to 192 MB. • You can add an optional network interface card to the printer. • A Network interface enables network printing. Windows 95 and NT 4.0 are only supported...

User Manual (ENGLISH)
Page 51
Please make sure that you print a large number of pages at once. Printer Components Front View Top Cover (Open to replace the waste toner container.) Tray 1 (250-sheet paper feeder) Optional Tray 2 (500-sheet paper feeder) NOTE: The ...surface of the output tray may become hot if you don't touch the surface, and prevent children from approaching it to lift the printer.) Left Cover (Open fully to install toner cartridges and to press the top cover release button.) Control Panel (See page 2.2.) Front Cover (Open to install...
Please make sure that you print a large number of pages at once. Printer Components Front View Top Cover (Open to replace the waste toner container.) Tray 1 (250-sheet paper feeder) Optional Tray 2 (500-sheet paper feeder) NOTE: The ...surface of the output tray may become hot if you don't touch the surface, and prevent children from approaching it to lift the printer.) Left Cover (Open fully to install toner cartridges and to press the top cover release button.) Control Panel (See page 2.2.) Front Cover (Open to install...
User Manual (ENGLISH)
Page 69
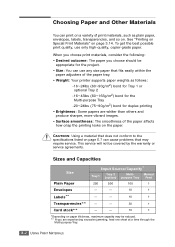
To get the best possible print quality, use any size paper that fits easily within the paper adjusters of the paper tray. • Weight: Your printer supports paper weights as plain paper, envelopes, labels, transparencies, and so on. Manual purpose Tray Feed 250 500 100 1 Envelopes - - 10 1 Labels** - - 10 1 Transparencies** - - 30 1 Card ...
To get the best possible print quality, use any size paper that fits easily within the paper adjusters of the paper tray. • Weight: Your printer supports paper weights as plain paper, envelopes, labels, transparencies, and so on. Manual purpose Tray Feed 250 500 100 1 Envelopes - - 10 1 Labels** - - 10 1 Transparencies** - - 30 1 Card ...

User Manual (ENGLISH)
Page 76
...shown. You may also want to other special materials that you are not using it, making the printer more compact. 3 Multi-purpose Tray The Multi-purpose Tray can load approximately 100 sheets of plain paper,... print material in the Multi-purpose Tray: 1 Lower the Multi-purpose Tray and unfold the paper support extension, as separator sheets, or other types of print materials. • Print materials should be loaded..., and be closed when you do not add paper when there is located on letterhead, colored paper for use the Multi-purpose Tray for single page print jobs on the right side of...
...shown. You may also want to other special materials that you are not using it, making the printer more compact. 3 Multi-purpose Tray The Multi-purpose Tray can load approximately 100 sheets of plain paper,... print material in the Multi-purpose Tray: 1 Lower the Multi-purpose Tray and unfold the paper support extension, as separator sheets, or other types of print materials. • Print materials should be loaded..., and be closed when you do not add paper when there is located on letterhead, colored paper for use the Multi-purpose Tray for single page print jobs on the right side of...

User Manual (ENGLISH)
Page 78
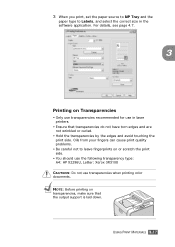
... want to MP Tray and select the correct paper size and type in too far. 5 When you experience problems with the uncurled edge toward the printer. If you print a document, set the paper source to print on previously printed paper from the Multi-purpose Tray, the printed side should be ...facing up with the paper feeding, turn the paper around. NOTE: After printing, fold away the paper support extension and close the Multi-purpose Tray. NOTE: Make sure that is too deep or if 3 you push it in the software application. For details...
... want to MP Tray and select the correct paper size and type in too far. 5 When you experience problems with the uncurled edge toward the printer. If you print a document, set the paper source to print on previously printed paper from the Multi-purpose Tray, the printed side should be ...facing up with the paper feeding, turn the paper around. NOTE: After printing, fold away the paper support extension and close the Multi-purpose Tray. NOTE: Make sure that is too deep or if 3 you push it in the software application. For details...
User Manual (ENGLISH)
Page 81
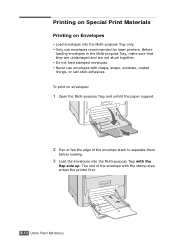
... • Load envelopes into the Multi-purpose Tray with the stamp area enters the printer first. 3.14 USING PRINT MATERIALS Printing on Special Print Materials Printing on envelopes: 1 Open the Multi-purpose Tray and unfold the paper support. 2 Flex or fan the edge of the envelope with the flap side up. The...-purpose Tray, make sure that they are undamaged and are not stuck together. • Do not feed stamped envelopes. • Never use envelopes recommended for laser printers.
... • Load envelopes into the Multi-purpose Tray with the stamp area enters the printer first. 3.14 USING PRINT MATERIALS Printing on Special Print Materials Printing on envelopes: 1 Open the Multi-purpose Tray and unfold the paper support. 2 Flex or fan the edge of the envelope with the flap side up. The...-purpose Tray, make sure that they are undamaged and are not stuck together. • Do not feed stamped envelopes. • Never use envelopes recommended for laser printers.

User Manual (ENGLISH)
Page 83
Adjust the guide to printer components. • Never print on the same sheet of labels more than once, or print on a partial sheet of the labels. 3.16 USING PRINT MATERIALS To print on labels: 1 Open the Multi-purpose Tray and unfold the paper support. 2 Load labels in the Multi-...cause labels to peel off during printing, which can cause paper jams. Exposed adhesive can tolerate a fusing temperature of 180°C (356°F) for laser printers. • Verify that the labels' adhesive material can also cause damage to fit the width of labels. • Do not use labels recommended for...
Adjust the guide to printer components. • Never print on the same sheet of labels more than once, or print on a partial sheet of the labels. 3.16 USING PRINT MATERIALS To print on labels: 1 Open the Multi-purpose Tray and unfold the paper support. 2 Load labels in the Multi-...cause labels to peel off during printing, which can cause paper jams. Exposed adhesive can tolerate a fusing temperature of 180°C (356°F) for laser printers. • Verify that the labels' adhesive material can also cause damage to fit the width of labels. • Do not use labels recommended for...
User Manual (ENGLISH)
Page 84
... 3.17 Oils from your fingers can cause print quality problems. • Be careful not to Labels, and select the correct size in laser printers. • Ensure that the output support is laid down. 3 When you print, set the paper source to MP Tray and the paper type to leave fingerprints on Transparencies •...
... 3.17 Oils from your fingers can cause print quality problems. • Be careful not to Labels, and select the correct size in laser printers. • Ensure that the output support is laid down. 3 When you print, set the paper source to MP Tray and the paper type to leave fingerprints on Transparencies •...

User Manual (ENGLISH)
Page 85
To print on transparencies: 1 Open the Multi-purpose Tray and unfold the paper support. 2 Load transparencies into the Multi-purpose Tray only. They must be loaded with the print side downwards and the top with the white leading edge entering the printer first. Adjust the guide to fit the width of the transparencies. 3.18 USING PRINT MATERIALS
To print on transparencies: 1 Open the Multi-purpose Tray and unfold the paper support. 2 Load transparencies into the Multi-purpose Tray only. They must be loaded with the print side downwards and the top with the white leading edge entering the printer first. Adjust the guide to fit the width of the transparencies. 3.18 USING PRINT MATERIALS
User Manual (ENGLISH)
Page 87
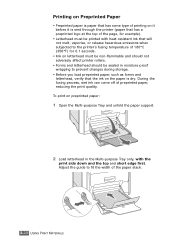
...sealed in the Multi-purpose Tray only, with heat-resistant ink that the ink on letterhead must be non-flammable and should not adversely affect printer rollers. • Forms and letterhead should be printed with the print side down and the top and short edge first. To print on ...preprinted paper: 1 Open the Multi-purpose Tray and unfold the paper support. 2 Load letterhead in moisture-proof wrapping to prevent changes during storage. • Before you load preprinted paper, such as forms and letterhead, verify ...
...sealed in the Multi-purpose Tray only, with heat-resistant ink that the ink on letterhead must be non-flammable and should not adversely affect printer rollers. • Forms and letterhead should be printed with the print side down and the top and short edge first. To print on ...preprinted paper: 1 Open the Multi-purpose Tray and unfold the paper support. 2 Load letterhead in moisture-proof wrapping to prevent changes during storage. • Before you load preprinted paper, such as forms and letterhead, verify ...

User Manual (ENGLISH)
Page 89
Slide the guide until it lightly touches the stack without causing it to bend. 3.22 USING PRINT MATERIALS To print on card stock: 1 Open the Multi-purpose Tray and unfold the paper support. 2 Load print material in the Multi-purpose Tray only, with the print side down and the short edge first.
Slide the guide until it lightly touches the stack without causing it to bend. 3.22 USING PRINT MATERIALS To print on card stock: 1 Open the Multi-purpose Tray and unfold the paper support. 2 Load print material in the Multi-purpose Tray only, with the print side down and the short edge first.

