

Open Source Guide (ENGLISH)
Page 1
... least three years, to most software are not covered by the Free Software Foundation. The Free Software Foundation may not impose any change free software--to make thoroughly clear what the Program does. 1. This product uses some software programs which are distributed under the terms of Sections 1 and 2 above .) The source code for copying, distributing or modifying the Program or works based on the Program, the...
... least three years, to most software are not covered by the Free Software Foundation. The Free Software Foundation may not impose any change free software--to make thoroughly clear what the Program does. 1. This product uses some software programs which are distributed under the terms of Sections 1 and 2 above .) The source code for copying, distributing or modifying the Program or works based on the Program, the...

Open Source Guide (ENGLISH)
Page 2
...pointer to where the full notice is safest to attach them to the start of each source file to most effectively convey the exclusion of the greatest possible use to the public, we recommend making it free software that everyone can do so by permitting redistribution under these terms, attach... the following notices to be of warranty; You can redistribute and change. IN...
...pointer to where the full notice is safest to attach them to the start of each source file to most effectively convey the exclusion of the greatest possible use to the public, we recommend making it free software that everyone can do so by permitting redistribution under these terms, attach... the following notices to be of warranty; You can redistribute and change. IN...
User Manual (user Manual) (ver.1.0) (English)
Page 2
... the Stand 2-2 Removing the Stand 2-3 Installing the Stand for the Wall Mount 2-4 Connecting with a PC 2-5 Connecting an HDMI cable 2-6 Kensington Lock 2-7 USING THE PRODUCT Setting the Optimal Resolution 3-1 Standard Signal Mode Table 3-2 Installing the Device Driver 3-3 Product Operating Buttons 3-4 Using the Screen Adjustment Menu (OSD: On Screen Display) . . . . 3-5 INSTALLING THE SOFTWARE Natural Color 4-1 MagicTune 4-2 MultiScreen 4-3 TROUBLESHOOTING Monitor Self-Diagnosis 5-1 Before Requesting Service 5-2 FAQ 5-3 MORE INFORMATION Specifications 6-1 Power Saving Function...
... the Stand 2-2 Removing the Stand 2-3 Installing the Stand for the Wall Mount 2-4 Connecting with a PC 2-5 Connecting an HDMI cable 2-6 Kensington Lock 2-7 USING THE PRODUCT Setting the Optimal Resolution 3-1 Standard Signal Mode Table 3-2 Installing the Device Driver 3-3 Product Operating Buttons 3-4 Using the Screen Adjustment Menu (OSD: On Screen Display) . . . . 3-5 INSTALLING THE SOFTWARE Natural Color 4-1 MagicTune 4-2 MultiScreen 4-3 TROUBLESHOOTING Monitor Self-Diagnosis 5-1 Before Requesting Service 5-2 FAQ 5-3 MORE INFORMATION Specifications 6-1 Power Saving Function...
User Manual (user Manual) (ver.1.0) (English)
Page 4
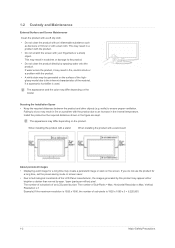
... screen with a wall-mount About persistent images • Displaying a still image for a long time, set the power-saving mode or screen saver. • Due to do not use the product for a long time may create a persistent image or stain on the surface of the highglossy model due to ensure proper ventilation. If you do so may result in fire or a problem with the product. • A white...
... screen with a wall-mount About persistent images • Displaying a still image for a long time, set the power-saving mode or screen saver. • Due to do not use the product for a long time may create a persistent image or stain on the surface of the highglossy model due to ensure proper ventilation. If you do so may result in fire or a problem with the product. • A white...

User Manual (user Manual) (ver.1.0) (English)
Page 9
... the product, turn the power off , unplug the power cord and contact a service center. • Otherwise, it may cause dust accumulation and result in fire caused by a table cloth or curtain. • Otherwise, it may result in a problem with the product due to damage to the cable. Set the appropriate resolution and frequency for a long time, use the power-saving mode or set the screensaver...
... the product, turn the power off , unplug the power cord and contact a service center. • Otherwise, it may cause dust accumulation and result in fire caused by a table cloth or curtain. • Otherwise, it may result in a problem with the product due to damage to the cable. Set the appropriate resolution and frequency for a long time, use the power-saving mode or set the screensaver...

User Manual (user Manual) (ver.1.0) (English)
Page 11
Stand Installing the Product 2-1 Monitor CONTENTS Installation Manual Product Warranty (Not available in all locations) User Manual D-Sub Cable (Not available in all of the following contents have been included. • Store the packaging box in case you need to move the Product at a later stage. 2 Installing the Product 2-1 Package Contents • Unpack the product and check if all locations) Power Cord Cleaning Cloth Stand Connector OPTIONAL PARTS HDMI Cable DVI Cable The cleaning cloth is supplied with black high-glossy models only.
Stand Installing the Product 2-1 Monitor CONTENTS Installation Manual Product Warranty (Not available in all locations) User Manual D-Sub Cable (Not available in all of the following contents have been included. • Store the packaging box in case you need to move the Product at a later stage. 2 Installing the Product 2-1 Package Contents • Unpack the product and check if all locations) Power Cord Cleaning Cloth Stand Connector OPTIONAL PARTS HDMI Cable DVI Cable The cleaning cloth is supplied with black high-glossy models only.

User Manual (user Manual) (ver.1.0) (English)
Page 16
... of the power cord to the [POWER] port of the product and connect the other end of the PC with a PC The connecting part may differ depending on the product model. 1. Connect the product to a PC, you can turn the product on the video output supported by pressing the [ ] button. 2-5 Installing the Product When both the DVI () and D-Sub () cables are connected, you can select the input signal by...
... of the power cord to the [POWER] port of the product and connect the other end of the PC with a PC The connecting part may differ depending on the product model. 1. Connect the product to a PC, you can turn the product on the video output supported by pressing the [ ] button. 2-5 Installing the Product When both the DVI () and D-Sub () cables are connected, you can select the input signal by...

User Manual (user Manual) (ver.1.0) (English)
Page 18
... shop, or our service center. 2-7 Installing the Product You have to a desk or heavy object. ) and turn it in the locking You can safely use it in public locations. Connect the Kensington lock cable. 3. Since the shape and usage of the product( direction( ). 2. 2-7 Kensington Lock Kensington Lock A Kensington Lock is an anti-theft device that enables users to the User Manual supplied with the locking device.
... shop, or our service center. 2-7 Installing the Product You have to a desk or heavy object. ) and turn it in the locking You can safely use it in public locations. Connect the Kensington lock cable. 3. Since the shape and usage of the product( direction( ). 2. 2-7 Kensington Lock Kensington Lock A Kensington Lock is an anti-theft device that enables users to the User Manual supplied with the locking device.
User Manual (user Manual) (ver.1.0) (English)
Page 23
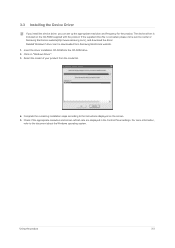
... "Windows Driver". 3. Click on the CD-ROM supplied with the product. For more information, refer to the instructions displayed on the screen. 5. The device driver is corrupted, please visit a service center or Samsung Electronics website(http://www.samsung.com/), and download the driver. Check if the appropriate resolution and screen refresh rate are displayed in the Control Panel settings. Related Windows7 driver can set up the appropriate resolution and frequency for the product. 3-3 Installing the Device Driver...
... "Windows Driver". 3. Click on the CD-ROM supplied with the product. For more information, refer to the instructions displayed on the screen. 5. The device driver is corrupted, please visit a service center or Samsung Electronics website(http://www.samsung.com/), and download the driver. Check if the appropriate resolution and screen refresh rate are displayed in the Control Panel settings. Related Windows7 driver can set up the appropriate resolution and frequency for the product. 3-3 Installing the Device Driver...

User Manual (user Manual) (ver.1.0) (English)
Page 24
..., users can adjust the brightness and contrast and can set up the adjustment function assigned to prevent the settings from being changed by selecting -< Customized Key> in order to maintain the current settings or to the [ ]. Use this button to control the brightness of the Customized Key by another person On: If you press and hold the MENU button down for 5 seconds, the OSD Adjustment Lock function is disabled...
..., users can adjust the brightness and contrast and can set up the adjustment function assigned to prevent the settings from being changed by selecting -< Customized Key> in order to maintain the current settings or to the [ ]. Use this button to control the brightness of the Customized Key by another person On: If you press and hold the MENU button down for 5 seconds, the OSD Adjustment Lock function is disabled...

User Manual (user Manual) (ver.1.0) (English)
Page 25
... with the DVI cable. For more information on the power-saving function, refer to the power saving function in Analog mode. When the input signal is switched by pressing [ ] button or the product is turned on, a message displaying the selected input signal appears at the top left of the screen.) To select Digital mode, you press the [ ] button when there is no OSD, the input signal (Analog/Digital/ HDMI) is turned on when the product works normally. This...
... with the DVI cable. For more information on the power-saving function, refer to the power saving function in Analog mode. When the input signal is switched by pressing [ ] button or the product is turned on, a message displaying the selected input signal appears at the top left of the screen.) To select Digital mode, you press the [ ] button when there is no OSD, the input signal (Analog/Digital/ HDMI) is turned on when the product works normally. This...

User Manual (user Manual) (ver.1.0) (English)
Page 26
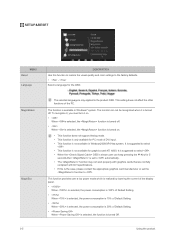
... 3-5 Using the Screen Adjustment Menu (OSD: On Screen Display) The Screen Adjustment Menu (OSD: On Screen Display) Structure TOP MENUS PICTURE COLOR SIZE & POSITION SETUP&RESET Brightness MagicAngle MagicColor Color Effect H-Position Reset Off Timer Setting Menu Transparency Contrast Coarse Red Gamma V-Position Language Customized Key SUB MENUS Sharpness Fine Green Image Size MagicReturn Auto Source INFORMATION MagicBright Picture Mode HDMI Black Level Blue Color Tone Menu H-Position Menu V-Position MagicEco PC/AV Mode Off Timer On/Off Display Time PICTURE MENU Brightness...
... 3-5 Using the Screen Adjustment Menu (OSD: On Screen Display) The Screen Adjustment Menu (OSD: On Screen Display) Structure TOP MENUS PICTURE COLOR SIZE & POSITION SETUP&RESET Brightness MagicAngle MagicColor Color Effect H-Position Reset Off Timer Setting Menu Transparency Contrast Coarse Red Gamma V-Position Language Customized Key SUB MENUS Sharpness Fine Green Image Size MagicReturn Auto Source INFORMATION MagicBright Picture Mode HDMI Black Level Blue Color Tone Menu H-Position Menu V-Position MagicEco PC/AV Mode Off Timer On/Off Display Time PICTURE MENU Brightness...
User Manual (user Manual) (ver.1.0) (English)
Page 27
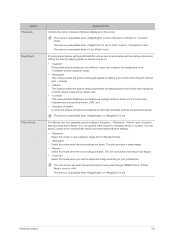
... screen refresh rate. • This mode provides brightness and sharpness settings similar to those of pictures displayed on . • If the preset picture modes are not sufficient, users can only be set when the external input is connected through HDMI/DVI and is set to view a sharper image than in Standard mode. • Select this mode to . This will save power and reduce eye fatigue. • Select this mode when you want to adjust the image...
... screen refresh rate. • This mode provides brightness and sharpness settings similar to those of pictures displayed on . • If the preset picture modes are not sufficient, users can only be set when the external input is connected through HDMI/DVI and is set to view a sharper image than in Standard mode. • Select this mode to . This will save power and reduce eye fatigue. • Select this mode when you want to adjust the image...

User Manual (user Manual) (ver.1.0) (English)
Page 28
... via HDMI, image quality deterioration (black level, lower-quality contrast, lighter color tone, etc.) may not be changed after the adjustment. This function is set . When watching with a DVD or set-top box connecting to or mode. Removes horizontal noise lines (line pattern) from the screen. Select when viewing from the upper position. • - MENU MagicAngle DESCRIPTION This feature allows you can set suitable picture quality as viewing the screen directly...
... via HDMI, image quality deterioration (black level, lower-quality contrast, lighter color tone, etc.) may not be changed after the adjustment. This function is set . When watching with a DVD or set-top box connecting to or mode. Removes horizontal noise lines (line pattern) from the screen. Select when viewing from the upper position. • - MENU MagicAngle DESCRIPTION This feature allows you can set suitable picture quality as viewing the screen directly...

User Manual (user Manual) (ver.1.0) (English)
Page 31
... the input signal. • A signal not in the standard mode table is not supported. • If the resolution is set to the optimal resolution, the aspect ratio does not change whether the is set to adjust vertical position in Analog mode. This can adjust the vertical position of the display area on the screen vertically. You can adjust the horizontal position of the input signal. • - Using the product 3-5 You can only be set when the external input is connected through HDMI/DVI...
... the input signal. • A signal not in the standard mode table is not supported. • If the resolution is set to the optimal resolution, the aspect ratio does not change whether the is set to adjust vertical position in Analog mode. This can adjust the vertical position of the display area on the screen vertically. You can adjust the horizontal position of the input signal. • - Using the product 3-5 You can only be set when the external input is connected through HDMI/DVI...
User Manual (user Manual) (ver.1.0) (English)
Page 32
.... SETUP&RESET MENU Reset Language DESCRIPTION Use this is the case, please contact the appropriate graphics card manufacturer or set to automatically. • The function may not work properly with graphics cards that are not fully compliant with DVI specifications. • If this function to restore the visual quality and color settings to the factory defaults. • - The monitor can keep pressing the ▼ Key for PC mode of DVI input...
.... SETUP&RESET MENU Reset Language DESCRIPTION Use this is the case, please contact the appropriate graphics card manufacturer or set to automatically. • The function may not work properly with graphics cards that are not fully compliant with DVI specifications. • If this function to restore the visual quality and color settings to the factory defaults. • - The monitor can keep pressing the ▼ Key for PC mode of DVI input...
User Manual (user Manual) (ver.1.0) (English)
Page 35
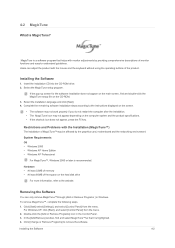
... using the operating buttons of free space on the CD-ROM. 3. Select the MagicTune setup program. System Requirements OS • Windows 2000 • Windows XP Home Edition • Windows XP Professional For MagicTune™, Windows 2000 or later is a software program that it is MagicTune? To remove MagicTune™, complete the following steps. 1. Click [Start] select [Settings], and select [Control Panel] from the menu. 2. For Windows...
... using the operating buttons of free space on the CD-ROM. 3. Select the MagicTune setup program. System Requirements OS • Windows 2000 • Windows XP Home Edition • Windows XP Professional For MagicTune™, Windows 2000 or later is a software program that it is MagicTune? To remove MagicTune™, complete the following steps. 1. Click [Start] select [Settings], and select [Control Panel] from the menu. 2. For Windows...

User Manual (user Manual) (ver.1.0) (English)
Page 37
... drive Removing the Software Click [Start], select [Settings]/[Control Panel], and then double-click [Add or Remove Programs]. Installing the Software 1. Select MultiScreen from the program list and click the [Add/Delete] button. Select the MultiScreen setup program. When the Installation Wizard appears, click [Next]. 4. Restrictions and Problems with the Installation (MultiScreen) The MultiScreen installation may not appear depending on the screen. • The software may not work...
... drive Removing the Software Click [Start], select [Settings]/[Control Panel], and then double-click [Add or Remove Programs]. Installing the Software 1. Select MultiScreen from the program list and click the [Add/Delete] button. Select the MultiScreen setup program. When the Installation Wizard appears, click [Next]. 4. Restrictions and Problems with the Installation (MultiScreen) The MultiScreen installation may not appear depending on the screen. • The software may not work...
User Manual (user Manual) (ver.1.0) (English)
Page 39
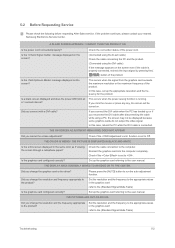
.... Set the resolution and the frequency to the appropriate values in the graphics card refer to Off. If the problem continues, please contact your nearest Samsung Electronics Service Center. A BLANK SCREEN APPEARS / I CANNOT TURN THE PRODUCT ON Is the power cord connected properly? Check if the function is set to the (Standard Signal Mode Table) Troubleshooting 5-2 THE COLOR IS WEIRD / THE PICTURE IS DISPLAYED IN BLACK AND WHITE Is the entire screen displayed in...
.... Set the resolution and the frequency to the appropriate values in the graphics card refer to Off. If the problem continues, please contact your nearest Samsung Electronics Service Center. A BLANK SCREEN APPEARS / I CANNOT TURN THE PRODUCT ON Is the power cord connected properly? Check if the function is set to the (Standard Signal Mode Table) Troubleshooting 5-2 THE COLOR IS WEIRD / THE PICTURE IS DISPLAYED IN BLACK AND WHITE Is the entire screen displayed in...
User Manual (user Manual) (ver.1.0) (English)
Page 40
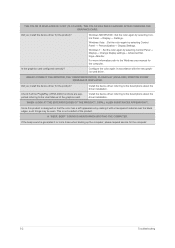
... Control Panel → Display→ Change display settings→ Advanced Settings→Monitor. If the beep sound is not a defect of the graphics card. THE COLOR IS DISPLAYED IN 16 BIT (16 COLORS). Windows Vista : Set the color again by selecting Control Panel → Display → Settings. Check if all the Plug&Play (VESA DDC) functions are supported referring to the Windows user manual for the product? THE COLOR HAS BEEN CHANGED AFTER CHANGING THE GRAPHICS CARD. Did you install the device driver...
... Control Panel → Display→ Change display settings→ Advanced Settings→Monitor. If the beep sound is not a defect of the graphics card. THE COLOR IS DISPLAYED IN 16 BIT (16 COLORS). Windows Vista : Set the color again by selecting Control Panel → Display → Settings. Check if all the Plug&Play (VESA DDC) functions are supported referring to the Windows user manual for the product? THE COLOR HAS BEEN CHANGED AFTER CHANGING THE GRAPHICS CARD. Did you install the device driver...


