
User Manual (ENGLISH)
Page 1
SyncMaster 743BM/943BM LCD Monitor User Manual imagine the possibilities
SyncMaster 743BM/943BM LCD Monitor User Manual imagine the possibilities

User Manual (ENGLISH)
Page 3
... power cord with low humidity and a minimum of dust. • Failure to do so may cause an electric shock or fire. Place your monitor. Install the monitor base in a location with a dusty plug or connector may cause serious damage to the product or the person carrying it . Safety Instructions Do ...not excessively bend the plug and wire nor place heavy objects upon them, which could cause damage. • This may damage the monitor. Do not place the product on an unstable or small surface area. • Place the product on an even and stable surface, as at ...
... power cord with low humidity and a minimum of dust. • Failure to do so may cause an electric shock or fire. Place your monitor. Install the monitor base in a location with a dusty plug or connector may cause serious damage to the product or the person carrying it . Safety Instructions Do ...not excessively bend the plug and wire nor place heavy objects upon them, which could cause damage. • This may damage the monitor. Do not place the product on an unstable or small surface area. • Place the product on an even and stable surface, as at ...

User Manual (ENGLISH)
Page 4
Keep any object or part of your monitor is adjustable, do so may damage the monitor. Put down . • This may damage the TFT-LCD surface. Do not place the monitor face down the monitor carefully. • Failing to do not place any heating devices away from the wall (more than ...melted coating may cause electric shock or fire. Do not install the product in a shortened component life and degraded performance. When cleaning the monitor case or the surface of the bracket must be done by a qualified professional. • Installing the bracket by unqualified personnel may cause fire...
Keep any object or part of your monitor is adjustable, do so may damage the monitor. Put down . • This may damage the TFT-LCD surface. Do not place the monitor face down the monitor carefully. • Failing to do not place any heating devices away from the wall (more than ...melted coating may cause electric shock or fire. Do not install the product in a shortened component life and degraded performance. When cleaning the monitor case or the surface of the bracket must be done by a qualified professional. • Installing the bracket by unqualified personnel may cause fire...

User Manual (ENGLISH)
Page 5
...is any chemicals such as wax, benzene, alcohol, thinners, insecticide, air freshener, lubricant or detergent. Then contact the Service Center. • The monitor may cause electric shock or fire. in particular, if there is not used for a long period of time. • Failure to do not ...cord before cleaning the product. • Otherwise, this may cause damage, electric shock or fire. Make sure to a qualified servicing company. If your monitor does not operate normally - unplug it properly using a soft, dry cloth. • Do not use any unusual sound or smell coming from the...
...is any chemicals such as wax, benzene, alcohol, thinners, insecticide, air freshener, lubricant or detergent. Then contact the Service Center. • The monitor may cause electric shock or fire. in particular, if there is not used for a long period of time. • Failure to do not ...cord before cleaning the product. • Otherwise, this may cause damage, electric shock or fire. Make sure to a qualified servicing company. If your monitor does not operate normally - unplug it properly using a soft, dry cloth. • Do not use any unusual sound or smell coming from the...

User Manual (ENGLISH)
Page 6
... to the level appropriate for an extended period of time. Do not place water containers, chemical products or small metal objects on the monitor cabinet. • Bad ventilation may cause a breakdown or fire. Keep the product away from combustible chemical sprays or inflammable substances. •...explosion or fire. If an alien substances or water enters the product, turn the product off, unplug the power connector from the monitor for the model. • An inappropriate resolution may cause undesirable picture quality. Adjusts the resolution and frequency to a changing picture ...
... to the level appropriate for an extended period of time. Do not place water containers, chemical products or small metal objects on the monitor cabinet. • Bad ventilation may cause a breakdown or fire. Keep the product away from combustible chemical sprays or inflammable substances. •...explosion or fire. If an alien substances or water enters the product, turn the product off, unplug the power connector from the monitor for the model. • An inappropriate resolution may cause undesirable picture quality. Adjusts the resolution and frequency to a changing picture ...

User Manual (ENGLISH)
Page 7
... so that all cables, including the antenna cable and cables connected to other devices, are disconnected before moving the monitor, do not lift the monitor upside down while holding only the stand. • This may cause your children's favorite toys or any other objects of the product or may cause ... off and unplug the power cord. Do not install the product on the product to retrieve an object. When not using the monitor. terest on the product. • Children may try to climb on an unstable, uneven surface or a location prone to vibrations. • Dropping the product may ...
... so that all cables, including the antenna cable and cables connected to other devices, are disconnected before moving the monitor, do not lift the monitor upside down while holding only the stand. • This may cause your children's favorite toys or any other objects of the product or may cause ... off and unplug the power cord. Do not install the product on the product to retrieve an object. When not using the monitor. terest on the product. • Children may try to climb on an unstable, uneven surface or a location prone to vibrations. • Dropping the product may ...

User Manual (ENGLISH)
Page 8
Try to maintain your arms perpendicular to your armpits. • Keep your arms level with the back of the knees at more than 90 degree. Adjust the arm position so that there is below the heart. 7 Safety Instructions • Adjust the monitor angle so that it is no reflected light on the screen. Do not let your hands. • Keep the angle of the elbow perpendicular. • Keep the angle of your feet fall up from the floor.
Try to maintain your arms perpendicular to your armpits. • Keep your arms level with the back of the knees at more than 90 degree. Adjust the arm position so that there is below the heart. 7 Safety Instructions • Adjust the monitor angle so that it is no reflected light on the screen. Do not let your hands. • Keep the angle of the elbow perpendicular. • Keep the angle of your feet fall up from the floor.

User Manual (ENGLISH)
Page 9
If any items are included with your dealer. Type2 Monitor & HAS stand Manuals Quick Setup Guide Warranty Card 8 User's Guide Contact a local dealer to buy optional items. Unpacking Type 1 Monitor & Simple stand Note MagicRotation program can not be provided as Simple Stand does not support Pivot function. Introduction Package Contents Note Please make sure the following items are missing, contact your monitor.
If any items are included with your dealer. Type2 Monitor & HAS stand Manuals Quick Setup Guide Warranty Card 8 User's Guide Contact a local dealer to buy optional items. Unpacking Type 1 Monitor & Simple stand Note MagicRotation program can not be provided as Simple Stand does not support Pivot function. Introduction Package Contents Note Please make sure the following items are missing, contact your monitor.

User Manual (ENGLISH)
Page 10
... will be displayed up or down key. It will disappear after 40 seconds. Cables Introduction D-Sub Cable Audio Cable Power Cord DVI Cable (option) Your Monitor Initial Settings Select the language using the up to adjust the resolution of your PC resolution so that it is the optimal resolution for this...
... will be displayed up or down key. It will disappear after 40 seconds. Cables Introduction D-Sub Cable Audio Cable Power Cord DVI Cable (option) Your Monitor Initial Settings Select the language using the up to adjust the resolution of your PC resolution so that it is the optimal resolution for this...

User Manual (ENGLISH)
Page 12
... or when leaving it unattended for long periods. [ ]Headphone sound output terminal Speaker You can hear sound by connecting the soundcard of the monitor may vary from product to product. Simple Stand POWER port 11 HAS Stand Power Indicator This light glows blue during normal operation, and blinking ...blue once as the monitor saves your PC to the monitor. Introduction Rear Note If you select the digital mode, you must connect your monitor to the graphic card's DVI port using the DVI cable. >> Click here to see...
... or when leaving it unattended for long periods. [ ]Headphone sound output terminal Speaker You can hear sound by connecting the soundcard of the monitor may vary from product to product. Simple Stand POWER port 11 HAS Stand Power Indicator This light glows blue during normal operation, and blinking ...blue once as the monitor saves your PC to the monitor. Introduction Rear Note If you select the digital mode, you must connect your monitor to the graphic card's DVI port using the DVI cable. >> Click here to see...

User Manual (ENGLISH)
Page 13
... ring, as shown in a public place. (The locking device has to the DVI IN port on the back of your monitor to the POWER port on the back of the monitor. Introduction Connect the power cord for further information regarding cable connections. DVI IN port Connect the DVI Cable to be purchased....) For using the holding ring • Fix the cables using a locking device, contact where you purchase it. AUDIO IN Connect the audio cable for your monitor to the 15-pin, RGB IN port on the back of your computer. RGB IN port Connect the D-sub cable to the audio port on...
... ring, as shown in a public place. (The locking device has to the DVI IN port on the back of your monitor to the POWER port on the back of the monitor. Introduction Connect the power cord for further information regarding cable connections. DVI IN port Connect the DVI Cable to be purchased....) For using the holding ring • Fix the cables using a locking device, contact where you purchase it. AUDIO IN Connect the audio cable for your monitor to the 15-pin, RGB IN port on the back of your computer. RGB IN port Connect the D-sub cable to the audio port on...

User Manual (ENGLISH)
Page 14
... on the video card. • Connect the DVI Cable to the DVI IN Port on and use them. 13 Plug the power cord for the monitor into a nearby outlet. Using the D-sub (Analog) connector on the video card. • Connect the signal cable to the Macintosh computer using the... D-sub connection cable. Use a connection appropriate for your monitor to the power port on the back of your Monitor. [DVI IN] Connected to a Macintosh. • Connect the monitor to the 15-pin, D-sub port on the back of the monitor. Connections Connecting Cables Connect the power cord for your computer.
... on the video card. • Connect the DVI Cable to the DVI IN Port on and use them. 13 Plug the power cord for the monitor into a nearby outlet. Using the D-sub (Analog) connector on the video card. • Connect the signal cable to the Macintosh computer using the... D-sub connection cable. Use a connection appropriate for your monitor to the power port on the back of your Monitor. [DVI IN] Connected to a Macintosh. • Connect the monitor to the 15-pin, D-sub port on the back of the monitor. Connections Connecting Cables Connect the power cord for your computer.

User Manual (ENGLISH)
Page 15
Stand Stopper Attaching a Base This monitor accepts a 75 mm x 75 mm VESA-compliant mounting interface pad. Using the Stand Monitor Assembly Connections Simple Stand Monitor and Bottom HAS Stand HAS Stand A. Simple Stand 14 HAS Stand
Stand Stopper Attaching a Base This monitor accepts a 75 mm x 75 mm VESA-compliant mounting interface pad. Using the Stand Monitor Assembly Connections Simple Stand Monitor and Bottom HAS Stand HAS Stand A. Simple Stand 14 HAS Stand

User Manual (ENGLISH)
Page 16
... Center for damages caused by using a base other base. • Do not use Wall Mount according to mount the monitor at least 10 cm away from the LCD monitor. 4. Samsung Electronics will not be responsible for more information. Align the mounting interface pad with the holes in the rear cover mounting pad and secure...
... Center for damages caused by using a base other base. • Do not use Wall Mount according to mount the monitor at least 10 cm away from the LCD monitor. 4. Samsung Electronics will not be responsible for more information. Align the mounting interface pad with the holes in the rear cover mounting pad and secure...

User Manual (ENGLISH)
Page 17
...Internet web site : http://www.samsung.com/ (Worldwide) Installing the Monitor Driver (Automatic) 1. If you have. Choose your monitor model in the model list, then click the "OK" button. 4. Follow the directions appropriate for the monitor driver, insert the CD-ROM included with this monitor. Insert CD into the CD...). 16 Prepare a blank disk and download the driver program file at the Internet web site shown here. Using the Software Monitor Driver Note When prompted by the operating system for the operating system you can see following message window, then click the "Continue Anyway...
...Internet web site : http://www.samsung.com/ (Worldwide) Installing the Monitor Driver (Automatic) 1. If you have. Choose your monitor model in the model list, then click the "OK" button. 4. Follow the directions appropriate for the monitor driver, insert the CD-ROM included with this monitor. Insert CD into the CD...). 16 Prepare a blank disk and download the driver program file at the Internet web site shown here. Using the Software Monitor Driver Note When prompted by the operating system for the operating system you can see following message window, then click the "Continue Anyway...

User Manual (ENGLISH)
Page 18
... "Control Panel". If the message "Windows needs..." The certified driver will be used as shown in the "Monitor" tab. Then, double-click on Samsung Monitor homepage. The monitor can be posted on "Appearance and Personalization". 3. If the "Properties" button is deactivated, it means the ...configuration for your monitor is . Using the Software Note This monitor driver is displayed, as is completed. is under ...
... "Control Panel". If the message "Windows needs..." The certified driver will be used as shown in the "Monitor" tab. Then, double-click on Samsung Monitor homepage. The monitor can be posted on "Appearance and Personalization". 3. If the "Properties" button is deactivated, it means the ...configuration for your monitor is . Using the Software Note This monitor driver is displayed, as is completed. is under ...

User Manual (ENGLISH)
Page 19
Click "Update Driver..." Using the Software Note This monitor driver is located, and click "OK". 18 in the "Driver" tab. 7. Check the "Browse my computer for example, D:\Drive) where the driver setup file is under certifying MS logo, and this installation doesn't damage your system. Click "Have Disk..." The certified driver will be posted on my computer". 8. and select the folder (for driver software" checkbox and click "Let me pick from a list of device drivers on Samsung Monitor homepage. 6.
Click "Update Driver..." Using the Software Note This monitor driver is located, and click "OK". 18 in the "Driver" tab. 7. Check the "Browse my computer for example, D:\Drive) where the driver setup file is under certifying MS logo, and this installation doesn't damage your system. Click "Have Disk..." The certified driver will be posted on my computer". 8. and select the folder (for driver software" checkbox and click "Let me pick from a list of device drivers on Samsung Monitor homepage. 6.

User Manual (ENGLISH)
Page 20
Microsoft® Windows® XP Operating System 19 Using the Software 9. Select the model that matches your monitor from the list of monitor models on the following screens displayed in sequence. Click "Close" → "Close" → "OK" → "OK" on the screen, and click "Next". 10.
Microsoft® Windows® XP Operating System 19 Using the Software 9. Select the model that matches your monitor from the list of monitor models on the following screens displayed in sequence. Click "Close" → "Close" → "OK" → "OK" on the screen, and click "Next". 10.
User Manual (ENGLISH)
Page 21
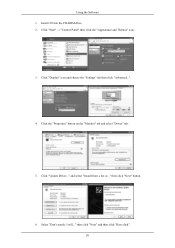
Click "Update Driver..." Select "Don't search, I will..." Insert CD into the CD-ROM drive. 2. Click the "Properties" button on the "Monitor" tab and select "Driver" tab. 5. Click "Start" → "Control Panel" then click the "Appearance and Themes" icon. 3. then click "Next" button. 6. and select "Install from a list or..." then click "Next" and then click "Have disk". 20 Using the Software 1. Click "Display" icon and choose the "Settings" tab then click "Advanced...". 4.
Click "Update Driver..." Select "Don't search, I will..." Insert CD into the CD-ROM drive. 2. Click the "Properties" button on the "Monitor" tab and select "Driver" tab. 5. Click "Start" → "Control Panel" then click the "Appearance and Themes" icon. 3. then click "Next" button. 6. and select "Install from a list or..." then click "Next" and then click "Have disk". 20 Using the Software 1. Click "Display" icon and choose the "Settings" tab then click "Advanced...". 4.

User Manual (ENGLISH)
Page 22
Then click "OK" button. Click the "Close" button then click "OK" button continually. 21 Note This monitor driver is under certifying MS logo, and this installation doesn't damage your monitor model in the model list and click the "Next" button. 8. The certified driver will be posted on Samsung Monitor homepage. Click the "Browse" button then choose A:(D:\Driver) and choose your system. http://www.samsung.com/ 9. Using the Software 7. If you can see following message window, then click the "Continue Anyway" button.
Then click "OK" button. Click the "Close" button then click "OK" button continually. 21 Note This monitor driver is under certifying MS logo, and this installation doesn't damage your monitor model in the model list and click the "Next" button. 8. The certified driver will be posted on Samsung Monitor homepage. Click the "Browse" button then choose A:(D:\Driver) and choose your system. http://www.samsung.com/ 9. Using the Software 7. If you can see following message window, then click the "Continue Anyway" button.


