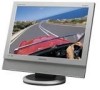

User Manual (ENGLISH)
Page 3
..., clean it does not come loose. Installation Be sure to one outlet. z This may cause fire. Do not disconnect the power cord while using the monitor. z Using the power cord with wet hands. z This may cause electric shock or fire. z This may cause fire. z A bad connection may cause ... not excessively bend the plug and wire nor place heavy objects upon them, which could cause damage. z An improper ground may damage the monitor. Do not pull the plug out by the separation and may cause electric shock or equipment damage. Insert the power plug firmly so that it...
..., clean it does not come loose. Installation Be sure to one outlet. z This may cause fire. Do not disconnect the power cord while using the monitor. z Using the power cord with wet hands. z This may cause electric shock or fire. z This may cause fire. z A bad connection may cause ... not excessively bend the plug and wire nor place heavy objects upon them, which could cause damage. z An improper ground may damage the monitor. Do not pull the plug out by the separation and may cause electric shock or equipment damage. Insert the power plug firmly so that it...

User Manual (ENGLISH)
Page 4
... product on an even end stable surface ,as someone walking by, specifically children. z Dropping the product may cause electric shock or fire inside the monitor. z Otherwise, this may cause fire. z Any increase in a showcase or shelf so that the end of dust. Place your... monitor. z A melted coating may cause serious damage to your monitor in places with poor ventilation, for 24 hours such as candles, insecticides or cigarettes away from the showcase or shelf. z Take care, as...
... product on an even end stable surface ,as someone walking by, specifically children. z Dropping the product may cause electric shock or fire inside the monitor. z Otherwise, this may cause fire. z Any increase in a showcase or shelf so that the end of dust. Place your... monitor. z A melted coating may cause serious damage to your monitor in places with poor ventilation, for 24 hours such as candles, insecticides or cigarettes away from the showcase or shelf. z Take care, as...

User Manual (ENGLISH)
Page 5
... the antenna is knocked over antenna may cause an increase in the internal temperature of the TFT-LCD screen, wipe with it may damage the TFT-LCD surface. Clean When cleaning the monitor case or the surface of the product, resulting in a shortened component life and degraded performance. ... the plastic packaging (bag) out of the bracket must be damaged or broken. z If rainwater enters the product, it . Do not place the monitor face down below the point of the cable hangs down . z A knocked-over by unqualified personnel may cause suffocation if children play with a slightly ...
... the antenna is knocked over antenna may cause an increase in the internal temperature of the TFT-LCD screen, wipe with it may damage the TFT-LCD surface. Clean When cleaning the monitor case or the surface of the product, resulting in a shortened component life and degraded performance. ... the plastic packaging (bag) out of the bracket must be damaged or broken. z If rainwater enters the product, it . Do not place the monitor face down below the point of the cable hangs down . z A knocked-over by unqualified personnel may cause suffocation if children play with a slightly ...
User Manual (ENGLISH)
Page 6
z This may cause an electric shock or fire. z Keep the product's interior clean. z This may cause damage, electric shock or fire. If your monitor does not operate normally - in the interior over an extended period of time may cause electric shock or fire. Use the recommended detergent with a smooth ... in particular, if there is dusty or dirty, clean it immediately and contact an authorized dealer or Service Center. Unplug the power cord from the monitor - unplug it properly using a soft, dry cloth.
z This may cause an electric shock or fire. z Keep the product's interior clean. z This may cause damage, electric shock or fire. If your monitor does not operate normally - in the interior over an extended period of time may cause electric shock or fire. Use the recommended detergent with a smooth ... in particular, if there is dusty or dirty, clean it immediately and contact an authorized dealer or Service Center. Unplug the power cord from the monitor - unplug it properly using a soft, dry cloth.

User Manual (ENGLISH)
Page 7
... or fire. z This may cause a breakdown or fire. z Failure to the cable. Do not move the monitor by pulling only the wire or the signal cable. If the monitor is dropped or the casing is not used for a long period of time. z Bad ventilation may cause electric shock..., fire or injury. z This may cause a malfunction, electric shock or fire. Do not cover the vents on the monitor. Keep the product away from the outlet during storms or lightning or if it could be exposed to the cable. Then contact a Service Center . ...
... or fire. z This may cause a breakdown or fire. z Failure to the cable. Do not move the monitor by pulling only the wire or the signal cable. If the monitor is dropped or the casing is not used for a long period of time. z Bad ventilation may cause electric shock..., fire or injury. z This may cause a malfunction, electric shock or fire. Do not cover the vents on the monitor. Keep the product away from the outlet during storms or lightning or if it could be exposed to the cable. Then contact a Service Center . ...

User Manual (ENGLISH)
Page 8
...angle may cause undesirable picture quality. 19 inch Wide (48 cm) - 1440 X 900 Keep the volume at least a five-minute break after every hour of children's reach, as paper and match into the product, turn off , unplug the power connector from the monitor for an extended period of time...., including the antenna cable and cables connected to disconnect cables may damage it . z Failure to other devices, are disconnected before moving the monitor, turn the product off and unplug the power cord. Do not insert metal objects such as chopsticks, wire and gimlet or inflammable objects such...
...angle may cause undesirable picture quality. 19 inch Wide (48 cm) - 1440 X 900 Keep the volume at least a five-minute break after every hour of children's reach, as paper and match into the product, turn off , unplug the power connector from the monitor for an extended period of time...., including the antenna cable and cables connected to disconnect cables may damage it . z Failure to other devices, are disconnected before moving the monitor, turn the product off and unplug the power cord. Do not insert metal objects such as chopsticks, wire and gimlet or inflammable objects such...

User Manual (ENGLISH)
Page 9
... to a store selling the same type of time, keep the product unplugged. z Keep a distance of the battery. z Adjust the monitor angle so that there is responsible for returning the used or rechargeable battery for recycling purposes as indicated on the product. Look at the ...elbow perpendicular. When replacing batteries, place the batteries in front of interest on battery holder. When lifting up or moving the monitor, do not lift the monitor upside down while holding only the stand. z Keep the angle of children. z The customer can return the used batteries together...
... to a store selling the same type of time, keep the product unplugged. z Keep a distance of the battery. z Adjust the monitor angle so that there is responsible for returning the used or rechargeable battery for recycling purposes as indicated on the product. Look at the ...elbow perpendicular. When replacing batteries, place the batteries in front of interest on battery holder. When lifting up or moving the monitor, do not lift the monitor upside down while holding only the stand. z Keep the angle of children. z The customer can return the used batteries together...
User Manual (ENGLISH)
Page 10
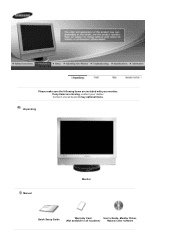
Contact a local dealer to buy optional items. Unpacking Manual Monitor Quick Setup Guide Warranty Card User's Guide, Monitor Driver, (Not available in all locations) Natural Color software Please make sure the following items are missing, contact your monitor. If any items are included with your dealer.
Contact a local dealer to buy optional items. Unpacking Manual Monitor Quick Setup Guide Warranty Card User's Guide, Monitor Driver, (Not available in all locations) Natural Color software Please make sure the following items are missing, contact your monitor. If any items are included with your dealer.
User Manual (ENGLISH)
Page 12
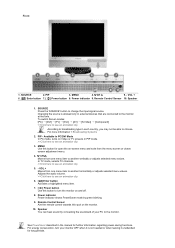
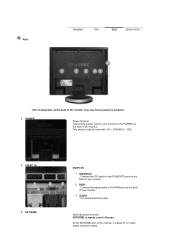
... [ ] Enter button Activates a highlighted menu item. 7. [ ] Power button Use this spot on and off. 8. For energy conservation, turn the monitor on the monitor. 10. Front 1. Power indicator 9. Available in PC/DVI Mode In PC mode, turns on -screen menu and exits from the menu screen or closes... screen adjustment menu. 4. MENU Use this button for long periods. Remote Control Sensor 10. SOURCE Press the 'SOURCE' button to the monitor at the time. CH 5. - See PowerSaver described in each country, you may not be able to another horizontally or adjusts selected menu ...
... [ ] Enter button Activates a highlighted menu item. 7. [ ] Power button Use this spot on and off. 8. For energy conservation, turn the monitor on the monitor. 10. Front 1. Power indicator 9. Available in PC/DVI Mode In PC mode, turns on -screen menu and exits from the menu screen or closes... screen adjustment menu. 4. MENU Use this button for long periods. Remote Control Sensor 10. SOURCE Press the 'SOURCE' button to the monitor at the time. CH 5. - See PowerSaver described in each country, you may not be able to another horizontally or adjusts selected menu ...
User Manual (ENGLISH)
Page 13
... the DVI cable to product.) 1. This product may vary from product to the DVI(HDCP) port on the back of your monitor. 3. DVI/PC IN 3. RGB : Connect the signal cable to the POWER on the back of your monitor. 2. POWER Power terminal Connect the power cord for EXT(RGB) port of the... monitor, it makes TV or Video signal input and output. Rear (The configuration at the back of the monitor may be used in Europe. AUDIO : PC sound terminal (input...
... the DVI cable to product.) 1. This product may vary from product to the DVI(HDCP) port on the back of your monitor. 3. DVI/PC IN 3. RGB : Connect the signal cable to the POWER on the back of your monitor. 2. POWER Power terminal Connect the power cord for EXT(RGB) port of the... monitor, it makes TV or Video signal input and output. Rear (The configuration at the back of the monitor may be used in Europe. AUDIO : PC sound terminal (input...

User Manual (ENGLISH)
Page 14
... physically fix the system when using it in a public place. (The locking device has to the "ANT IN" port on the rear side of the monitor. COMPONENT IN 5. ANT IN COMPONENT IN 1. PR, PB,Y : DVD/DTV video input terminal(PR, PB,Y) ANT IN Connect the CATV cable or TV antenna cable...
... physically fix the system when using it in a public place. (The locking device has to the "ANT IN" port on the rear side of the monitor. COMPONENT IN 5. ANT IN COMPONENT IN 1. PR, PB,Y : DVD/DTV video input terminal(PR, PB,Y) ANT IN Connect the CATV cable or TV antenna cable...

User Manual (ENGLISH)
Page 15
POWER 2. TTX/MIX 7. INFO 12. PIP 19. POSITION 25. MAGIC-CH 1. MUTE 6. SOURCE 11. P.SIZE 17. SOURCE 23. SIZE 24. STILL 18. DUAL/MTS 21. POWER Use this button to interference with frequency. 1. EXIT 13. MENU 8. P.MODE, M/B (MagicBright™) 16. PRE-CH 22. See Connecting the monitor for further information regarding cable connections...
POWER 2. TTX/MIX 7. INFO 12. PIP 19. POSITION 25. MAGIC-CH 1. MUTE 6. SOURCE 11. P.SIZE 17. SOURCE 23. SIZE 24. STILL 18. DUAL/MTS 21. POWER Use this button to interference with frequency. 1. EXIT 13. MENU 8. P.MODE, M/B (MagicBright™) 16. PRE-CH 22. See Connecting the monitor for further information regarding cable connections...

User Manual (ENGLISH)
Page 16
...8482; is displayed. For example, to select channel 121, press "+100", then press "2" and "1". -/-- (One/Two-Digit channel selection ) Use to the monitor at the factory. MUTE Press to cancel the Mute function. Press the MUTE button again to mute the sound temporarily. For more information > TTX / MIX..., vertically or adjusts selected menu values. 14. TV / AV / Ext. / S-Video /Component Mode : P.MODE( Picture Mode ) The monitor has four automatic picture settings that are not available in the TV mode. Available In PC mode Only Adjusts the screen display automatically. 15. P....
...8482; is displayed. For example, to select channel 121, press "+100", then press "2" and "1". -/-- (One/Two-Digit channel selection ) Use to the monitor at the factory. MUTE Press to cancel the Mute function. Press the MUTE button again to mute the sound temporarily. For more information > TTX / MIX..., vertically or adjusts selected menu values. 14. TV / AV / Ext. / S-Video /Component Mode : P.MODE( Picture Mode ) The monitor has four automatic picture settings that are not available in the TV mode. Available In PC mode Only Adjusts the screen display automatically. 15. P....

User Manual (ENGLISH)
Page 17
... of the PIP window. 25. This function is used to return to turn PIP screen On/Off. 19. SOURCE - Adjustable when the PIP function is ON. Adjustable when the PIP function is ON. The monitor has a built-in PC/DVI Mode Push the PIP button to the immediately previous channel. 22. MTS...
... of the PIP window. 25. This function is used to return to turn PIP screen On/Off. 19. SOURCE - Adjustable when the PIP function is ON. Adjustable when the PIP function is ON. The monitor has a built-in PC/DVI Mode Push the PIP button to the immediately previous channel. 22. MTS...

User Manual (ENGLISH)
Page 18
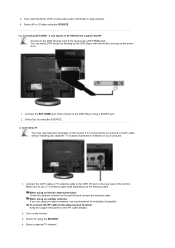
... card of the PC. 4. Plug the power cord for your monitor. 3. Turn on both your monitor. 2-2. Connect the DVI cable to the DVI(HDCP) port on the back of your monitor to a Computer 1. Connecting the monitor 1.Connecting to the POWER on the back of the monitor. Using the DVI (Digital) connector on the video card...
... card of the PC. 4. Plug the power cord for your monitor. 3. Turn on both your monitor. 2-2. Connect the DVI cable to the DVI(HDCP) port on the back of your monitor to a Computer 1. Connecting the monitor 1.Connecting to the POWER on the back of the monitor. Using the DVI (Digital) connector on the video card...

User Manual (ENGLISH)
Page 19
... as a DVD player, a VCR or camcorder, or a DTV or TV without disconnecting the PC. Input devices such as the monitor is turned on its rear. 3. The configuration at the back of the monitor may enjoy AV signals as long as DVD, VCR or Camcorder are connected to product. 1-1. Connect the port of... the monitor. Connect the signal cable to the R-AUDIO-L port of the DVD, VCR (DVD / DTV Set-Top Box) to the D-SUB port on the Macintosh computer. 2. ...
... as a DVD player, a VCR or camcorder, or a DTV or TV without disconnecting the PC. Input devices such as the monitor is turned on its rear. 3. The configuration at the back of the monitor may enjoy AV signals as long as DVD, VCR or Camcorder are connected to product. 1-1. Connect the port of... the monitor. Connect the signal cable to the R-AUDIO-L port of the DVD, VCR (DVD / DTV Set-Top Box) to the D-SUB port on the Macintosh computer. 2. ...
User Manual (ENGLISH)
Page 20
... connect the RF cable to AV DEVICE that supports SCART. 3. It only applies to the antenna input terminal: Keep the copper wire portion of the monitor. Select Ext. Connect to the "ANT IN" port on . 1. Make sure to use a professional for installation if possible. Connecting TV You may view ...television programs on the monitor if it is on the rear side of the RF cable straight. 2. When using an outdoor antenna: If you are using the SOURCE. 1-2. Select a ...
... connect the RF cable to AV DEVICE that supports SCART. 3. It only applies to the antenna input terminal: Keep the copper wire portion of the monitor. Select Ext. Connect to the "ANT IN" port on . 1. Make sure to use a professional for installation if possible. Connecting TV You may view ...television programs on the monitor if it is on the rear side of the RF cable straight. 2. When using an outdoor antenna: If you are using the SOURCE. 1-2. Select a ...

User Manual (ENGLISH)
Page 21
... the DVD/DTVSet Top Box input if the device has a DVD/DTV connector. You can watch Component simply by hooking up the Component with the monitor as long as the power is not supported, first, attach Connecter to the PR, PB,Y input ports using the SOURCE. 4. In areas where Antenna cable... is on. 1. Connect the VIDEO OUT port of the monitor. 2. Purchase and install a signal amplifier for better reception. Connect the port of the DVD, VCR (DVD / DTV Set-Top Box) to the R-AUDIO-L port of...
... the DVD/DTVSet Top Box input if the device has a DVD/DTV connector. You can watch Component simply by hooking up the Component with the monitor as long as the power is not supported, first, attach Connecter to the PR, PB,Y input ports using the SOURCE. 4. In areas where Antenna cable... is on. 1. Connect the VIDEO OUT port of the monitor. 2. Purchase and install a signal amplifier for better reception. Connect the port of the DVD, VCR (DVD / DTV Set-Top Box) to the R-AUDIO-L port of...
User Manual (ENGLISH)
Page 22
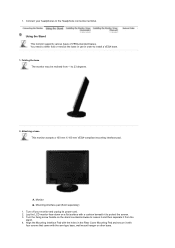
...wall mount hanger or other base. Folding the base The monitor may be reclined from the stand. 4. Mounting interface pad (Sold separately) 1. A. Using the Stand This monitor supports various types of VESA-standard bases. Lay the LCD monitor face-down on the stand counterclockwise to loosen it and... then separate it to install a VESA base. 1. Align the Mounting Interface Pad with the holes in order to protect the screen. 3. Connect your monitor and unplug its power cord. ...
...wall mount hanger or other base. Folding the base The monitor may be reclined from the stand. 4. Mounting interface pad (Sold separately) 1. A. Using the Stand This monitor supports various types of VESA-standard bases. Lay the LCD monitor face-down on the stand counterclockwise to loosen it and... then separate it to install a VESA base. 1. Align the Mounting Interface Pad with the holes in order to protect the screen. 3. Connect your monitor and unplug its power cord. ...
User Manual (ENGLISH)
Page 23
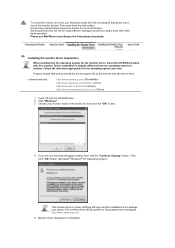
... button. 4. Please use Wall Mount according to mount the monitor at the Internet web site shown here. z Internet web site : http://www.samsung.com/ (WorldWide) http://www.samsung.com/monitor (U.S.A) http://www.sec.co.kr/monitor (Korea) http://www.samsungmonitor.com.cn/ (China) 1. ..."OK" button. (Microsoft® Windows® XP Operating System) This monitor driver is under certifying MS logo,and this monitor. Driver installation is completed. To mount the monitor on Samsung Monitor Homepage http://www.samsung.com/ 5. Click "Windows" 3. If you have. Choose your system....
... button. 4. Please use Wall Mount according to mount the monitor at the Internet web site shown here. z Internet web site : http://www.samsung.com/ (WorldWide) http://www.samsung.com/monitor (U.S.A) http://www.sec.co.kr/monitor (Korea) http://www.samsungmonitor.com.cn/ (China) 1. ..."OK" button. (Microsoft® Windows® XP Operating System) This monitor driver is under certifying MS logo,and this monitor. Driver installation is completed. To mount the monitor on Samsung Monitor Homepage http://www.samsung.com/ 5. Click "Windows" 3. If you have. Choose your system....


