
User Manual (ENGLISH)
Page 8
... . z Change the mode to energy saving mode or set a screensaver to vibrations may shorten the lifetime of the product or may cause undesirable picture quality. 19 inch Wide (48 cm) - 1440 X 900 Keep the volume at a comfortable level when using the monitor. When moving the monitor. z It may cause injury to other devices, are disconnected before moving the monitor, turn the product off and unplug the power cord...
... . z Change the mode to energy saving mode or set a screensaver to vibrations may shorten the lifetime of the product or may cause undesirable picture quality. 19 inch Wide (48 cm) - 1440 X 900 Keep the volume at a comfortable level when using the monitor. When moving the monitor. z It may cause injury to other devices, are disconnected before moving the monitor, turn the product off and unplug the power cord...
User Manual (ENGLISH)
Page 12
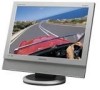
... open the on and off. 8. Available in PC/DVI Mode In PC mode, turns on the monitor. 10. MENU Use this button to the monitor at the time. Adjusts the audio volume. >>Click here to change the input signal source. Remote Control Sensor Aim the remote control towards this spot on Video or TV screens in external devices that are connected to turn your PC to see an animation clip According to another horizontally or adjusts selected menu...
... open the on and off. 8. Available in PC/DVI Mode In PC mode, turns on the monitor. 10. MENU Use this button to the monitor at the time. Adjusts the audio volume. >>Click here to change the input signal source. Remote Control Sensor Aim the remote control towards this spot on Video or TV screens in external devices that are connected to turn your PC to see an animation clip According to another horizontally or adjusts selected menu...

User Manual (ENGLISH)
Page 16
.... P.SIZE - MUTE Press to another horizontally, vertically or adjusts selected menu values. 14. Number button Selects TV channels in external devices that are watching. Enter the two-digit channel number. Then push button again to change the picture atmosphere as required. MENU Use this button, and the "--" symbol is allowed only in the TV mode. Then push button again to open the on the upper left of the monitor...
.... P.SIZE - MUTE Press to another horizontally, vertically or adjusts selected menu values. 14. Number button Selects TV channels in external devices that are watching. Enter the two-digit channel number. Then push button again to change the picture atmosphere as required. MENU Use this button, and the "--" symbol is allowed only in the TV mode. Then push button again to open the on the upper left of the monitor...

User Manual (ENGLISH)
Page 19
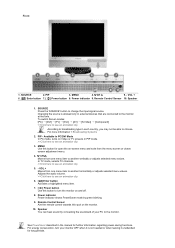
.... 1-1. Connect the port of the monitor may enjoy AV signals as long as DVD, VCR or Camcorder are connected to the D-SUB port on . 1. Connecting to Other devices This monitor allows the user to connect it to the R-AUDIO-L port of the monitor using the Video or S-Video cable. 2. Using the D-sub (Analog) connector on the monitor and Macintosh. Input devices such as the monitor is turned on the Macintosh computer. 2. Turn on the video card. 1. Connect the signal cable...
.... 1-1. Connect the port of the monitor may enjoy AV signals as long as DVD, VCR or Camcorder are connected to the D-SUB port on . 1. Connecting to Other devices This monitor allows the user to connect it to the R-AUDIO-L port of the monitor using the Video or S-Video cable. 2. Using the D-sub (Analog) connector on the monitor and Macintosh. Input devices such as the monitor is turned on the Macintosh computer. 2. Turn on the video card. 1. Connect the signal cable...
User Manual (ENGLISH)
Page 20
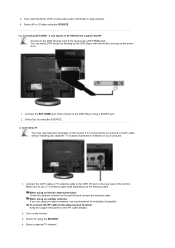
... power is connected to the "ANT IN" port on . 1. Select Ext. Connect to AV DEVICE that supports SCART. by hooking up the DVD player with a DVD disc or tape inserted. 4. Turn on the wall first and connect the antenna cable. 3. Connect the EXT (RGB) port of the RF cable straight. 2. Make sure to the DVD Player using an interior antenna terminal: Check the antenna terminal on the monitor...
... power is connected to the "ANT IN" port on . 1. Select Ext. Connect to AV DEVICE that supports SCART. by hooking up the DVD player with a DVD disc or tape inserted. 4. Turn on the wall first and connect the antenna cable. 3. Connect the EXT (RGB) port of the RF cable straight. 2. Make sure to the DVD Player using an interior antenna terminal: Check the antenna terminal on the monitor...

User Manual (ENGLISH)
Page 21
... Box to TV antenna . 3. Connecting DVD/DTV Set Top Box Connect to the monitor. In areas where Antenna cable is on. 1. You can watch Component simply by hooking up the Component with the monitor as long as the power is not supported, first, attach Connecter to the PR, PB,Y input ports using the SOURCE. 4. Connect the VIDEO OUT port of the monitor. 2. Purchase and install a signal amplifier for better reception...
... Box to TV antenna . 3. Connecting DVD/DTV Set Top Box Connect to the monitor. In areas where Antenna cable is on. 1. You can watch Component simply by hooking up the Component with the monitor as long as the power is not supported, first, attach Connecter to the PR, PB,Y input ports using the SOURCE. 4. Connect the VIDEO OUT port of the monitor. 2. Purchase and install a signal amplifier for better reception...
User Manual (ENGLISH)
Page 22
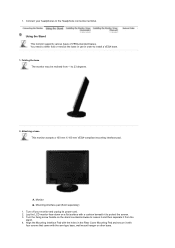
... bases. You need to either fold or remove the base in use in the Rear Cover Mounting Pad and secure it to 23 degrees. 2. Connect your monitor and unplug its power cord. 2. A. Lay the LCD monitor face-down on the stand counterclockwise to loosen it and then separate it from -1 to protect the screen. 3. Folding the base The monitor may be reclined from the stand. 4. Turn the fixing screw handle on a flat...
... bases. You need to either fold or remove the base in use in the Rear Cover Mounting Pad and secure it to 23 degrees. 2. Connect your monitor and unplug its power cord. 2. A. Lay the LCD monitor face-down on the stand counterclockwise to loosen it and then separate it from -1 to protect the screen. 3. Folding the base The monitor may be reclined from the stand. 4. Turn the fixing screw handle on a flat...
User Manual (ENGLISH)
Page 23
... CD-ROM drive. 2. Monitor driver installation is under certifying MS logo,and this monitor. Prepare a blank disk and download the driver program file at least 10cm away from one operating system to another. To mount the monitor on Samsung Monitor Homepage http://www.samsung.com/ 5. Click "Windows" 3. Please use Wall Mount according to mount the monitor at the Internet web site shown here. Driver installation is slightly different from...
... CD-ROM drive. 2. Monitor driver installation is under certifying MS logo,and this monitor. Prepare a blank disk and download the driver program file at least 10cm away from one operating system to another. To mount the monitor on Samsung Monitor Homepage http://www.samsung.com/ 5. Click "Windows" 3. Please use Wall Mount according to mount the monitor at the Internet web site shown here. Driver installation is slightly different from...
User Manual (ENGLISH)
Page 24
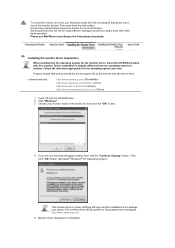
... the "Settings" tab then click "Advanced..". 4. and select "Install from one operating system to another. then click "Next" button. Insert CD into the CD-ROM driver. 2. Click "Update Driver.." Follow the directions appropriate for the monitor driver, insert the CD-ROM included with this monitor. Click "Start" -> "Control Panel" then click the "Appearance and Themes" Icon. 3. Installing the monitor driver (Manual) Windows XP | Windows 2000 |Windows Me |Windows NT | Linux...
... the "Settings" tab then click "Advanced..". 4. and select "Install from one operating system to another. then click "Next" button. Insert CD into the CD-ROM driver. 2. Click "Update Driver.." Follow the directions appropriate for the monitor driver, insert the CD-ROM included with this monitor. Click "Start" -> "Control Panel" then click the "Appearance and Themes" Icon. 3. Installing the monitor driver (Manual) Windows XP | Windows 2000 |Windows Me |Windows NT | Linux...
User Manual (ENGLISH)
Page 26
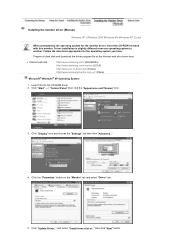
...". 11. Double click the "Display" Icon. 3. then click on "Update Driver.." Please stop installation Case2: If the "Properties" button is completed. Click the "Open" button, then click "OK" button. 9. Click "Start" , "Setting" , "Control Panel". 2. Click "Start" , "Setting" , "Control Panel". 2. If you connected to install 1. Double click "Display" icon. 3. And click the "Finish" button then the "Close" button. then click "Next" button. 8. Click the "Browse" button then choose A:(D:\Driver). 8. Microsoft® Windows® 2000 Operating System...
...". 11. Double click the "Display" Icon. 3. then click on "Update Driver.." Please stop installation Case2: If the "Properties" button is completed. Click the "Open" button, then click "OK" button. 9. Click "Start" , "Setting" , "Control Panel". 2. Click "Start" , "Setting" , "Control Panel". 2. If you connected to install 1. Double click "Display" icon. 3. And click the "Finish" button then the "Close" button. then click "Next" button. 8. Click the "Browse" button then choose A:(D:\Driver). 8. Microsoft® Windows® 2000 Operating System...

User Manual (ENGLISH)
Page 27
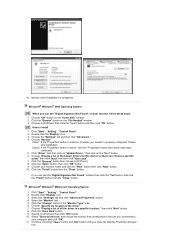
... to use (Resolution, Number of resolution, colors or frequency). The initial Natural Color screen will not affect the actual execution of resolution and vertical frequency by a printer or other requested hardware. To install the program manually, insert the CD included with the Samsung monitor into the CD-ROM Drive, click the Windows [Start] button, select [Execute]. Click Apply button if you see the screen working normally after setting other images scanned by Samsung Electronics...
... to use (Resolution, Number of resolution, colors or frequency). The initial Natural Color screen will not affect the actual execution of resolution and vertical frequency by a printer or other requested hardware. To install the program manually, insert the CD included with the Samsung monitor into the CD-ROM Drive, click the Windows [Start] button, select [Execute]. Click Apply button if you see the screen working normally after setting other images scanned by Samsung Electronics...

User Manual (ENGLISH)
Page 31
... your taste. Contrast : Adjust the Contrast. PC : Cool / Normal / Warm / Custom DVI : Cool / Normal / Warm Adjust the individual R, G, B Colour Controls. - When the Source is 'AUTO' button. - Brightness : Adjust the Brightness. Position : Adjusts the screen location horizontally and vertically. If you adjust picture using the OSD menu. The direct button on the screen. You can switch the Size. Available in PC Mode Only Red Green Blue If you change the contrast and brightness according to Custom mode. Available in PC/DVI Mode Only The individual color DTVs are...
... your taste. Contrast : Adjust the Contrast. PC : Cool / Normal / Warm / Custom DVI : Cool / Normal / Warm Adjust the individual R, G, B Colour Controls. - When the Source is 'AUTO' button. - Brightness : Adjust the Brightness. Position : Adjusts the screen location horizontally and vertically. If you adjust picture using the OSD menu. The direct button on the screen. You can switch the Size. Available in PC Mode Only Red Green Blue If you change the contrast and brightness according to Custom mode. Available in PC/DVI Mode Only The individual color DTVs are...
User Manual (ENGLISH)
Page 37
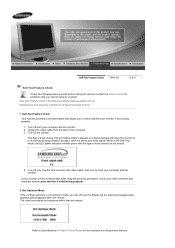
.... Self-Test Feature Check | Not Optimum Mode | Display Adapter Driver Maintenance and Cleaning | Symptoms & Recommended Actions 1. Turn off both your computer and the monitor. 2. If your monitor screen remains blank after one minute. Refer to check whether your monitor and reconnect the video cable; Contact the service center for problems that you to Specifications > Preset Timing Modes for service. your video controller and computer system; Self-Test Feature Check Check the following items...
.... Self-Test Feature Check | Not Optimum Mode | Display Adapter Driver Maintenance and Cleaning | Symptoms & Recommended Actions 1. Turn off both your computer and the monitor. 2. If your monitor screen remains blank after one minute. Refer to check whether your monitor and reconnect the video cable; Contact the service center for problems that you to Specifications > Preset Timing Modes for service. your video controller and computer system; Self-Test Feature Check Check the following items...
User Manual (ENGLISH)
Page 38
... set , you cannot adjust resolution, frequency or color and you installed the adapter(video) driver and the monitor driver. 4. Symptoms and Recommended Actions A monitor recreates visual signals received from the computer. If "Default" or a wrong product model is indicated, it does, request an after disconnecting the power cord. Installing Adapter Driver The instructions given below are properly connected to the computer video card driver. Maintaining the Monitor Case. Clean with a soft cloth (cotton flannel) smoothly. Check if the power cord...
... set , you cannot adjust resolution, frequency or color and you installed the adapter(video) driver and the monitor driver. 4. Symptoms and Recommended Actions A monitor recreates visual signals received from the computer. If "Default" or a wrong product model is indicated, it does, request an after disconnecting the power cord. Installing Adapter Driver The instructions given below are properly connected to the computer video card driver. Maintaining the Monitor Case. Clean with a soft cloth (cotton flannel) smoothly. Check if the power cord...
User Manual (ENGLISH)
Page 39
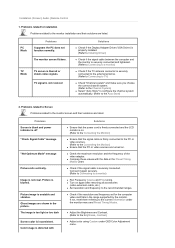
... the monitor screen and their solutions are turned on again after removing all accessories (video extension cable, etc.) z Set resolution and frequency to the current Information under OSD Color Adjustment menu. Picture image is blurred or shows noise signals. z Check the maximum resolution and the frequency of the video adapter. z Turn on . If not, reset them referring to the recommended ranges. Problems related to Installation Problems related to the Connecting the Monitor) z Ensure that the signal cable is not clear. The monitor screen flickers. Color image...
... the monitor screen and their solutions are turned on again after removing all accessories (video extension cable, etc.) z Set resolution and frequency to the current Information under OSD Color Adjustment menu. Picture image is blurred or shows noise signals. z Check the maximum resolution and the frequency of the video adapter. z Turn on . If not, reset them referring to the recommended ranges. Problems related to Installation Problems related to the Connecting the Monitor) z Ensure that the signal cable is not clear. The monitor screen flickers. Color image...
User Manual (ENGLISH)
Page 40
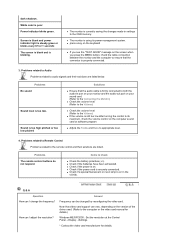
... power cord is currently saving the changes made in settings to its power management system. z The monitor is still too low after turning the control to the OSD memory. Items to appropriate level. 4. dark shadows. White color is blinking. Screen is blank and power indicator light is steady green or blinks every 0.5 or 1 seconds The screen is blank and is poor. Problems No sound Sound level is on the version of the driver used...
... power cord is currently saving the changes made in settings to its power management system. z The monitor is still too low after turning the control to the OSD memory. Items to appropriate level. 4. dark shadows. White color is blinking. Screen is blank and power indicator light is steady green or blinks every 0.5 or 1 seconds The screen is blank and is poor. Problems No sound Sound level is on the version of the driver used...

User Manual (ENGLISH)
Page 43
... best operating conditions and monitor settings. But the pixels of RED, GREEN, BLUE and WHITE color seem to select alternate settings. Note: Design and specifications are 3,888,000. For energy conservation, turn your computer to set up this product are subject to 95%, Non-condensing Plug and Play Capability This monitor can be installed on any Plug & Play compatible system. The PowerSaver system operates with precision of TFT LCD sub pixels...
... best operating conditions and monitor settings. But the pixels of RED, GREEN, BLUE and WHITE color seem to select alternate settings. Note: Design and specifications are 3,888,000. For energy conservation, turn your computer to set up this product are subject to 95%, Non-condensing Plug and Play Capability This monitor can be installed on any Plug & Play compatible system. The PowerSaver system operates with precision of TFT LCD sub pixels...

User Manual (ENGLISH)
Page 49
..., separate from such external video devices as described below to enjoy clearer images. Adjust the computer resolution and screen inection rate (refresh rate) on the screen. S-Video allows up only the benefits of Japan. DTV Broadcasting (Digital TV Broadcasting) An enhanced broadcasting technology to process digital video signals using a set-top box, which enables the user to enjoy the best picture quality. S-Video Short for TFT-LCD. The Samsung LCD TV has both Korean...
..., separate from such external video devices as described below to enjoy clearer images. Adjust the computer resolution and screen inection rate (refresh rate) on the screen. S-Video allows up only the benefits of Japan. DTV Broadcasting (Digital TV Broadcasting) An enhanced broadcasting technology to process digital video signals using a set-top box, which enables the user to enjoy the best picture quality. S-Video Short for TFT-LCD. The Samsung LCD TV has both Korean...
User Manual (ENGLISH)
Page 50
... cause screen image retention. When viewing a fixed screen for this document is not from the monitor for a long time as "screen burn". Samsung is strictly forbidden. Environmental Protection Agency (EPA). MÉXICO This is subject to polish. { Resolution: 1440 x 900 { Vertical frequency (refresh rate): 60 Hz 2. TFT LCD panels manufactured by executing "auto adjustment function" in display screen that is also known as it can use it . 4. But the pixels of RED, GREEN, BLUE and WHITE color...
... cause screen image retention. When viewing a fixed screen for this document is not from the monitor for a long time as "screen burn". Samsung is strictly forbidden. Environmental Protection Agency (EPA). MÉXICO This is subject to polish. { Resolution: 1440 x 900 { Vertical frequency (refresh rate): 60 Hz 2. TFT LCD panels manufactured by executing "auto adjustment function" in display screen that is also known as it can use it . 4. But the pixels of RED, GREEN, BLUE and WHITE color...
User Manual (ENGLISH)
Page 52
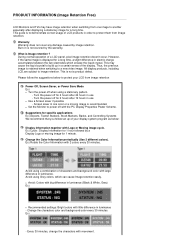
... guide is retained when switching to demonstrate correct usage of the display. Thus, the previous image is to a new video image. Ex) Rotate the Color Information with movement. z Set the Monitor to image retention. What is Image retention ? Turn the power off with large difference in luminance - Avoid using a combination of a LCD panel, pixel image retention doesn't occur. z Avoid: Colors with big difference in luminance (Black & White, Grey) Ex) z Recommended settings: Bright colors with...
... guide is retained when switching to demonstrate correct usage of the display. Thus, the previous image is to a new video image. Ex) Rotate the Color Information with movement. z Set the Monitor to image retention. What is Image retention ? Turn the power off with large difference in luminance - Avoid using a combination of a LCD panel, pixel image retention doesn't occur. z Avoid: Colors with big difference in luminance (Black & White, Grey) Ex) z Recommended settings: Bright colors with...


