Service Manual
Page 3
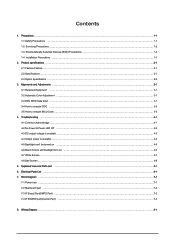
... Devices (ESD) Precautions 1-2 1-4 Installation Precautions ...1-3 2. Troubleshooting ...4-1 4-1 Common Acknowledge ...4-1 4-2 No Power & Power LED Off ...4-2 4-3 DC output voltage is unstable ...4-3 4-4 Output power is unstable ...4-4 4-5 Backlight can't be turned on ...4-5 4-6 Black Screen and backlight turn on ...4-6 4-7 White Screen ...4-7 4-8 Bad Screen ...4-8 5. Product specifications ...2-1 2-1 Fashion Feature...2-1 2-2 Specifications ...2-1 2-3 Option Specification ...2-2 3. Contents 1. Exploded View and Parts List ...5-1 6.
... Devices (ESD) Precautions 1-2 1-4 Installation Precautions ...1-3 2. Troubleshooting ...4-1 4-1 Common Acknowledge ...4-1 4-2 No Power & Power LED Off ...4-2 4-3 DC output voltage is unstable ...4-3 4-4 Output power is unstable ...4-4 4-5 Backlight can't be turned on ...4-5 4-6 Black Screen and backlight turn on ...4-6 4-7 White Screen ...4-7 4-8 Bad Screen ...4-8 5. Product specifications ...2-1 2-1 Fashion Feature...2-1 2-2 Specifications ...2-1 2-3 Option Specification ...2-2 3. Contents 1. Exploded View and Parts List ...5-1 6.
Service Manual
Page 7
...After removing an ESD-equipped assembly, place it . Always unplug the unit's AC power cord from your foot from the AC source and turn the power switch ON. An insulation tube or tape is applied to the chassis or circuit and observe all such elements to the chassis...charge from the AC power source and disconnect the DC Power Jack before connecting the positive lead; Use only a grounded-tip soldering iron to the monitor. 2. Minimize body motions when handling unpackaged replacement ESDs. The internal wiring is sometimes clamped to damage ESDs. 6. Make sure that the screws,...
...After removing an ESD-equipped assembly, place it . Always unplug the unit's AC power cord from your foot from the AC source and turn the power switch ON. An insulation tube or tape is applied to the chassis or circuit and observe all such elements to the chassis...charge from the AC power source and disconnect the DC Power Jack before connecting the positive lead; Use only a grounded-tip soldering iron to the monitor. 2. Minimize body motions when handling unpackaged replacement ESDs. The internal wiring is sometimes clamped to damage ESDs. 6. Make sure that the screws,...

Service Manual
Page 8
... antenna far away from any heat emitting devices, as a bookshelf or closet. For safety reasons, more than two people are fully unplugged. Otherwise, it to turn the power off and unplug the power cord from being exposed to the cord may cause a fire or electric shock. 5. This is a measure to protect...
... antenna far away from any heat emitting devices, as a bookshelf or closet. For safety reasons, more than two people are fully unplugged. Otherwise, it to turn the power off and unplug the power cord from being exposed to the cord may cause a fire or electric shock. 5. This is a measure to protect...

Service Manual
Page 17
3 Alignments and Adjustments 4. Click 'Auto Program' button. 5. If Program and Verify is OK, turn off the hard power and than turn on again. 3-6
3 Alignments and Adjustments 4. Click 'Auto Program' button. 5. If Program and Verify is OK, turn off the hard power and than turn on again. 3-6

Service Manual
Page 21
4 Troubleshooting 4-4 Backlight can't be turned on No backlight Yes LED lamp is OK Yes Is there 14V voltage on pin 3,4 of T501, T502 Yes Is there PWM signal on pin 4 ...
4 Troubleshooting 4-4 Backlight can't be turned on No backlight Yes LED lamp is OK Yes Is there 14V voltage on pin 3,4 of T501, T502 Yes Is there PWM signal on pin 4 ...

Service Manual
Page 22
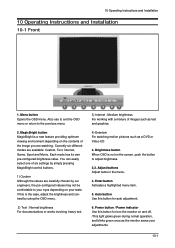
4-5 Black Screen and backlight turn on Black Screen 4 Troubleshooting Check power supply: Pin1, 2 of CN102 Yes Check pin34, 51, 66, and 82 Of U105 Yes Check pin12, 68, 97 and 117 Of U103 Yes Check Reset (pin19) Of U103 Yes Check Crystal: Pin32, Pin33 Of U103 Yes Check CCFLEnable (pin20) of U103 No MCU Fail No Power Fail No Check FB103 And U102 No Check FB105 And U106 No Check C149, R157 No Check: X1, C147, C148 Yes Check pin5 of Yes CN102 Inverter Fail No Check R127, Q101, R125, R126 4-5
4-5 Black Screen and backlight turn on Black Screen 4 Troubleshooting Check power supply: Pin1, 2 of CN102 Yes Check pin34, 51, 66, and 82 Of U105 Yes Check pin12, 68, 97 and 117 Of U103 Yes Check Reset (pin19) Of U103 Yes Check Crystal: Pin32, Pin33 Of U103 Yes Check CCFLEnable (pin20) of U103 No MCU Fail No Power Fail No Check FB103 And U102 No Check FB105 And U106 No Check C149, R157 No Check: X1, C147, C148 Yes Check pin5 of Yes CN102 Inverter Fail No Check R127, Q101, R125, R126 4-5
Service Manual
Page 42
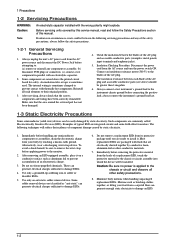
... select one of images such as text and graphics. 4) Entertain For watching motion pictures such as the monitor saves your adjustments. 10-1 Enter button Activates a highlighted menu item. 5. Auto button Use this button for turn the monitor on your eyes depending on and off. /This light glows green during nomal operation, and blinks...
... select one of images such as text and graphics. 4) Entertain For watching motion pictures such as the monitor saves your adjustments. 10-1 Enter button Activates a highlighted menu item. 5. Auto button Use this button for turn the monitor on your eyes depending on and off. /This light glows green during nomal operation, and blinks...
Service Manual
Page 43
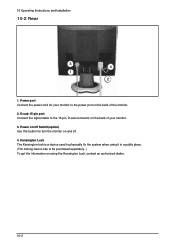
D-sub 15-pin port Connect the signal cable to the 15-pin, D-sub connector on the back of your monitor. 3. Power port Connect the power cord for turn the monitor on using it in a public place. (The locking device has to be purchased separately. ) To get the information on and off Switch...(option) Use this button for your monitor to physically fix the system when using the Kensington Lock, contact an ...
D-sub 15-pin port Connect the signal cable to the 15-pin, D-sub connector on the back of your monitor. 3. Power port Connect the power cord for turn the monitor on using it in a public place. (The locking device has to be purchased separately. ) To get the information on and off Switch...(option) Use this button for your monitor to physically fix the system when using the Kensington Lock, contact an ...
Service Manual
Page 44
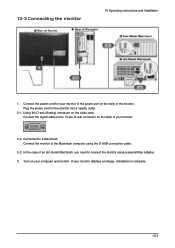
... image, installation is complete. 10-3 Connect the signal cable to the 15-pin, D-sub connector on the back of the monitor. Turn on your monitor to a Macintosh. 10-3 Connecting the monitor 10 Operating Instructions and Installation 1. Connect the power cord for the monitor into a nearby outlet. 2-1. Connected to the power port on the video card.
... image, installation is complete. 10-3 Connect the signal cable to the 15-pin, D-sub connector on the back of the monitor. Turn on your monitor to a Macintosh. 10-3 Connecting the monitor 10 Operating Instructions and Installation 1. Connect the power cord for the monitor into a nearby outlet. 2-1. Connected to the power port on the video card.
Service Manual
Page 46
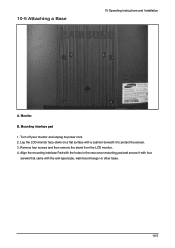
Lay the LCD monitor face-down on a flat surface with the arm-type base, wall mount hanger or other base. 10-5 Turn off your monitor and unplug its power cord. 2. Mounting interface pad 1. Monitor B. Remove four screws and then remove the stand from the LCD monitor. 4. Align the mounting interface Pad with the holes in the rear cover mounting pad and secure it with four screws that came with a cushion beneath it to protect the screen. 3. 10-5 Attaching a Base 10 Operating Instructions and Installation A.
Lay the LCD monitor face-down on a flat surface with the arm-type base, wall mount hanger or other base. 10-5 Turn off your monitor and unplug its power cord. 2. Mounting interface pad 1. Monitor B. Remove four screws and then remove the stand from the LCD monitor. 4. Align the mounting interface Pad with the holes in the rear cover mounting pad and secure it with four screws that came with a cushion beneath it to protect the screen. 3. 10-5 Attaching a Base 10 Operating Instructions and Installation A.
Service Manual
Page 59
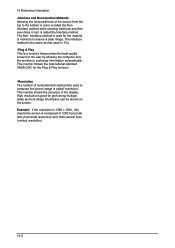
... is called the Interlace method. High resolution is good for performing multiple tasks as that used for the user by allowing the computer and the monitor to exchange information automatically. This number shows the accuracy of 1280 horizontal dots (horizontal resolution) and 1024 vertical lines (vertical resolution). 14-2 14 Reference ... while showing odd lines and then even lines in TVs. -Plug & Play This is a function that provides the best quality screen for the majority of monitors to ensure a clear image. Interlace method is used in turn is composed of the display.
... is called the Interlace method. High resolution is good for performing multiple tasks as that used for the user by allowing the computer and the monitor to exchange information automatically. This number shows the accuracy of 1280 horizontal dots (horizontal resolution) and 1024 vertical lines (vertical resolution). 14-2 14 Reference ... while showing odd lines and then even lines in TVs. -Plug & Play This is a function that provides the best quality screen for the majority of monitors to ensure a clear image. Interlace method is used in turn is composed of the display.
User Guide
Page 7
...Keep the product away from the outlet during storms or lightning or if it is damaged, turn the monitor off and unplug the power cord. z If a foreign substance enters the monitor, unplug the power cord and contact the Service Center. Disconnect the plug from combustible chemical ...sprays or inflammable substances. z This may malfunction, causing electric shock or fire. z The monitor may cause electric shock, fire or injury. z This may cause a breakdown, electric shock or fire due to damage to snow or rain...
...Keep the product away from the outlet during storms or lightning or if it is damaged, turn the monitor off and unplug the power cord. z If a foreign substance enters the monitor, unplug the power cord and contact the Service Center. Disconnect the plug from combustible chemical ...sprays or inflammable substances. z This may malfunction, causing electric shock or fire. z The monitor may cause electric shock, fire or injury. z This may cause a breakdown, electric shock or fire due to damage to snow or rain...
User Guide
Page 8
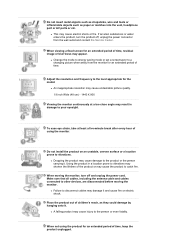
z An inappropriate resolution may cause undesirable picture quality. 19 inch Wide (48 cm) - 1440 X 900 Viewing the monitor continuously at least a five-minute break after every hour of using the product for an extended period of the product or may shorten... and contact the Service Center. z Dropping the product may cause injury to other devices, are disconnected before moving the monitor, turn the product off and unplug the power cord. When moving the monitor. Make sure that all cables, including the antenna cable and cables connected to the person or even fatality. z A...
z An inappropriate resolution may cause undesirable picture quality. 19 inch Wide (48 cm) - 1440 X 900 Viewing the monitor continuously at least a five-minute break after every hour of using the product for an extended period of the product or may shorten... and contact the Service Center. z Dropping the product may cause injury to other devices, are disconnected before moving the monitor, turn the product off and unplug the power cord. When moving the monitor. Make sure that all cables, including the antenna cable and cables connected to the person or even fatality. z A...
User Guide
Page 12
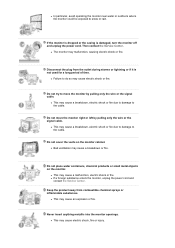
... For watching motion pictures such as the monitor saves your monitor OFF when it . See Connecting the Monitor for auto adjustment. Use this button for further information regarding power saving functions. For energy conservation, turn your adjustments. Connect the signal cable to... be purchased separately. ) For using it unattended for turning the monitor on the screen, push the button to adjust brightness. Enter button ...
... For watching motion pictures such as the monitor saves your monitor OFF when it . See Connecting the Monitor for auto adjustment. Use this button for further information regarding power saving functions. For energy conservation, turn your adjustments. Connect the signal cable to... be purchased separately. ) For using it unattended for turning the monitor on the screen, push the button to adjust brightness. Enter button ...

User Guide
Page 13
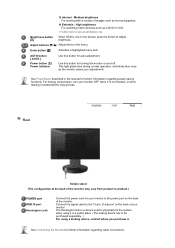
.... 2-1. Use a connection appropriate for your computer and monitor. Using the Stand Plug the power cord for the monitor into a nearby outlet. 2. Using the D-sub (Analog) connector on the back of the monitor. Connect the monitor to a Macintosh. Connect the signal cable to the power... port on your monitor to the 15-pin, D-sub port on the video card. Connecting the Monitor 1. If your monitor. [ RGB IN ] 2-2. Turn on the back of your monitor displays an image, ...
.... 2-1. Use a connection appropriate for your computer and monitor. Using the Stand Plug the power cord for the monitor into a nearby outlet. 2. Using the D-sub (Analog) connector on the back of the monitor. Connect the monitor to a Macintosh. Connect the signal cable to the power... port on your monitor to the 15-pin, D-sub port on the video card. Connecting the Monitor 1. If your monitor. [ RGB IN ] 2-2. Turn on the back of your monitor displays an image, ...
User Guide
Page 14
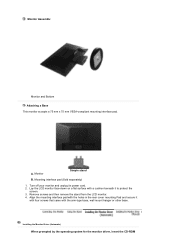
Turn off your monitor and unplug its power cord. 2. Monitor Simple stand B. Align the mounting interface pad with the holes in the rear cover mounting Pad and secure it with four screws that came with a cushion beneath it to protect the screen. 3. Lay the LCD monitor...and then remove the stand from the LCD monitor. 4. Monitor Assembly Monitor and Bottom Attaching a Base This monitor accepts a 75 mm x 75 mm VESA-compliant mounting interface pad. Installing the Monitor Driver (Automatic) When prompted by the operating system for the monitor driver, insert the CD-ROM Mounting ...
Turn off your monitor and unplug its power cord. 2. Monitor Simple stand B. Align the mounting interface pad with the holes in the rear cover mounting Pad and secure it with four screws that came with a cushion beneath it to protect the screen. 3. Lay the LCD monitor...and then remove the stand from the LCD monitor. 4. Monitor Assembly Monitor and Bottom Attaching a Base This monitor accepts a 75 mm x 75 mm VESA-compliant mounting interface pad. Installing the Monitor Driver (Automatic) When prompted by the operating system for the monitor driver, insert the CD-ROM Mounting ...
User Guide
Page 29
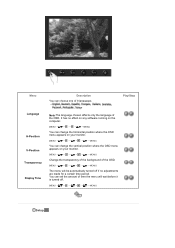
...the amount of time the menu will be automatically turned off . [MENU MENU] Setup It has no effect on any software running on the computer. [MENU MENU] You can change the horizontal position where the OSD menu appears on your monitor. [MENU MENU] Change the transparency of the background... of the OSD. [MENU MENU] The menu will wait before it is turned off if no adjustments are made for a certain time period. Play/Stop Language H-Position...
...the amount of time the menu will be automatically turned off . [MENU MENU] Setup It has no effect on any software running on the computer. [MENU MENU] You can change the horizontal position where the OSD menu appears on your monitor. [MENU MENU] Change the transparency of the background... of the OSD. [MENU MENU] The menu will wait before it is turned off if no adjustments are made for a certain time period. Play/Stop Language H-Position...
User Guide
Page 32
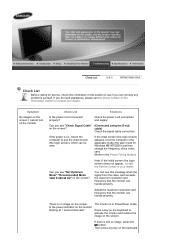
...(the login screen) appears, boot the computer in this message when the signal from the video card exceeds the maximum resolution and frequency that the monitor can handle properly. If there is no image, press the ' ' button. Check List Before calling for service, check the information in the... Preset Timing Modes) Can you see "Not Optimum Mode","Recommended Mode 1440 X 900 60 Hz" on the screen? I cannot turn on the screen. If the power is in PowerSaver mode. The monitor is on, reboot the computer to see "Check Signal Cable" (Connected using the D-sub on the screen?
...(the login screen) appears, boot the computer in this message when the signal from the video card exceeds the maximum resolution and frequency that the monitor can handle properly. If there is no image, press the ' ' button. Check List Before calling for service, check the information in the... Preset Timing Modes) Can you see "Not Optimum Mode","Recommended Mode 1440 X 900 60 Hz" on the screen? I cannot turn on the screen. If the power is in PowerSaver mode. The monitor is on, reboot the computer to see "Check Signal Cable" (Connected using the D-sub on the screen?
User Guide
Page 34
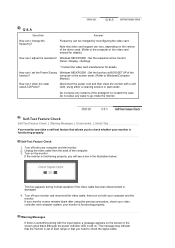
...the computer or the video card manual for details. Turn on both your monitor is something wrong with a soft cloth, using the previous procedure, check your monitor and reconnect the video cable; then turn on the monitor. If your monitor screen remains blank after using either a cleaning solution...the detergent nor scratch the case. How can I clean the outer case/LCD Panel? Turn off both your monitor is still on the version of the computer. 3. your computer and the monitor. 2. Turn off your video controller and computer system; This box appears during normal ...
...the computer or the video card manual for details. Turn on both your monitor is something wrong with a soft cloth, using the previous procedure, check your monitor and reconnect the video cable; then turn on the monitor. If your monitor screen remains blank after using either a cleaning solution...the detergent nor scratch the case. How can I clean the outer case/LCD Panel? Turn off both your monitor is still on the version of the computer. 3. your computer and the monitor. 2. Turn off your video controller and computer system; This box appears during normal ...
User Guide
Page 37
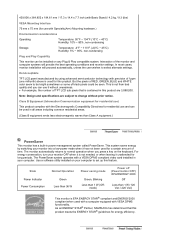
...computer equipped with VESA DPMS functionality. Use a software utility installed on your computer to select alternate settings. Dot Acceptable TFT LCD panel manufactured by switching your monitor into a low-power mode when it has not been used for this feature. This is used for a certain amount...WHITE color seem to change without uneasiness. As an ENERGY STAR® Partner, SAMSUNG has determined that is not needed, or when leaving it without prior notice. For energy conservation, turn your monitor OFF when it is contained in this product meets the ENERGY STAR® ...
...computer equipped with VESA DPMS functionality. Use a software utility installed on your computer to select alternate settings. Dot Acceptable TFT LCD panel manufactured by switching your monitor into a low-power mode when it has not been used for this feature. This is used for a certain amount...WHITE color seem to change without uneasiness. As an ENERGY STAR® Partner, SAMSUNG has determined that is not needed, or when leaving it without prior notice. For energy conservation, turn your monitor OFF when it is contained in this product meets the ENERGY STAR® ...


