
User Manual (ENGLISH)
Page 1
LCD Monitor User Manual
LCD Monitor User Manual
User Manual (ENGLISH)
Page 3
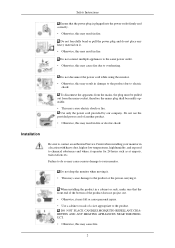
... pulled out from the mains socket, therefore the mains plug shall be readily operable. • This may cause serious damage to your monitor in a location with heavy dust, high or low temperatures, high humidity, and exposed to contact an authorized Service Center when installing your... NEAR THE PRODUCT. • Otherwise, this may result in damage to the product due to overheating. Do not disconnect the power cord while using the monitor. • Otherwise, this may fall or cause personal injury. • Use a cabinet or rack of another product. • Otherwise, this may cause...
... pulled out from the mains socket, therefore the mains plug shall be readily operable. • This may cause serious damage to your monitor in a location with heavy dust, high or low temperatures, high humidity, and exposed to contact an authorized Service Center when installing your... NEAR THE PRODUCT. • Otherwise, this may result in damage to the product due to overheating. Do not disconnect the power cord while using the monitor. • Otherwise, this may fall or cause personal injury. • Use a cabinet or rack of another product. • Otherwise, this may cause...

User Manual (ENGLISH)
Page 4
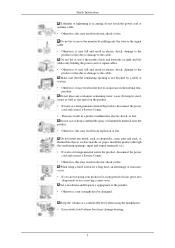
...result in the discoloration and distortion of your body on the floor. • Otherwise, this may result in electric shock or fire. Install your monitor is kept away from children. • Otherwise, it may result in serious harm (suffocation) if children play with it. Ensure that the ...possible. • Otherwise, this may result in damage to the screen display. Do not place the front of the TFT-LCD screen, wipe with a monitor cleaner only. perature. If the height of 1:10. 3 Clean Safety Instructions Keep heating appliances as far away from the wall. • Otherwise, ...
...result in the discoloration and distortion of your body on the floor. • Otherwise, this may result in electric shock or fire. Install your monitor is kept away from children. • Otherwise, it may result in serious harm (suffocation) if children play with it. Ensure that the ...possible. • Otherwise, this may result in damage to the screen display. Do not place the front of the TFT-LCD screen, wipe with a monitor cleaner only. perature. If the height of 1:10. 3 Clean Safety Instructions Keep heating appliances as far away from the wall. • Otherwise, ...
User Manual (ENGLISH)
Page 6
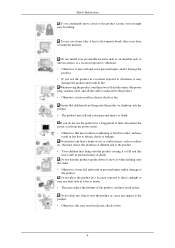
... keep combustible spray or flammable material near the product. • Otherwise, this may result in electric shock or fire. Do not lift or move the monitor by a table or curtain. • Otherwise, it may result in fire due to an increase in the internal temperature. Do not insert any metal on...
... keep combustible spray or flammable material near the product. • Otherwise, this may result in electric shock or fire. Do not lift or move the monitor by a table or curtain. • Otherwise, it may result in fire due to an increase in the internal temperature. Do not insert any metal on...
User Manual (ENGLISH)
Page 7
... result in electric shock or fire. If you use the product for a long period of the product, and may attract the attention of using the monitor.
... result in electric shock or fire. If you use the product for a long period of the product, and may attract the attention of using the monitor.

User Manual (ENGLISH)
Page 8
Good Postures When Using the Monitor When using the product, use it may result in personal injury and/or damage to be level with the back of the hand. • Keep ...
Good Postures When Using the Monitor When using the product, use it may result in personal injury and/or damage to be level with the back of the hand. • Keep ...

User Manual (ENGLISH)
Page 9
If any items are included with your dealer. Contact a local dealer to buy optional items. Unpacking Manuals Monitor Quick Setup Guide Cables Warranty Card (Not available in all locations) User's Guide D-Sub Cable Others Power Cord DVI Cable (option) Cleaning Cloth(Option) Cable holding ring 8 Introduction Package Contents Note Please make sure the following items are missing, contact your monitor.
If any items are included with your dealer. Contact a local dealer to buy optional items. Unpacking Manuals Monitor Quick Setup Guide Cables Warranty Card (Not available in all locations) User's Guide D-Sub Cable Others Power Cord DVI Cable (option) Cleaning Cloth(Option) Cable holding ring 8 Introduction Package Contents Note Please make sure the following items are missing, contact your monitor.

User Manual (ENGLISH)
Page 10
... for this product. Turn the Power button off and on -screen menu and exits from the menu. It can be displayed again. Customized Key[ ] 9 Your Monitor Initial Settings Select the language using the up to the previous menu. Make sure to adjust brightness. Front MENU button [MENU/ ] Opens the on . Also...
... for this product. Turn the Power button off and on -screen menu and exits from the menu. It can be displayed again. Customized Key[ ] 9 Your Monitor Initial Settings Select the language using the up to the previous menu. Make sure to adjust brightness. Front MENU button [MENU/ ] Opens the on . Also...

User Manual (ENGLISH)
Page 11
...is not available for products with an Analog interface only. Power Indicator This light is lit when operating normally, and blinks once when your monitor to product. Note The configuration at the back of the screen displaying the current mode -- Rear Note You can customize key assignment for... the Custom button according to your monitor OFF when it is pressed to adjust items in the manual for a required function via Setup > Customized Key. analog or digital input signal...
...is not available for products with an Analog interface only. Power Indicator This light is lit when operating normally, and blinks once when your monitor to product. Note The configuration at the back of the screen displaying the current mode -- Rear Note You can customize key assignment for... the Custom button according to your monitor OFF when it is pressed to adjust items in the manual for a required function via Setup > Customized Key. analog or digital input signal...
User Manual (ENGLISH)
Page 12
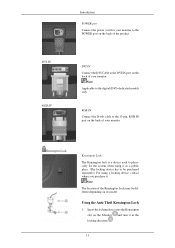
... IN port on the back of the product. DVI IN RGB IN Introduction POWER port Connect the power cord for your monitor to the POWER port on the back of your monitor. Kensington Lock Kensington Lock The Kensington lock is a device used to the DVI IN port on its model. Note The... where you purchase it in the locking direction . 11 Using the Anti-Theft Kensington Lock 1. Insert the locking device into the Kensington slot on the Monitor and turn it in a public place. (The locking device has to the digital (DVI)-dedicated models only.
... IN port on the back of the product. DVI IN RGB IN Introduction POWER port Connect the power cord for your monitor to the POWER port on the back of your monitor. Kensington Lock Kensington Lock The Kensington lock is a device used to the DVI IN port on its model. Note The... where you purchase it in the locking direction . 11 Using the Anti-Theft Kensington Lock 1. Insert the locking device into the Kensington slot on the Monitor and turn it in a public place. (The locking device has to the digital (DVI)-dedicated models only.

User Manual (ENGLISH)
Page 14
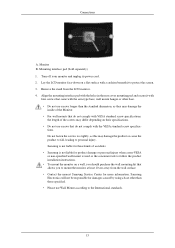
Using the D-sub (Analog) connector on the video card. • Connect the signal cable to the DVI IN Port on the back of your Monitor. 13 Connections Connecting Cables Use a connection appropriate for your monitor. Using the DVI (Digital) connector on the video card. • Connect the DVI Cable to the 15-pin, D-sub port on the back of your computer.
Using the D-sub (Analog) connector on the video card. • Connect the signal cable to the DVI IN Port on the back of your Monitor. 13 Connections Connecting Cables Use a connection appropriate for your monitor. Using the DVI (Digital) connector on the video card. • Connect the DVI Cable to the 15-pin, D-sub port on the back of your computer.

User Manual (ENGLISH)
Page 15
Note The VESA dimensions given above are connected, you can tilt the monitor upwards at an angle of the monitor. Plug the power cord for your monitor to the power port on the back of -1° to 16°. ( ±1.0°) Attaching a Base This monitor accepts a 100 mm x 100 mm VESA-compliant mounting interface pad. Using the Stand Folding the base Note You can turn them . The VESA dimensions may differ depending on and use them on the product. 14 Connections Connect the power cord for the monitor into a nearby outlet. Note If the monitor and the computer are an example.
Note The VESA dimensions given above are connected, you can tilt the monitor upwards at an angle of the monitor. Plug the power cord for your monitor to the power port on the back of -1° to 16°. ( ±1.0°) Attaching a Base This monitor accepts a 100 mm x 100 mm VESA-compliant mounting interface pad. Using the Stand Folding the base Note You can turn them . The VESA dimensions may differ depending on and use them on the product. 14 Connections Connect the power cord for the monitor into a nearby outlet. Note If the monitor and the computer are an example.
User Manual (ENGLISH)
Page 16
...the screws too tightly, as they may damage the product or cause the product to fall, leading to mount the monitor at least 10 cm away from the LCD monitor. 4. Samsung Electronics will not be responsible for damages caused by using a base other base. • Do not use screws ...longer than the standard dimension, as this may damage the inside of the Monitor. • For wall mounts that do not comply with...
...the screws too tightly, as they may damage the product or cause the product to fall, leading to mount the monitor at least 10 cm away from the LCD monitor. 4. Samsung Electronics will not be responsible for damages caused by using a base other base. • Do not use screws ...longer than the standard dimension, as this may damage the inside of the Monitor. • For wall mounts that do not comply with...
User Manual (ENGLISH)
Page 17
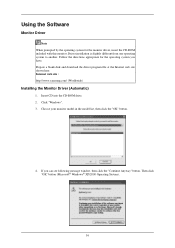
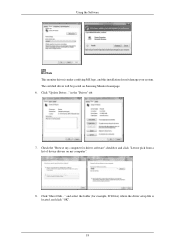
... you have. Driver installation is slightly different from one operating system to another. Choose your monitor model in the model list, then click the "OK" button. 4. Insert CD into the CD-ROM drive. 2. Click "Windows". 3. Then click "OK" button (Microsoft® ...® XP/2000 Operating System). 16 Prepare a blank disk and download the driver program file at the Internet web site shown here. Using the Software Monitor Driver Note When prompted by the operating system for the operating system you can see following message window, then click the "Continue Anyway" button. Internet...
... you have. Driver installation is slightly different from one operating system to another. Choose your monitor model in the model list, then click the "OK" button. 4. Insert CD into the CD-ROM drive. 2. Click "Windows". 3. Then click "OK" button (Microsoft® ...® XP/2000 Operating System). 16 Prepare a blank disk and download the driver program file at the Internet web site shown here. Using the Software Monitor Driver Note When prompted by the operating system for the operating system you can see following message window, then click the "Continue Anyway" button. Internet...
User Manual (ENGLISH)
Page 18
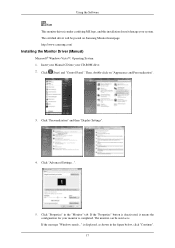
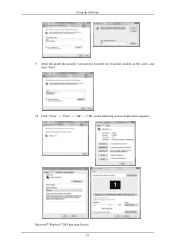
..." in the figure below, click "Continue". 17 The certified driver will be used as shown in the "Monitor" tab. Click (Start) and "Control Panel". If the "Properties" button is . http://www.samsung.com/ Installing the Monitor Driver (Manual) Microsoft® Windows Vista™, Operating System 1. If the message "Windows needs..." Click "Personalization" and...
..." in the figure below, click "Continue". 17 The certified driver will be used as shown in the "Monitor" tab. Click (Start) and "Control Panel". If the "Properties" button is . http://www.samsung.com/ Installing the Monitor Driver (Manual) Microsoft® Windows Vista™, Operating System 1. If the message "Windows needs..." Click "Personalization" and...
User Manual (ENGLISH)
Page 19
Using the Software Note This monitor driver is located, and click "OK". 18 Click "Have Disk..." and select the folder (for driver software" checkbox and click "Let me pick from a list of device drivers on Samsung Monitor homepage. 6. Click "Update Driver..." Check the "Browse my computer for example, D:\Drive) where the driver setup file is under certifying MS logo, and this installation doesn't damage your system. in the "Driver" tab. 7. The certified driver will be posted on my computer". 8.
Using the Software Note This monitor driver is located, and click "OK". 18 Click "Have Disk..." and select the folder (for driver software" checkbox and click "Let me pick from a list of device drivers on Samsung Monitor homepage. 6. Click "Update Driver..." Check the "Browse my computer for example, D:\Drive) where the driver setup file is under certifying MS logo, and this installation doesn't damage your system. in the "Driver" tab. 7. The certified driver will be posted on my computer". 8.
User Manual (ENGLISH)
Page 20
Microsoft® Windows® XP Operating System 19 Click "Close" → "Close" → "OK" → "OK" on the screen, and click "Next". 10. Using the Software 9. Select the model that matches your monitor from the list of monitor models on the following screens displayed in sequence.
Microsoft® Windows® XP Operating System 19 Click "Close" → "Close" → "OK" → "OK" on the screen, and click "Next". 10. Using the Software 9. Select the model that matches your monitor from the list of monitor models on the following screens displayed in sequence.
User Manual (ENGLISH)
Page 21
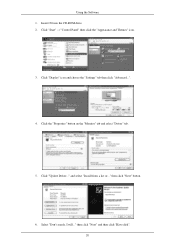
Insert CD into the CD-ROM drive. 2. Click the "Properties" button on the "Monitor" tab and select "Driver" tab. 5. Select "Don't search, I will..." Click "Display" icon and choose the "Settings" tab then click "Advanced...". 4. and select "Install from a list or..." Click "Update Driver..." then click "Next" and then click "Have disk". 20 then click "Next" button. 6. Using the Software 1. Click "Start" → "Control Panel" then click the "Appearance and Themes" icon. 3.
Insert CD into the CD-ROM drive. 2. Click the "Properties" button on the "Monitor" tab and select "Driver" tab. 5. Select "Don't search, I will..." Click "Display" icon and choose the "Settings" tab then click "Advanced...". 4. and select "Install from a list or..." Click "Update Driver..." then click "Next" and then click "Have disk". 20 then click "Next" button. 6. Using the Software 1. Click "Start" → "Control Panel" then click the "Appearance and Themes" icon. 3.

User Manual (ENGLISH)
Page 22
Click the "Close" button then click "OK" button continually. 21 Then click "OK" button. http://www.samsung.com/ 9. Click the "Browse" button then choose A:(D:\Driver) and choose your system. Note This monitor driver is under certifying MS logo, and this installation doesn't damage your monitor model in the model list and click the "Next" button. 8. The certified driver will be posted on Samsung Monitor homepage. Using the Software 7. If you can see following message window, then click the "Continue Anyway" button.
Click the "Close" button then click "OK" button continually. 21 Then click "OK" button. http://www.samsung.com/ 9. Click the "Browse" button then choose A:(D:\Driver) and choose your system. Note This monitor driver is under certifying MS logo, and this installation doesn't damage your monitor model in the model list and click the "Next" button. 8. The certified driver will be posted on Samsung Monitor homepage. Using the Software 7. If you can see following message window, then click the "Continue Anyway" button.
User Manual (ENGLISH)
Page 23
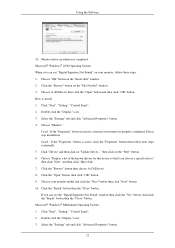
..." button is properly configured. Click the "Browse" button then choose A:(D:\Driver). 8. Click the "Finish" button then the "Close" button. Monitor driver installation is completed. then click on the "Insert disk" window. 2. If you can see the "Digital Signature Not Found" window then... "Next" button then click "Next" button. 10. And click the "Finish" button then the "Close" button. How to install 1. Choose your monitor, follow next steps continually. 5. Choose "OK" button on the "Next" button. 6. Select the "Settings" tab and click "Advanced Properties" button....
..." button is properly configured. Click the "Browse" button then choose A:(D:\Driver). 8. Click the "Finish" button then the "Close" button. Monitor driver installation is completed. then click on the "Insert disk" window. 2. If you can see the "Digital Signature Not Found" window then... "Next" button then click "Next" button. 10. And click the "Finish" button then the "Close" button. How to install 1. Choose your monitor, follow next steps continually. 5. Choose "OK" button on the "Next" button. 6. Select the "Settings" tab and click "Advanced Properties" button....


