
User Manual
Page 9
... in death, serious personal injury or fire. Use a cable with 14 AWG or more . • KS specification - Failing to the Cable Safety Specifications. • UL specifications - Use a cable with 20.SQ or more . Use a power cable with 12.5 A or more . •... power cable with a permitted current of the products connected to the 'Rated Capacities' table. Use a cable with the permitted current specifications greater than the current product consumption/power consumption, install a separate power transformer according to it to check the power requirements for the...
... in death, serious personal injury or fire. Use a cable with 14 AWG or more . • KS specification - Failing to the Cable Safety Specifications. • UL specifications - Use a cable with 20.SQ or more . Use a power cable with 12.5 A or more . •... power cable with a permitted current of the products connected to the 'Rated Capacities' table. Use a cable with the permitted current specifications greater than the current product consumption/power consumption, install a separate power transformer according to it to check the power requirements for the...

User Manual
Page 16
...performance of the remote control may be affected by a TV or other electronic device operating near the LCD Display , causing a malfunction due to the DXN-2 model only. During BNC input, please check specifications for the input ports below . • [R/Y] --> Red port input • [G/PB] ...• [B/PR] --> Blue port input - USB1,USB2 (USB Connection Terminal) Keyboard / Mouse, Mass Storage Device Compatible. During component input, please check specifications for the input ports below . • [R/Y] --> Green port input • [G/PB] --> Blue port input • [B/PR] --> Red port ...
...performance of the remote control may be affected by a TV or other electronic device operating near the LCD Display , causing a malfunction due to the DXN-2 model only. During BNC input, please check specifications for the input ports below . • [R/Y] --> Red port input • [G/PB] ...• [B/PR] --> Blue port input - USB1,USB2 (USB Connection Terminal) Keyboard / Mouse, Mass Storage Device Compatible. During component input, please check specifications for the input ports below . • [R/Y] --> Green port input • [G/PB] --> Blue port input • [B/PR] --> Red port ...
User Manual
Page 41
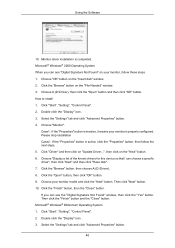
...: If the "Properties" button is properly configured. Then click the "Finish" button and the "Close" button. Click "Start", "Setting", "Control Panel". 2. Double click the "Display" icon. 3. Double click the "Display" icon. 3. Select the "Settings" tab and click "Advanced Properties" button. 40 How to install 1. Choose "Monitor". Using the Software 10. ... you can see "Digital Signature Not Found" on the "Next" button. 6. Click the "Browse" button, then choose A:(D:\Driver). 8. If you can choose a specific driver", then click "Next" and then click "Have disk". 7.
...: If the "Properties" button is properly configured. Then click the "Finish" button and the "Close" button. Click "Start", "Setting", "Control Panel". 2. Double click the "Display" icon. 3. Double click the "Display" icon. 3. Select the "Settings" tab and click "Advanced Properties" button. 40 How to install 1. Choose "Monitor". Using the Software 10. ... you can see "Digital Signature Not Found" on the "Next" button. 6. Click the "Browse" button, then choose A:(D:\Driver). 8. If you can choose a specific driver", then click "Next" and then click "Have disk". 7.
User Manual
Page 42
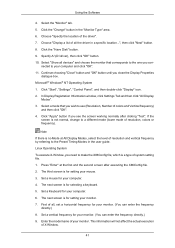
...for your computer. 6. Click "Start", "Settings", "Control Panel", and then double-click "Display" icon. 2. Select a mode that corresponds to make the X86Config file, which is for your monitor. Enter the model name of all the driver in a specific location...", then click "Next" button. 8. Click "Apply" ...button if you close the Display Properties dialogue box. First of your monitor. (You can enter the frequency directly.) 9. ...
...for your computer. 6. Click "Start", "Settings", "Control Panel", and then double-click "Display" icon. 2. Select a mode that corresponds to make the X86Config file, which is for your monitor. Enter the model name of all the driver in a specific location...", then click "Next" button. 8. Click "Apply" ...button if you close the Display Properties dialogue box. First of your monitor. (You can enter the frequency directly.) 9. ...

User Manual
Page 43
... start the program. Select MDC from the list and then click the "Add/Delete" button. 42 MDC (Multi-Display Channel) Installation 1. When the Installation Shield Wizard window appears, click "Next". 4. Using the Software 10. Click ... main screen is complete, the MDC executable icon appears on the CD. 3. When the installation is not displayed, proceed with the installation using the "Add or Remove Programs" option of computer system or monitor. Perform ... and the network environment. Click "Finish". 8. Select "Setting/Control Panel" on specification of the Windows® Control...
... start the program. Select MDC from the list and then click the "Add/Delete" button. 42 MDC (Multi-Display Channel) Installation 1. When the Installation Shield Wizard window appears, click "Next". 4. Using the Software 10. Click ... main screen is complete, the MDC executable icon appears on the CD. 3. When the installation is not displayed, proceed with the installation using the "Add or Remove Programs" option of computer system or monitor. Perform ... and the network environment. Click "Finish". 8. Select "Setting/Control Panel" on specification of the Windows® Control...

User Manual
Page 106
Adjusting the LCD Display When using multiple languages, you can select which rotation type will be applied to your device. 5. step 4 You can choose and set a specific language among them. 4. Setup Information 83 Select Screen Type -
Adjusting the LCD Display When using multiple languages, you can select which rotation type will be applied to your device. 5. step 4 You can choose and set a specific language among them. 4. Setup Information 83 Select Screen Type -
User Manual
Page 108
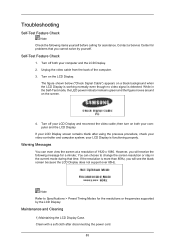
...yourself before calling for assistance. then turn on the screen. 4. Maintenance and Cleaning 1) Maintaining the LCD Display Case. Turn on a black background when the LCD Display is working normally even though no video signal is detected: While in the current mode during that...soft cloth after using the previous procedure, check your LCD Display and reconnect the video cable; Self-Test Feature Check 1. The figure shown below ("Check Signal Cable") appears on the LCD Display. Warning Messages You can choose to Specifications > Preset Timing Modes for the resolutions or frequencies ...
...yourself before calling for assistance. then turn on the screen. 4. Maintenance and Cleaning 1) Maintaining the LCD Display Case. Turn on a black background when the LCD Display is working normally even though no video signal is detected: While in the current mode during that...soft cloth after using the previous procedure, check your LCD Display and reconnect the video cable; Self-Test Feature Check 1. The figure shown below ("Check Signal Cable") appears on the LCD Display. Warning Messages You can choose to Specifications > Preset Timing Modes for the resolutions or frequencies ...
User Manual
Page 114
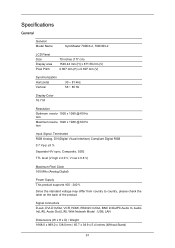
... In(L/R), Audio Out (L/R), With Network Model : USB, LAN Dimensions (W x H x D) / Weight 1668.0 x 989.0 x 138.0 mm / 65.7 x 38.9 x 5.4 inches (Without Stand) 91 Specifications General General Model Name SyncMaster 700DX-2, 700DXN-2 LCD Panel Size Display area Pixel Pitch 70 inches (177 cm) 1549.44 mm (H) x 871.56 mm (V) 0.807 mm (H) x 0.807 mm (V) Synchronization Horizontal Vertical 30 ~ 81 kHz 56 ~ 85...
... In(L/R), Audio Out (L/R), With Network Model : USB, LAN Dimensions (W x H x D) / Weight 1668.0 x 989.0 x 138.0 mm / 65.7 x 38.9 x 5.4 inches (Without Stand) 91 Specifications General General Model Name SyncMaster 700DX-2, 700DXN-2 LCD Panel Size Display area Pixel Pitch 70 inches (177 cm) 1549.44 mm (H) x 871.56 mm (V) 0.807 mm (H) x 0.807 mm (V) Synchronization Horizontal Vertical 30 ~ 81 kHz 56 ~ 85...
User Manual
Page 115
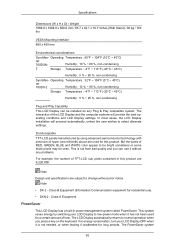
...LCD panels manufactured by switching your LCD Display OFF when it is not from bad quality and you press a key on any problems. For example, the number of TFT-LCD... advanced semiconductor technology with precision of the LCD Display and the computer systems will proceed automatically, unless the user wishes to select alternate settings. Specifications Dimensions (W x H x D) / ...700DXN- Humidity : 10 % ~ 80 %, non-condensing 2 Storage Temperature : -4°F ~ 113°F (-20°C ~ 45°C) Humidity : 5 % ~ 95 %, non-condensing SyncMas- Note Design and specifications...
...LCD panels manufactured by switching your LCD Display OFF when it is not from bad quality and you press a key on any problems. For example, the number of TFT-LCD... advanced semiconductor technology with precision of the LCD Display and the computer systems will proceed automatically, unless the user wishes to select alternate settings. Specifications Dimensions (W x H x D) / ...700DXN- Humidity : 10 % ~ 80 %, non-condensing 2 Storage Temperature : -4°F ~ 113°F (-20°C ~ 45°C) Humidity : 5 % ~ 95 %, non-condensing SyncMas- Note Design and specifications...

User Manual
Page 116
Refer to set up this feature. Display Mode IBM, 640 x 350 IBM, 640 x 480 IBM, 720 x 400 MAC, 640 x 480 ....363 56.476 60.023 67.500 47.776 60.000 Vertical Frequency (Hz) 70.086 59.940 70.087 66.667 74.551 75.062 72.809 75.000 56.250 60.317... 72.188 75.000 60.000 60.004 70.069 75.029 75.000 59.870 60.000 Pixel Clock (MHz) 25.175 ...) On Blinking Off 680 watts Less than 2 watts Less than 0 watts PowerSaver (When used as follows. Specifications operates with a VESA DPM compliant video card installed in your computer to the video card manual and adjusts the...
Refer to set up this feature. Display Mode IBM, 640 x 350 IBM, 640 x 480 IBM, 720 x 400 MAC, 640 x 480 ....363 56.476 60.023 67.500 47.776 60.000 Vertical Frequency (Hz) 70.086 59.940 70.087 66.667 74.551 75.062 72.809 75.000 56.250 60.317... 72.188 75.000 60.000 60.004 70.069 75.029 75.000 59.870 60.000 Pixel Clock (MHz) 25.175 ...) On Blinking Off 680 watts Less than 2 watts Less than 0 watts PowerSaver (When used as follows. Specifications operates with a VESA DPM compliant video card installed in your computer to the video card manual and adjusts the...

User Manual
Page 117
... edge of the screen horizontally is called the Horizontal Cycle and the inverse number of this repetition is called the Vertical Frequency or Refresh Rate. Specifications Display Mode VESA, 1280 x 1024 VESA, 1280 x 1024 VESA, 1366 x 768 VESA, 1600 x 1200 VESA, 1920 x 1080 Horizontal Frequency (kHz) 63.981 79.976 47.712...
... edge of the screen horizontally is called the Horizontal Cycle and the inverse number of this repetition is called the Vertical Frequency or Refresh Rate. Specifications Display Mode VESA, 1280 x 1024 VESA, 1280 x 1024 VESA, 1366 x 768 VESA, 1600 x 1200 VESA, 1920 x 1080 Horizontal Frequency (kHz) 63.981 79.976 47.712...


