User Manual (ENGLISH)
Page 1
All rights reserved. SyncMaster 570DXn Install Programs PDF Manuals Registration Model SyncMaster 570DXn Select Language Safety Instructions Introduction Connections Using the Software Adjusting the LCD Display Troubleshooting Specifications Information Appendix © 2007 Samsung Electronics Co., Ltd.
All rights reserved. SyncMaster 570DXn Install Programs PDF Manuals Registration Model SyncMaster 570DXn Select Language Safety Instructions Introduction Connections Using the Software Adjusting the LCD Display Troubleshooting Specifications Information Appendix © 2007 Samsung Electronics Co., Ltd.
User Manual (ENGLISH)
Page 2
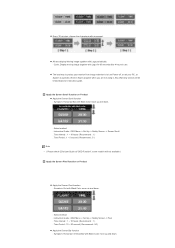
... period of time, set it to the user. If using a screen saver, set your computer to the equipment. The images here are for reasons of performance enhancement. z This may cause electric shock or fire. z This may cause electric shock or fire. Select Language Main Page Safety Instructions Notational Power Installation Clean Others Introduction Connections Using the Software Adjusting the LCD Display Troubleshooting Specifications Information Appendix Model SyncMaster 570DXn The color and...
... period of time, set it to the user. If using a screen saver, set your computer to the equipment. The images here are for reasons of performance enhancement. z This may cause electric shock or fire. z This may cause electric shock or fire. Select Language Main Page Safety Instructions Notational Power Installation Clean Others Introduction Connections Using the Software Adjusting the LCD Display Troubleshooting Specifications Information Appendix Model SyncMaster 570DXn The color and...
User Manual (ENGLISH)
Page 11
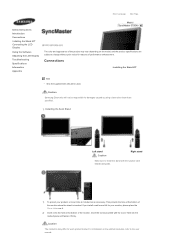
Select Language Main Page Safety Instructions Introduction Package Contents Your LCD Display Machanical Layout Connections Using the Software Adjusting the LCD Display Troubleshooting Specifications Information Appendix Model SyncMaster 570DXn The color and appearance of the product may vary depending on the model, and the product specifications are missing, contact your LCD Display. If any items are subject to buy optional items. Note • This stand is not for reasons of performance...
Select Language Main Page Safety Instructions Introduction Package Contents Your LCD Display Machanical Layout Connections Using the Software Adjusting the LCD Display Troubleshooting Specifications Information Appendix Model SyncMaster 570DXn The color and appearance of the product may vary depending on the model, and the product specifications are missing, contact your LCD Display. If any items are subject to buy optional items. Note • This stand is not for reasons of performance...

User Manual (ENGLISH)
Page 14
... mode (Analog PC) 8) DVI / PC / HDMI IN [DVI(HDCP)] (PC Video Connection Terminal) Using a DVI Cable (DVI-D to Connecting Cables under Setup. The LCD Display 's configuration at the back may vary slightly depending on the LCD Display model. 1) POWER S/W ON [ | ] / OFF [O] Switches the LCD Display On/Off. 2) POWER IN The power cord plugs into the LCD Display and the wall plug. 3) REMOTE OUT/IN You can use a wired remote control by connecting it to your monitor. 4) RS232C OUT/IN (RS232C Serial PORT) MDC(Multiple Display Control) Program Port 5) DVI...
... mode (Analog PC) 8) DVI / PC / HDMI IN [DVI(HDCP)] (PC Video Connection Terminal) Using a DVI Cable (DVI-D to Connecting Cables under Setup. The LCD Display 's configuration at the back may vary slightly depending on the LCD Display model. 1) POWER S/W ON [ | ] / OFF [O] Switches the LCD Display On/Off. 2) POWER IN The power cord plugs into the LCD Display and the wall plug. 3) REMOTE OUT/IN You can use a wired remote control by connecting it to your monitor. 4) RS232C OUT/IN (RS232C Serial PORT) MDC(Multiple Display Control) Program Port 5) DVI...

User Manual (ENGLISH)
Page 15
... Speaker Connection Terminal) 18) AUDIO OUT [L-AUDIO-R] (LCD Display Audio Connection Terminal (Output)) AUDIO OUT is a device used to physically fix the system to ten LCD Displays can be purchased separately.) For using it in a public place. (The locking device has to be connected to loopout may differ depending on the cables, signal source etc. 9) COMPONENT AUDIO IN [L-AUDIO-R] (Component Audio Connection Terminal (Input)) 10) BNC/COMPONENT OUT [R/PR, G/Y, B/PB, H, V] (BNC/Component Connection Terminal (Output)) BNC (Analog PC) Connection: connecting the R, G, B, H, V ports Component...
... Speaker Connection Terminal) 18) AUDIO OUT [L-AUDIO-R] (LCD Display Audio Connection Terminal (Output)) AUDIO OUT is a device used to physically fix the system to ten LCD Displays can be purchased separately.) For using it in a public place. (The locking device has to be connected to loopout may differ depending on the cables, signal source etc. 9) COMPONENT AUDIO IN [L-AUDIO-R] (Component Audio Connection Terminal (Input)) 10) BNC/COMPONENT OUT [R/PR, G/Y, B/PB, H, V] (BNC/Component Connection Terminal (Output)) BNC (Analog PC) Connection: connecting the R, G, B, H, V ports Component...
User Manual (ENGLISH)
Page 26
... model, and the product specifications are subject to change without prior notice for reasons of performance enhancement. Insert the screw provided with the Caution label folded backwards. 1) To protect your monitor, please place the Cover Hole over it. 2) Insert it firmly. Select Language Main Page Safety Instructions Introduction Connections Installing the Stand KIT Connecting the LCD Display Using the Software Adjusting the LCD Display Troubleshooting Specifications Information Appendix Model SyncMaster 570DXn The color...
... model, and the product specifications are subject to change without prior notice for reasons of performance enhancement. Insert the screw provided with the Caution label folded backwards. 1) To protect your monitor, please place the Cover Hole over it. 2) Insert it firmly. Select Language Main Page Safety Instructions Introduction Connections Installing the Stand KIT Connecting the LCD Display Using the Software Adjusting the LCD Display Troubleshooting Specifications Information Appendix Model SyncMaster 570DXn The color...

User Manual (ENGLISH)
Page 27
... connecting AV input devices, refer to the LCD Display. Connecting a Computer 1) Connect the power cord for your LCD Display. Connect the D-sub to the 15-pin, RGB port on the back of your computer can be connected to the User Controls under Adjusting Your LCD Display. Trun on the video card. R, G, B, H, V ports on the back of your LCD Display and the 15 pin Dsub Port on the computer. 2-2) Using the DVI (Digital) connector on the power switch...
... connecting AV input devices, refer to the LCD Display. Connecting a Computer 1) Connect the power cord for your LCD Display. Connect the D-sub to the 15-pin, RGB port on the back of your computer can be connected to the User Controls under Adjusting Your LCD Display. Trun on the video card. R, G, B, H, V ports on the back of your LCD Display and the 15 pin Dsub Port on the computer. 2-2) Using the DVI (Digital) connector on the power switch...

User Manual (ENGLISH)
Page 30
... on the Set Top Box. 2) Connect a set of two cables. Connecting Speakers Note • Fasten the SET and the speaker using the SOURCE button on the remote control. Connecting a DTV Set Top Box Note • The connections for the connection to connect a set without the speaker stand. Note • For an explanation of the LCD Display or on the front of Component video, see your camcorder is stereo, you need to a DTV Set Top Box using the screws. * Mount the speaker set of audio cables between the...
... on the Set Top Box. 2) Connect a set of two cables. Connecting Speakers Note • Fasten the SET and the speaker using the SOURCE button on the remote control. Connecting a DTV Set Top Box Note • The connections for the connection to connect a set without the speaker stand. Note • For an explanation of the LCD Display or on the front of Component video, see your camcorder is stereo, you need to a DTV Set Top Box using the screws. * Mount the speaker set of audio cables between the...

User Manual (ENGLISH)
Page 32
...; Input devices such as digital DVD are connected to the HDMI IN terminal of the monitor using a DVI to HDMI cable. 2) Connect the red and white jacks of an RCA to stereo (for PC) cable to the same colored audio output terminals of the digital output device, and connect the opposite jack to the HDMI / PC / DVI-D AUDIO IN terminal of other devices through the REMOTE IN terminal. Note • You can control...
...; Input devices such as digital DVD are connected to the HDMI IN terminal of the monitor using a DVI to HDMI cable. 2) Connect the red and white jacks of an RCA to stereo (for PC) cable to the same colored audio output terminals of the digital output device, and connect the opposite jack to the HDMI / PC / DVI-D AUDIO IN terminal of other devices through the REMOTE IN terminal. Note • You can control...
User Manual (ENGLISH)
Page 36
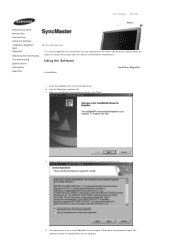
... login. You are required to log in . Select Language Main Page Model Safety Instructions Introduction Connections Using the Software Installation MagicNet MDC MagicNet Adjusting the LCD Display Troubleshooting Specifications Information Appendix The color and appearance of the product may vary depending on the model, and the product specifications are subject to the MagicNet Server program. Insert the installation CD into the CD-ROM drive. 2. Using the Software Installation Installation MagicNet 1.
... login. You are required to log in . Select Language Main Page Model Safety Instructions Introduction Connections Using the Software Installation MagicNet MDC MagicNet Adjusting the LCD Display Troubleshooting Specifications Information Appendix The color and appearance of the product may vary depending on the model, and the product specifications are subject to the MagicNet Server program. Insert the installation CD into the CD-ROM drive. 2. Using the Software Installation Installation MagicNet 1.
User Manual (ENGLISH)
Page 104
... order in Remote Management. Schedule Folder of the monitor. When set on the monitor for publishing a schedule. Maximum publishing size: Sets the option regarding the free space on the client. Content Synchronization Period: Sets the time interval for updating in which local schedules are created using the direct connection method. Content Synchronization Time: Sets a time to 0, you cannot register, save and import screens. The default value is...
... order in Remote Management. Schedule Folder of the monitor. When set on the monitor for publishing a schedule. Maximum publishing size: Sets the option regarding the free space on the client. Content Synchronization Period: Sets the time interval for updating in which local schedules are created using the direct connection method. Content Synchronization Time: Sets a time to 0, you cannot register, save and import screens. The default value is...
User Manual (ENGLISH)
Page 133
... Connections Using the Software Adjusting the LCD Display Input Picture [PC / BNC /DVI Mode] Picture [AV / S-Video / Component / HDMI Mode] Sound Setup Multi Control Direct Functions MagicNet Troubleshooting Specifications Information Appendix Model SyncMaster 570DXn The color and appearance of the product may vary depending on the remote control is the 'PIP' button.] 2) Source [MENU] → [ENTER ENTER ENTER ENTER] Selects the input source for reasons of your choice. 1) PC 2) BNC 3) DVI 4) AV 5) S-Video 6) Component 7) HDMI 8) MagicNet [The direct button on screen as VCRs or DVDs...
... Connections Using the Software Adjusting the LCD Display Input Picture [PC / BNC /DVI Mode] Picture [AV / S-Video / Component / HDMI Mode] Sound Setup Multi Control Direct Functions MagicNet Troubleshooting Specifications Information Appendix Model SyncMaster 570DXn The color and appearance of the product may vary depending on the remote control is the 'PIP' button.] 2) Source [MENU] → [ENTER ENTER ENTER ENTER] Selects the input source for reasons of your choice. 1) PC 2) BNC 3) DVI 4) AV 5) S-Video 6) Component 7) HDMI 8) MagicNet [The direct button on screen as VCRs or DVDs...
User Manual (ENGLISH)
Page 145
... be reset to LCD Display : execute Device mode. Set up external devices only if the LCD Display turns on. • Do not unplug the LAN cable used by an USB device (ex: video display). Note • Press ALT + F12 to directly go to the MagicNet Window screen. • To setup MagicNet on the screen. • For MagicNet, a remote control is available for the network (ex: video display). Note • Resetting the password for resetting the password...
... be reset to LCD Display : execute Device mode. Set up external devices only if the LCD Display turns on. • Do not unplug the LAN cable used by an USB device (ex: video display). Note • Press ALT + F12 to directly go to the MagicNet Window screen. • To setup MagicNet on the screen. • For MagicNet, a remote control is available for the network (ex: video display). Note • Resetting the password for resetting the password...
User Manual (ENGLISH)
Page 148
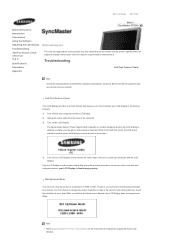
... Safety Instructions Introduction Connections Using the Software Adjusting the LCD Display Troubleshooting Self-Test Feature Check Check List Q & A Specifications Information Appendix Model SyncMaster 570DXn The color and appearance of the product may vary depending on the model, and the product specifications are subject to change the screen resolution or stay in the Self-Test mode, the LED power indicator remains green and the figure moves around on the LCD Display. your LCD Display and reconnect the video cable; And...
... Safety Instructions Introduction Connections Using the Software Adjusting the LCD Display Troubleshooting Self-Test Feature Check Check List Q & A Specifications Information Appendix Model SyncMaster 570DXn The color and appearance of the product may vary depending on the model, and the product specifications are subject to change the screen resolution or stay in the Self-Test mode, the LED power indicator remains green and the figure moves around on the LCD Display. your LCD Display and reconnect the video cable; And...

User Manual (ENGLISH)
Page 149
... connected to the computer. 2) Check if the computer beeps more network-related information, refer to the screen. 2) Maintaining the Flat Panel Display Screen. Before calling for assistance, check the information in the "Control Panel, System, Device Administrator" and then reboot the computer to see if you have poor coloring, become blank, have problems in installing the Adaptor (video) driver, boot the computer in Safe Mode, remove...
... connected to the computer. 2) Check if the computer beeps more network-related information, refer to the screen. 2) Maintaining the Flat Panel Display Screen. Before calling for assistance, check the information in the "Control Panel, System, Device Administrator" and then reboot the computer to see if you have poor coloring, become blank, have problems in installing the Adaptor (video) driver, boot the computer in Safe Mode, remove...

User Manual (ENGLISH)
Page 152
... I set the Power Saving function? Disconnect the power cord and then clean the LCD Display with a soft cloth, using either a cleaning solution or plain water. z Windows ME/2000: Set the resolution in the Control Panel → Appearance and Themes → Display → Settings. The video supports the MPEG1 and WMV codecs only. Install the corresponding codec to the Windows / Computer Manual). Set the resolution in the Control Panel → Display → Settings. * Contact...
... I set the Power Saving function? Disconnect the power cord and then clean the LCD Display with a soft cloth, using either a cleaning solution or plain water. z Windows ME/2000: Set the resolution in the Control Panel → Appearance and Themes → Display → Settings. The video supports the MPEG1 and WMV codecs only. Install the corresponding codec to the Windows / Computer Manual). Set the resolution in the Control Panel → Display → Settings. * Contact...
User Manual (ENGLISH)
Page 153
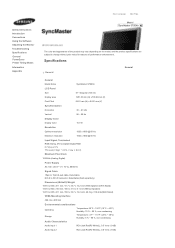
...; 2.0 V, V low ≤ 0.8 V) Maximum Pixel Clock 165 MHz (Analog, Digital) Power Supply AC 100 - 240 V~ (+/- 10 %), 50/60 Hz Signal Cable 15pin to 15pin D-sub cable, Detachable DVI-D to change without prior notice for reasons of performance enhancement. Safety Instructions Introduction Connections Using the Software Adjusting the Monitor Troubleshooting Specifications General PowerSaver Preset Timing Modes Information Appendix Select Language Main Page Model SyncMaster 570DXn The color and appearance of the product may vary...
...; 2.0 V, V low ≤ 0.8 V) Maximum Pixel Clock 165 MHz (Analog, Digital) Power Supply AC 100 - 240 V~ (+/- 10 %), 50/60 Hz Signal Cable 15pin to 15pin D-sub cable, Detachable DVI-D to change without prior notice for reasons of performance enhancement. Safety Instructions Introduction Connections Using the Software Adjusting the Monitor Troubleshooting Specifications General PowerSaver Preset Timing Modes Information Appendix Select Language Main Page Model SyncMaster 570DXn The color and appearance of the product may vary...
User Manual (ENGLISH)
Page 157
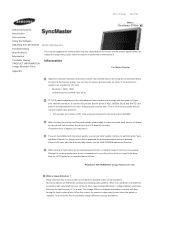
... increases with a precision of 1ppm (one millionth) and above is changed. Normal conditions are not satisfied with the picture quality, you need to enjoy the best picture quality. Select Language Main Page Safety Instructions Introduction Connections Using the Software Adjusting the LCD Display Troubleshooting Specifications Information For Better Display PRODUCT INFORMATION (Image Retention Free) Appendix Model SyncMaster 570DXn The color and appearance of the product may appear. Do not force...
... increases with a precision of 1ppm (one millionth) and above is changed. Normal conditions are not satisfied with the picture quality, you need to enjoy the best picture quality. Select Language Main Page Safety Instructions Introduction Connections Using the Software Adjusting the LCD Display Troubleshooting Specifications Information For Better Display PRODUCT INFORMATION (Image Retention Free) Appendix Model SyncMaster 570DXn The color and appearance of the product may appear. Do not force...
User Manual (ENGLISH)
Page 159
... ( Recommend : 1 ) . Instruction Guide : OSD Menu -> Set Up -> Safety Screen -> Screen Scroll . Instruction Guide : OSD Menu -> Set Up -> Safety Screen -> Pixel . z Every 30 minutes, change the characters with Logo periodically. - z All area display Moving image together with movement. Cycle: Display moving image together with Black Color move up and down . Time Period : 1 ~ 5 second ( Recommend : 5 ) Note • ( Please check CD's User Guide at "OSD Function", some model's will be limited based on Product...
... ( Recommend : 1 ) . Instruction Guide : OSD Menu -> Set Up -> Safety Screen -> Screen Scroll . Instruction Guide : OSD Menu -> Set Up -> Safety Screen -> Pixel . z Every 30 minutes, change the characters with Logo periodically. - z All area display Moving image together with movement. Cycle: Display moving image together with Black Color move up and down . Time Period : 1 ~ 5 second ( Recommend : 5 ) Note • ( Please check CD's User Guide at "OSD Function", some model's will be limited based on Product...

User Manual (ENGLISH)
Page 161
Select Language Main Page Safety Instructions Introduction Connections Using the Software Adjusting the LCD Display Troubleshooting Specifications Information Appendix Contact SAMSUNG WORLDWIDE Terms Correct Disposal Authority Model SyncMaster 570DXn The color and appearance of the product may vary depending on the model, and the product specifications are subject to Samsung products, please contact the SAMSUNG customer care center. DOMINICA TRINIDAD & TOBAGO VENEZUELA Latin America 0800-333-3733 0800-124...
Select Language Main Page Safety Instructions Introduction Connections Using the Software Adjusting the LCD Display Troubleshooting Specifications Information Appendix Contact SAMSUNG WORLDWIDE Terms Correct Disposal Authority Model SyncMaster 570DXn The color and appearance of the product may vary depending on the model, and the product specifications are subject to Samsung products, please contact the SAMSUNG customer care center. DOMINICA TRINIDAD & TOBAGO VENEZUELA Latin America 0800-333-3733 0800-124...


