Universal Print Driver Guide (ENGLISH)
Page 4
... SPECIFIC DRIVERS Consistent user interface. Manually discover devices. System requirements Minimum system requirements for each device. The Samsung Universal Print Driver is automatically set to usable default PDL. Inconsistent user interface. • Download and install with the installer • Manually locate, download, and install file provided with the Samsung driver for the Samsung Universal Print Driver are not supported (Click to download separate drivers. • PDL means both PCL and PS. • Samsung does not guarantee the quality of other vendors' printer...
... SPECIFIC DRIVERS Consistent user interface. Manually discover devices. System requirements Minimum system requirements for each device. The Samsung Universal Print Driver is automatically set to usable default PDL. Inconsistent user interface. • Download and install with the installer • Manually locate, download, and install file provided with the Samsung driver for the Samsung Universal Print Driver are not supported (Click to download separate drivers. • PDL means both PCL and PS. • Samsung does not guarantee the quality of other vendors' printer...

Universal Print Driver Guide (ENGLISH)
Page 9
... window. • Update Now: Updates the selected printer's information. • Buy Supplies: Opens the website for this window to appear when you are connected either by the printer's IP address. • My Printer - Click the Settings button on the bottom left corner. You can set the Samsung Universal Print Driver window to pop-up option You can only use this option with network printers. Changing Samsung Universal Print Driver settings Setting the pop-up : 1. Main menus 2 3 Printer list Status window 4 • Recent - Recently Used Printers: Shows the list...
... window. • Update Now: Updates the selected printer's information. • Buy Supplies: Opens the website for this window to appear when you are connected either by the printer's IP address. • My Printer - Click the Settings button on the bottom left corner. You can set the Samsung Universal Print Driver window to pop-up option You can only use this option with network printers. Changing Samsung Universal Print Driver settings Setting the pop-up : 1. Main menus 2 3 Printer list Status window 4 • Recent - Recently Used Printers: Shows the list...

User Manual (KOREAN)
Page 54
Information ( 2.6 ) Configuration Menu Map Demo Page Layout ( 2.6 ) Duplex Duplex Margin Printer ( 2.7 ) Default Set Current Job Setup Color ( 2.9 ) ( 2.8 ) LCD Language Jam Recovery Calibration Power Save Auto Continue Altitude Adj. Maintenance Custom Color 2 Network * ( Config Network Config TCP IP Get Method IP Address Subnet Mask Gateway Config 802.11b 2.11 ) Netware Config Netware IPX Frame Type Reset Network Default Set Print Net CFG * Network CLP-500N .) . (CLP-500G 2.5
Information ( 2.6 ) Configuration Menu Map Demo Page Layout ( 2.6 ) Duplex Duplex Margin Printer ( 2.7 ) Default Set Current Job Setup Color ( 2.9 ) ( 2.8 ) LCD Language Jam Recovery Calibration Power Save Auto Continue Altitude Adj. Maintenance Custom Color 2 Network * ( Config Network Config TCP IP Get Method IP Address Subnet Mask Gateway Config 802.11b 2.11 ) Netware Config Netware IPX Frame Type Reset Network Default Set Print Net CFG * Network CLP-500N .) . (CLP-500G 2.5

User Manual (ENGLISH)
Page 5
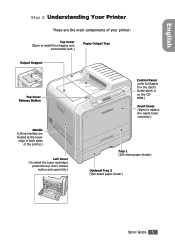
... are the main components of your printer: Top Cover (Open to install the imaging unit, and transfer belt.) Paper Output Tray Output Support Top Cover Release Button Handle (Lifting handles are located at the lower edge of both sides of the printer.) Left Cover (To install the toner cartridges press the top cover release button and open fully.) Control Panel (refer to Chapter 5 in the User's Guide which is on the CDROM.) Front Cover (Open to replace the waste toner container.) Tray 1 (250-sheet paper feeder) Optional Tray 2 (500-sheet paper feeder) SETUP GUIDE 5
... are the main components of your printer: Top Cover (Open to install the imaging unit, and transfer belt.) Paper Output Tray Output Support Top Cover Release Button Handle (Lifting handles are located at the lower edge of both sides of the printer.) Left Cover (To install the toner cartridges press the top cover release button and open fully.) Control Panel (refer to Chapter 5 in the User's Guide which is on the CDROM.) Front Cover (Open to replace the waste toner container.) Tray 1 (250-sheet paper feeder) Optional Tray 2 (500-sheet paper feeder) SETUP GUIDE 5
User Manual (ENGLISH)
Page 25
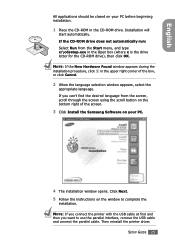
... instructions on the window to use the parallel interface, remove the USB cable and connect the parallel cable. SETUP GUIDE 25 Then reinstall the printer driver. If you want to complete the installation. NOTE: If you connect the printer with the USB cable at first and then you can't find the desired language from the Start menu, and type x:\cdsetup.exe in the upper right corner of the screen. 3 Click Install the Samsung Software...
... instructions on the window to use the parallel interface, remove the USB cable and connect the parallel cable. SETUP GUIDE 25 Then reinstall the printer driver. If you want to complete the installation. NOTE: If you connect the printer with the USB cable at first and then you can't find the desired language from the Start menu, and type x:\cdsetup.exe in the upper right corner of the screen. 3 Click Install the Samsung Software...
User Manual (ENGLISH)
Page 35
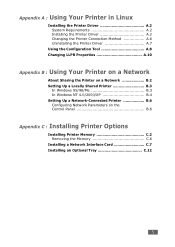
... Changing the Printer Connection Method A.6 Uninstalling the Printer Driver A.7 Using the Configuration Tool A.8 Changing LLPR Properties A.10 Appendix B : Using Your Printer on a Network About Sharing the Printer on a Network B.2 Setting Up a Locally Shared Printer B.3 In Windows 95/98/Me B.3 In Windows NT 4.0/2000/XP B.4 Setting Up a Network-Connected Printer B.6 Configuring Network Parameters on the Control Panel B.6 Appendix C : Installing Printer Options Installing Printer Memory C.2 Removing the Memory C.6 Installing a Network Interface Card C.7 Installing an Optional Tray...
... Changing the Printer Connection Method A.6 Uninstalling the Printer Driver A.7 Using the Configuration Tool A.8 Changing LLPR Properties A.10 Appendix B : Using Your Printer on a Network About Sharing the Printer on a Network B.2 Setting Up a Locally Shared Printer B.3 In Windows 95/98/Me B.3 In Windows NT 4.0/2000/XP B.4 Setting Up a Network-Connected Printer B.6 Configuring Network Parameters on the Control Panel B.6 Appendix C : Installing Printer Options Installing Printer Memory C.2 Removing the Memory C.6 Installing a Network Interface Card C.7 Installing an Optional Tray...
User Manual (ENGLISH)
Page 46
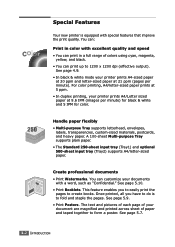
... tray (Tray1) and optional 500-sheet input tray (Tray2) supports A4/letter-sized paper. See page 5.7. 8 1.2 INTRODUCTION See page 4.9. • In black & white mode your documents 9 with a word, such as "Confidential." You can: Print in color with special features that improve the print quality. For color printing, A4/letter-sized paper prints at 5 ppm. • In duplex printing, your document are magnified and printed across sheet of colors using cyan, magenta, yellow, and black. • You can customize your printer prints A4-sized paper...
... tray (Tray1) and optional 500-sheet input tray (Tray2) supports A4/letter-sized paper. See page 5.7. 8 1.2 INTRODUCTION See page 4.9. • In black & white mode your documents 9 with a word, such as "Confidential." You can: Print in color with special features that improve the print quality. For color printing, A4/letter-sized paper prints at 5 ppm. • In duplex printing, your document are magnified and printed across sheet of colors using cyan, magenta, yellow, and black. • You can customize your printer prints A4-sized paper...

User Manual (ENGLISH)
Page 53
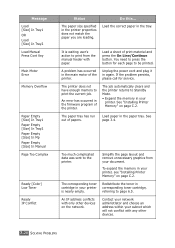
... Power Save mode. See page 7.26 for the error to be cleared. Check the display message. Off • The printer is on -line and off -line and cannot print. USING THE CONTROL PANEL 2.3 Buttons Button Description (status map) When an error occurs, a lamp turns on at the corresponding location on the meaning of the error message. An error message appears on -line. • Press to enter menu mode. • In menu mode, press to ignore this warning, press this button. • The printer...
... Power Save mode. See page 7.26 for the error to be cleared. Check the display message. Off • The printer is on -line and off -line and cannot print. USING THE CONTROL PANEL 2.3 Buttons Button Description (status map) When an error occurs, a lamp turns on at the corresponding location on the meaning of the error message. An error message appears on -line. • Press to enter menu mode. • In menu mode, press to ignore this warning, press this button. • The printer...

User Manual (ENGLISH)
Page 64
..., you set. 2.14 USING THE CONTROL PANEL In the Config Netware menu, you select Yes, the IPX Frame Type option appears on your network. If you can specify the frame type parameter used on the display. Item Netware Config Netware IPX Frame Type Reset Network Default Set Print Net CFG Explanation Options: On*, Off You can select whether or not you set Config Netware to Yes. This item reboots the network interface card. Values: Auto*, EN_8022...
..., you set. 2.14 USING THE CONTROL PANEL In the Config Netware menu, you select Yes, the IPX Frame Type option appears on your network. If you can specify the frame type parameter used on the display. Item Netware Config Netware IPX Frame Type Reset Network Default Set Print Net CFG Explanation Options: On*, Off You can select whether or not you set Config Netware to Yes. This item reboots the network interface card. Values: Auto*, EN_8022...
User Manual (ENGLISH)
Page 121
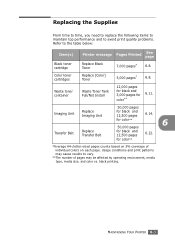
... message Pages Printed See page Black toner cartridge Replace Black Toner 7,000 pages* 6.8. black printing. Color toner cartridges Replace [Color] Toner 5,000 pages* 6.8. Waste toner container Waste Toner Tank Full/Not Install 12,000 pages for black and 3,000 pages for black and 12,500 pages 6.22. MAINTAINING YOUR PRINTER 6.3 Imaging Unit Replace Imaging Unit Transfer Belt Replace Transfer Belt 50,000 pages for color** *Average A4-/letter-sized pages counts based on 5% coverage of pages may be affected by operating environment, media type, media size...
... message Pages Printed See page Black toner cartridge Replace Black Toner 7,000 pages* 6.8. black printing. Color toner cartridges Replace [Color] Toner 5,000 pages* 6.8. Waste toner container Waste Toner Tank Full/Not Install 12,000 pages for black and 3,000 pages for black and 12,500 pages 6.22. MAINTAINING YOUR PRINTER 6.3 Imaging Unit Replace Imaging Unit Transfer Belt Replace Transfer Belt 50,000 pages for color** *Average A4-/letter-sized pages counts based on 5% coverage of pages may be affected by operating environment, media type, media size...

User Manual (ENGLISH)
Page 159
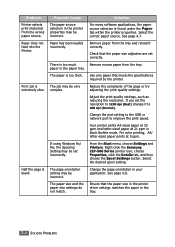
... port, make sure that all of the print settings are correct. The port setting is not installed. Check the power switch and the power source. Check the printer for the following: • The printer cover is not closed. • Paper is jammed. • No paper is loaded. • The toner cartridge is incorrect. You can also try using a different printer cable. The printer may be in manual feed mode and out of paper. The printer driver may be configured incorrectly. Solving General Printing Problems...
... port, make sure that all of the print settings are correct. The port setting is not installed. Check the power switch and the power source. Check the printer for the following: • The printer cover is not closed. • Paper is jammed. • No paper is loaded. • The toner cartridge is incorrect. You can also try using a different printer cable. The printer may be in manual feed mode and out of paper. The printer driver may be configured incorrectly. Solving General Printing Problems...
User Manual (ENGLISH)
Page 160
... printer driver settings matches the paper in your application. Change the port setting to the USB or network port to 1200 dpi (Best) change it correctly. Change the page orientation in the tray. 7.4 SOLVING PROBLEMS See page 4.6. The paper is extremely slow. Remove excess paper from the wrong paper source. The job may be incorrect. Problem Printer selects print materials from the tray. For color printing, A4/ letter-sized paper prints at 21 ppm in black &white mode. Paper does not feed into the Printer. If using Windows...
... printer driver settings matches the paper in your application. Change the port setting to the USB or network port to 1200 dpi (Best) change it correctly. Change the page orientation in the tray. 7.4 SOLVING PROBLEMS See page 4.6. The paper is extremely slow. Remove excess paper from the wrong paper source. The job may be incorrect. Problem Printer selects print materials from the tray. For color printing, A4/ letter-sized paper prints at 21 ppm in black &white mode. Paper does not feed into the Printer. If using Windows...

User Manual (ENGLISH)
Page 161
... blank Check the file to ensure that it does not pages. If necessary, see page 6.5. The setting in Adobe Illustrator. Problem Possible Cause Solution The paper keeps jamming. Remove excess paper from another computer and try a new printer cable. The printer prints, but are set correctly. If possible, attach the cable and printer to ensure that the paper size adjusters are blank. The wrong printer driver was selected. Try printing a job from the tray. malfunctioning. Some parts, such as Bit Image...
... blank Check the file to ensure that it does not pages. If necessary, see page 6.5. The setting in Adobe Illustrator. Problem Possible Cause Solution The paper keeps jamming. Remove excess paper from another computer and try a new printer cable. The printer prints, but are set correctly. If possible, attach the cable and printer to ensure that the paper size adjusters are blank. The wrong printer driver was selected. Try printing a job from the tray. malfunctioning. Some parts, such as Bit Image...
User Manual (ENGLISH)
Page 182
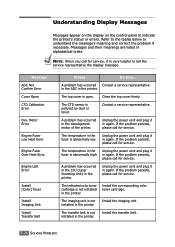
... the printer. Understanding Display Messages Messages appear on the display on the control panel to understand the message's meaning and correct the problem if necessary. Message ADC Not Confirm Error Cover Open CTD Calibration Error Dev. Motor Error Engine Fuser Low Heat Error Engine Fuser Over Heat Error Engine LSU Error Install [Color] Toner Install Imaging Unit Install Transfer Belt Status Do this... Close the top cover firmly. Refer to the tables below to indicate the printer's status or errors. A problem has occurred Contact a service representative...
... the printer. Understanding Display Messages Messages appear on the display on the control panel to understand the message's meaning and correct the problem if necessary. Message ADC Not Confirm Error Cover Open CTD Calibration Error Dev. Motor Error Engine Fuser Low Heat Error Engine Fuser Over Heat Error Engine LSU Error Install [Color] Toner Install Imaging Unit Install Transfer Belt Status Do this... Close the top cover firmly. Refer to the tables below to indicate the printer's status or errors. A problem has occurred Contact a service representative...
User Manual (ENGLISH)
Page 184
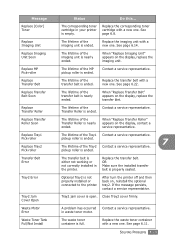
... devices on page C.2. You need to press the button for service. The corresponding toner cartridge in the firmware program of the printer. An IP address conflicts with paper. It is nearly empty. Load a sheet of papers. An error has occurred in your document. See "Installing Printer Memory" on the network. Too much complicated data was sent to print the current job. Load paper in corresponding toner cartridge, referring to Standby Mode. • Expand the memory in the printer...
... devices on page C.2. You need to press the button for service. The corresponding toner cartridge in the firmware program of the printer. An IP address conflicts with paper. It is nearly empty. Load a sheet of papers. An error has occurred in your document. See "Installing Printer Memory" on the network. Too much complicated data was sent to print the current job. Load paper in corresponding toner cartridge, referring to Standby Mode. • Expand the memory in the printer...
User Manual (ENGLISH)
Page 185
... Make sure the installed transfer belt is either not working or not correctly installed in the printer. After turn the printer off and then back on the display, replace the imaging unit. Tray2 jam cover is full. The waste toner container is open. See page 6.8. The lifetime of the MP pickup roller is nearly ended. The lifetime of the imaging unit is ended. Close Tray2 cover firmly. Replace the waste toner container with a new one . See page...
... Make sure the installed transfer belt is either not working or not correctly installed in the printer. After turn the printer off and then back on the display, replace the imaging unit. Tray2 jam cover is full. The waste toner container is open. See page 6.8. The lifetime of the MP pickup roller is nearly ended. The lifetime of the imaging unit is ended. Close Tray2 cover firmly. Replace the waste toner container with a new one . See page...

User Manual (ENGLISH)
Page 217
Recognizing that has been optimized to enhance your printing needs. This chapter includes: • Installing Printer Memory • Installing a Network Interface Card • Installing an Optional Tray C INSTALLING PRINTER OPTIONS Your printer is a full-featured laser printer that each user may have different requirements, however, Samsung makes several options available to meet most of your printer's capabilities.
Recognizing that has been optimized to enhance your printing needs. This chapter includes: • Installing Printer Memory • Installing a Network Interface Card • Installing an Optional Tray C INSTALLING PRINTER OPTIONS Your printer is a full-featured laser printer that each user may have different requirements, however, Samsung makes several options available to meet most of your printer's capabilities.
User Manual (ENGLISH)
Page 242
...6.29 color mode 4.9, 4.10 components 1.4 configuration page, print 6.2 connect Ethernet C.11 control panel 2.2 buttons 2.3 display 2.2 menus 2.5 custom-sized materials, print 3.21 D double-sided printing 5.2 E envelopes, print 3.14 error messages 7.26 Ethernet cable, print C.11 F Favorite setting, use 4.13 features printer 1.2 G graphic properties, set 4.9 H help, use 4.14 I imaging unit, replace 6.14 Install Memory C.2 Network Interface Card C.7 optional Tray2 C.12 install printer options C.1 SPL driver for Linux A.2 interface card, install C.7 L labels, print 3.16 Linux common problems 7.31...
...6.29 color mode 4.9, 4.10 components 1.4 configuration page, print 6.2 connect Ethernet C.11 control panel 2.2 buttons 2.3 display 2.2 menus 2.5 custom-sized materials, print 3.21 D double-sided printing 5.2 E envelopes, print 3.14 error messages 7.26 Ethernet cable, print C.11 F Favorite setting, use 4.13 features printer 1.2 G graphic properties, set 4.9 H help, use 4.14 I imaging unit, replace 6.14 Install Memory C.2 Network Interface Card C.7 optional Tray2 C.12 install printer options C.1 SPL driver for Linux A.2 interface card, install C.7 L labels, print 3.16 Linux common problems 7.31...
Quick Guide (ENGLISH)
Page 5
... main components of your printer: Top Cover (Open to install the imaging unit, and transfer belt.) Paper Output Tray Output Support Top Cover Release Button Handle (Lifting handles are located at the lower edge of both sides of the printer.) Left Cover (To install the toner cartridges press the top cover release button and open fully.) Control Panel (refer to Chapter 5 in the User's Guide which is on the CDROM.) Front Cover (Open to replace the waste toner container.) Tray 1 (250-sheet paper feeder) Optional Tray 2 (500-sheet paper feeder) SETUP GUIDE 5 English Step 2.
... main components of your printer: Top Cover (Open to install the imaging unit, and transfer belt.) Paper Output Tray Output Support Top Cover Release Button Handle (Lifting handles are located at the lower edge of both sides of the printer.) Left Cover (To install the toner cartridges press the top cover release button and open fully.) Control Panel (refer to Chapter 5 in the User's Guide which is on the CDROM.) Front Cover (Open to replace the waste toner container.) Tray 1 (250-sheet paper feeder) Optional Tray 2 (500-sheet paper feeder) SETUP GUIDE 5 English Step 2.
Quick Guide (ENGLISH)
Page 28
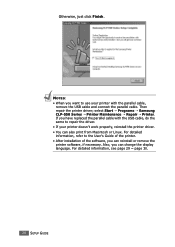
... User's Guide of the printer. • After installation of the software, you have replaced the parallel cable with the parallel cable, remove the USB cable and connect the parallel cable. For detailed information, see page 29 ~ page 30. 28 SETUP GUIDE Otherwise, just click Finish. Then repair the printer driver; If you can change the display language. Also, you want to use your printer doesn't work properly, reinstall the printer driver. • You can also print from Macintosh or Linux...
... User's Guide of the printer. • After installation of the software, you have replaced the parallel cable with the parallel cable, remove the USB cable and connect the parallel cable. For detailed information, see page 29 ~ page 30. 28 SETUP GUIDE Otherwise, just click Finish. Then repair the printer driver; If you can change the display language. Also, you want to use your printer doesn't work properly, reinstall the printer driver. • You can also print from Macintosh or Linux...


