
User Manual (ENGLISH)
Page 4
... sure to put it may result in fire due to an increase in the internal temperature. Ensure that there is a clearance of the TFT-LCD screen, wipe with a monitor cleaner only. When cleaning the monitor case or the surface of more than the monitor cleaner, dilute it with it...Do not install it may fall and cause personal injury. • Make sure to install the specified wall mount. Install your body on the floor. • Otherwise, this may result in damage to the screen display. Clean the product using a soft cloth with a slightly moistened, soft fabric. If the height of ...
... sure to put it may result in fire due to an increase in the internal temperature. Ensure that there is a clearance of the TFT-LCD screen, wipe with a monitor cleaner only. When cleaning the monitor case or the surface of more than the monitor cleaner, dilute it with it...Do not install it may fall and cause personal injury. • Make sure to install the specified wall mount. Install your body on the floor. • Otherwise, this may result in damage to the screen display. Clean the product using a soft cloth with a slightly moistened, soft fabric. If the height of ...
User Manual (ENGLISH)
Page 11
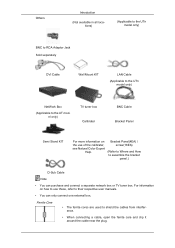
... TV tuner box. Others Introduction (Not available in all locations) (Applicable to the UTn model only) BNC to RCA Adaptor Jack Sold separately DVI Cable Wall Mount KIT LAN Cable (Applicable to the UTn model only) NetWork Box (Applicable to the UT model only) TV tuner box Calibrater BNC Cable Bracket Panel...
... TV tuner box. Others Introduction (Not available in all locations) (Applicable to the UTn model only) BNC to RCA Adaptor Jack Sold separately DVI Cable Wall Mount KIT LAN Cable (Applicable to the UTn model only) NetWork Box (Applicable to the UT model only) TV tuner box Calibrater BNC Cable Bracket Panel...
User Manual (ENGLISH)
Page 20
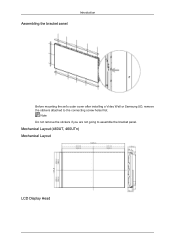
Mechanical Layout (460UT, 460UTn) Mechanical Layout LCD Display Head Note Do not remove the stickers if you are not going to the connecting screw holes first. Assembling the bracket panel Introduction Before mounting the set's outer cover after installing a Video Wall or Samsung UD, remove the stickers attached to assemble the bracket panel.
Mechanical Layout (460UT, 460UTn) Mechanical Layout LCD Display Head Note Do not remove the stickers if you are not going to the connecting screw holes first. Assembling the bracket panel Introduction Before mounting the set's outer cover after installing a Video Wall or Samsung UD, remove the stickers attached to assemble the bracket panel.

User Manual (ENGLISH)
Page 22
... • Contact a technician for installing the wall bracket. • SAMSUNG Electronics is not responsible for any damages to the product or harm to 12 mm length. Components Only use only machine screws of the arrow. When done, mount the wall bracket on cement walls. Wall Bracket(1) Hinge(Left 1, Right Plastic Screw Screw 1) Hanger (A)(11) (B)(4) (4) Anchor (11...
... • Contact a technician for installing the wall bracket. • SAMSUNG Electronics is not responsible for any damages to the product or harm to 12 mm length. Components Only use only machine screws of the arrow. When done, mount the wall bracket on cement walls. Wall Bracket(1) Hinge(Left 1, Right Plastic Screw Screw 1) Hanger (A)(11) (B)(4) (4) Anchor (11...

User Manual (ENGLISH)
Page 24
Remove the 4 screws on the back of the product. Insert the screw B into the plastic hanger. Notice • Mount the product on the wall bracket and make sure it is properly fixed to the left and right plastic hangers. • Be careful when installing the product on the bracket ...as fingers can be caught in the holes. • Make sure the wall bracket is securely fixed to the rear holes of the product. 2. Introduction To mount the product on the wall bracket The shape of the product may not stay in place after installation. 3. Tighten the 4 screws...
Remove the 4 screws on the back of the product. Insert the screw B into the plastic hanger. Notice • Mount the product on the wall bracket and make sure it is properly fixed to the left and right plastic hangers. • Be careful when installing the product on the bracket ...as fingers can be caught in the holes. • Make sure the wall bracket is securely fixed to the rear holes of the product. 2. Introduction To mount the product on the wall bracket The shape of the product may not stay in place after installation. 3. Tighten the 4 screws...

Quick Guide (ENGLISH)
Page 3
... Color Expert Help. Others Introduction (Not available in all locations) (Applicable to the UTn model only) BNC to RCA Adaptor Jack Sold separately DVI Cable Wall Mount KIT LAN Cable (Applicable to the UTn model only) NetWork Box (Applicable to the UT model only) TV tuner box Calibrater BNC Cable Bracket Panel...
... Color Expert Help. Others Introduction (Not available in all locations) (Applicable to the UTn model only) BNC to RCA Adaptor Jack Sold separately DVI Cable Wall Mount KIT LAN Cable (Applicable to the UTn model only) NetWork Box (Applicable to the UT model only) TV tuner box Calibrater BNC Cable Bracket Panel...
Quick Guide (ENGLISH)
Page 12
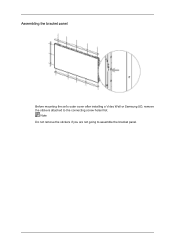
Note Do not remove the stickers if you are not going to the connecting screw holes first. Assembling the bracket panel Before mounting the set's outer cover after installing a Video Wall or Samsung UD, remove the stickers attached to assemble the bracket panel.
Note Do not remove the stickers if you are not going to the connecting screw holes first. Assembling the bracket panel Before mounting the set's outer cover after installing a Video Wall or Samsung UD, remove the stickers attached to assemble the bracket panel.


