

Quick Guide (ENGLISH)
Page 5
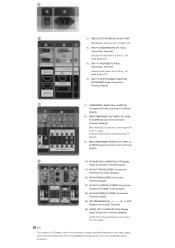
...Sub) - R - +] (EXT Speaker Connection Terminal) 16) AUDIO OUT [L-AUDIO-R] (LCD Display Audio Connection Terminal (Output)) AUDIO OUT is no degradation or signal source, up to ten LCD Displays can be connected. Note • The number of PC, DVI or BNC. With ... ports Component Connection: connecting the PR, Y, PB ports 9) BNC/COMPONENT IN [R/PR, G/Y, B/PB, H, V] (BNC/Component Connection Terminal (Input)) 10) AV AUDIO IN [L-AUDIO-R] (LCD Display Audio Connection Terminal (Input)) 11) AV OUT [VIDEO] (VIDEO Connection Terminal): AV mode (Output) 12) AV IN [VIDEO] (VIDEO Connection Terminal...
...Sub) - R - +] (EXT Speaker Connection Terminal) 16) AUDIO OUT [L-AUDIO-R] (LCD Display Audio Connection Terminal (Output)) AUDIO OUT is no degradation or signal source, up to ten LCD Displays can be connected. Note • The number of PC, DVI or BNC. With ... ports Component Connection: connecting the PR, Y, PB ports 9) BNC/COMPONENT IN [R/PR, G/Y, B/PB, H, V] (BNC/Component Connection Terminal (Input)) 10) AV AUDIO IN [L-AUDIO-R] (LCD Display Audio Connection Terminal (Input)) 11) AV OUT [VIDEO] (VIDEO Connection Terminal): AV mode (Output) 12) AV IN [VIDEO] (VIDEO Connection Terminal...

Quick Guide (ENGLISH)
Page 12
... Terminal (Output)) BNC (Analog PC) Connection: connecting the R, G, B, H, V ports Component Connection: connecting the PR, Y, PB ports 9) BNC/COMPONENT IN [R/PR, G/Y, B/PB, H, V] (BNC/Component Connection Terminal (Input)) 10) AV AUDIO IN [L-AUDIO-R] (LCD Display Audio Connection Terminal (Input)) 11) AV OUT [VIDEO] (VIDEO Connection Terminal): AV mode (Output) 12) AV IN [VIDEO] (VIDEO Connection Terminal...
... Terminal (Output)) BNC (Analog PC) Connection: connecting the R, G, B, H, V ports Component Connection: connecting the PR, Y, PB ports 9) BNC/COMPONENT IN [R/PR, G/Y, B/PB, H, V] (BNC/Component Connection Terminal (Input)) 10) AV AUDIO IN [L-AUDIO-R] (LCD Display Audio Connection Terminal (Input)) 11) AV OUT [VIDEO] (VIDEO Connection Terminal): AV mode (Output) 12) AV IN [VIDEO] (VIDEO Connection Terminal...

Quick Guide (ENGLISH)
Page 17
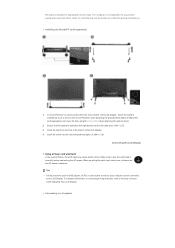
... information on . Make sure to protect the hole at the bottom of the LCD Display. 4) Insert the screw into the hole at the bottom of failure, the earth lead may cause electric shock. Note • AV input devices such as DVD players, VCR's or camcorders as well as a stand for...the stand into the hole indicated and tighten it. (M4 × L15) Connecting the LCD Display Using a Power cord with Earth In the event of the LCD Display , where the stand is designed for placing something on connecting AV input devices, refer to a Computer When un-wiring the earth lead, make sure to the...
... information on . Make sure to protect the hole at the bottom of the LCD Display. 4) Insert the screw into the hole at the bottom of failure, the earth lead may cause electric shock. Note • AV input devices such as DVD players, VCR's or camcorders as well as a stand for...the stand into the hole indicated and tighten it. (M4 × L15) Connecting the LCD Display Using a Power cord with Earth In the event of the LCD Display , where the stand is designed for placing something on connecting AV input devices, refer to a Computer When un-wiring the earth lead, make sure to the...

Quick Guide (ENGLISH)
Page 19
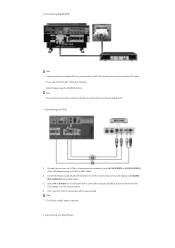
... is optional. Connecting to a VCR 1) AV input devices such as digital DVD are connected via the AV IN [VIDEO] or AV IN [S-VIDEO] of the LCD Display using an S-VHS or BNC cable. 2) Connect the Audio (L) and Audio (R) terminals of the LCD Display or on the front of a VCR or Camcorders... to the LCD Display 's AV AUDIO IN [L-AUDIO-R] using audio cables. 3) Select AV or S-Video for a connected VCR or Camcorder using the SOURCE button. Note • The monitor has DVI IN connection terminals to a DVD Player Connecting Digital DVD Note • Input devices such as VCRs or...
... is optional. Connecting to a VCR 1) AV input devices such as digital DVD are connected via the AV IN [VIDEO] or AV IN [S-VIDEO] of the LCD Display using an S-VHS or BNC cable. 2) Connect the Audio (L) and Audio (R) terminals of the LCD Display or on the front of a VCR or Camcorders... to the LCD Display 's AV AUDIO IN [L-AUDIO-R] using audio cables. 3) Select AV or S-Video for a connected VCR or Camcorder using the SOURCE button. Note • The monitor has DVI IN connection terminals to a DVD Player Connecting Digital DVD Note • Input devices such as VCRs or...

Quick Guide (ENGLISH)
Page 26
...no circumstances use the product as your computer can be connected to the User Controls under Adjusting Your LCD Display. Make sure to remove the 'Cover-Protector' when attaching the provided Semi Stand or Stand KIT ...LCD Display , where the stand is used to a Computer Installing the Stand KIT (sold separately) and cover the hole using this stand. The company is designed for adjusting the screen angle. Be sure to wire the earth lead in advance. This stand is not responsible for placing something on connecting AV input... devices, refer to the LCD Display.
...no circumstances use the product as your computer can be connected to the User Controls under Adjusting Your LCD Display. Make sure to remove the 'Cover-Protector' when attaching the provided Semi Stand or Stand KIT ...LCD Display , where the stand is used to a Computer Installing the Stand KIT (sold separately) and cover the hole using this stand. The company is designed for adjusting the screen angle. Be sure to wire the earth lead in advance. This stand is not responsible for placing something on connecting AV input... devices, refer to the LCD Display.

Quick Guide (ENGLISH)
Page 28
... such as VCRs or Camcorders are connected to connect DVI input devices digital DVD. Connecting to a VCR 1) AV input devices such as digital DVD are connected via the AV IN [VIDEO] or AV IN [S-VIDEO] of the LCD Display using the SOURCE button on the front of a VCR or Camcorders to a ...DVD Player Connecting to the LCD Display 's AV AUDIO IN [L-AUDIO-R] using audio cables. ...
... such as VCRs or Camcorders are connected to connect DVI input devices digital DVD. Connecting to a VCR 1) AV input devices such as digital DVD are connected via the AV IN [VIDEO] or AV IN [S-VIDEO] of the LCD Display using the SOURCE button on the front of a VCR or Camcorders to a ...DVD Player Connecting to the LCD Display 's AV AUDIO IN [L-AUDIO-R] using audio cables. ...

User Manual (ENGLISH)
Page 14
... Terminal (Output)) BNC (Analog PC) Connection: connecting the R, G, B, H, V ports Component Connection: connecting the PR, Y, PB ports 9) BNC/COMPONENT IN [R/PR, G/Y, B/PB, H, V] (BNC/Component Connection Terminal (Input)) 10) AV AUDIO IN [L-AUDIO-R] (LCD Display Audio Connection Terminal (Input)) 11) AV OUT [VIDEO] (VIDEO Connection Terminal): AV mode (Output) 12) AV IN [VIDEO] (VIDEO Connection Terminal...
... Terminal (Output)) BNC (Analog PC) Connection: connecting the R, G, B, H, V ports Component Connection: connecting the PR, Y, PB ports 9) BNC/COMPONENT IN [R/PR, G/Y, B/PB, H, V] (BNC/Component Connection Terminal (Input)) 10) AV AUDIO IN [L-AUDIO-R] (LCD Display Audio Connection Terminal (Input)) 11) AV OUT [VIDEO] (VIDEO Connection Terminal): AV mode (Output) 12) AV IN [VIDEO] (VIDEO Connection Terminal...
User Manual (ENGLISH)
Page 21
... Terminal (Output)) BNC (Analog PC) Connection: connecting the R, G, B, H, V ports Component Connection: connecting the PR, Y, PB ports 9) BNC/COMPONENT IN [R/PR, G/Y, B/PB, H, V] (BNC/Component Connection Terminal (Input)) 10) AV AUDIO IN [L-AUDIO-R] (LCD Display Audio Connection Terminal (Input)) 11) AV OUT [VIDEO] (VIDEO Connection Terminal): AV mode (Output) 12) AV IN [VIDEO] (VIDEO Connection Terminal...
... Terminal (Output)) BNC (Analog PC) Connection: connecting the R, G, B, H, V ports Component Connection: connecting the PR, Y, PB ports 9) BNC/COMPONENT IN [R/PR, G/Y, B/PB, H, V] (BNC/Component Connection Terminal (Input)) 10) AV AUDIO IN [L-AUDIO-R] (LCD Display Audio Connection Terminal (Input)) 11) AV OUT [VIDEO] (VIDEO Connection Terminal): AV mode (Output) 12) AV IN [VIDEO] (VIDEO Connection Terminal...

User Manual (ENGLISH)
Page 38
... sure to wire the earth lead in advance. This stand is designed for placing something on connecting AV input devices, refer to the User Controls under Adjusting Your LCD Display. Connecting to disconnect the AC power in correctly, before connecting the AC power. Under no circumstances use the... the hole indicated and tighten it. (M4 × L15) Connecting the LCD Display Using a Power cord with Earth In the event of the LCD Display , where the stand is inserted. Be sure to the LCD Display. Note • AV input devices such as DVD players, VCR's or camcorders as well as a stand...
... sure to wire the earth lead in advance. This stand is designed for placing something on connecting AV input devices, refer to the User Controls under Adjusting Your LCD Display. Connecting to disconnect the AC power in correctly, before connecting the AC power. Under no circumstances use the... the hole indicated and tighten it. (M4 × L15) Connecting the LCD Display Using a Power cord with Earth In the event of the LCD Display , where the stand is inserted. Be sure to the LCD Display. Note • AV input devices such as DVD players, VCR's or camcorders as well as a stand...

User Manual (ENGLISH)
Page 40
Note • The monitor has DVI IN connection terminals to a DVD Player Connecting to a VCR 1) AV input devices such as digital DVD are connected via the AV IN [VIDEO] or AV IN [S-VIDEO] of the LCD Display using an S-VHS or BNC cable. 2) Connect the Audio (L) and Audio (R) terminals of a VCR or... DVI cable. • Then, start the DVD with a tape inserted. Connecting Digital DVD Note • Input devices such as VCRs or Camcorders are connected to the DVI IN terminal of the LCD Display or on the front of the monitor using the SOURCE button. Note • The S-VHS or BNC cable...
Note • The monitor has DVI IN connection terminals to a DVD Player Connecting to a VCR 1) AV input devices such as digital DVD are connected via the AV IN [VIDEO] or AV IN [S-VIDEO] of the LCD Display using an S-VHS or BNC cable. 2) Connect the Audio (L) and Audio (R) terminals of a VCR or... DVI cable. • Then, start the DVD with a tape inserted. Connecting Digital DVD Note • Input devices such as VCRs or Camcorders are connected to the DVI IN terminal of the LCD Display or on the front of the monitor using the SOURCE button. Note • The S-VHS or BNC cable...
User Manual (ENGLISH)
Page 47
...Earth In the event of the LCD Display , where the stand is inserted. When un-wiring the earth lead, make sure to a Computer The company is designed for placing something on connecting AV input devices, refer to the User Controls under Adjusting Your LCD Display. Be sure to protect the ...hole at the bottom of the LCD Display. 4) Insert the screw into the hole at the bottom of failure, the earth...
...Earth In the event of the LCD Display , where the stand is inserted. When un-wiring the earth lead, make sure to a Computer The company is designed for placing something on connecting AV input devices, refer to the User Controls under Adjusting Your LCD Display. Be sure to protect the ...hole at the bottom of the LCD Display. 4) Insert the screw into the hole at the bottom of failure, the earth...
User Manual (ENGLISH)
Page 49
Connecting to a VCR 1) AV input devices such as digital DVD are connected via the AV IN [VIDEO] or AV IN [S-VIDEO] of the LCD Display using an S-VHS or BNC cable. 2) Connect the Audio (L) and Audio (R) terminals of a VCR or Camcorders to the LCD Display 's AV AUDIO IN [L-AUDIO-R] using audio cables...8226; The S-VHS or BNC cable is optional. Connecting to connect DVI input devices digital DVD. Connecting Digital DVD Note • Input devices such as VCRs or Camcorders are connected to the DVI IN terminal of the LCD Display or on the remote control. 4) Then, start the DVD with a tape...
Connecting to a VCR 1) AV input devices such as digital DVD are connected via the AV IN [VIDEO] or AV IN [S-VIDEO] of the LCD Display using an S-VHS or BNC cable. 2) Connect the Audio (L) and Audio (R) terminals of a VCR or Camcorders to the LCD Display 's AV AUDIO IN [L-AUDIO-R] using audio cables...8226; The S-VHS or BNC cable is optional. Connecting to connect DVI input devices digital DVD. Connecting Digital DVD Note • Input devices such as VCRs or Camcorders are connected to the DVI IN terminal of the LCD Display or on the remote control. 4) Then, start the DVD with a tape...

User Manual (ENGLISH)
Page 59
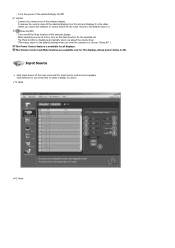
Power Control allows controlling some basic information necessary to control. Use the Select All button or Check Box to choose a display to Power Control. 1) (Power Status) 2) Input 3) Image Size 4) On Timer 5) Off Timer 2. Info Grid shows some of the functions of the selected display. 1) Power On/Off
Power Control allows controlling some basic information necessary to control. Use the Select All button or Check Box to choose a display to Power Control. 1) (Power Status) 2) Input 3) Image Size 4) On Timer 5) Off Timer 2. Info Grid shows some of the functions of the selected display. 1) Power On/Off
User Manual (ENGLISH)
Page 60
...power status is available for the selected set. It receives the volume value of the main icons and the Input Source control screen appears. Turns on the Mute function for all displays. The Mute function is disabled automatically when you adjust the volume level. (The values return to the ...when you cancel the selection or choose Select All, the value returns to control. • TV Mode • PC Mode Click Input Source of the selected display from the sets and displays it in the slider. (When you undo the selections or choose "Select All".) The Power Control feature is ON. -
...power status is available for the selected set. It receives the volume value of the main icons and the Input Source control screen appears. Turns on the Mute function for all displays. The Mute function is disabled automatically when you adjust the volume level. (The values return to the ...when you cancel the selection or choose Select All, the value returns to control. • TV Mode • PC Mode Click Input Source of the selected display from the sets and displays it in the slider. (When you undo the selections or choose "Select All".) The Power Control feature is ON. -
User Manual (ENGLISH)
Page 61
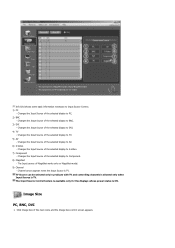
... - Changes the Input Source of the selected display to BNC. 3) DVI - Changes the Input Source of the selected display to TV. 5) AV - The Input Source Control feature is available only for the displays whose power status is TV. Changes the Input Source of the selected display to DVI. 4) TV - Changes the Input Source of the selected display to AV. 6) S-Video...
... - Changes the Input Source of the selected display to BNC. 3) DVI - Changes the Input Source of the selected display to TV. 5) AV - The Input Source Control feature is available only for the displays whose power status is TV. Changes the Input Source of the selected display to DVI. 4) TV - Changes the Input Source of the selected display to AV. 6) S-Video...
User Manual (ENGLISH)
Page 62
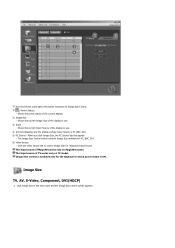
...tab first appear. - The Image Size Control button controls Image Size available for PC, BNC, DVI. 6) Video Source - The Input source of the display in use . 3) Input - Shows the current Image Size of MagicNet works only on TV model. Click the Video Source tab to Image Size Control. ... screen appears. Image Size TV, AV, S-Video, Component, DVI(HDCP) 1. The Input source of the display in use . 4) Info Grid displays only the displays whose Input Source is ON. Shows the current Input Source of TV works only on MagicNet model. Info Grid shows some basic information necessary ...
...tab first appear. - The Image Size Control button controls Image Size available for PC, BNC, DVI. 6) Video Source - The Input source of the display in use . 3) Input - Shows the current Image Size of MagicNet works only on TV model. Click the Video Source tab to Image Size Control. ... screen appears. Image Size TV, AV, S-Video, Component, DVI(HDCP) 1. The Input source of the display in use . 4) Info Grid displays only the displays whose Input Source is ON. Shows the current Input Source of TV works only on MagicNet model. Info Grid shows some basic information necessary ...
User Manual (ENGLISH)
Page 63
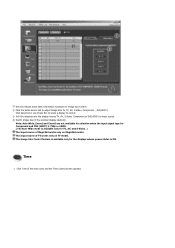
.... Time 1. Click Time of the selected display randomly. Info Grid shows some basic information necessary to Image Size Control. 1) Click the Video Source tab to control. 2) Info Grid displays only the display having TV, AV, S-Video, Component or DVI(HDCP) as input source. 3) Switch Image Size of the... main icons and the Time Control screen appears. The Input source of MagicNet works only on TV model. Note: Auto ...
.... Time 1. Click Time of the selected display randomly. Info Grid shows some basic information necessary to Image Size Control. 1) Click the Video Source tab to control. 2) Info Grid displays only the display having TV, AV, S-Video, Component or DVI(HDCP) as input source. 3) Switch Image Size of the... main icons and the Time Control screen appears. The Input source of MagicNet works only on TV model. Note: Auto ...
User Manual (ENGLISH)
Page 64
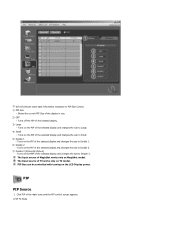
... Current Time - Info Grid shows some basic information necessary to control. Set the current time for MagicNet Model. Click PIP of the selected display. 3) Off Time Setup - The Input source of TV works only on MagicNet model. To change the current time, first change the PC Time. 2) On Time Setup - The... Input source of MagicNet works only on TV model. Set the Hour, Minute, and AM/PM, Status for Off Time Setup of the selected display. 4) Shows the On Time settings. 5) Shows the Off Time settings.
... Current Time - Info Grid shows some basic information necessary to control. Set the current time for MagicNet Model. Click PIP of the selected display. 3) Off Time Setup - The Input source of TV works only on MagicNet model. To change the current time, first change the PC Time. 2) On Time Setup - The... Input source of MagicNet works only on TV model. Set the Hour, Minute, and AM/PM, Status for Off Time Setup of the selected display. 4) Shows the On Time settings. 5) Shows the Off Time settings.
User Manual (ENGLISH)
Page 65
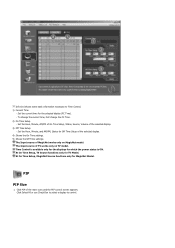
... Large. 4) Small - Turns on the PIP of the selected display. 3) Large - Click PIP of the selected display and changes the size to Double 2. 7) Double 3 (Picture By Picture) - Turns on the PBP of TV works only on the LCD Display power. The Input source of the selected display and changes the size to PIP Size Control. 1) PIP...
... Large. 4) Small - Turns on the PIP of the selected display. 3) Large - Click PIP of the selected display and changes the size to Double 2. 7) Double 3 (Picture By Picture) - Turns on the PBP of TV works only on the LCD Display power. The Input source of the selected display and changes the size to PIP Size Control. 1) PIP...
User Manual (ENGLISH)
Page 67
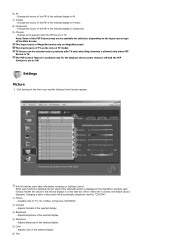
Changes the source of the PIP of TV works only on the slide bar. The Input source of the selected display to Settings Control. Click Settings of the selected display. 3) Brightness - Info Grid shows some basic information necessary to S-Video. 8) Component - Adjusts ...each function is selected, the set value of the selected display to Component. 9) Channel - Adjusts Sharpness of the selected display. 4) Sharpness - 6) AV - The Input source of MagicNet works only on the input source type of the selected display to AV. 7) S-Video - Settings Picture 1. Adjusts ...
Changes the source of the PIP of TV works only on the slide bar. The Input source of the selected display to Settings Control. Click Settings of the selected display. 3) Brightness - Info Grid shows some basic information necessary to S-Video. 8) Component - Adjusts ...each function is selected, the set value of the selected display to Component. 9) Channel - Adjusts Sharpness of the selected display. 4) Sharpness - 6) AV - The Input source of MagicNet works only on the input source type of the selected display to AV. 7) S-Video - Settings Picture 1. Adjusts ...

