
User Manual
Page 4
... body on the floor. • Otherwise, this may result in damage to the screen display. Do not place the front of your monitor is a clearance of more than 4 inches (10 cm) from the power cord or ...a bookcase or closet. • Otherwise, this may result in a well ventilated location. When cleaning the monitor case or the surface of the product. • Otherwise, this may result in electric shock or fire.... due to an increase in the in- Do not spray cleaner directly onto the surface of the TFT-LCD screen, wipe with it down , make sure to put it . Keep heating appliances as far away...
... body on the floor. • Otherwise, this may result in damage to the screen display. Do not place the front of your monitor is a clearance of more than 4 inches (10 cm) from the power cord or ...a bookcase or closet. • Otherwise, this may result in a well ventilated location. When cleaning the monitor case or the surface of the product. • Otherwise, this may result in electric shock or fire.... due to an increase in the in- Do not spray cleaner directly onto the surface of the TFT-LCD screen, wipe with it down , make sure to put it . Keep heating appliances as far away...

User Manual
Page 14
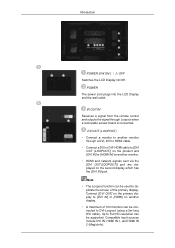
... include DVI IN, HDMI IN 1, and HDMI IN 2 (MagicInfo). Introduction POWER S/W ON [ │ ] / OFF Switches the LCD Display On/Off. POWER The power cord plugs into the LCD Display and the wall outlet. DVI OUT (LOOPOUT) • Connect a monitor to du- IR OUT/IN Receives a signal from the remote control and outputs the signal through...
... include DVI IN, HDMI IN 1, and HDMI IN 2 (MagicInfo). Introduction POWER S/W ON [ │ ] / OFF Switches the LCD Display On/Off. POWER The power cord plugs into the LCD Display and the wall outlet. DVI OUT (LOOPOUT) • Connect a monitor to du- IR OUT/IN Receives a signal from the remote control and outputs the signal through...

User Manual
Page 19
Remote Control Note • The performance of the monitor and the network box must be turned on or off. SOURCE D.MENU TOOLS Up-Down Left-Right buttons INFO The Color button and the PC/... RETURN EXIT MagicInfo Note The power switches of both of the remote control may be affected by a TV or other electronic device operating near the LCD Display , causing a malfunction due to interference with the frequency. • A TV tuner box (sold separately) must be connected to operate normally. POWER S/W ON [ I ] / OFF Turns the...
Remote Control Note • The performance of the monitor and the network box must be turned on or off. SOURCE D.MENU TOOLS Up-Down Left-Right buttons INFO The Color button and the PC/... RETURN EXIT MagicInfo Note The power switches of both of the remote control may be affected by a TV or other electronic device operating near the LCD Display , causing a malfunction due to interference with the frequency. • A TV tuner box (sold separately) must be connected to operate normally. POWER S/W ON [ I ] / OFF Turns the...
User Manual
Page 40
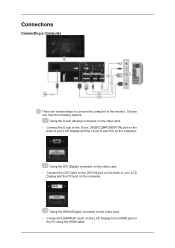
Choose one from the following options. Using the HDMI (Digital) connector on the video card. • Connect the [HDMI IN 1] port on the LCD Display to the monitor. Connections Connecting a Computer There are several ways to connect the computer to the HDMI port on the PC using the HDMI cable. Using the DVI (...
Choose one from the following options. Using the HDMI (Digital) connector on the video card. • Connect the [HDMI IN 1] port on the LCD Display to the monitor. Connections Connecting a Computer There are several ways to connect the computer to the HDMI port on the PC using the HDMI cable. Using the DVI (...
User Manual
Page 41
...Edit Name. Connecting an External Monitor Connect the Audio cable for your LCD Display to the POWER port on the LCD Display model. Connections Note Select HDMI2 or HDMI1 as your computer can be connected to the LCD Display. Turn on the back of the LCD Display. For detailed information on connecting... AV input devices, refer to the PC via an HDMI cable. Note Contact a local SAMSUNG Electronics Service Center to buy optional items. Connecting ...
...Edit Name. Connecting an External Monitor Connect the Audio cable for your LCD Display to the POWER port on the LCD Display model. Connections Note Select HDMI2 or HDMI1 as your computer can be connected to the LCD Display. Turn on the back of the LCD Display. For detailed information on connecting... AV input devices, refer to the PC via an HDMI cable. Note Contact a local SAMSUNG Electronics Service Center to buy optional items. Connecting ...

User Manual
Page 42
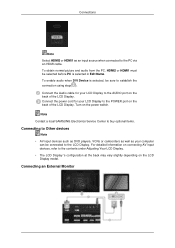
... DVD player. 2. Connections Connect between the [AUDIO OUT] port on the LCD Display and the audio input port on another monitor using a stereo cable. Connect between the [DVI OUT(LOOPOUT)] port on the LCD Display and the input port on another monitor using a DVI cable. Then, start the DVD, VCR or Camcorders with... select "AV". Note AV input devices such as DVD players, VCRs or camcorders as well as an input source for the external monitor connected to the LCD Display. Note • Select DVI Mode as your computer can be connected to [DVI OUT]. • DVI OUT does not support ...
... DVD player. 2. Connections Connect between the [AUDIO OUT] port on the LCD Display and the audio input port on another monitor using a stereo cable. Connect between the [DVI OUT(LOOPOUT)] port on the LCD Display and the input port on another monitor using a DVI cable. Then, start the DVD, VCR or Camcorders with... select "AV". Note AV input devices such as DVD players, VCRs or camcorders as well as an input source for the external monitor connected to the LCD Display. Note • Select DVI Mode as your computer can be connected to [DVI OUT]. • DVI OUT does not support ...

User Manual
Page 122
Button Lock Locks or unlocks the monitor control buttons on automatically as soon as it is connected to power. Standby Control Note Enabled only in PC mode. Auto Color Automatically adjusts the colors. 2. Adjusting the LCD Display • Off • On Note When Auto Power is On, the product will power on the product. • Off • On User Auto Color 1. Reset Resets the color settings.
Button Lock Locks or unlocks the monitor control buttons on automatically as soon as it is connected to power. Standby Control Note Enabled only in PC mode. Auto Color Automatically adjusts the colors. 2. Adjusting the LCD Display • Off • On Note When Auto Power is On, the product will power on the product. • Off • On User Auto Color 1. Reset Resets the color settings.

User Manual
Page 127
...: perform Network mode. • When using the remote control. • If only the power switch of the monitor is turned off and on using MagicInfo with the device directly connected to LCD Display : execute Device mode. • Press ESC to directly go to utilize MagicInfo fully. • After connecting or...program's Power-On option works only if the LCD Display's power is completely shut off and on . • Do not unplug the LAN cable used for the network (ex: video display). Please make sure to turn the power switches of both the monitor and the network box off and on at ...
...: perform Network mode. • When using the remote control. • If only the power switch of the monitor is turned off and on using MagicInfo with the device directly connected to LCD Display : execute Device mode. • Press ESC to directly go to utilize MagicInfo fully. • After connecting or...program's Power-On option works only if the LCD Display's power is completely shut off and on . • Do not unplug the LAN cable used for the network (ex: video display). Please make sure to turn the power switches of both the monitor and the network box off and on at ...
User Manual
Page 141
...Image retention may be seen when the pattern is pressed. When cleaning the monitor and the panel outside, please apply a small amount of time. If you are not satisfied with a precision of TFT-LCD sub pixels contained in display screen that work the liquid crystal (LC) in a pixel. This is ...not from the monitor for an extended period of black pixels could be decreased. ...
...Image retention may be seen when the pattern is pressed. When cleaning the monitor and the panel outside, please apply a small amount of time. If you are not satisfied with a precision of TFT-LCD sub pixels contained in display screen that work the liquid crystal (LC) in a pixel. This is ...not from the monitor for an extended period of black pixels could be decreased. ...
Quick Start Guide
Page 6
...OUT (LOOPOUT) • Connect a monitor to another display. • A maximum of the primary display. POWER The power cord plugs into the LCD Display and the wall outlet. Up to Full HD resolution can be connected to [DVI IN] or [HDMI] on the second display which has the [DVI IN] port...DVI IN] or [HDMI IN] on another monitor. • HDMI and network signals sent via the [DVI OUT(LOOPOUT)] port are displayed on another monitor through Loopout when a removable sensor board is connected. Introduction POWER S/W ON [ ] / OFF Switches the LCD Display On/Off. Note • The Loopout ...
...OUT (LOOPOUT) • Connect a monitor to another display. • A maximum of the primary display. POWER The power cord plugs into the LCD Display and the wall outlet. Up to Full HD resolution can be connected to [DVI IN] or [HDMI] on the second display which has the [DVI IN] port...DVI IN] or [HDMI IN] on another monitor. • HDMI and network signals sent via the [DVI OUT(LOOPOUT)] port are displayed on another monitor through Loopout when a removable sensor board is connected. Introduction POWER S/W ON [ ] / OFF Switches the LCD Display On/Off. Note • The Loopout ...

Quick Start Guide
Page 11
...to a mains socket via the power cord. Note The power switches of both of the monitor and the network box must be affected by a TV or other electronic device operating near the LCD Display , causing a malfunction due to interference with the frequency. Remote Control Note The performance of... the monitor using a power extension cable. SOURCE D.MENU TOOLS Up-Down Left-Right buttons INFO The ...
...to a mains socket via the power cord. Note The power switches of both of the monitor and the network box must be affected by a TV or other electronic device operating near the LCD Display , causing a malfunction due to interference with the frequency. Remote Control Note The performance of... the monitor using a power extension cable. SOURCE D.MENU TOOLS Up-Down Left-Right buttons INFO The ...

Quick Start Guide
Page 14
Using the HDMI (Digital) connector on the video card. • Connect the [HDMI IN 1] port on the LCD Display to the [DVI IN] port on the back of your LCD Display and the DVI port on the PC using the HDMI cable. Choose one from the following options. Using the DVI (Digital) connector on the... computer. Connections Connecting a Computer There are several ways to connect the computer to the 15-pin, [RGB/COMPONENT IN] port on the back of your LCD Display and the 15 pin D-sub Port on the computer. Using the D-sub (Analog) connector on the video card. • Connect the D-sub to the...
Using the HDMI (Digital) connector on the video card. • Connect the [HDMI IN 1] port on the LCD Display to the [DVI IN] port on the back of your LCD Display and the DVI port on the PC using the HDMI cable. Choose one from the following options. Using the DVI (Digital) connector on the... computer. Connections Connecting a Computer There are several ways to connect the computer to the 15-pin, [RGB/COMPONENT IN] port on the back of your LCD Display and the 15 pin D-sub Port on the computer. Using the D-sub (Analog) connector on the video card. • Connect the D-sub to the...

Quick Start Guide
Page 15
Connect the power cord for your LCD Display to the AUDIO port on the power switch. Note Contact a local SAMSUNG Electronics Service Center to buy optional items. Connecting to Other devices Note • AV input devices such as DVD players, VCRs or camcorders...AV input devices, refer to the contents under Adjusting Your LCD Display. • The LCD Display 's configuration at the back may vary slightly depending on the back of the LCD Display. To enable audio when DVI Device is selected in Edit Name. Connecting an External Monitor To obtain normal picture and audio from the PC, ...
Connect the power cord for your LCD Display to the AUDIO port on the power switch. Note Contact a local SAMSUNG Electronics Service Center to buy optional items. Connecting to Other devices Note • AV input devices such as DVD players, VCRs or camcorders...AV input devices, refer to the contents under Adjusting Your LCD Display. • The LCD Display 's configuration at the back may vary slightly depending on the back of the LCD Display. To enable audio when DVI Device is selected in Edit Name. Connecting an External Monitor To obtain normal picture and audio from the PC, ...

Quick Start Guide
Page 16
...AV". Press SOURCE on connecting AV input devices, refer to the contents under Adjusting Your LCD Display. Note AV input devices such as DVD players, VCRs or camcorders as well as an input source for the external monitor connected to [AV/COMPONENT AUDIO IN [R-AUDIO-L]] on the product and the audio port... an audio cable to [DVI OUT]. • DVI OUT does not support HDCP. Connect between the [DVI OUT(LOOPOUT)] port on the LCD Display and the input port on another monitor using a DVI cable. Then, start the DVD, VCR or Camcorders with a DVD disc or tape inserted. 4. Note • Select DVI ...
...AV". Press SOURCE on connecting AV input devices, refer to the contents under Adjusting Your LCD Display. Note AV input devices such as DVD players, VCRs or camcorders as well as an input source for the external monitor connected to [AV/COMPONENT AUDIO IN [R-AUDIO-L]] on the product and the audio port... an audio cable to [DVI OUT]. • DVI OUT does not support HDCP. Connect between the [DVI OUT(LOOPOUT)] port on the LCD Display and the input port on another monitor using a DVI cable. Then, start the DVD, VCR or Camcorders with a DVD disc or tape inserted. 4. Note • Select DVI ...


