User Manual
Page 13
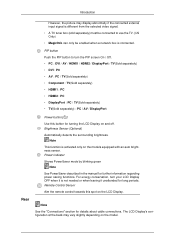
... LCD Display's configuration at the back may display abnormally if the connected external input signal is not needed or when leaving it unattended for turning the LCD Display on and off. PIP button Push the PIP button to use the TV. (US Only) • MagicInfo can only be connected to turn your LCD Display OFF when it is different from the selected video signal. • A TV tuner box (sold separately) must be enabled when a network box...
... LCD Display's configuration at the back may display abnormally if the connected external input signal is not needed or when leaving it unattended for turning the LCD Display on and off. PIP button Push the PIP button to use the TV. (US Only) • MagicInfo can only be connected to turn your LCD Display OFF when it is different from the selected video signal. • A TV tuner box (sold separately) must be enabled when a network box...

User Manual
Page 14
...; Connect a monitor to DVI-Loopout (using a 2m-long DVI cable). Up to Full HD resolution can be connected to another monitor through Loopout when a removable sensor board is connected. Connect [DVI OUT] on the primary display to du- Introduction POWER S/W ON [ │ ] / OFF Switches the LCD Display On/Off. Compatible input sources include DVI IN, HDMI IN 1, and HDMI IN 2 (MagicInfo). POWER The power cord plugs into the LCD Display and the wall outlet. plicate the screen of 100 monitors...
...; Connect a monitor to DVI-Loopout (using a 2m-long DVI cable). Up to Full HD resolution can be connected to another monitor through Loopout when a removable sensor board is connected. Connect [DVI OUT] on the primary display to du- Introduction POWER S/W ON [ │ ] / OFF Switches the LCD Display On/Off. Compatible input sources include DVI IN, HDMI IN 1, and HDMI IN 2 (MagicInfo). POWER The power cord plugs into the LCD Display and the wall outlet. plicate the screen of 100 monitors...

User Manual
Page 20
... work for setting the broadcasting announcement function of the screen. Press the button to quickly select frequently used to another horizontally, vertically or adjusts selected menu values. Use to change the channel. Current picture information is displayed on or off. - Audio Type MTS/S_Mode Default Adjusts the audio volume. Turns the TV menu screen in TV mode on the upper left corner of a digital channel. Introduction POWER OFF Number Buttons / GUIDE button + VOL SOURCE D.MENU TOOLS Up-Down Left-Right buttons INFO The Color button...
... work for setting the broadcasting announcement function of the screen. Press the button to quickly select frequently used to another horizontally, vertically or adjusts selected menu values. Use to change the channel. Current picture information is displayed on or off. - Audio Type MTS/S_Mode Default Adjusts the audio volume. Turns the TV menu screen in TV mode on the upper left corner of a digital channel. Introduction POWER OFF Number Buttons / GUIDE button + VOL SOURCE D.MENU TOOLS Up-Down Left-Right buttons INFO The Color button...
User Manual
Page 41
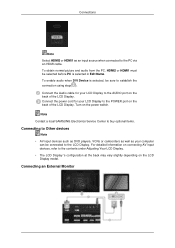
... depending on the power switch. Connecting an External Monitor Connect the power cord for your LCD Display to the AUDIO port on the back of the LCD Display. Note Contact a local SAMSUNG Electronics Service Center to buy optional items. Connecting to Other devices Note • AV input devices such as DVD players, VCRs or camcorders as well as an input source when connected to the PC via an HDMI cable. To enable audio when DVI Device...
... depending on the power switch. Connecting an External Monitor Connect the power cord for your LCD Display to the AUDIO port on the back of the LCD Display. Note Contact a local SAMSUNG Electronics Service Center to buy optional items. Connecting to Other devices Note • AV input devices such as DVD players, VCRs or camcorders as well as an input source when connected to the PC via an HDMI cable. To enable audio when DVI Device...

User Manual
Page 42
Note • Select DVI Mode as an input source for the external monitor connected to the LCD Display. Connect an audio cable to [AV/COMPONENT AUDIO IN [R-AUDIO-L]] on the product and the audio port on another monitor using a stereo cable. Then, start the DVD, VCR or Camcorders with a DVD disc or tape inserted. 4. Note AV input devices such as DVD players, VCRs or camcorders as well as your computer can be connected to [DVI OUT...
Note • Select DVI Mode as an input source for the external monitor connected to the LCD Display. Connect an audio cable to [AV/COMPONENT AUDIO IN [R-AUDIO-L]] on the product and the audio port on another monitor using a stereo cable. Then, start the DVD, VCR or Camcorders with a DVD disc or tape inserted. 4. Note AV input devices such as DVD players, VCRs or camcorders as well as your computer can be connected to [DVI OUT...
User Manual
Page 49
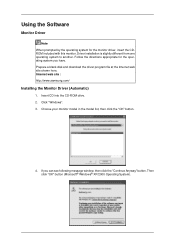
... a blank disk and download the driver program file at the Internet web site shown here. Internet web site : http://www.samsung.com/ Installing the Monitor Driver (Automatic) 1. Click "Windows". 3. Choose your monitor model in the model list, then click the "OK" button. 4. Then click "OK" button (Microsoft® Windows® XP/2000 Operating System). If you have. Using the Software Monitor Driver Note When prompted by the operating system for the...
... a blank disk and download the driver program file at the Internet web site shown here. Internet web site : http://www.samsung.com/ Installing the Monitor Driver (Automatic) 1. Click "Windows". 3. Choose your monitor model in the model list, then click the "OK" button. 4. Then click "OK" button (Microsoft® Windows® XP/2000 Operating System). If you have. Using the Software Monitor Driver Note When prompted by the operating system for the...
User Manual
Page 50
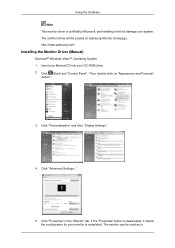
... Personal- Click (Start) and "Control Panel". ization". 3. If the "Properties" button is deactivated, it will be used as is. The certified driver will not damage your system. http://www.samsung.com/ Installing the Monitor Driver (Manual) Microsoft® Windows Vista™, Operating System 1. Click "Advanced Settings...". 5. Click "Personalization" and then "Display Settings". 4. Using the Software Note This monitor driver is certified by Microsoft, and installing it means the configuration...
... Personal- Click (Start) and "Control Panel". ization". 3. If the "Properties" button is deactivated, it will be used as is. The certified driver will not damage your system. http://www.samsung.com/ Installing the Monitor Driver (Manual) Microsoft® Windows Vista™, Operating System 1. Click "Advanced Settings...". 5. Click "Personalization" and then "Display Settings". 4. Using the Software Note This monitor driver is certified by Microsoft, and installing it means the configuration...
User Manual
Page 55
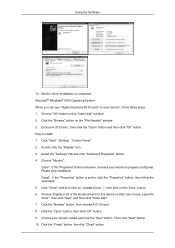
..." button is completed. Click the "Browse" button, then choose A:(D:\Driver). 8. Microsoft® Windows® 2000 Operating System When you can choose a specific driver", then click "Next" and then click "Have disk". 7. Monitor driver installation is inactive, it means your monitor model and click the "Next" button. Click "Start", "Setting", "Control Panel". 2. Click "Driver" and then click on "Update Driver...", then click on your monitor, follow the next steps. 5. Using the Software...
..." button is completed. Click the "Browse" button, then choose A:(D:\Driver). 8. Microsoft® Windows® 2000 Operating System When you can choose a specific driver", then click "Next" and then click "Have disk". 7. Monitor driver installation is inactive, it means your monitor model and click the "Next" button. Click "Start", "Setting", "Control Panel". 2. Click "Driver" and then click on "Update Driver...", then click on your monitor, follow the next steps. 5. Using the Software...

User Manual
Page 56
... monitor that you connected to use (Resolution, Number of the driver". 7. The third screen is no Mode at the first and the second screen after clicking "Test". Select the "Settings" tab and click "Advanced Properties" button. 4. Select a mode that corresponds to the one you wish to your mouse. 3. Choose "Specify the location of colors and Vertical frequency) and then click "OK". 4. Using the Software If you close...
... monitor that you connected to use (Resolution, Number of the driver". 7. The third screen is no Mode at the first and the second screen after clicking "Test". Select the "Settings" tab and click "Advanced Properties" button. 4. Select a mode that corresponds to the one you wish to your mouse. 3. Choose "Specify the location of colors and Vertical frequency) and then click "OK". 4. Using the Software If you close...

User Manual
Page 58
... directory path is not specified, the program will be displayed depending on the Start menu and double-click Add/Delete Program. 2 Select MDC Unified from the list and click Change/Remove. Uninstallation 1 Select Settings > Control Panel on the PC system or product specifications. Press F5 if the execution icon is not displayed on the main screen, install with the "MDC Unified" execution file...
... directory path is not specified, the program will be displayed depending on the Start menu and double-click Add/Delete Program. 2 Select MDC Unified from the list and click Change/Remove. Uninstallation 1 Select Settings > Control Panel on the PC system or product specifications. Press F5 if the execution icon is not displayed on the main screen, install with the "MDC Unified" execution file...

User Manual
Page 93
... . Note • If the display TV source is active (TV tuner connected to AV. Refer to PIP > Source for compatible signals for the PIP feature to enjoy the video and audio from the connected PC. When using a DVI to HDMI cable connection (which does not support audio and video at will automatically search the different video input sources for active video. VCR / DVD / Cable STB / HD STB / Satellite STB / AV Receiver / DVD Receiver / Game /Camcorder / DVD Combo / DHR / PC / DVI...
... . Note • If the display TV source is active (TV tuner connected to AV. Refer to PIP > Source for compatible signals for the PIP feature to enjoy the video and audio from the connected PC. When using a DVI to HDMI cable connection (which does not support audio and video at will automatically search the different video input sources for active video. VCR / DVD / Cable STB / HD STB / Satellite STB / AV Receiver / DVD Receiver / Game /Camcorder / DVD Combo / DHR / PC / DVI...
User Manual
Page 110
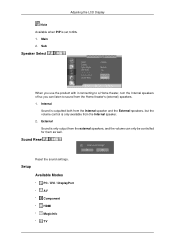
... you use the product with it connecting to a Home theater, turn the Internal speakers off so you can only be controlled for them as well. Sound Reset Reset the sound settings. Internal Sound is outputted both from the Internal speaker and the External speakers, but the volume control is only output from the external speakers, and the volume can listen to On. 1. Setup Available Modes • PC / DVI / DisplayPort • AV • Component • HDMI...
... you use the product with it connecting to a Home theater, turn the Internal speakers off so you can only be controlled for them as well. Sound Reset Reset the sound settings. Internal Sound is outputted both from the Internal speaker and the External speakers, but the volume control is only output from the external speakers, and the volume can listen to On. 1. Setup Available Modes • PC / DVI / DisplayPort • AV • Component • HDMI...

User Manual
Page 131
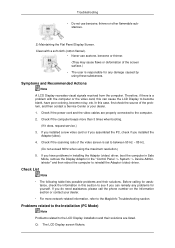
... LCD Display. Turn off your LCD Display and reconnect the video cable; Note Refer to change the screen resolution or stay in the SelfTest mode, the LED power indicator remains green and the figure moves around on the screen. 4. Clean with a soft cloth after using the previous procedure, check your computer and the LCD Display. 2. Turn on both your video controller and computer system; Warning Messages You can choose to Specifications > Preset Timing Modes...
... LCD Display. Turn off your LCD Display and reconnect the video cable; Note Refer to change the screen resolution or stay in the SelfTest mode, the LED power indicator remains green and the figure moves around on the screen. 4. Clean with a soft cloth after using the previous procedure, check your computer and the LCD Display. 2. Turn on both your video controller and computer system; Warning Messages You can choose to Specifications > Preset Timing Modes...
User Manual
Page 132
... caused by using the maximum resolution.) 5. Check if the power cord and the video cables are listed. Check if the scanning ratio of the video screen is set to the computer. 2. If you installed the Adaptor(video). 4. Check if the computer beeps more network-related information, refer to the LCD Display installation and their solutions. Check List Note • The following table lists possible problems and their solutions are properly connected to...
... caused by using the maximum resolution.) 5. Check if the power cord and the video cables are listed. Check if the scanning ratio of the video screen is set to the computer. 2. If you installed the Adaptor(video). 4. Check if the computer beeps more network-related information, refer to the LCD Display installation and their solutions. Check List Note • The following table lists possible problems and their solutions are properly connected to...
User Manual
Page 137
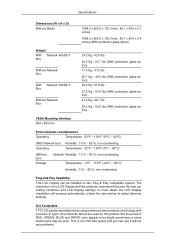
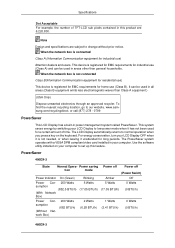
... Play Capability This LCD Display can use it without any Plug & Play compatible system. But the pixels of RED, GREEN, BLUE and WHITE color appear to select alternate settings. Dot Acceptable TFT-LCD panels manufactured by using advanced semiconductor technology with precision of the LCD Display and the computer systems will proceed automatically, unless the user wishes to be bright sometimes or some black pixels may be installed on any problems...
... Play Capability This LCD Display can use it without any Plug & Play compatible system. But the pixels of RED, GREEN, BLUE and WHITE color appear to select alternate settings. Dot Acceptable TFT-LCD panels manufactured by using advanced semiconductor technology with precision of the LCD Display and the computer systems will proceed automatically, unless the user wishes to be bright sometimes or some black pixels may be installed on any problems...
User Manual
Page 138
... number of time. Power saving tion mode Power off Power off (Power Swich) Power Indicator On (Green) Blinking Amber Off Power Con- 250 Watts sumption (852.5 BTU/h) (With Network Box) 5 Watts (17.05 BTU/h) 5 Watts (17.05 BTU/h) 0 Watts (0 BTU/h) Power Consumption (Without Network Box) 200 Watts (682 BTU/h) 2 Watts (6.28 BTU/h) 1 Watts (3.41 BTU/h) 0 Watts (0 BTU/h) 460DX-3 The PowerSaver system operates with a VESA DPM compliant video card installed in your LCD Display...
... number of time. Power saving tion mode Power off Power off (Power Swich) Power Indicator On (Green) Blinking Amber Off Power Con- 250 Watts sumption (852.5 BTU/h) (With Network Box) 5 Watts (17.05 BTU/h) 5 Watts (17.05 BTU/h) 0 Watts (0 BTU/h) Power Consumption (Without Network Box) 200 Watts (682 BTU/h) 2 Watts (6.28 BTU/h) 1 Watts (3.41 BTU/h) 0 Watts (0 BTU/h) 460DX-3 The PowerSaver system operates with a VESA DPM compliant video card installed in your LCD Display...

Quick Start Guide
Page 15
... selected, be connected to the LCD Display. Connecting an External Monitor Turn on the back of the LCD Display. Note Contact a local SAMSUNG Electronics Service Center to buy optional items. Connecting to Other devices Note • AV input devices such as DVD players, VCRs or camcorders as well as an input source when connected to the PC via an HDMI cable. Connect the Audio cable for your LCD Display to the POWER port on the LCD Display model. Connections Note Select...
... selected, be connected to the LCD Display. Connecting an External Monitor Turn on the back of the LCD Display. Note Contact a local SAMSUNG Electronics Service Center to buy optional items. Connecting to Other devices Note • AV input devices such as DVD players, VCRs or camcorders as well as an input source when connected to the PC via an HDMI cable. Connect the Audio cable for your LCD Display to the POWER port on the LCD Display model. Connections Note Select...

Quick Start Guide
Page 16
.../COMPONENT AUDIO IN [R-AUDIO-L]] on the product and the audio port on the external device. 3. Note • Select DVI Mode as your computer can be connected to [DVI OUT]. • DVI OUT does not support HDCP. Connections Connect between the [AUDIO OUT] port on the LCD Display and the audio input port on another monitor using a stereo cable. Note AV input devices such as DVD players, VCRs or camcorders as well as an input source for...
.../COMPONENT AUDIO IN [R-AUDIO-L]] on the product and the audio port on the external device. 3. Note • Select DVI Mode as your computer can be connected to [DVI OUT]. • DVI OUT does not support HDCP. Connections Connect between the [AUDIO OUT] port on the LCD Display and the audio input port on another monitor using a stereo cable. Note AV input devices such as DVD players, VCRs or camcorders as well as an input source for...
Quick Start Guide
Page 23
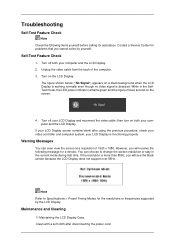
... your computer and the LCD Display. 2. Note Refer to change the screen resolution or stay in the SelfTest mode, the LED power indicator remains green and the figure moves around on both your video controller and computer system; then turn on the screen. 4. Warning Messages You can choose to Specifications > Preset Timing Modes for problems that time. The figure shown below ("No Signal") appears on the LCD Display. Troubleshooting Self-Test Feature...
... your computer and the LCD Display. 2. Note Refer to change the screen resolution or stay in the SelfTest mode, the LED power indicator remains green and the figure moves around on both your video controller and computer system; then turn on the screen. 4. Warning Messages You can choose to Specifications > Preset Timing Modes for problems that time. The figure shown below ("No Signal") appears on the LCD Display. Troubleshooting Self-Test Feature...

Quick Start Guide
Page 24
...). • Never use benzene, thinner or other flammable substances. 2) Maintaining the Flat Panel Display Screen. If you installed a new video card or if you assembled the PC, check if you have poor coloring, become blank, have problems in installing the Adaptor (video) driver, boot the computer in Safe Mode, remove the Display Adaptor in this case, first check the source of the problem, and then contact a Service Center or...
...). • Never use benzene, thinner or other flammable substances. 2) Maintaining the Flat Panel Display Screen. If you installed a new video card or if you assembled the PC, check if you have poor coloring, become blank, have problems in installing the Adaptor (video) driver, boot the computer in Safe Mode, remove the Display Adaptor in this case, first check the source of the problem, and then contact a Service Center or...


