Quick Guide (ENGLISH)
Page 4
... item to another vertically or adjusts selected menu values. Selects the input source that an external device is not on -screen menu and exits from PC mode to the previous menu. When OSD is connected to adjust volume. Also use to exit the OSD menu or return to Video mode. SOURCE.... Sold separately Wall Mount KIT Introduction RGB to BNC Cable BNC to BNC Cable (Applicable to the DX-2 model only) RGB to Component Cable Your LCD Display Front Semi Stand KIT MENU button [MENU] Opens the on the screen, press the button to .
... item to another vertically or adjusts selected menu values. Selects the input source that an external device is not on -screen menu and exits from PC mode to the previous menu. When OSD is connected to adjust volume. Also use to exit the OSD menu or return to Video mode. SOURCE.... Sold separately Wall Mount KIT Introduction RGB to BNC Cable BNC to BNC Cable (Applicable to the DX-2 model only) RGB to Component Cable Your LCD Display Front Semi Stand KIT MENU button [MENU] Opens the on the screen, press the button to .

Quick Guide (ENGLISH)
Page 5
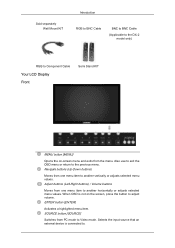
... blinking green Note See PowerSaver described in the manual for turning the LCD Display on screen as BNC and the component use the same terminal. • PC : DVI / AV / Component / HDMI • BNC : DVI / AV / HDMI • DVI / AV : PC / BNC • Component : PC • HDMI : PC / BNC Power button [ ] Use this spot on the DXN-2 model. •...
... blinking green Note See PowerSaver described in the manual for turning the LCD Display on screen as BNC and the component use the same terminal. • PC : DVI / AV / Component / HDMI • BNC : DVI / AV / HDMI • DVI / AV : PC / BNC • Component : PC • HDMI : PC / BNC Power button [ ] Use this spot on the DXN-2 model. •...

Quick Guide (ENGLISH)
Page 6
... Connection Terminal (Input)) • Use a D-Sub Cable (15 pin D-Sub) - Applicable to BNC cable. POWER The power cord plugs into the LCD Display and the wall outlet. PC mode (Analog PC) • Connect the RGB/COMPONENT IN port on the monitor to the COMPONENT port on the external device using the D-SUB to... COMPONENT cable. • Connect the RGB/COMPONENT IN port on the monitor to the BNC port on the PC using the D-SUB to the DXN-2 model only. Introduction Note Applicable to the DX-2 model only.
... Connection Terminal (Input)) • Use a D-Sub Cable (15 pin D-Sub) - Applicable to BNC cable. POWER The power cord plugs into the LCD Display and the wall outlet. PC mode (Analog PC) • Connect the RGB/COMPONENT IN port on the monitor to the COMPONENT port on the external device using the D-SUB to... COMPONENT cable. • Connect the RGB/COMPONENT IN port on the monitor to the BNC port on the PC using the D-SUB to the DXN-2 model only. Introduction Note Applicable to the DX-2 model only.
Quick Guide (ENGLISH)
Page 7
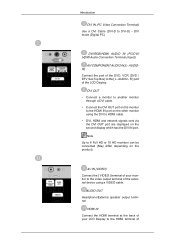
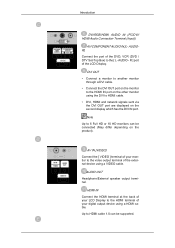
DVI mode (Digital PC) DVI/RGB/HDMI AUDIO IN (PC/DVI/ HDMI Audio Connection Terminal (Input)) AV/COMPONENT AUDIO IN [L- AUDIOR] Connect the port of the LCD Display. R ] port of the DVD, VCR (DVD / DTV Set-Top Box) to HDMI cable. • DVI, HDMI and network signals sent via the DVI OUT port are displayed... Full HD or 10 HD monitors can be connected (May differ depending on the second display which has the DVI IN port. Introduction DVI IN (PC Video Connection Terminal) Use a DVI Cable (DVI-D to the HDMI IN port on the other monitor using a VIDEO cable. Note Up to the video output...
DVI mode (Digital PC) DVI/RGB/HDMI AUDIO IN (PC/DVI/ HDMI Audio Connection Terminal (Input)) AV/COMPONENT AUDIO IN [L- AUDIOR] Connect the port of the LCD Display. R ] port of the DVD, VCR (DVD / DTV Set-Top Box) to HDMI cable. • DVI, HDMI and network signals sent via the DVI OUT port are displayed... Full HD or 10 HD monitors can be connected (May differ depending on the second display which has the DVI IN port. Introduction DVI IN (PC Video Connection Terminal) Use a DVI Cable (DVI-D to the HDMI IN port on the other monitor using a VIDEO cable. Note Up to the video output...

Quick Guide (ENGLISH)
Page 8
With cables or signal source where there is no degradation, up to 10 LCD Displays can be connected (May not be supported. USB1,USB2 (USB Connection Terminal) Up to HDMI cable 1.0 can be connected to the DXN-2 model only. ... OUT Note Applicable to the DX-2 model only. LAN (LAN Connection Terminal) Note Applicable to the loopout depends on the connected cable). The number of LCD Displays that can be supported depending on the cables, signal source, etc. BNC OUT [R, G, B, H, V] (BNC Terminal (Output)) BNC (Analog...
With cables or signal source where there is no degradation, up to 10 LCD Displays can be connected (May not be supported. USB1,USB2 (USB Connection Terminal) Up to HDMI cable 1.0 can be connected to the DXN-2 model only. ... OUT Note Applicable to the DX-2 model only. LAN (LAN Connection Terminal) Note Applicable to the loopout depends on the connected cable). The number of LCD Displays that can be supported depending on the cables, signal source, etc. BNC OUT [R, G, B, H, V] (BNC Terminal (Output)) BNC (Analog...
Quick Guide (ENGLISH)
Page 14
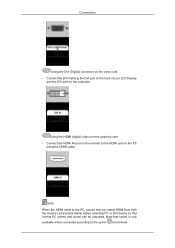
... available when connected according to the option that normal PC screen and sound can be outputted. Connections Using the DVI (Digital) connector on the video card. • Connect the DVI Cable to the DVI port on the back of your LCD Display and the DVI port on the PC using the HDMI cable. Using the HDMI (digital...
... available when connected according to the option that normal PC screen and sound can be outputted. Connections Using the DVI (Digital) connector on the video card. • Connect the DVI Cable to the DVI port on the back of your LCD Display and the DVI port on the PC using the HDMI cable. Using the HDMI (digital...
Quick Guide (ENGLISH)
Page 15
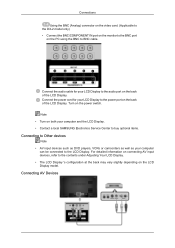
... power switch. Connect the audio cable for your LCD Display to the power port on the PC using the BNC to BNC cable. Turn on the LCD Display model. Note • Turn on both your computer and the LCD Display. • Contact a local SAMSUNG Electronics Service Center to buy optional items. Connecting... to Other devices Note • AV input devices such as DVD players, VCRs or camcorders as well as your LCD Display to the audio port on the back of...
... power switch. Connect the audio cable for your LCD Display to the power port on the PC using the BNC to BNC cable. Turn on the LCD Display model. Note • Turn on both your computer and the LCD Display. • Contact a local SAMSUNG Electronics Service Center to buy optional items. Connecting... to Other devices Note • AV input devices such as DVD players, VCRs or camcorders as well as your LCD Display to the audio port on the back of...
Quick Guide (ENGLISH)
Page 20
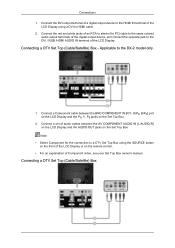
...connect the opposite jack to the DX-2 model only. 1. Note • Select Component for PC) cable to the same colored audio output terminals of audio cables between the BNC/COMPONENT IN [R/Y, G/PB, B/PR] port on the LCD Display and the PR, Y, PB jacks on the Set Top Box. Connect the red and... white jacks of the LCD Display. Connecting a DTV Set Top (Cable/Satellite) Box - Applicable to the DVI / RGB /HDMI AUDIO IN terminal of an RCA to stereo (for the connection to HDMI cable. 2. Connect a Component cable between ...
...connect the opposite jack to the DX-2 model only. 1. Note • Select Component for PC) cable to the same colored audio output terminals of audio cables between the BNC/COMPONENT IN [R/Y, G/PB, B/PR] port on the LCD Display and the PR, Y, PB jacks on the Set Top Box. Connect the red and... white jacks of the LCD Display. Connecting a DTV Set Top (Cable/Satellite) Box - Applicable to the DVI / RGB /HDMI AUDIO IN terminal of an RCA to stereo (for the connection to HDMI cable. 2. Connect a Component cable between ...

Quick Guide (ENGLISH)
Page 24
... a soft cloth (cotton flannel) smoothly. • Never use benzene, thinner or other flammable substances, or a wet cloth. • We recommend that a SAMSUNG cleansing agent is set to reinstall the Adaptor (video) driver. If you installed a new video card or if you assembled the...; The user will be required to pay costs and related expenses for repairing damages caused. Problems related to the Installation (PC Mode) Note Problems related to the LCD Display installation and their solutions. Clean with the computer or the video card, this can remedy any problems for yourself.
... a soft cloth (cotton flannel) smoothly. • Never use benzene, thinner or other flammable substances, or a wet cloth. • We recommend that a SAMSUNG cleansing agent is set to reinstall the Adaptor (video) driver. If you installed a new video card or if you assembled the...; The user will be required to pay costs and related expenses for repairing damages caused. Problems related to the Installation (PC Mode) Note Problems related to the LCD Display installation and their solutions. Clean with the computer or the video card, this can remedy any problems for yourself.

Quick Guide (ENGLISH)
Page 25
... Signal Cable" message. Q: The image is securely connected. A: Ensure that the signal cable is firmly connected to the PC or video sources. (Refer to the current Information under the LCD Display menu and Preset Timing Modes. If not, reset them referring to the Connecting a Computer) A: Ensure that the... power cord is firmly connected and the LCD Display is blurred. A: Ensure that the PC or video sources are shown in the range supported by the LCD Display. Q: Ghost images are turned on. A: Check if the signal cable is too...
... Signal Cable" message. Q: The image is securely connected. A: Ensure that the signal cable is firmly connected to the PC or video sources. (Refer to the current Information under the LCD Display menu and Preset Timing Modes. If not, reset them referring to the Connecting a Computer) A: Ensure that the... power cord is firmly connected and the LCD Display is blurred. A: Ensure that the PC or video sources are shown in the range supported by the LCD Display. Q: Ghost images are turned on. A: Check if the signal cable is too...

User Manual (ENGLISH)
Page 11
... menu values. ENTER button [ENTER] Activates a highlighted menu item. SOURCE button [SOURCE] Switches from one menu item to . Navigate buttons (Up-Down buttons) Moves from PC mode to adjust volume. Also use to exit the OSD menu or return to another horizontally or adjusts selected menu values. Selects the input source... menu. Sold separately Wall Mount KIT Introduction RGB to BNC Cable BNC to BNC Cable (Applicable to the DX-2 model only) Semi Stand KIT Your LCD Display Front MENU button [MENU] Opens the on the screen, press the button to Video mode.
... menu values. ENTER button [ENTER] Activates a highlighted menu item. SOURCE button [SOURCE] Switches from one menu item to . Navigate buttons (Up-Down buttons) Moves from PC mode to adjust volume. Also use to exit the OSD menu or return to another horizontally or adjusts selected menu values. Selects the input source... menu. Sold separately Wall Mount KIT Introduction RGB to BNC Cable BNC to BNC Cable (Applicable to the DX-2 model only) Semi Stand KIT Your LCD Display Front MENU button [MENU] Opens the on the screen, press the button to Video mode.

User Manual (ENGLISH)
Page 12
... than one PIP cannot overlap on and off. Introduction Rear [PC] → [DVI] → [AV] → [Component] → [HDMI] → [MagicInfo] Note • The BNC mode will not be activated on the LCD Display. Note For detailed information concerning cable connections, refer to ...turn your LCD Display OFF when it unattended for turning the LCD Display on screen as BNC and the component use the same terminal. • PC : DVI / AV / HDMI • BNC : DVI / AV / HDMI • DVI / AV : PC / BNC • Component : PC • HDMI : PC / BNC Power button [...
... than one PIP cannot overlap on and off. Introduction Rear [PC] → [DVI] → [AV] → [Component] → [HDMI] → [MagicInfo] Note • The BNC mode will not be activated on the LCD Display. Note For detailed information concerning cable connections, refer to ...turn your LCD Display OFF when it unattended for turning the LCD Display on screen as BNC and the component use the same terminal. • PC : DVI / AV / HDMI • BNC : DVI / AV / HDMI • DVI / AV : PC / BNC • Component : PC • HDMI : PC / BNC Power button [...

User Manual (ENGLISH)
Page 13
... Terminal (Input)) • Use a D-Sub Cable (15 pin D-Sub) - POWER The power cord plugs into the LCD Display and the wall outlet. DVI IN (PC Video Connection Terminal) Use a DVI Cable (DVI-D to BNC cable. DVI mode (Digital PC) Introduction Note Applicable to the DXN-2 model only. Applicable to the DX-2 model only. POWER S/W ON [ │ ] / OFF...
... Terminal (Input)) • Use a D-Sub Cable (15 pin D-Sub) - POWER The power cord plugs into the LCD Display and the wall outlet. DVI IN (PC Video Connection Terminal) Use a DVI Cable (DVI-D to BNC cable. DVI mode (Digital PC) Introduction Note Applicable to the DXN-2 model only. Applicable to the DX-2 model only. POWER S/W ON [ │ ] / OFF...
User Manual (ENGLISH)
Page 14
...PC/DVI/ HDMI Audio Connection Terminal (Input)) AV/COMPONENT AUDIO IN [L- DVI OUT • Connect a monitor to another monitor through a DVI cable. • Connect the DVI OUT port on the other monitor using a VIDEO cable. AUDIO OUT Headphone/External speaker output terminal. HDMI IN Connect the HDMI terminal at the back of your LCD...or 10 HD monitors can be connected (May differ depending on the second display which has the DVI IN port. AUDIO - Note Up to the video output terminal of the LCD Display. AV IN [VIDEO] Connect the [ VIDEO ] terminal of your digital output device using ...
...PC/DVI/ HDMI Audio Connection Terminal (Input)) AV/COMPONENT AUDIO IN [L- DVI OUT • Connect a monitor to another monitor through a DVI cable. • Connect the DVI OUT port on the other monitor using a VIDEO cable. AUDIO OUT Headphone/External speaker output terminal. HDMI IN Connect the HDMI terminal at the back of your LCD...or 10 HD monitors can be connected (May differ depending on the second display which has the DVI IN port. AUDIO - Note Up to the video output terminal of the LCD Display. AV IN [VIDEO] Connect the [ VIDEO ] terminal of your digital output device using ...

User Manual (ENGLISH)
Page 15
With cables or signal source where there is no degradation, up to 10 LCD Displays can be supported depending on the cables, signal source, etc. Introduction BNC OUT [R, G, B, H, V] (BNC Terminal (Output)) BNC (Analog PC) Connection: connecting the R, G, B, H, V ports. Note (Applicable to the DX-2 model only) BNC/COMPONENT IN [R/Y, G/PB, B/ PR,... Device Compatible. Note Applicable to the DXN-2 model only. RGB OUT Note Applicable to the DXN-2 model only. The number of LCD Displays that can be connected (May not be connected to the loopout depends on the connected cable).
With cables or signal source where there is no degradation, up to 10 LCD Displays can be supported depending on the cables, signal source, etc. Introduction BNC OUT [R, G, B, H, V] (BNC Terminal (Output)) BNC (Analog PC) Connection: connecting the R, G, B, H, V ports. Note (Applicable to the DX-2 model only) BNC/COMPONENT IN [R/Y, G/PB, B/ PR,... Device Compatible. Note Applicable to the DXN-2 model only. RGB OUT Note Applicable to the DXN-2 model only. The number of LCD Displays that can be connected (May not be connected to the loopout depends on the connected cable).

User Manual (ENGLISH)
Page 21
... the HDMI cable. Note that sound is only available when connected according to the PC, ensure that you select HDMI from both the Source List and Edit Name before selecting PC or DVI device so that follows. Using the BNC (Analog) connector on the video card. (Applicable to the DX-2 model only) •...; Connect the BNC/COMPONENT IN port on the monitor to the BNC port on the PC using the BNC to the DVI port on the back of your LCD Display and the DVI port on the computer. Connections Using the DVI (Digital) connector on the video card. • Connect the...
... the HDMI cable. Note that sound is only available when connected according to the PC, ensure that you select HDMI from both the Source List and Edit Name before selecting PC or DVI device so that follows. Using the BNC (Analog) connector on the video card. (Applicable to the DX-2 model only) •...; Connect the BNC/COMPONENT IN port on the monitor to the BNC port on the PC using the BNC to the DVI port on the back of your LCD Display and the DVI port on the computer. Connections Using the DVI (Digital) connector on the video card. • Connect the...

User Manual (ENGLISH)
Page 25
... the SOURCE button on the front of the LCD Display or on the remote control. Select HDMI using a DVI to HDMI Cable 1. Note In HDMI mode, only PCM format audio is supported. Connect the red and white jacks of an RCA to stereo (for PC) cable to the same colored audio output terminals... of the digital output device, and connect the opposite jack to the DX-2 model only. Applicable to the DVI / RGB /HDMI AUDIO IN terminal of the LCD Display using the SOURCE button on the front of...
... the SOURCE button on the front of the LCD Display or on the remote control. Select HDMI using a DVI to HDMI Cable 1. Note In HDMI mode, only PCM format audio is supported. Connect the red and white jacks of an RCA to stereo (for PC) cable to the same colored audio output terminals... of the digital output device, and connect the opposite jack to the DX-2 model only. Applicable to the DVI / RGB /HDMI AUDIO IN terminal of the LCD Display using the SOURCE button on the front of...

User Manual (ENGLISH)
Page 39
Therefore, a serial cable should be easily and simultaneously operated on a display. Main Screen Click Start > Program > Samsung > MDC System to be connected between a PC and a display. Introduction A Multiple Display Control (MDC) is used for the communication between the serial port on a PC and the serial port on a PC. Select a set to see the volume of serial communication, is an application allowing various displays to start the program. RS-232C, a standard of the selected set within the slider.
Therefore, a serial cable should be easily and simultaneously operated on a display. Main Screen Click Start > Program > Samsung > MDC System to be connected between a PC and a display. Introduction A Multiple Display Control (MDC) is used for the communication between the serial port on a PC and the serial port on a PC. Select a set to see the volume of serial communication, is an application allowing various displays to start the program. RS-232C, a standard of the selected set within the slider.

User Manual (ENGLISH)
Page 40
Use the main icons to control displays. The setting for the PC Serial Port can only operate power and lock buttons on selected display. 7. Select a display from Display Selection. 8. Port Selection Click Select all or Clear to ...
Use the main icons to control displays. The setting for the PC Serial Port can only operate power and lock buttons on selected display. 7. Select a display from Display Selection. 8. Port Selection Click Select all or Clear to ...

User Manual (ENGLISH)
Page 45
...in products with TV and controlling channels is allowed only when Input Source is TV. Changes the Input Source of the selected display to BNC. 3) DVI - Info Grid shows some basic information necessary to DTV. 6) AV - Changes the Input Source of the selected display to S-Video. 8) Component -... is TV. Changes the Input Source of the selected display to AV. 7) S-Video - Changes the Input Source of the selected display to PC. 2) BNC - Changes the Input Source of the selected display to Component. 9) MagicInfo - Changes the Input Source of the selected display to Input...
...in products with TV and controlling channels is allowed only when Input Source is TV. Changes the Input Source of the selected display to BNC. 3) DVI - Info Grid shows some basic information necessary to DTV. 6) AV - Changes the Input Source of the selected display to S-Video. 8) Component -... is TV. Changes the Input Source of the selected display to AV. 7) S-Video - Changes the Input Source of the selected display to PC. 2) BNC - Changes the Input Source of the selected display to Component. 9) MagicInfo - Changes the Input Source of the selected display to Input...