User Manual
Page 11
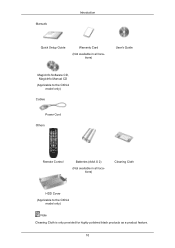
Manuals Introduction Quick Setup Guide Warranty Card (Not available in all locations) User's Guide MagicInfo Software CD, MagicInfo Manual CD (Applicable to the CXN-2 model only) Cables Power Cord Others Remote Control Batteries (AAA X 2) (Not available in all locations) Cleaning Cloth HDD Cover (Applicable to the CXN-2 model only) Note Cleaning Cloth is only provided for highly polished black products as a product feature. 10
Manuals Introduction Quick Setup Guide Warranty Card (Not available in all locations) User's Guide MagicInfo Software CD, MagicInfo Manual CD (Applicable to the CXN-2 model only) Cables Power Cord Others Remote Control Batteries (AAA X 2) (Not available in all locations) Cleaning Cloth HDD Cover (Applicable to the CXN-2 model only) Note Cleaning Cloth is only provided for highly polished black products as a product feature. 10
User Manual
Page 13
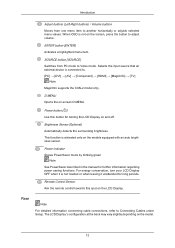
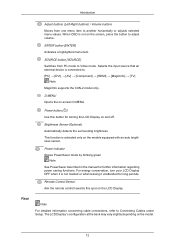
... [Component] → [HDMI] → [MagicInfo] → [TV] Note MagicInfo supports the CXN-2 model only. For energy conservation, turn your LCD Display OFF when it unattended for further information regarding power saving functions. ENTER button [ENTER] Activates a highlighted menu item. Remote Control Sensor Aim the remote control towards this button for turning the LCD Display on the LCD Display. SOURCE button [SOURCE] Switches from one menu item to another horizontally or adjusts selected menu values. Rear Note For detailed information concerning cable connections...
... [Component] → [HDMI] → [MagicInfo] → [TV] Note MagicInfo supports the CXN-2 model only. For energy conservation, turn your LCD Display OFF when it unattended for further information regarding power saving functions. ENTER button [ENTER] Activates a highlighted menu item. Remote Control Sensor Aim the remote control towards this button for turning the LCD Display on the LCD Display. SOURCE button [SOURCE] Switches from one menu item to another horizontally or adjusts selected menu values. Rear Note For detailed information concerning cable connections...
User Manual
Page 14
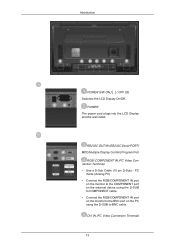
... [O] Switches the LCD Display On/Off. POWER The power cord plugs into the LCD Display and the wall outlet. PC mode (Analog PC) • Connect the RGB/COMPONENT IN port on the monitor to the COMPONENT port on the external device using the D-SUB to COMPONENT cable. • Connect the RGB/COMPONENT IN port on the monitor to the BNC port on the PC using the D-SUB to BNC cable. RS232C OUT/IN (RS232C Serial PORT) MDC(Multiple Display Control) Program Port RGB/ COMPONENT IN (PC Video Connection...
... [O] Switches the LCD Display On/Off. POWER The power cord plugs into the LCD Display and the wall outlet. PC mode (Analog PC) • Connect the RGB/COMPONENT IN port on the monitor to the COMPONENT port on the external device using the D-SUB to COMPONENT cable. • Connect the RGB/COMPONENT IN port on the monitor to the BNC port on the PC using the D-SUB to BNC cable. RS232C OUT/IN (RS232C Serial PORT) MDC(Multiple Display Control) Program Port RGB/ COMPONENT IN (PC Video Connection...
User Manual
Page 30
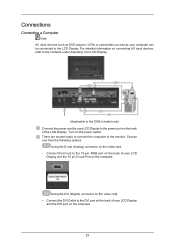
... the 15 pin D-sub Port on the computer. 29 For detailed information on connecting AV input devices, refer to the contents under Adjusting Your LCD Display. (Applicable to the CXN-2 model only) Connect the power cord for your computer can be connected to the LCD Display. Connections Connecting a Computer Note AV input devices such as DVD players, VCRs or camcorders as well as your LCD Display to the power port on the power switch.
... the 15 pin D-sub Port on the computer. 29 For detailed information on connecting AV input devices, refer to the contents under Adjusting Your LCD Display. (Applicable to the CXN-2 model only) Connect the power cord for your computer can be connected to the LCD Display. Connections Connecting a Computer Note AV input devices such as DVD players, VCRs or camcorders as well as your LCD Display to the power port on the power switch.

User Manual
Page 31
... LCD Display 's configuration at the back may view television programs on the LCD Display if it is only available when connected according to the LCD Display. For detailed information on connecting AV input devices, refer to an antenna or CATV cable without installing any separate TV reception hardware or software on your LCD Display to the HDMI port on the PC using the HDMI cable. Connecting TV Note You may vary slightly depending on the LCD Display model. Connections Using the HDMI (digital) output...
... LCD Display 's configuration at the back may view television programs on the LCD Display if it is only available when connected according to the LCD Display. For detailed information on connecting AV input devices, refer to an antenna or CATV cable without installing any separate TV reception hardware or software on your LCD Display to the HDMI port on the PC using the HDMI cable. Connecting TV Note You may vary slightly depending on the LCD Display model. Connections Using the HDMI (digital) output...
User Manual
Page 38
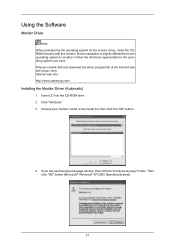
Choose your monitor model in the model list, then click the "OK" button. 4. If you have. Internet web site : http://www.samsung.com/ Installing the Monitor Driver (Automatic) 1. Click "Windows". 3. Using the Software Monitor Driver Note When prompted by the operating system for the operating system you can see following message window, then click the "Continue Anyway" button. Follow the directions appropriate for the monitor driver, insert the CDROM included...
Choose your monitor model in the model list, then click the "OK" button. 4. If you have. Internet web site : http://www.samsung.com/ Installing the Monitor Driver (Automatic) 1. Click "Windows". 3. Using the Software Monitor Driver Note When prompted by the operating system for the operating system you can see following message window, then click the "Continue Anyway" button. Follow the directions appropriate for the monitor driver, insert the CDROM included...
User Manual
Page 39
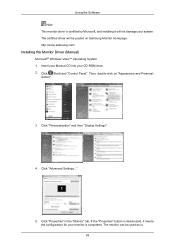
Using the Software Note This monitor driver is certified by Microsoft, and installing it means the configuration for your monitor is completed. http://www.samsung.com/ Installing the Monitor Driver (Manual) Microsoft® Windows Vista™, Operating System 1. ization". 3. Click "Properties" in the "Monitor" tab. If the "Properties" button is . 38 Click "Advanced Settings...". 5. The monitor can be posted on "Appearance and Personal- Click (Start) and "Control Panel". Then...
Using the Software Note This monitor driver is certified by Microsoft, and installing it means the configuration for your monitor is completed. http://www.samsung.com/ Installing the Monitor Driver (Manual) Microsoft® Windows Vista™, Operating System 1. ization". 3. Click "Properties" in the "Monitor" tab. If the "Properties" button is . 38 Click "Advanced Settings...". 5. The monitor can be posted on "Appearance and Personal- Click (Start) and "Control Panel". Then...
User Manual
Page 40
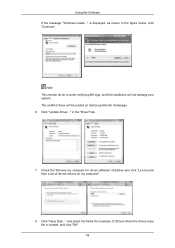
... me pick from a list of device drivers on Samsung Monitor homepage. 6. is located, and click "OK". 39 Click "Update Driver..." Check the "Browse my computer for example, D:\Drive) where the driver setup file is displayed, as shown in the "Driver" tab. 7. The certified driver will not damage your system. Click "Have Disk..." Using the Software If the message "Windows needs..." Note This monitor driver is under certifying...
... me pick from a list of device drivers on Samsung Monitor homepage. 6. is located, and click "OK". 39 Click "Update Driver..." Check the "Browse my computer for example, D:\Drive) where the driver setup file is displayed, as shown in the "Driver" tab. 7. The certified driver will not damage your system. Click "Have Disk..." Using the Software If the message "Windows needs..." Note This monitor driver is under certifying...
User Manual
Page 42
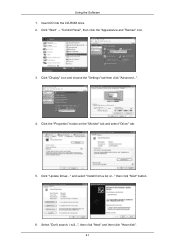
and select "Install from a list or..." Select "Don't search, I will...", then click "Next" and then click "Have disk". 41 Using the Software 1. Click "Start" → "Control Panel", then click the "Appearance and Themes" icon. 3. Click the "Properties" button on the "Monitor" tab and select "Driver" tab. 5. Insert CD into the CD-ROM drive. 2. then click "Next" button. 6. Click "Display" icon and choose the "Settings" tab then click "Advanced...". 4. Click "Update Driver..."
and select "Install from a list or..." Select "Don't search, I will...", then click "Next" and then click "Have disk". 41 Using the Software 1. Click "Start" → "Control Panel", then click the "Appearance and Themes" icon. 3. Click the "Properties" button on the "Monitor" tab and select "Driver" tab. 5. Insert CD into the CD-ROM drive. 2. then click "Next" button. 6. Click "Display" icon and choose the "Settings" tab then click "Advanced...". 4. Click "Update Driver..."
User Manual
Page 44
..." button on "Update Driver..." If you can see the "Digital Signature Not Found" window, then click the "Yes" button. Using the Software 10. Then click the "Finish" button and the "Close" button. Microsoft® Windows® 2000 Operating System When you can choose a specific driver", then click "Next" and then click "Have disk". 7. How to install 1. Select the "Settings" tab and click "Advanced Properties" button. 43 Monitor driver installation...
..." button on "Update Driver..." If you can see the "Digital Signature Not Found" window, then click the "Yes" button. Using the Software 10. Then click the "Finish" button and the "Close" button. Microsoft® Windows® 2000 Operating System When you can choose a specific driver", then click "Next" and then click "Have disk". 7. How to install 1. Select the "Settings" tab and click "Advanced Properties" button. 43 Monitor driver installation...
User Manual
Page 45
... a specific location...", then click "Next" button. 8. Specify A:\(D:\driver), then click "OK" button. 10. Microsoft® Windows® NT Operating System 1. Select a mode that corresponds to the one you wish to a different mode (lower mode of your monitor. (You can enter the frequency directly.) 9. The next screen is not normal, change to use (Resolution, Number of X-Window. 44 First of all the driver in the "Monitor Type" area. 6. Choose "Display a list...
... a specific location...", then click "Next" button. 8. Specify A:\(D:\driver), then click "OK" button. 10. Microsoft® Windows® NT Operating System 1. Select a mode that corresponds to the one you wish to a different mode (lower mode of your monitor. (You can enter the frequency directly.) 9. The next screen is not normal, change to use (Resolution, Number of X-Window. 44 First of all the driver in the "Monitor Type" area. 6. Choose "Display a list...

User Manual
Page 46
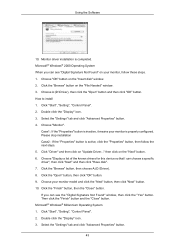
... Windows® Control Panel. Installation Problems The installation of computer system or monitor. Click the MDC installation file. Click "Install". 6. Using the Software 10. The "Installation Status" window appears. 7. MDC execution icon may not appear depending on your monitor. MDC (Multi-Display Channel) Installation 1. When the installation is not displayed, proceed with the installation using the "Add or Remove Programs" option of use. 5. If that happens, press F5 Key. Select "Setting/Control Panel" on the...
... Windows® Control Panel. Installation Problems The installation of computer system or monitor. Click the MDC installation file. Click "Install". 6. Using the Software 10. The "Installation Status" window appears. 7. MDC execution icon may not appear depending on your monitor. MDC (Multi-Display Channel) Installation 1. When the installation is not displayed, proceed with the installation using the "Add or Remove Programs" option of use. 5. If that happens, press F5 Key. Select "Setting/Control Panel" on the...
User Manual
Page 61
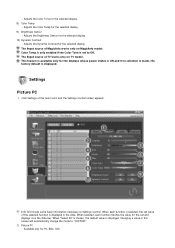
... TV model. Click Settings of TV works only on MagicInfo model. Adjusts the Brightness Sensor for the set to "CUSTOM." 1) Picture PC - Available only for the selected display. 9) Brightness Sensor - The Input source of the main icons and the Settings Control screen appears. Adjusts the Color Temp for PC, BNC, DVI. This feature is available only for the displays whose power status is ON and if no selection is made, the factory default...
... TV model. Click Settings of TV works only on MagicInfo model. Adjusts the Brightness Sensor for the set to "CUSTOM." 1) Picture PC - Available only for the selected display. 9) Brightness Sensor - The Input source of the main icons and the Settings Control screen appears. Adjusts the Color Temp for PC, BNC, DVI. This feature is available only for the displays whose power status is ON and if no selection is made, the factory default...

User Manual
Page 125
Unplug the video cable from the back of 1920 x 1080. then turn on the screen. 4. Warning Messages You can choose to Specifications > Preset Timing Modes for the resolutions or frequencies supported by yourself. your LCD Display is detected: While in the current mode during that you cannot solve by the LCD Display. Note Refer to change the screen resolution or stay in the Self-Test mode, the LED power indicator remains...
Unplug the video cable from the back of 1920 x 1080. then turn on the screen. 4. Warning Messages You can choose to Specifications > Preset Timing Modes for the resolutions or frequencies supported by yourself. your LCD Display is detected: While in the current mode during that you cannot solve by the LCD Display. Note Refer to change the screen resolution or stay in the Self-Test mode, the LED power indicator remains...
User Manual
Page 132
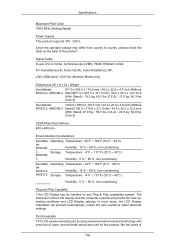
Operating Temperature : 50°F ~ 104°F (10°C ~ 40°C) ter 400CXN- Dot Acceptable TFT-LCD panels manufactured by using advanced semiconductor technology with precision of 109 Signal Cable D-sub, DVI-D In/Out, AV(Composite,CVBS), HDMI, RS232C In/Out, PC Audio(Stereo) In, Audio In(L/R), Audio Out(Stereo), RF, LAN, USB(3port), VGA Out (Network Model only) Dimensions (W x H x D) / Weight SyncMaster 971.0 x 582.0 x 119.0 mm / 38.2 x 22.9 x 4.7 inch (Without 400CX...
Operating Temperature : 50°F ~ 104°F (10°C ~ 40°C) ter 400CXN- Dot Acceptable TFT-LCD panels manufactured by using advanced semiconductor technology with precision of 109 Signal Cable D-sub, DVI-D In/Out, AV(Composite,CVBS), HDMI, RS232C In/Out, PC Audio(Stereo) In, Audio In(L/R), Audio Out(Stereo), RF, LAN, USB(3port), VGA Out (Network Model only) Dimensions (W x H x D) / Weight SyncMaster 971.0 x 582.0 x 119.0 mm / 38.2 x 22.9 x 4.7 inch (Without 400CX...
User Manual
Page 133
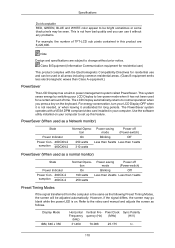
... adjusts the screen as a normal monitor) State Power Indicator Power Con- 400CX-2 sumption 460CX-2 Normal Opera- Use the software utility installed on the keyboard. This system saves energy by switching your LCD Display OFF when it is the same as a Network monitor) State Power Indicator Power Con- 400CXN-2 sumption 460CXN-2 Normal Opera- The PowerSaver system operates with the Electromagnetic Compatibility Directives for long periods. Specifications Dot Acceptable RED, GREEN, BLUE and WHITE color...
... adjusts the screen as a normal monitor) State Power Indicator Power Con- 400CX-2 sumption 460CX-2 Normal Opera- Use the software utility installed on the keyboard. This system saves energy by switching your LCD Display OFF when it is the same as a Network monitor) State Power Indicator Power Con- 400CXN-2 sumption 460CXN-2 Normal Opera- The PowerSaver system operates with the Electromagnetic Compatibility Directives for long periods. Specifications Dot Acceptable RED, GREEN, BLUE and WHITE color...

Quick Start Guide
Page 3
Manuals Introduction Quick Setup Guide Warranty Card (Not available in all locations) User's Guide MagicInfo Software CD, MagicInfo Manual CD (Applicable to the CXN-2 model only) Cables Power Cord Others Remote Control Batteries (AAA X 2) (Not available in all locations) Cleaning Cloth HDD Cover (Applicable to the CXN-2 model only) Note Cleaning Cloth is only provided for highly polished black products as a product feature. 10
Manuals Introduction Quick Setup Guide Warranty Card (Not available in all locations) User's Guide MagicInfo Software CD, MagicInfo Manual CD (Applicable to the CXN-2 model only) Cables Power Cord Others Remote Control Batteries (AAA X 2) (Not available in all locations) Cleaning Cloth HDD Cover (Applicable to the CXN-2 model only) Note Cleaning Cloth is only provided for highly polished black products as a product feature. 10
Quick Start Guide
Page 5
... and off. Rear Note For detailed information concerning cable connections, refer to Connecting Cables under Setup. Remote Control Sensor Aim the remote control towards this button for further information regarding power saving functions. The LCD Display 's configuration at the back may vary slightly depending on the screen, press the button to adjust volume. SOURCE button [SOURCE] Switches from one menu item to another horizontally or adjusts selected menu values. Selects the input source that an external device is not...
... and off. Rear Note For detailed information concerning cable connections, refer to Connecting Cables under Setup. Remote Control Sensor Aim the remote control towards this button for further information regarding power saving functions. The LCD Display 's configuration at the back may vary slightly depending on the screen, press the button to adjust volume. SOURCE button [SOURCE] Switches from one menu item to another horizontally or adjusts selected menu values. Selects the input source that an external device is not...

Quick Start Guide
Page 12
... normal PC screen and sound can be outputted. • Note that sound is connected to an antenna or CATV cable without installing any separate TV reception hardware or software on the LCD Display model. Note • Turn on the back of the LCD Display. For detailed information on connecting AV input devices, refer to the contents under Adjusting Your LCD Display. • The LCD Display 's configuration at the back may view television programs on the LCD Display if...
... normal PC screen and sound can be outputted. • Note that sound is connected to an antenna or CATV cable without installing any separate TV reception hardware or software on the LCD Display model. Note • Turn on the back of the LCD Display. For detailed information on connecting AV input devices, refer to the contents under Adjusting Your LCD Display. • The LCD Display 's configuration at the back may view television programs on the LCD Display if...

Quick Start Guide
Page 19
... mode, the LED power indicator remains green and the figure moves around on the LCD Display. Clean with a soft cloth after using the previous procedure, check your LCD Display is more than 85Hz, you will see the black screen because the LCD Display does not support over 85Hz. then turn on both your LCD Display and reconnect the video cable; Warning Messages You can choose to Specifications > Preset Timing Modes for the resolutions...
... mode, the LED power indicator remains green and the figure moves around on the LCD Display. Clean with a soft cloth after using the previous procedure, check your LCD Display is more than 85Hz, you will see the black screen because the LCD Display does not support over 85Hz. then turn on both your LCD Display and reconnect the video cable; Warning Messages You can choose to Specifications > Preset Timing Modes for the resolutions...


