
Quick Guide (ENGLISH)
Page 6
... V] (BNC/Component Connection Terminal (Input)) AV IN [VIDEO] (VIDEO Connection Terminal) Connect the [ VIDEO ] terminal of your monitor to the authorized TV-Tuner Box[SBB-DT*]. Otherwise, this to the POWER connector of the external device using a VIDEO cable. ... connecting DC-OUT terminal to the video output terminal of a TV tuner box or network box. AV AUDIO IN [L-AUDIO-R](LCD Display Audio Connection Terminal (Input)) AV AUDIO OUT [L-AUDIO-R] (LCD Display Audio Connection Terminal (Output)) BNC/COMPONENT OUT[R/PR, G/Y, B/PB, H, V] (BNC/Component Connection Terminal (Output)) BNC ...
... V] (BNC/Component Connection Terminal (Input)) AV IN [VIDEO] (VIDEO Connection Terminal) Connect the [ VIDEO ] terminal of your monitor to the authorized TV-Tuner Box[SBB-DT*]. Otherwise, this to the POWER connector of the external device using a VIDEO cable. ... connecting DC-OUT terminal to the video output terminal of a TV tuner box or network box. AV AUDIO IN [L-AUDIO-R](LCD Display Audio Connection Terminal (Input)) AV AUDIO OUT [L-AUDIO-R] (LCD Display Audio Connection Terminal (Output)) BNC/COMPONENT OUT[R/PR, G/Y, B/PB, H, V] (BNC/Component Connection Terminal (Output)) BNC ...
Quick Guide (ENGLISH)
Page 7
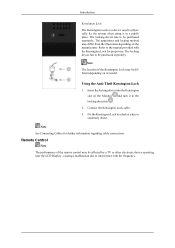
The appearance and locking method may differ from the illustration depending on the Monitor and turn it in the locking direction . 2. The locking device has to be purchased separately. Insert the locking device into the Kensington slot ... a desk or a heavy stationary object. Note The location of the remote control may be affected by a TV or other electronic device operating near the LCD Display , causing a malfunction due to interference with the Kensington Lock for further information regarding cable connections. Introduction Kensington Lock The Kensington Lock is a device used...
The appearance and locking method may differ from the illustration depending on the Monitor and turn it in the locking direction . 2. The locking device has to be purchased separately. Insert the locking device into the Kensington slot ... a desk or a heavy stationary object. Note The location of the remote control may be affected by a TV or other electronic device operating near the LCD Display , causing a malfunction due to interference with the Kensington Lock for further information regarding cable connections. Introduction Kensington Lock The Kensington Lock is a device used...

Quick Guide (ENGLISH)
Page 9
INFO 11.COLOR BUTTONS 12. RETURN Introduction The "-" button operates only for external devices that are connected to the monitor at the bottom centre of the screen. Activates a highlighted menu item. TV channels provide written information services via teletext. - ...output temporarily. This is performed. Selects the TV and DTV mode directly. Adjusts the screen display automatically in the control panel, auto function is displayed on both the remote control and the LCD Display except for a DTV. By changing the resolution in PC mode. Changing the SOURCE is used...
INFO 11.COLOR BUTTONS 12. RETURN Introduction The "-" button operates only for external devices that are connected to the monitor at the bottom centre of the screen. Activates a highlighted menu item. TV channels provide written information services via teletext. - ...output temporarily. This is performed. Selects the TV and DTV mode directly. Adjusts the screen display automatically in the control panel, auto function is displayed on both the remote control and the LCD Display except for a DTV. By changing the resolution in PC mode. Changing the SOURCE is used...

User Manual (ENGLISH)
Page 3
...• Use a cabinet or rack of a size appropriate to the product. Installation Be sure to contact an authorized Service Center when installing your monitor. age the product. Keep heating appliances as far away from the mains socket, therefore the mains plug shall be dropped and cause personal injury,... cord provided by our company. Safety Instructions Do not forcefully bend or pull the power plug and do so may cause serious damage to your monitor in a location with heavy dust, high or low temperatures, high humidity, and exposed to chemical substances and where it . • Otherwise,...
...• Use a cabinet or rack of a size appropriate to the product. Installation Be sure to contact an authorized Service Center when installing your monitor. age the product. Keep heating appliances as far away from the mains socket, therefore the mains plug shall be dropped and cause personal injury,... cord provided by our company. Safety Instructions Do not forcefully bend or pull the power plug and do so may cause serious damage to your monitor in a location with heavy dust, high or low temperatures, high humidity, and exposed to chemical substances and where it . • Otherwise,...

User Manual (ENGLISH)
Page 4
...specified wall mount. Do not spray cleaner directly onto the surface of the product. • Otherwise, this may result in damage to the screen display. When cleaning the power plug pins or dusting the power outlet, clean it down softly. • Otherwise, this may result in the internal..., soft fabric. When putting the product down, make sure to an increase in the discoloration and distortion of the TFT-LCD screen, wipe with a dry cloth. • Otherwise, it with a monitor cleaner only. Ensure that there is adjustable, do not place any object or part of more than the...
...specified wall mount. Do not spray cleaner directly onto the surface of the product. • Otherwise, this may result in damage to the screen display. When cleaning the power plug pins or dusting the power outlet, clean it down softly. • Otherwise, this may result in the internal..., soft fabric. When putting the product down, make sure to an increase in the discoloration and distortion of the TFT-LCD screen, wipe with a dry cloth. • Otherwise, it with a monitor cleaner only. Ensure that there is adjustable, do not place any object or part of more than the...

User Manual (ENGLISH)
Page 6
... volume too high. • Having the sound too loud may damage your eyesight may result in the internal temperature. Do not lift or move the monitor by a table or curtain. • Otherwise, it may result in a product malfunction, electric shock, or fire. Make sure that the ventilating opening is not blocked...
... volume too high. • Having the sound too loud may damage your eyesight may result in the internal temperature. Do not lift or move the monitor by a table or curtain. • Otherwise, it may result in a product malfunction, electric shock, or fire. Make sure that the ventilating opening is not blocked...

User Manual (ENGLISH)
Page 7
... product. • If you do not use the product for recycling. • The customer can return used battery at least five (5) minutes after using the monitor for recycling purposes. Use only the specified standardized batteries, and do not use a new battery and a used or rechargeable batteries to a nearby public recycling center...
... product. • If you do not use the product for recycling. • The customer can return used battery at least five (5) minutes after using the monitor for recycling purposes. Use only the specified standardized batteries, and do not use a new battery and a used or rechargeable batteries to a nearby public recycling center...

User Manual (ENGLISH)
Page 13
...) Connect the [ VIDEO ] terminal of your monitor to the video output terminal of a TV tuner box or network box. Introduction DC OUT [5V/1.5A] Connect this may result in damage to the product. AV AUDIO IN [L-AUDIO-R](LCD Display Audio Connection Terminal (Input)) AV AUDIO OUT [L-AUDIO-R] (LCD Display Audio Connection Terminal (Output)) BNC/COMPONENT...
...) Connect the [ VIDEO ] terminal of your monitor to the video output terminal of a TV tuner box or network box. Introduction DC OUT [5V/1.5A] Connect this may result in damage to the product. AV AUDIO IN [L-AUDIO-R](LCD Display Audio Connection Terminal (Input)) AV AUDIO OUT [L-AUDIO-R] (LCD Display Audio Connection Terminal (Output)) BNC/COMPONENT...

User Manual (ENGLISH)
Page 14
...Note See Connecting Cables for proper use. Connect the Kensington Lock cable. 3. Insert the locking device into the Kensington slot on the Monitor and turn it in the locking direction . 2. Note The location of the remote control may be different depending on the manufacturer....further information regarding cable connections. The appearance and locking method may be affected by a TV or other electronic device operating near the LCD Display , causing a malfunction due to be purchased separately. Remote Control Note The performance of the Kensington Lock may differ from the ...
...Note See Connecting Cables for proper use. Connect the Kensington Lock cable. 3. Insert the locking device into the Kensington slot on the Monitor and turn it in the locking direction . 2. Note The location of the remote control may be different depending on the manufacturer....further information regarding cable connections. The appearance and locking method may be affected by a TV or other electronic device operating near the LCD Display , causing a malfunction due to be purchased separately. Remote Control Note The performance of the Kensington Lock may differ from the ...

User Manual (ENGLISH)
Page 16
... a built-in PC mode. Changing the SOURCE is used to return to select MMS (multi-channel) for external devices that are connected to the monitor at the bottom centre of the screen. In TV mode, selects TV channels. It is only allowed for a DTV. The audio resumes if MUTE... the control panel, auto function is pressed in the "Channel List" menu. Activates or deactivates all function keys on -screen menu and exits from the menu or closes the adjustment menu. This button is displayed at the time. 4. Opens the on both the remote control and the LCD Display except for ...
... a built-in PC mode. Changing the SOURCE is used to return to select MMS (multi-channel) for external devices that are connected to the monitor at the bottom centre of the screen. In TV mode, selects TV channels. It is only allowed for a DTV. The audio resumes if MUTE... the control panel, auto function is pressed in the "Channel List" menu. Activates or deactivates all function keys on -screen menu and exits from the menu or closes the adjustment menu. This button is displayed at the time. 4. Opens the on both the remote control and the LCD Display except for ...
User Manual (ENGLISH)
Page 29
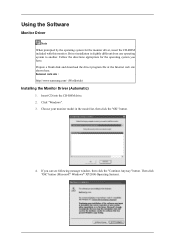
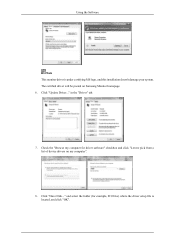
...the directions appropriate for the monitor driver, insert the CD-ROM included with this monitor. Click "Windows". 3. Prepare a blank disk and download the driver program file at the Internet web site shown here. Internet web site : http://www.samsung.com/ (Worldwide) Installing the Monitor Driver (Automatic) 1. ...Insert CD into the CD-ROM drive. 2. If you have. Using the Software Monitor Driver Note When prompted by the operating system for the operating ...
...the directions appropriate for the monitor driver, insert the CD-ROM included with this monitor. Click "Windows". 3. Prepare a blank disk and download the driver program file at the Internet web site shown here. Internet web site : http://www.samsung.com/ (Worldwide) Installing the Monitor Driver (Automatic) 1. ...Insert CD into the CD-ROM drive. 2. If you have. Using the Software Monitor Driver Note When prompted by the operating system for the operating ...
User Manual (ENGLISH)
Page 30
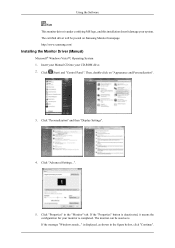
... "Display Settings". 4. The monitor can be posted on "Appearance and Personalization". 3. Insert your Manual CD into your system. The certified driver will be used as shown in the "Monitor" tab. http://www.samsung.com/ Installing the Monitor Driver (Manual) Microsoft® Windows Vista™, Operating System 1. Click (Start) and "Control Panel". Then, double-click on Samsung Monitor homepage...
... "Display Settings". 4. The monitor can be posted on "Appearance and Personalization". 3. Insert your Manual CD into your system. The certified driver will be used as shown in the "Monitor" tab. http://www.samsung.com/ Installing the Monitor Driver (Manual) Microsoft® Windows Vista™, Operating System 1. Click (Start) and "Control Panel". Then, double-click on Samsung Monitor homepage...
User Manual (ENGLISH)
Page 31
The certified driver will be posted on my computer". 8. Using the Software Note This monitor driver is located, and click "OK". in the "Driver" tab. 7. Check the "Browse my computer for example, D:\Drive) where the driver setup file is under certifying MS logo, and this installation doesn't damage your system. Click "Have Disk..." and select the folder (for driver software" checkbox and click "Let me pick from a list of device drivers on Samsung Monitor homepage. 6. Click "Update Driver..."
The certified driver will be posted on my computer". 8. Using the Software Note This monitor driver is located, and click "OK". in the "Driver" tab. 7. Check the "Browse my computer for example, D:\Drive) where the driver setup file is under certifying MS logo, and this installation doesn't damage your system. Click "Have Disk..." and select the folder (for driver software" checkbox and click "Let me pick from a list of device drivers on Samsung Monitor homepage. 6. Click "Update Driver..."

User Manual (ENGLISH)
Page 32
Select the model that matches your monitor from the list of monitor models on the following screens displayed in sequence. Microsoft® Windows® XP Operating System Using the Software 9. Click "Close" → "Close" → "OK" → "OK" on the screen, and click "Next". 10.
Select the model that matches your monitor from the list of monitor models on the following screens displayed in sequence. Microsoft® Windows® XP Operating System Using the Software 9. Click "Close" → "Close" → "OK" → "OK" on the screen, and click "Next". 10.

User Manual (ENGLISH)
Page 33
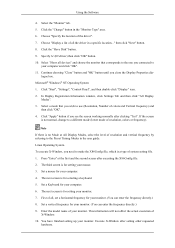
Click "Display" icon and choose the "Settings" tab then click "Advanced...". 4. then click "Next" button. 6. Click "Start" → "Control Panel" then click the "Appearance and Themes" icon. 3. Select "Don't search, I will..." and select "Install from a list or..." Click the "Properties" button on the "Monitor" tab and select "Driver" tab. 5. Click "Update Driver..." then click "Next" and then click "Have disk". Insert CD into the CD-ROM drive. 2. Using the Software 1.
Click "Display" icon and choose the "Settings" tab then click "Advanced...". 4. then click "Next" button. 6. Click "Start" → "Control Panel" then click the "Appearance and Themes" icon. 3. Select "Don't search, I will..." and select "Install from a list or..." Click the "Properties" button on the "Monitor" tab and select "Driver" tab. 5. Click "Update Driver..." then click "Next" and then click "Have disk". Insert CD into the CD-ROM drive. 2. Using the Software 1.

User Manual (ENGLISH)
Page 34
Note This monitor driver is under certifying MS logo, and this installation doesn't damage your monitor model in the model list and click the "Next" button. 8. Click the "Close" button then click "OK" button continually. Then click "OK" button. Click the "Browse" button then choose A:(D:\Driver) and choose your system. If you can see following message window, then click the "Continue Anyway" button. The certified driver will be posted on Samsung Monitor homepage. http://www.samsung.com/ 9. Using the Software 7.
Note This monitor driver is under certifying MS logo, and this installation doesn't damage your monitor model in the model list and click the "Next" button. 8. Click the "Close" button then click "OK" button continually. Then click "OK" button. Click the "Browse" button then choose A:(D:\Driver) and choose your system. If you can see following message window, then click the "Continue Anyway" button. The certified driver will be posted on Samsung Monitor homepage. http://www.samsung.com/ 9. Using the Software 7.

User Manual (ENGLISH)
Page 35
... Panel". 2. then click on the "File Needed" window. 3. Monitor driver installation is active, click the "Properties" button then follow these steps. 1. Please stop installation Case2 : If the "Properties" button is completed. Click the "Browse" button then choose A:(D:\Driver). 8. Choose your monitor... I can see "Digital Signature Not Found" on your monitor, follow next steps continually. 5. Microsoft® Windows® Millennium Operating System 1. Choose "OK" button on "Update Driver..." Double click the "Display" icon. 3. Click the "Finish" button then the ...
... Panel". 2. then click on the "File Needed" window. 3. Monitor driver installation is active, click the "Properties" button then follow these steps. 1. Please stop installation Case2 : If the "Properties" button is completed. Click the "Browse" button then choose A:(D:\Driver). 8. Choose your monitor... I can see "Digital Signature Not Found" on your monitor, follow next steps continually. 5. Microsoft® Windows® Millennium Operating System 1. Choose "OK" button on "Update Driver..." Double click the "Display" icon. 3. Click the "Finish" button then the ...
User Manual (ENGLISH)
Page 36
...after executing the X86Config file. 2. Set a vertical frequency for setting your computer. 4. Execute X-Window after clicking "Test". Select the "Monitor" tab. 5. Microsoft® Windows® NT Operating System 1. Select "Show all the driver in a specific location..." Continue choosing "... system setting file. 1. First of X-Window. 10. Click the "Have Disk" button. 9. Click "Start", "Settings", "Control Panel", and then double-click "Display" icon. 2. Enter the model name of the driver". 7. then click "Next" button. 8. logue box. Click the "Change...
...after executing the X86Config file. 2. Set a vertical frequency for setting your computer. 4. Execute X-Window after clicking "Test". Select the "Monitor" tab. 5. Microsoft® Windows® NT Operating System 1. Select "Show all the driver in a specific location..." Continue choosing "... system setting file. 1. First of X-Window. 10. Click the "Have Disk" button. 9. Click "Start", "Settings", "Control Panel", and then double-click "Display" icon. 2. Enter the model name of the driver". 7. then click "Next" button. 8. logue box. Click the "Change...

User Manual (ENGLISH)
Page 53
...and Eraser types, it can select and control with this function. Click on the "Maintenance" icon in hour units and the Time item is displayed on the selected display for a long time. For the Scroll type, the Time item can be set to 1, 2, 3, 4 or 5. The Maintenance Control ...Screen2 - This allows the screen to be set to prevent afterimages from occurring. There are five (5) types that occur when a still screen is displayed on the monitor for a long time. 2) Pixel Shift - The Input source of TV works only on MagicInfo model. The Input source of MagicInfo works only ...
...and Eraser types, it can select and control with this function. Click on the "Maintenance" icon in hour units and the Time item is displayed on the selected display for a long time. For the Scroll type, the Time item can be set to 1, 2, 3, 4 or 5. The Maintenance Control ...Screen2 - This allows the screen to be set to prevent afterimages from occurring. There are five (5) types that occur when a still screen is displayed on the monitor for a long time. 2) Pixel Shift - The Input source of TV works only on MagicInfo model. The Input source of MagicInfo works only ...

User Manual (ENGLISH)
Page 94
mended. Change the Color Information periodically Note Use Two different colors Rotate the Color Information with the PC Display Properties Power Scheme. • Use a Screen saver if possible - Information Power Off, Screen Saver, or Power Save Mode • Turn the power off for 2 hours after 12 hours in one color or a moving image is recom- Screen saver in use • Set the Monitor to power off for 4 hours after 20 hours in use • Turn the power off with 2 different colors every 30 minutes.
mended. Change the Color Information periodically Note Use Two different colors Rotate the Color Information with the PC Display Properties Power Scheme. • Use a Screen saver if possible - Information Power Off, Screen Saver, or Power Save Mode • Turn the power off for 2 hours after 12 hours in one color or a moving image is recom- Screen saver in use • Set the Monitor to power off for 4 hours after 20 hours in use • Turn the power off with 2 different colors every 30 minutes.

