
Quick Guide (ENGLISH)
Page 2
Package Contents Please make sure the following items are missing, contact your monitor. Contact a local dealer to buy optional items. Unpacking Without Stand With Stand Monitor Manual Monitor & Sliding Stand If any items are included with your dealer.
Package Contents Please make sure the following items are missing, contact your monitor. Contact a local dealer to buy optional items. Unpacking Without Stand With Stand Monitor Manual Monitor & Sliding Stand If any items are included with your dealer.

Quick Guide (ENGLISH)
Page 7
...locking device has to the Y, PB,PR input ports using a locking device, contact where you have to connect the UP (Upstream Cable ) to connect the monitor's UP port and your computer's USB port. DOWN (USB downstream port) : Connect the DOWN port of the computer with the USB cable. See Connecting Cables...z Remove the fixing pin on the stand to hear audio from the HDMI screen. Make sure to use DOWN (Downstream Port), you purchase it. UP (USB upstream port) : Connect the UP port of the monitor and the USB port of the USB monitor and a USB device with this monitor to the PC. To use...
...locking device has to the Y, PB,PR input ports using a locking device, contact where you have to connect the UP (Upstream Cable ) to connect the monitor's UP port and your computer's USB port. DOWN (USB downstream port) : Connect the DOWN port of the computer with the USB cable. See Connecting Cables...z Remove the fixing pin on the stand to hear audio from the HDMI screen. Make sure to use DOWN (Downstream Port), you purchase it. UP (USB upstream port) : Connect the UP port of the monitor and the USB port of the USB monitor and a USB device with this monitor to the PC. To use...
Quick Guide (ENGLISH)
Page 12
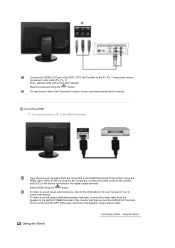
Then, start the DVD with a DVD disc inserted. Input devices such as digital DVD are completed, connect the power cords for the monitor and DVD (or the device connected to the PR, PB, Y input ports using a component video cable (PR, PB, Y). When all the connections are connected to... to the Connection section of the speaker using a stereo cable. To hear sound, refer to the AUDIO POWER terminal of the monitor and then connect the AUDIO OUT terminal of the monitor and the SPK (light green) terminal of your conncted external device manual . Select HDMI using the ' ' button. Using the...
Then, start the DVD with a DVD disc inserted. Input devices such as digital DVD are completed, connect the power cords for the monitor and DVD (or the device connected to the PR, PB, Y input ports using a component video cable (PR, PB, Y). When all the connections are connected to... to the Connection section of the speaker using a stereo cable. To hear sound, refer to the AUDIO POWER terminal of the monitor and then connect the AUDIO OUT terminal of the monitor and the SPK (light green) terminal of your conncted external device manual . Select HDMI using the ' ' button. Using the...

Quick Guide (ENGLISH)
Page 13
Rotating the monitor (When pivoting the monitor, rotation angle is displayed on screen of the monitor.) 0° 90° When rotating the screen, make sure to tilt the monitor 45 to 65 degrees so that it more than 65 degrees. When tilting the screen backwards, do not tilt it does not touch the floor. Sliding stand Stand Stopper
Rotating the monitor (When pivoting the monitor, rotation angle is displayed on screen of the monitor.) 0° 90° When rotating the screen, make sure to tilt the monitor 45 to 65 degrees so that it more than 65 degrees. When tilting the screen backwards, do not tilt it does not touch the floor. Sliding stand Stand Stopper

Quick Guide (ENGLISH)
Page 14
When you try to rotate the monitor in the state of 3° forward to avoid the monitor slide. Swivel stand Using ( ),You can swivel the monitor left and right at an angle of 350° to the monitor, the power cord of cable can adjust the tilt anlgle within a range of the power cord or cable connecting to set the monitor lengthwise. The rubber under the stand is to 25° backward for the most comfortable viewing angle. Attaching a Base This monitor accepts a 200 mm x 100 mm VESA-compliant Mounting interface pad. Tilt angle Using ( ), You can be destroyed.
When you try to rotate the monitor in the state of 3° forward to avoid the monitor slide. Swivel stand Using ( ),You can swivel the monitor left and right at an angle of 350° to the monitor, the power cord of cable can adjust the tilt anlgle within a range of the power cord or cable connecting to set the monitor lengthwise. The rubber under the stand is to 25° backward for the most comfortable viewing angle. Attaching a Base This monitor accepts a 200 mm x 100 mm VESA-compliant Mounting interface pad. Tilt angle Using ( ), You can be destroyed.

Quick Guide (ENGLISH)
Page 15
Remove four screws and then remove the stand from the wall surface. z Contact the nearest Samsung Service Center for product damage or personal injury when a non-VESA or non-specified wall mount is used or the consumer fails to follow the ... of the screws may differ depending on a wall, you to protect the screen. 3. z Samsung is not liable for damages caused by using a base other base. Samsung Electronics will not be responsible for these kinds of accidents. Lay the LCD monitor face-down on a flat surface with the VESA standard screw specifications. z Do not use...
Remove four screws and then remove the stand from the wall surface. z Contact the nearest Samsung Service Center for product damage or personal injury when a non-VESA or non-specified wall mount is used or the consumer fails to follow the ... of the screws may differ depending on a wall, you to protect the screen. 3. z Samsung is not liable for damages caused by using a base other base. Samsung Electronics will not be responsible for these kinds of accidents. Lay the LCD monitor face-down on a flat surface with the VESA standard screw specifications. z Do not use...

User Manual (ENGLISH)
Page 9
...to your back straight. Using the product in a location prone to vibrations may cause heat emission from slightly above it . Good Postures When Using the Monitor Try to catch fire. z Keep your armpits. z Keep a distance of the product or may cause your arms level with the back of children's ... fall , causing injury or even fatality. z Keep the angle of you. When moving the monitor, do not lift the monitor upside down while holding only the stand. Place the product out of your A falling product may cause damage to the product or the person carrying it and cause fire or ...
...to your back straight. Using the product in a location prone to vibrations may cause heat emission from slightly above it . Good Postures When Using the Monitor Try to catch fire. z Keep your armpits. z Keep a distance of the product or may cause your arms level with the back of children's ... fall , causing injury or even fatality. z Keep the angle of you. When moving the monitor, do not lift the monitor upside down while holding only the stand. Place the product out of your A falling product may cause damage to the product or the person carrying it and cause fire or ...

User Manual (ENGLISH)
Page 13
Package Contents Please make sure the following items are missing, contact your monitor. Contact a local dealer to buy optional items. Unpacking Without Stand With Stand Monitor Manual Monitor & Sliding Stand Warranty Card User's Guide, Monitor Driver, If any items are included with your dealer.
Package Contents Please make sure the following items are missing, contact your monitor. Contact a local dealer to buy optional items. Unpacking Without Stand With Stand Monitor Manual Monitor & Sliding Stand Warranty Card User's Guide, Monitor Driver, If any items are included with your dealer.

User Manual (ENGLISH)
Page 18
See Connecting Cables for further information regarding cable connections. Stand Stopper z Remove the fixing pin on the stand to be purchased separately.) For using a locking device, contact where you purchase it. system when using it in a public place. (The locking device has to lift the monitor up and down.
See Connecting Cables for further information regarding cable connections. Stand Stopper z Remove the fixing pin on the stand to be purchased separately.) For using a locking device, contact where you purchase it. system when using it in a public place. (The locking device has to lift the monitor up and down.

User Manual (ENGLISH)
Page 23
...Input devices such as digital DVD are completed, connect the power cords for the monitor and DVD (or the device connected to your monitor using an HDMI cable, you must connect the AUDIO OUT terminal of the monitor using a stereo cable to the HDMI IN terminal of your conncted external device ...manual . Using the Stand Rotating the monitor Then, start the DVD with a DVD disc inserted. Select Component using the ' ' button. When all the ...
...Input devices such as digital DVD are completed, connect the power cords for the monitor and DVD (or the device connected to your monitor using an HDMI cable, you must connect the AUDIO OUT terminal of the monitor using a stereo cable to the HDMI IN terminal of your conncted external device ...manual . Using the Stand Rotating the monitor Then, start the DVD with a DVD disc inserted. Select Component using the ' ' button. When all the ...

User Manual (ENGLISH)
Page 24
Sliding stand Stand Stopper When tilting the screen backwards, do not tilt it does not touch the floor. (When pivoting the monitor, rotation angle is displayed on screen of the monitor.) 0° 90° When rotating the screen, make sure to tilt the monitor 45 to 65 degrees so that it more than 65 degrees.
Sliding stand Stand Stopper When tilting the screen backwards, do not tilt it does not touch the floor. (When pivoting the monitor, rotation angle is displayed on screen of the monitor.) 0° 90° When rotating the screen, make sure to tilt the monitor 45 to 65 degrees so that it more than 65 degrees.

User Manual (ENGLISH)
Page 25
Tilt angle Using ( ), You can be destroyed. Attaching a Base This monitor accepts a 200 mm x 100 mm VESA-compliant Mounting interface pad. When you try to rotate the monitor in the state of the power cord or cable connecting to the monitor, the power cord of cable can adjust the tilt anlgle within a range of 90° to avoid the monitor slide. Swivel stand Using ( ),You can swivel the monitor left and right at an angle of 3° forward to 25° backward for the most comfortable viewing angle. The rubber under the stand is to set the monitor lengthwise.
Tilt angle Using ( ), You can be destroyed. Attaching a Base This monitor accepts a 200 mm x 100 mm VESA-compliant Mounting interface pad. When you try to rotate the monitor in the state of the power cord or cable connecting to the monitor, the power cord of cable can adjust the tilt anlgle within a range of 90° to avoid the monitor slide. Swivel stand Using ( ),You can swivel the monitor left and right at an angle of 3° forward to 25° backward for the most comfortable viewing angle. The rubber under the stand is to set the monitor lengthwise.

User Manual (ENGLISH)
Page 26
...monitor at least 10cm away from the LCD monitor. 4. Remove four screws and then remove the stand from the wall surface. z To mount the monitor on a flat surface with VESA standard screw specifications, the length of accidents. Turn off your monitor and unplug its power cord. 2. z Contact the nearest Samsung... mount is not liable for these kinds of the screws may differ depending on their specifications. Samsung Electronics will not be responsible for more information. Lay the LCD monitor face-down on a wall, you should purchase the wall mounting kit that came with the ...
...monitor at least 10cm away from the LCD monitor. 4. Remove four screws and then remove the stand from the wall surface. z To mount the monitor on a flat surface with VESA standard screw specifications, the length of accidents. Turn off your monitor and unplug its power cord. 2. z Contact the nearest Samsung... mount is not liable for these kinds of the screws may differ depending on their specifications. Samsung Electronics will not be responsible for more information. Lay the LCD monitor face-down on a wall, you should purchase the wall mounting kit that came with the ...

User Manual (ENGLISH)
Page 58
...installed in this feature. Interaction of TFT LCD sub pixels that is used in all areas including common residential areas. (Class B equipment emits less electromagnetic waves than Class A equipment.) PowerSaver This monitor has a built-in power management system called..., Component Dimensions (W x H x D) / Weight 560.5 X 369.0 X 91.0 mm / 22.1 x 14.5 x 3.6 inch (Without Stand) 560.5 X 460.0 X 250.0 mm / 22.1 x 18.1 x 9.8 inch (With Stand) / 8.8 kg / 19.4 lbs VESA Mounting Interface 200 mm x 100 mm Environmental considerations Operating Storage Temperature: 50°F ~ 104°F ...
...installed in this feature. Interaction of TFT LCD sub pixels that is used in all areas including common residential areas. (Class B equipment emits less electromagnetic waves than Class A equipment.) PowerSaver This monitor has a built-in power management system called..., Component Dimensions (W x H x D) / Weight 560.5 X 369.0 X 91.0 mm / 22.1 x 14.5 x 3.6 inch (Without Stand) 560.5 X 460.0 X 250.0 mm / 22.1 x 18.1 x 9.8 inch (With Stand) / 8.8 kg / 19.4 lbs VESA Mounting Interface 200 mm x 100 mm Environmental considerations Operating Storage Temperature: 50°F ~ 104°F ...


