
Quick Guide (ENGLISH)
Page 2
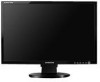
If any items are included with your dealer. Contact a local dealer to buy optional items. Unpacking Without Stand With Stand Monitor Manual Monitor & Sliding Stand Package Contents Please make sure the following items are missing, contact your monitor.
If any items are included with your dealer. Contact a local dealer to buy optional items. Unpacking Without Stand With Stand Monitor Manual Monitor & Sliding Stand Package Contents Please make sure the following items are missing, contact your monitor.

Quick Guide (ENGLISH)
Page 6
AUDIO POWER z Connect the speaker power line connected to the speaker to the AUDIO POWER terminal of your monitor to your computer. Stand Stopper z Remove the fixing pin on the stand to lift the monitor up and down. RGB IN : Connect the RGB IN terminal at the back of the monitor Kensington Lock z The Kensington lock is a device used to physically fix the system when using it in a public place. (The locking device has to be purchased separately.) For using a locking device, contact where you purchase it. See Connecting Cables for further information regarding cable connections.
AUDIO POWER z Connect the speaker power line connected to the speaker to the AUDIO POWER terminal of your monitor to your computer. Stand Stopper z Remove the fixing pin on the stand to lift the monitor up and down. RGB IN : Connect the RGB IN terminal at the back of the monitor Kensington Lock z The Kensington lock is a device used to physically fix the system when using it in a public place. (The locking device has to be purchased separately.) For using a locking device, contact where you purchase it. See Connecting Cables for further information regarding cable connections.

Quick Guide (ENGLISH)
Page 9
It is to avoid the monitor slide. The rubber under the stand is connected to set the monitor lengthwise. This speaker is not connected to the monitor, the power cord of cable can swivel the monitor left and right at an angle of the monitor. Using the Stand Sliding stand Stand Stopper Swivel stand Using ( ),You can be destroyed. Connect the...
It is to avoid the monitor slide. The rubber under the stand is connected to set the monitor lengthwise. This speaker is not connected to the monitor, the power cord of cable can swivel the monitor left and right at an angle of the monitor. Using the Stand Sliding stand Stand Stopper Swivel stand Using ( ),You can be destroyed. Connect the...

Quick Guide (ENGLISH)
Page 10
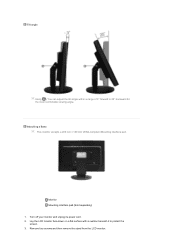
Tilt angle Using ( ), You can adjust the tilt anlgle within a range of 3° forward to protect the screen. 3. Attaching a Base This monitor accepts a 200 mm x 100 mm VESA-compliant Mounting interface pad. Remove four screws and then remove the stand from the LCD monitor. Turn off your monitor and unplug its power cord. 2. Lay the LCD monitor face-down on a flat surface with a cushion beneath it to 25° backward for the most comfortable viewing angle. Monitor Mounting interface pad (Sold separately) 1.
Tilt angle Using ( ), You can adjust the tilt anlgle within a range of 3° forward to protect the screen. 3. Attaching a Base This monitor accepts a 200 mm x 100 mm VESA-compliant Mounting interface pad. Remove four screws and then remove the stand from the LCD monitor. Turn off your monitor and unplug its power cord. 2. Lay the LCD monitor face-down on a flat surface with a cushion beneath it to 25° backward for the most comfortable viewing angle. Monitor Mounting interface pad (Sold separately) 1.

Quick Guide (ENGLISH)
Page 2
If any items are included with your dealer. Contact a local dealer to buy optional items. Unpacking Without Stand With Stand Monitor Manual Monitor & Sliding Stand Package Contents Please make sure the following items are missing, contact your monitor.
If any items are included with your dealer. Contact a local dealer to buy optional items. Unpacking Without Stand With Stand Monitor Manual Monitor & Sliding Stand Package Contents Please make sure the following items are missing, contact your monitor.

Quick Guide (ENGLISH)
Page 6
... the fixing pin on the stand to your computer. See Connecting Cables for further information regarding cable connections. RGB IN : Connect the RGB IN terminal at the back of the monitor Kensington Lock z The Kensington lock is a device used to physically fix the system when using it in a public place. (The locking... a locking device, contact where you purchase it. AUDIO POWER z Connect the speaker power line connected to the speaker to the AUDIO POWER terminal of your monitor to lift the monitor up and down.
... the fixing pin on the stand to your computer. See Connecting Cables for further information regarding cable connections. RGB IN : Connect the RGB IN terminal at the back of the monitor Kensington Lock z The Kensington lock is a device used to physically fix the system when using it in a public place. (The locking... a locking device, contact where you purchase it. AUDIO POWER z Connect the speaker power line connected to the speaker to the AUDIO POWER terminal of your monitor to lift the monitor up and down.

Quick Guide (ENGLISH)
Page 9
... power cord or cable connecting to the monitor, the power cord of cable can swivel the monitor left and right at an angle of the monitor. Using the Stand Sliding stand Stand Stopper Swivel stand Using ( ),You can be destroyed. The rubber under the stand is not connected to avoid the monitor slide. This speaker is to an external...
... power cord or cable connecting to the monitor, the power cord of cable can swivel the monitor left and right at an angle of the monitor. Using the Stand Sliding stand Stand Stopper Swivel stand Using ( ),You can be destroyed. The rubber under the stand is not connected to avoid the monitor slide. This speaker is to an external...

Quick Guide (ENGLISH)
Page 10
Turn off your monitor and unplug its power cord. 2. Remove four screws and then remove the stand from the LCD monitor. Lay the LCD monitor face-down on a flat surface with a cushion beneath it to 25° backward for the most comfortable viewing angle. Monitor Mounting interface pad (Sold separately) 1. Attaching a Base This monitor accepts a 200 mm x 100 mm VESA-compliant Mounting interface pad. Tilt angle Using ( ), You can adjust the tilt anlgle within a range of 3° forward to protect the screen. 3.
Turn off your monitor and unplug its power cord. 2. Remove four screws and then remove the stand from the LCD monitor. Lay the LCD monitor face-down on a flat surface with a cushion beneath it to 25° backward for the most comfortable viewing angle. Monitor Mounting interface pad (Sold separately) 1. Attaching a Base This monitor accepts a 200 mm x 100 mm VESA-compliant Mounting interface pad. Tilt angle Using ( ), You can adjust the tilt anlgle within a range of 3° forward to protect the screen. 3.

User Manual (ENGLISH)
Page 9
...interest on the product to maintain a good posture when using the product for an extended period of the monitor is below eye level. Otherwise, this may damage it , and have the monitor directly in front of the elbow perpendicular. z Keep the angle of the knees at the screen from... degraded insulation, causing electric shock or fire. z Keep a distance of your eyes and the monitor screen. Do not let your back straight. When moving the monitor, do not lift the monitor upside down while holding only the stand. Children may try to climb on the product. z Keep the angle of you.
...interest on the product to maintain a good posture when using the product for an extended period of the monitor is below eye level. Otherwise, this may damage it , and have the monitor directly in front of the elbow perpendicular. z Keep the angle of the knees at the screen from... degraded insulation, causing electric shock or fire. z Keep a distance of your eyes and the monitor screen. Do not let your back straight. When moving the monitor, do not lift the monitor upside down while holding only the stand. Children may try to climb on the product. z Keep the angle of you.

User Manual (ENGLISH)
Page 13
Contact a local dealer to buy optional items. Unpacking Without Stand With Stand Monitor Manual Monitor & Sliding Stand Package Contents Please make sure the following items are missing, contact your monitor. If any items are included with your dealer.
Contact a local dealer to buy optional items. Unpacking Without Stand With Stand Monitor Manual Monitor & Sliding Stand Package Contents Please make sure the following items are missing, contact your monitor. If any items are included with your dealer.

User Manual (ENGLISH)
Page 17
AUDIO POWER z Connect the speaker power line connected to the speaker to the AUDIO POWER terminal of your monitor to your computer. See Connecting Cables for further information regarding cable connections. Stand Stopper z Remove the fixing pin on the stand to lift the monitor up and down. RGB IN : Connect the RGB IN terminal at the back of the monitor Kensington Lock z The Kensington lock is a device used to physically fix the system when using it in a public place. (The locking device has to be purchased separately.) For using a locking device, contact where you purchase it.
AUDIO POWER z Connect the speaker power line connected to the speaker to the AUDIO POWER terminal of your monitor to your computer. See Connecting Cables for further information regarding cable connections. Stand Stopper z Remove the fixing pin on the stand to lift the monitor up and down. RGB IN : Connect the RGB IN terminal at the back of the monitor Kensington Lock z The Kensington lock is a device used to physically fix the system when using it in a public place. (The locking device has to be purchased separately.) For using a locking device, contact where you purchase it.

User Manual (ENGLISH)
Page 20
The rubber under the stand is to the black terminal of 350° to set the monitor lengthwise. Connect the power line connected to the speaker to avoid the monitor slide. When you try to rotate the monitor in the figure below, the speaker turns on and the volume increases. This ...part ( + , - ) in the direction shown in the state of the power cord or cable connecting to the monitor, the power cord of cable can swivel the monitor left and right at an angle of the monitor. Using the Stand Sliding stand Stand Stopper Swivel stand Using ( ),You can be destroyed. It is not connected to...
The rubber under the stand is to the black terminal of 350° to set the monitor lengthwise. Connect the power line connected to the speaker to avoid the monitor slide. When you try to rotate the monitor in the figure below, the speaker turns on and the volume increases. This ...part ( + , - ) in the direction shown in the state of the power cord or cable connecting to the monitor, the power cord of cable can swivel the monitor left and right at an angle of the monitor. Using the Stand Sliding stand Stand Stopper Swivel stand Using ( ),You can be destroyed. It is not connected to...
User Manual (ENGLISH)
Page 21
Monitor Mounting interface pad (Sold separately) 1. Remove four screws and then remove the stand from the LCD monitor. Lay the LCD monitor face-down on a flat surface with a cushion beneath it to 25° backward for the most comfortable viewing angle. Turn off your monitor and unplug its power cord. 2. Tilt angle Using ( ), You can adjust the tilt anlgle within a range of 3° forward to protect the screen. 3. Attaching a Base This monitor accepts a 200 mm x 100 mm VESA-compliant Mounting interface pad.
Monitor Mounting interface pad (Sold separately) 1. Remove four screws and then remove the stand from the LCD monitor. Lay the LCD monitor face-down on a flat surface with a cushion beneath it to 25° backward for the most comfortable viewing angle. Turn off your monitor and unplug its power cord. 2. Tilt angle Using ( ), You can adjust the tilt anlgle within a range of 3° forward to protect the screen. 3. Attaching a Base This monitor accepts a 200 mm x 100 mm VESA-compliant Mounting interface pad.

User Manual (ENGLISH)
Page 48
... and can be installed on the keyboard. In most cases, monitor installation will provide the best operating conditions and monitor settings. Dot Acceptable TFT LCD panel manufactured by switching your monitor into a low-power mode when it is not from bad ...system. The monitor automatically returns to DVI-D connector, Detachable (not supplied) Signal Connectors 15pin 3-row D-sub connector, 24pin 3-row DVI-D connector Dimensions (W x H x D) / Weight 560.0 X 368.5 X 83.0 mm / 22.0 x 14.5 x 3.3 inch (Without Stand) 560.0 X 444.5 X 250.0 mm / 22.0 x 17.5 x 9.8 inch (With Stand) / 8.4 ...
... and can be installed on the keyboard. In most cases, monitor installation will provide the best operating conditions and monitor settings. Dot Acceptable TFT LCD panel manufactured by switching your monitor into a low-power mode when it is not from bad ...system. The monitor automatically returns to DVI-D connector, Detachable (not supplied) Signal Connectors 15pin 3-row D-sub connector, 24pin 3-row DVI-D connector Dimensions (W x H x D) / Weight 560.0 X 368.5 X 83.0 mm / 22.0 x 14.5 x 3.3 inch (Without Stand) 560.0 X 444.5 X 250.0 mm / 22.0 x 17.5 x 9.8 inch (With Stand) / 8.4 ...


