User Manual (KOREAN)
Page 38
AUTO ( OSD OSD OSD OSD OSD AUTO OSD OSD AUTO OSD 37
AUTO ( OSD OSD OSD OSD OSD AUTO OSD OSD AUTO OSD 37

Quick Guide (ENGLISH)
Page 5
Front Introduction Note Touch them . Also use them lightly with your preferences. Note You can customize key assignment for a required function via Setup > Customized Key. Adjust buttons [ ] These buttons allow you to adjust brightness. 11 Brightness button [ ] When OSD is not on -screen menu and exits from the menu. MENU button [MENU/ ] Opens the on the screen, push the button to adjust items in the menu. Customized Key[ ] You can configure the customized key for the Custom button according to your fingers to use to exit the OSD menu or return to the previous menu.
Front Introduction Note Touch them . Also use them lightly with your preferences. Note You can customize key assignment for a required function via Setup > Customized Key. Adjust buttons [ ] These buttons allow you to adjust brightness. 11 Brightness button [ ] When OSD is not on -screen menu and exits from the menu. MENU button [MENU/ ] Opens the on the screen, push the button to adjust items in the menu. Customized Key[ ] You can configure the customized key for the Custom button according to your fingers to use to exit the OSD menu or return to the previous menu.
Quick Guide (ENGLISH)
Page 6
For energy conservation, turn your monitor to the models that have speakers only. Volume button[ ] When OSD is not on and off . (When the ' ' button is pressed to adjust volume. AUTO button Use this button for auto adjustment. (Available in Analog mode ... available for further information regarding power saving functions. analog or digital input signal.) Note • If you select the digital mode, you must connect your monitor OFF when it is not needed or when leaving it unattended for turning the product on the screen, push the button to change the input...
For energy conservation, turn your monitor to the models that have speakers only. Volume button[ ] When OSD is not on and off . (When the ' ' button is pressed to adjust volume. AUTO button Use this button for auto adjustment. (Available in Analog mode ... available for further information regarding power saving functions. analog or digital input signal.) Note • If you select the digital mode, you must connect your monitor OFF when it is not needed or when leaving it unattended for turning the product on the screen, push the button to change the input...
Quick Guide (ENGLISH)
Page 17
... video cable from the back of scan range or that allows you to check the signal cable. your monitor is not shown in the Warning Message OSD. 47 The message may indicate that the monitor is out of the computer. 3. Turn off both your video controller and computer system; Note For models with...
... video cable from the back of scan range or that allows you to check the signal cable. your monitor is not shown in the Warning Message OSD. 47 The message may indicate that the monitor is out of the computer. 3. Turn off both your video controller and computer system; Note For models with...
Quick Guide (ENGLISH)
Page 19
...from the video card exceeds the maximum resolution and frequency that the monitor can handle properly. Then press any key on the keyboard again to the video card manual. 49 A: Unlock the OSD by referring to activate the monitor and restore the image on the screen. A: Reboot the computer.... Q: Has the video card been set properly? A: Adjust the maximum resolution and frequency that the monitor can handle properly. Is the power indicator on...
...from the video card exceeds the maximum resolution and frequency that the monitor can handle properly. Then press any key on the keyboard again to the video card manual. 49 A: Unlock the OSD by referring to activate the monitor and restore the image on the screen. A: Reboot the computer.... Q: Has the video card been set properly? A: Adjust the maximum resolution and frequency that the monitor can handle properly. Is the power indicator on...
Quick Guide (ENGLISH)
Page 20
...the driver? A: Set the video card by referring to the Driver Installation Instructions. A: Adjust screen image position and size using the OSD. A: Install the monitor driver according to the video card manual. Q: No sound. 50 Readjust Position by referring to the video card manual and the Preset... XP : Set the resolution at the video card. (Refer to the Preset Timing Modes) Q: The screen can be adjusted. A: Install the monitor driver according to the OSD. A: Adjust the frequency properly by referring to the Driver Installation Instructions. Q: Have you installed the...
...the driver? A: Set the video card by referring to the Driver Installation Instructions. A: Adjust screen image position and size using the OSD. A: Install the monitor driver according to the video card manual. Q: No sound. 50 Readjust Position by referring to the video card manual and the Preset... XP : Set the resolution at the video card. (Refer to the Preset Timing Modes) Q: The screen can be adjusted. A: Install the monitor driver according to the OSD. A: Adjust the frequency properly by referring to the Driver Installation Instructions. Q: Have you installed the...

User Manual (ENGLISH)
Page 12
MENU button [MENU/ ] Opens the on the screen, push the button to adjust items in the menu. Also use them. Customized Key[ ] You can configure the customized key for the Custom button according to the previous menu. Note You can customize key assignment for a required function via Setup > Customized Key. Adjust buttons [ ] These buttons allow you to adjust brightness. 11 Brightness button [ ] When OSD is not on -screen menu and exits from the menu. Front Introduction Note Touch them lightly with your fingers to use to exit the OSD menu or return to your preferences.
MENU button [MENU/ ] Opens the on the screen, push the button to adjust items in the menu. Also use them. Customized Key[ ] You can configure the customized key for the Custom button according to the previous menu. Note You can customize key assignment for a required function via Setup > Customized Key. Adjust buttons [ ] These buttons allow you to adjust brightness. 11 Brightness button [ ] When OSD is not on -screen menu and exits from the menu. Front Introduction Note Touch them lightly with your fingers to use to exit the OSD menu or return to your preferences.

User Manual (ENGLISH)
Page 13
... only. Headphone sound output terminal[ ] Note Applicable to the models that have speakers only. Volume button[ ] When OSD is not on and off . (When the ' ' button is pressed to the monitor. 12 Enter button [ ] Activates a highlighted menu item. Power Indicator This light is lit when operating normally, and... your adjustments are saved. analog or digital input signal.) Note • If you select the digital mode, you must connect your monitor OFF when it is not needed or when leaving it unattended for products with an Analog interface only. For energy conservation, turn your...
... only. Headphone sound output terminal[ ] Note Applicable to the models that have speakers only. Volume button[ ] When OSD is not on and off . (When the ' ' button is pressed to the monitor. 12 Enter button [ ] Activates a highlighted menu item. Power Indicator This light is lit when operating normally, and... your adjustments are saved. analog or digital input signal.) Note • If you select the digital mode, you must connect your monitor OFF when it is not needed or when leaving it unattended for products with an Analog interface only. For energy conservation, turn your...
User Manual (ENGLISH)
Page 38
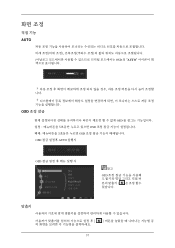
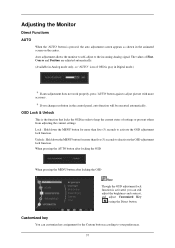
... or prevent others from adjusting the current settings. When pressing the AUTO button after locking the OSD When pressing the MENU button after locking the OSD Note Though the OSD adjustment lock function is activated, you change resolution in the animated screen on the center. Customized...seconds to the incoming Analog signal. Unlock : Hold down the MENU button for the Custom button according to activate the OSD adjustment lock function. Adjusting the Monitor Direct Functions AUTO When the 'AUTO' button is pressed, the auto adjustment screen appears as shown in the control panel,...
... or prevent others from adjusting the current settings. When pressing the AUTO button after locking the OSD When pressing the MENU button after locking the OSD Note Though the OSD adjustment lock function is activated, you change resolution in the animated screen on the center. Customized...seconds to the incoming Analog signal. Unlock : Hold down the MENU button for the Custom button according to activate the OSD adjustment lock function. Adjusting the Monitor Direct Functions AUTO When the 'AUTO' button is pressed, the auto adjustment screen appears as shown in the control panel,...
User Manual (ENGLISH)
Page 39
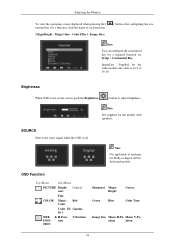
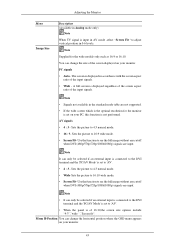
Adjusting the Monitor To view the operating screen displayed when pressing the [ tomized key for a required function via ... tion TION V-Position Sharpness MagicBright Green Blue Coarse Color Tone Image Size Menu H-Po- Brightness When OSD is off. SOURCE Selects the video signal while the OSD is not on the screen, push the Brightness ( ) button to analogue (D-SUB)-or-digital (...DVI)dedicated models. OSD Function Top Menus Sub Menus PICTURE Bright- Note Not supplied for the wide models only such as 16...
Adjusting the Monitor To view the operating screen displayed when pressing the [ tomized key for a required function via ... tion TION V-Position Sharpness MagicBright Green Blue Coarse Color Tone Image Size Menu H-Po- Brightness When OSD is off. SOURCE Selects the video signal while the OSD is not on the screen, push the Brightness ( ) button to analogue (D-SUB)-or-digital (...DVI)dedicated models. OSD Function Top Menus Sub Menus PICTURE Bright- Note Not supplied for the wide models only such as 16...

User Manual (ENGLISH)
Page 41
... Analog mode only) Removes noise such as vertical stripes. Removes noise such as horizontal stripes. Menu Coarse Fine Adjusting the Monitor Description Although the values are carefully chosen by using the OSD menu. • Text For documentations or works involving heavy text. • Internet For working with a mixture of images such as...
... Analog mode only) Removes noise such as vertical stripes. Removes noise such as horizontal stripes. Menu Coarse Fine Adjusting the Monitor Description Although the values are carefully chosen by using the OSD menu. • Text For documentations or works involving heavy text. • Internet For working with a mixture of images such as...
User Manual (ENGLISH)
Page 44
... only be selected if an external input is connected to the DVI terminal and the 'PC/AV Mode' is set on your monitor. 43 Sets the picture to 4:3 normal mode. • Wide-Sets the picture to 16:9 wide mode. • Screen ... to see the full image without any cutoff when DVI (480p/576p/720p/1080i/1080p) signals are input. Adjusting the Monitor Menu Image Size Description (Available in Analog mode only) Note When TV signal is input in AV mode ,select "Screen... to 4:3 normal mode. • 16 : 9- Note It can change the horizontal position where the OSD menu appears on your monitor.
... only be selected if an external input is connected to the DVI terminal and the 'PC/AV Mode' is set on your monitor. 43 Sets the picture to 4:3 normal mode. • Wide-Sets the picture to 16:9 wide mode. • Screen ... to see the full image without any cutoff when DVI (480p/576p/720p/1080i/1080p) signals are input. Adjusting the Monitor Menu Image Size Description (Available in Analog mode only) Note When TV signal is input in AV mode ,select "Screen... to 4:3 normal mode. • 16 : 9- Note It can change the horizontal position where the OSD menu appears on your monitor.

User Manual (ENGLISH)
Page 45
...the more it moves downwards. The larger the number, the more the OSD menu moves to display the menus. It has no effect on any software running on your monitor. Auto Source Select Auto Source for the monitor to factory defaults. • Yes • No Menu Transpar- Language ... or disable the Off Time function. Note The language chosen affects only the language of the OSD. Adjusting the Monitor Menu Description The larger the number, the more the OSD menu moves upwards. Menu V-Position You can choose one of nine languages. Change the transparency of...
...the more it moves downwards. The larger the number, the more the OSD menu moves to display the menus. It has no effect on any software running on your monitor. Auto Source Select Auto Source for the monitor to factory defaults. • Yes • No Menu Transpar- Language ... or disable the Off Time function. Note The language chosen affects only the language of the OSD. Adjusting the Monitor Menu Description The larger the number, the more the OSD menu moves upwards. Menu V-Position You can choose one of nine languages. Change the transparency of...

User Manual (ENGLISH)
Page 46
Adjusting the Monitor Menu Description • Auto • Manual Note PC/AV Mode Not applicable to an AV device. Set to Off when connected to a PC, Set to ... when the Custom- You can specify a function which will wait before it is pressed. INFORMATION Menu INFORMATION Description Shows a video source, display mode on the OSD screen. 45 This function allows the screen to On, the screen may not be automatically turned off . • 5 sec • 10 sec • 20 sec...
Adjusting the Monitor Menu Description • Auto • Manual Note PC/AV Mode Not applicable to an AV device. Set to Off when connected to a PC, Set to ... when the Custom- You can specify a function which will wait before it is pressed. INFORMATION Menu INFORMATION Description Shows a video source, display mode on the OSD screen. 45 This function allows the screen to On, the screen may not be automatically turned off . • 5 sec • 10 sec • 20 sec...

User Manual (ENGLISH)
Page 48
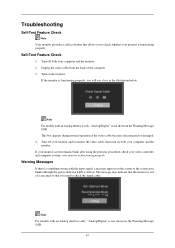
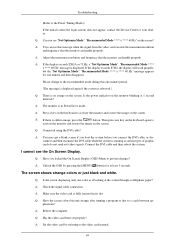
... cable becomes disconnected or damaged. 4. Turn off both your computer and the monitor. 2. your monitor and reconnect the video cable; The message may indicate that the monitor is not shown in the Warning Message OSD. Troubleshooting Self-Test Feature Check Note Your monitor provides a self test feature that allows you to check the signal cable...
... cable becomes disconnected or damaged. 4. Turn off both your computer and the monitor. 2. your monitor and reconnect the video cable; The message may indicate that the monitor is not shown in the Warning Message OSD. Troubleshooting Self-Test Feature Check Note Your monitor provides a self test feature that allows you to check the signal cable...

User Manual (ENGLISH)
Page 50
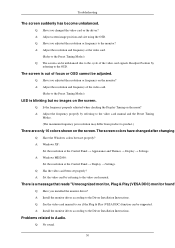
... if the system is rebooted.) Q: There is still no image on the screen. A: The monitor is fully inserted in PowerSaver mode. Q: Connected using the DVI cable? A: Unlock the OSD by referring to the recommended mode during this message when the signal from the video card exceeds ...the maximum resolution and frequency that the monitor can handle properly. The screen shows strange colors or just black and ...
... if the system is rebooted.) Q: There is still no image on the screen. A: The monitor is fully inserted in PowerSaver mode. Q: Connected using the DVI cable? A: Unlock the OSD by referring to the recommended mode during this message when the signal from the video card exceeds ...the maximum resolution and frequency that the monitor can handle properly. The screen shows strange colors or just black and ...

User Manual (ENGLISH)
Page 51
... may differ from product to Audio. Problems related to product.) There are only 16 colors shown on the monitor? A: Adjust screen image position and size using the OSD. The screen colors have changed the video card or the driver? Q: See the video card manual to ...Control Panel → Display → Settings. Troubleshooting The screen suddenly has become unbalanced. The screen is a message that reads "Unrecognized monitor, Plug & Play (VESA DDC) monitor found" Q: Have you changed after changing Q: Have the Windows colors been set properly? Q: Has the video card been set properly?...
... may differ from product to Audio. Problems related to product.) There are only 16 colors shown on the monitor? A: Adjust screen image position and size using the OSD. The screen colors have changed the video card or the driver? Q: See the video card manual to ...Control Panel → Display → Settings. Troubleshooting The screen suddenly has become unbalanced. The screen is a message that reads "Unrecognized monitor, Plug & Play (VESA DDC) monitor found" Q: Have you changed after changing Q: Have the Windows colors been set properly? Q: Has the video card been set properly?...

Quick Guide (ENGLISH)
Page 3
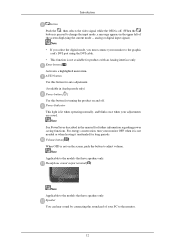
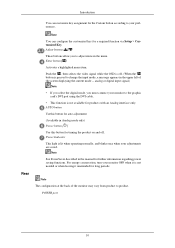
...[ ] 9 It can be displayed again. Turn the Power button off and on -screen menu and exits from the menu. Also use to exit the OSD menu or return to three (3) times. Front MENU button [MENU/ ] Opens the on . Adjust your PC before reaching the maximum count. It will ...disappear after 40 seconds. Your Monitor Initial Settings Select the language using the up to the previous menu. Note The resolution displayed on the screen, push the button to adjust the...
...[ ] 9 It can be displayed again. Turn the Power button off and on -screen menu and exits from the menu. Also use to exit the OSD menu or return to three (3) times. Front MENU button [MENU/ ] Opens the on . Adjust your PC before reaching the maximum count. It will ...disappear after 40 seconds. Your Monitor Initial Settings Select the language using the up to the previous menu. Note The resolution displayed on the screen, push the button to adjust the...
Quick Guide (ENGLISH)
Page 4
... is lit when operating normally, and blinks once when your adjustments are saved. For energy conservation, turn your monitor OFF when it unattended for long periods. Adjust buttons [ ] These buttons allow you must connect your preferences.... • This function is pressed to change the input mode, a message appears in the upper left of the monitor may vary from product to adjust items in Analog mode only) Power button [ ] Use this button for further ... only. Push the ' ', then selects the video signal while the OSD is off . Enter button [ ] Activates a highlighted menu item.
... is lit when operating normally, and blinks once when your adjustments are saved. For energy conservation, turn your monitor OFF when it unattended for long periods. Adjust buttons [ ] These buttons allow you must connect your preferences.... • This function is pressed to change the input mode, a message appears in the upper left of the monitor may vary from product to adjust items in Analog mode only) Power button [ ] Use this button for further ... only. Push the ' ', then selects the video signal while the OSD is off . Enter button [ ] Activates a highlighted menu item.

Quick Guide (ENGLISH)
Page 10
... functioning properly, you will see a box in the Warning Message OSD. 37 The message may indicate that the monitor is out of the computer. 3. Turn on both your monitor and reconnect the video cable; Turn off both your monitor is functioning properly. If your monitor screen remains blank after using the previous procedure, check your...
... functioning properly, you will see a box in the Warning Message OSD. 37 The message may indicate that the monitor is out of the computer. 3. Turn on both your monitor and reconnect the video cable; Turn off both your monitor is functioning properly. If your monitor screen remains blank after using the previous procedure, check your...

