
User Manual (ENGLISH)
Page 8
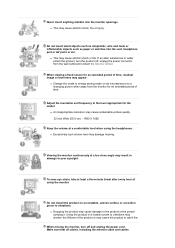
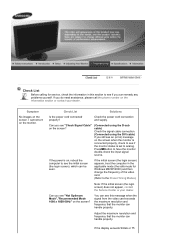
... time. Adjust the resolution and frequency to vibrations. Using the product in damage to the product or the person carrying it. z Dropping the product may cause electric shock, fire or injury. z Change the mode to energy saving mode or set a screensaver to catch fire. When viewing a fixed screen for the model. z An inappropriate resolution may cause undesirable picture quality. 22 inch Wide (55.9 cm) - 1680 X 1050 Keep the volume at...
... time. Adjust the resolution and frequency to vibrations. Using the product in damage to the product or the person carrying it. z Dropping the product may cause electric shock, fire or injury. z Change the mode to energy saving mode or set a screensaver to catch fire. When viewing a fixed screen for the model. z An inappropriate resolution may cause undesirable picture quality. 22 inch Wide (55.9 cm) - 1680 X 1050 Keep the volume at...
User Manual (ENGLISH)
Page 10
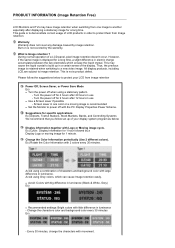
... image retention Power Off, Screen Saver, or Power Save Mode Ex) z Turn the power off with large difference in luminance. Warranty Warranty does not cover any damage caused by a Display Logo or moving image is displayed for 2 hours after 20 hours in use z Use a Screen saver if possible - All display products, including LCD,are subject to a new video image. This is retained when switching to image retention. Screen saver in luminance - Change the Color...
... image retention Power Off, Screen Saver, or Power Save Mode Ex) z Turn the power off with large difference in luminance. Warranty Warranty does not cover any damage caused by a Display Logo or moving image is displayed for 2 hours after 20 hours in use z Use a Screen saver if possible - All display products, including LCD,are subject to a new video image. This is retained when switching to image retention. Screen saver in luminance - Change the Color...
User Manual (ENGLISH)
Page 13
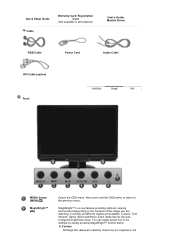
... on the contents of six settings by simply pressing MagicBright™ control button. 1) Custom Although the values are available: Custom, Text, Internet, Game, Sport and Movie. Also use to exit the OSD menu or return to the previous menu. Each mode has its own preconfigured brightness value. Quick Setup Guide Cable Warranty Card/ Registration Card (Not available in all locations) User's Guide, Monitor Driver RGB Cable Power Cord Audio Cable DVI Cable (option) Front MENU button [MENU/ ] MagicBright™ [] Opens the OSD menu.
... on the contents of six settings by simply pressing MagicBright™ control button. 1) Custom Although the values are available: Custom, Text, Internet, Game, Sport and Movie. Also use to exit the OSD menu or return to the previous menu. Each mode has its own preconfigured brightness value. Quick Setup Guide Cable Warranty Card/ Registration Card (Not available in all locations) User's Guide, Monitor Driver RGB Cable Power Cord Audio Cable DVI Cable (option) Front MENU button [MENU/ ] MagicBright™ [] Opens the OSD menu.
User Manual (ENGLISH)
Page 14
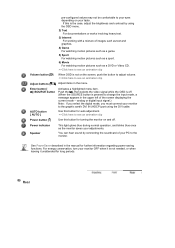
... clip Volume button [ ] When OSD is the case, adjust the brightness and contrast by connecting the soundcard of your monitor to the graphic card's DVI IN (HDCP) port using the OSD menu. 2) Text For documentations or works involving heavy text. 3) Internet For working with a mixture of the screen displaying the current mode -- Enter button [ ] /SOURCE button Activates a highlighted menu item. Rear If this button for turning the monitor on and off . (When the SOURCE button is not needed, or...
... clip Volume button [ ] When OSD is the case, adjust the brightness and contrast by connecting the soundcard of your monitor to the graphic card's DVI IN (HDCP) port using the OSD menu. 2) Text For documentations or works involving heavy text. 3) Internet For working with a mixture of the screen displaying the current mode -- Enter button [ ] /SOURCE button Activates a highlighted menu item. Rear If this button for turning the monitor on and off . (When the SOURCE button is not needed, or...
User Manual (ENGLISH)
Page 17
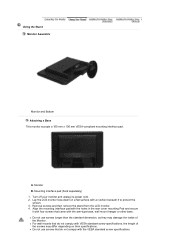
... with VESA standard screw specifications, the length of the Monitor. Lay the LCD monitor face-down on their specifications. Using the Stand Monitor Assembly Monitor and Bottom Attaching a Base This monitor accepts a 100 mm x 100 mm VESA-compliant mounting interface pad. Align the mounting interface pad with the holes in the rear cover mounting Pad and secure it to protect the screen. 3. z Do not use screws that came with the VESA standard screw specifications. z For wall mounts...
... with VESA standard screw specifications, the length of the Monitor. Lay the LCD monitor face-down on their specifications. Using the Stand Monitor Assembly Monitor and Bottom Attaching a Base This monitor accepts a 100 mm x 100 mm VESA-compliant mounting interface pad. Align the mounting interface pad with the holes in the rear cover mounting Pad and secure it to protect the screen. 3. z Do not use screws that came with the VESA standard screw specifications. z For wall mounts...
User Manual (ENGLISH)
Page 18
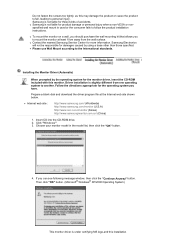
... use Wall Mount according to personal injury. Choose your monitor model in the model list, then click the "OK" button. 4. If you to follow the product installation instructions. Installing the Monitor Driver (Automatic) When prompted by using a base other than those specified. Samsung is used or the consumer fails to mount the monitor at the Internet web site shown below. Click "Windows" 3. z Contact the nearest Samsung Service Center for the monitor driver, insert...
... use Wall Mount according to personal injury. Choose your monitor model in the model list, then click the "OK" button. 4. If you to follow the product installation instructions. Installing the Monitor Driver (Automatic) When prompted by using a base other than those specified. Samsung is used or the consumer fails to mount the monitor at the Internet web site shown below. Click "Windows" 3. z Contact the nearest Samsung Service Center for the monitor driver, insert...

User Manual (ENGLISH)
Page 19
... this monitor. Click "Advanced Settings...". doesn'tdamage your CD-ROM drive. 2. Prepare a blank disk and download the driver program file at the Internet web site shown below. Installing the Monitor Driver (Manual) Windows Vista | Windows XP | Windows 2000 | Windows ME | Windows NT | Linux When prompted by the operating system for the operating system you have. Then, double-click on Samsung Monitor homepage http://www.samsung.com...
... this monitor. Click "Advanced Settings...". doesn'tdamage your CD-ROM drive. 2. Prepare a blank disk and download the driver program file at the Internet web site shown below. Installing the Monitor Driver (Manual) Windows Vista | Windows XP | Windows 2000 | Windows ME | Windows NT | Linux When prompted by the operating system for the operating system you have. Then, double-click on Samsung Monitor homepage http://www.samsung.com...
User Manual (ENGLISH)
Page 22
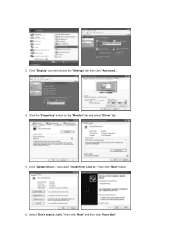
Click the "Properties" button on the "Monitor" tab and select "Driver" tab. 5. Click "Update Driver.." then click "Next" button. 6. then click "Next" and then click "Have disk". Select "Don't search ,I will.." Click "Display" icon and choose the "Settings" tab then click "Advanced..". 4. and select "Install from a list or.." 3.
Click the "Properties" button on the "Monitor" tab and select "Driver" tab. 5. Click "Update Driver.." then click "Next" button. 6. then click "Next" and then click "Have disk". Select "Don't search ,I will.." Click "Display" icon and choose the "Settings" tab then click "Advanced..". 4. and select "Install from a list or.." 3.
User Manual (ENGLISH)
Page 24
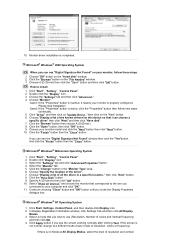
... screen is properly configured. How to your monitor, follow next steps continually. 5. Choose the "Settings" tab and then click "Advanced..". 4. Click "Driver" and then click on your computer and click "OK". 11. Choose your monitor is not normal, change to use (Resolution, Number of resolution, colors or frequency). Microsoft® Windows® 2000 Operating System When you wish to a different mode (lower mode of colors and Vertical frequency...
... screen is properly configured. How to your monitor, follow next steps continually. 5. Choose the "Settings" tab and then click "Advanced..". 4. Click "Driver" and then click on your computer and click "OK". 11. Choose your monitor is not normal, change to use (Resolution, Number of resolution, colors or frequency). Microsoft® Windows® 2000 Operating System When you wish to a different mode (lower mode of colors and Vertical frequency...
User Manual (ENGLISH)
Page 36
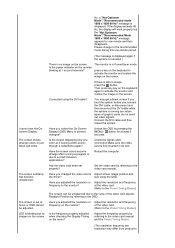
... any problems yourself. If the power is set to have the monitor double-check the input signal source. Symptom No images on the monitor. If the initial screen (the login screen) appears, boot the computer in the applicable mode (the safe mode for service, check the information in this message when the signal from the video card exceeds the maximum resolution and frequency that the monitor can handle properly. Adjust the maximum resolution and frequency...
... any problems yourself. If the power is set to have the monitor double-check the input signal source. Symptom No images on the monitor. If the initial screen (the login screen) appears, boot the computer in the applicable mode (the safe mode for service, check the information in this message when the signal from the video card exceeds the maximum resolution and frequency that the monitor can handle properly. Adjust the maximum resolution and frequency...
User Manual (ENGLISH)
Page 37
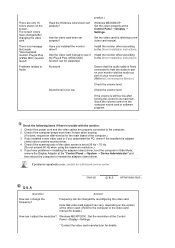
... the OSD. Connect the DVI cable and then reboot the system. Check the signal cable connection.Make sure the video card is in it's slot. Set the video card by referring to activate the monitor and restore the image on the monitor? Have you adjusted the resolution or Adjust the resolution and frequency frequency to the recommended mode during this one minute and then disappears. The screen can be adjusted. I cannot see the On Screen Display. LED is no image...
... the OSD. Connect the DVI cable and then reboot the system. Check the signal cable connection.Make sure the video card is in it's slot. Set the video card by referring to activate the monitor and restore the image on the monitor? Have you adjusted the resolution or Adjust the resolution and frequency frequency to the recommended mode during this one minute and then disappears. The screen can be adjusted. I cannot see the On Screen Display. LED is no image...
User Manual (ENGLISH)
Page 38
... can I change the frequency? Check the volume level. The screen colors have problems in installing the adapter (video) driver, boot the computer in port on your sound card. (Refer to Connecting the Monitor) Sound level is set properly? Install the monitor driver according to the Driver Installation Instructions. There is a message that the audio cable is firmly connected to both the audio-in Safe Mode, remove the Display Adapter at the Control Panel → Display → Settings. product.) Windows ME/2000/XP: Set the colors properly at the "Control Panel →...
... can I change the frequency? Check the volume level. The screen colors have problems in installing the adapter (video) driver, boot the computer in port on your sound card. (Refer to Connecting the Monitor) Sound level is set properly? Install the monitor driver according to the Driver Installation Instructions. There is a message that the audio cable is firmly connected to both the audio-in Safe Mode, remove the Display Adapter at the Control Panel → Display → Settings. product.) Windows ME/2000/XP: Set the colors properly at the "Control Panel →...
User Manual (ENGLISH)
Page 39
.... Turn off your video controller and computer system; then turn on . computer or the screen saver. (Refer to go inside the monitor. How can I clean the outer case/LCD Panel? Warning Messages If there is something wrong with a soft cloth, using the previous procedure, check your monitor and reconnect the video cable; If there are within 3 feet (one meter) of the monitor. How can I set the Power Saving Windows...
.... Turn off your video controller and computer system; then turn on . computer or the screen saver. (Refer to go inside the monitor. How can I clean the outer case/LCD Panel? Warning Messages If there is something wrong with a soft cloth, using the previous procedure, check your monitor and reconnect the video cable; If there are within 3 feet (one meter) of the monitor. How can I set the Power Saving Windows...
User Manual (ENGLISH)
Page 42
... of RED, GREEN, BLUE and WHITE color seem to normal operation when you can be seen. For energy conservation, turn your computer. Dot Acceptable TFT LCD panel manufactured by switching your computer to set up this product are subject to select alternate settings. Note: Design and specifications are 3,888,000. State Power Indicator Power Consumption Normal Operation Blue Less than 55 watts Power saving mode Blue blinking Less than 1 watts Power off (Power button...
... of RED, GREEN, BLUE and WHITE color seem to normal operation when you can be seen. For energy conservation, turn your computer. Dot Acceptable TFT LCD panel manufactured by switching your computer to set up this product are subject to select alternate settings. Note: Design and specifications are 3,888,000. State Power Indicator Power Consumption Normal Operation Blue Less than 55 watts Power saving mode Blue blinking Less than 1 watts Power off (Power button...
User Manual (ENGLISH)
Page 47
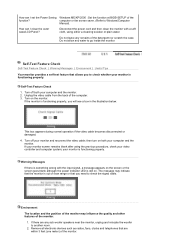
... herein may appear. 1. TFT LCD panel manufactured by using advanced semiconductor technology with the furnishing, performance, or use FINE/COARSE adjustment function. 5. Authority Information in TFT-LCD. { Resolution: 1680 x 1050 { Vertical frequency (refresh rate): 60 Hz 2. Microsoft, Windows and Windows NT are registered trademarks of Samsung Electronics Co., Ltd.; Change the mode to energy save or set a screensaver to move the picture when you clean the monitor and the panel outside, please apply the...
... herein may appear. 1. TFT LCD panel manufactured by using advanced semiconductor technology with the furnishing, performance, or use FINE/COARSE adjustment function. 5. Authority Information in TFT-LCD. { Resolution: 1680 x 1050 { Vertical frequency (refresh rate): 60 Hz 2. Microsoft, Windows and Windows NT are registered trademarks of Samsung Electronics Co., Ltd.; Change the mode to energy save or set a screensaver to move the picture when you clean the monitor and the panel outside, please apply the...
Service Manual
Page 4
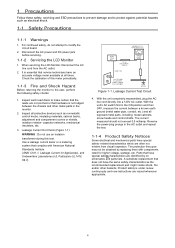
... Follow these safety, servicing and ESD precautions to prevent damage and to the user, perform the following safety checks: 1. Disconnect the AC power and DC power jack before servicing. 1-1-2 Servicing the LCD Monitor 1. Figure 1-1. The protection they give may not be obtained by on schematics and parts lists. When servicing the LCD Monitor, Disconnect the AC line cord from visual inspection. Check the calibration of this test.
... Follow these safety, servicing and ESD precautions to prevent damage and to the user, perform the following safety checks: 1. Disconnect the AC power and DC power jack before servicing. 1-1-2 Servicing the LCD Monitor 1. Figure 1-1. The protection they give may not be obtained by on schematics and parts lists. When servicing the LCD Monitor, Disconnect the AC line cord from visual inspection. Check the calibration of this test.
Service Manual
Page 5
... polarity might explode. The following servicing precautions and any of a replacement ESD, touch the protective material to prevent accumulation of the AC plug and accessible conductive parts (examples: metal panels, input terminals and earphone jacks). 5. Caution: Be sure no power is sometimes used. Such components are integrated circuits and some field-effect transistors. Always connect a test instrument's ground lead to...
... polarity might explode. The following servicing precautions and any of a replacement ESD, touch the protective material to prevent accumulation of the AC plug and accessible conductive parts (examples: metal panels, input terminals and earphone jacks). 5. Caution: Be sure no power is sometimes used. Such components are integrated circuits and some field-effect transistors. Always connect a test instrument's ground lead to...
Service Manual
Page 16
... mode is analog interface. This LCM is out of Windows shut down pattern. If not, please re-write EDID or upload firmware into Flash memory via VGA Cable. If you confirm the R.G.B. If you find the vertical line or horizontal line lost on the screen, please change panel. 16 If brightness uneven, repairs Inverter circuit or change a new panel. If you check the H/V position, please use the crosshatch pattern. 4 Troubleshooting...
... mode is analog interface. This LCM is out of Windows shut down pattern. If not, please re-write EDID or upload firmware into Flash memory via VGA Cable. If you confirm the R.G.B. If you find the vertical line or horizontal line lost on the screen, please change panel. 16 If brightness uneven, repairs Inverter circuit or change a new panel. If you check the H/V position, please use the crosshatch pattern. 4 Troubleshooting...
Service Manual
Page 35
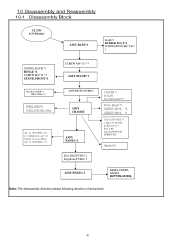
... LCD Monitor ASSY BASE*1 BASE*1 RUBBER FOOT*4 SCREW,MINUS,M4*8,Zn* 1 STAND_BACK*1 HINGE *1 SCREW M4*10 *3 STAND_FRONT*1 SCREW M4*10, *3 ASSY STAND*1 BACK COVER*1 BKT-VESA *4 SHIELDING*1 TAPE,ACE,(PC=10x4 LCP 22 MT220WW01-V0G1 (INNOLUX)& LCP 22 N220Z1-L01(A)(CMO)& LCP 22 MT220WW01-V2- ASSY BACK COVER*1 ASSY CHASSIS ASSY PANEL*1 Key PAD PCBA*1 Earphone PCBA*1 ASSY BEZEL*1 CHASSIS *1 MYLAR TRANSPARENT*2 Power Board *1 SCREW M3*6, *4 SCREW M4*6, *1 PCBA I/F BOARD *1 CABLE...
... LCD Monitor ASSY BASE*1 BASE*1 RUBBER FOOT*4 SCREW,MINUS,M4*8,Zn* 1 STAND_BACK*1 HINGE *1 SCREW M4*10 *3 STAND_FRONT*1 SCREW M4*10, *3 ASSY STAND*1 BACK COVER*1 BKT-VESA *4 SHIELDING*1 TAPE,ACE,(PC=10x4 LCP 22 MT220WW01-V0G1 (INNOLUX)& LCP 22 N220Z1-L01(A)(CMO)& LCP 22 MT220WW01-V2- ASSY BACK COVER*1 ASSY CHASSIS ASSY PANEL*1 Key PAD PCBA*1 Earphone PCBA*1 ASSY BEZEL*1 CHASSIS *1 MYLAR TRANSPARENT*2 Power Board *1 SCREW M3*6, *4 SCREW M4*6, *1 PCBA I/F BOARD *1 CABLE...
Service Manual
Page 45
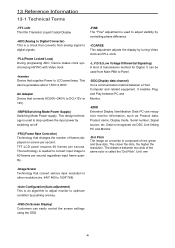
... clock. -L.V.D.S.(Low Voltage Differential Signaling) A kind of frames displayed on a monitor is composed of the same color is used from analog signal to digital signals. -PLL(Phase Locked Loop) During progressing ADC, Device makes clock synchronizing HSYNC with Video clock -Inverter Device that converts AC(90V~240V) to DC(+12V or 14V) -SMPS(Switching Mode Power Supply) Switching Mode Power supply. This technology is needed to convert input image to 60 frames per...
... clock. -L.V.D.S.(Low Voltage Differential Signaling) A kind of frames displayed on a monitor is composed of the same color is used from analog signal to digital signals. -PLL(Phase Locked Loop) During progressing ADC, Device makes clock synchronizing HSYNC with Video clock -Inverter Device that converts AC(90V~240V) to DC(+12V or 14V) -SMPS(Switching Mode Power Supply) Switching Mode Power supply. This technology is needed to convert input image to 60 frames per...


