
User Manual (ENGLISH)
Page 3
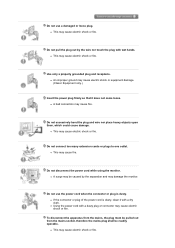
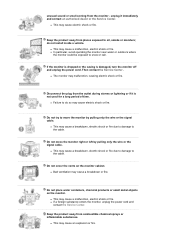
z This may cause electric shock or fire. z An improper ground may be readily operable. Do not disconnect the power cord while using the monitor. z If the connector or plug of the power cord is dusty. z A surge may cause electric shock or equipment damage. (Class l Equipment only.) ...the mains socket, therefore the mains plug shall be caused by the wire nor touch the plug with a dusty plug or connector may damage the monitor. Use only a properly grounded plug and receptacle. z This may cause electric shock or fire. Do not use the power cord when the connector...
z This may cause electric shock or fire. z An improper ground may be readily operable. Do not disconnect the power cord while using the monitor. z If the connector or plug of the power cord is dusty. z A surge may cause electric shock or equipment damage. (Class l Equipment only.) ...the mains socket, therefore the mains plug shall be caused by the wire nor touch the plug with a dusty plug or connector may damage the monitor. Use only a properly grounded plug and receptacle. z This may cause electric shock or fire. Do not use the power cord when the connector...
User Manual (ENGLISH)
Page 4
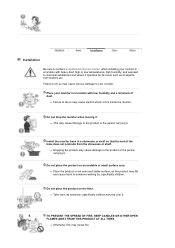
... OTHER OPEN FLAMES AWAY FROM THIS PRODUCT AT ALL TIMES. z Otherwise, this may cause damage to the product or the person carrying it. Install the monitor base in a showcase or shelf so that the end of dust. z Failure to do so may cause serious damage to your... may cause fire. Do not place the product on the floor. Installation Be sure to contact an authorized Service Center, when installing your monitor in a location with heavy dust, high or low temperatures, high humidity, and exposed to chemical substances and where it operates for 24 hours such as ...
... OTHER OPEN FLAMES AWAY FROM THIS PRODUCT AT ALL TIMES. z Otherwise, this may cause damage to the product or the person carrying it. Install the monitor base in a showcase or shelf so that the end of dust. z Failure to do so may cause serious damage to your... may cause fire. Do not place the product on the floor. Installation Be sure to contact an authorized Service Center, when installing your monitor in a location with heavy dust, high or low temperatures, high humidity, and exposed to chemical substances and where it operates for 24 hours such as ...
User Manual (ENGLISH)
Page 5
...poor ventilation, for ventilation purposes. Do not place the monitor face down the monitor carefully. z Poor ventilation may cause an increase in the internal temperature of the product, resulting in the internal temperature may damage the TFT-LCD surface.The installation of the bracket must be done ...suffocation if children play with Keep the plastic packaging (bag) out of the TFT-LCD screen, wipe with it away from the power cable. z Failing to keep it . Clean When cleaning the monitor case or the surface of children's reach. z Always use the mounting device specified...
...poor ventilation, for ventilation purposes. Do not place the monitor face down the monitor carefully. z Poor ventilation may cause an increase in the internal temperature of the product, resulting in the internal temperature may damage the TFT-LCD surface.The installation of the bracket must be done ...suffocation if children play with Keep the plastic packaging (bag) out of the TFT-LCD screen, wipe with it away from the power cable. z Failing to keep it . Clean When cleaning the monitor case or the surface of children's reach. z Always use the mounting device specified...
User Manual (ENGLISH)
Page 6
... product. z A dirty connector may cause electric shock or fire. z This may cause electric shock or fire. Do not spray water or detergent directly onto the monitor. Use the recommended detergent with a smooth cloth. in the interior over an extended period of time may cause damage, electric shock or fire. a slightly moistened...
... product. z A dirty connector may cause electric shock or fire. z This may cause electric shock or fire. Do not spray water or detergent directly onto the monitor. Use the recommended detergent with a smooth cloth. in the interior over an extended period of time may cause damage, electric shock or fire. a slightly moistened...
User Manual (ENGLISH)
Page 7
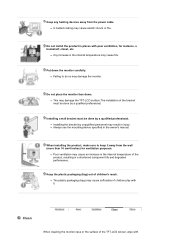
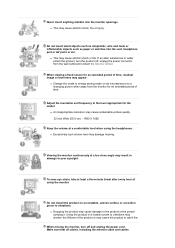
...inside a vehicle. z Bad ventilation may cause a malfunction, electric shock or fire. z This may cause a breakdown or fire. unplug it is damaged, turn the monitor off and unplug the power cord. z This may cause an explosion or fire. Then contact the Service Center . Keep the product away from the... monitor - If the monitor is dropped or the casing is not used for a long period of time. z Failure to snow or rain. z This may cause a breakdown, ...
...inside a vehicle. z Bad ventilation may cause a malfunction, electric shock or fire. z This may cause a breakdown or fire. unplug it is damaged, turn the monitor off and unplug the power cord. z This may cause an explosion or fire. Then contact the Service Center . Keep the product away from the... monitor - If the monitor is dropped or the casing is not used for a long period of time. z Failure to snow or rain. z This may cause a breakdown, ...
User Manual (ENGLISH)
Page 8
.... z This may appear. Do not install the product on an unstable, uneven surface or a location prone to your eyesight. When moving the monitor, turn the product off and unplug the power cord. Make sure that all cables, including the antenna cable and cables When viewing a fixed screen... for an extended period of the product or may cause damage to catch fire. z An inappropriate resolution may cause undesirable picture quality. 22 inch Wide (55.9 cm) - 1680 X 1050 Keep the volume at a too close angle may result in a location prone to vibrations may shorten...
.... z This may appear. Do not install the product on an unstable, uneven surface or a location prone to your eyesight. When moving the monitor, turn the product off and unplug the power cord. Make sure that all cables, including the antenna cable and cables When viewing a fixed screen... for an extended period of the product or may cause damage to catch fire. z An inappropriate resolution may cause undesirable picture quality. 22 inch Wide (55.9 cm) - 1680 X 1050 Keep the volume at a too close angle may result in a location prone to vibrations may shorten...
User Manual (ENGLISH)
Page 9
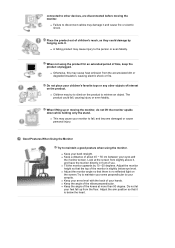
... so that the top of about 45 ~ 50 cm between your armpits. z Keep the angle of time, keep the product unplugged. Do not let your monitor to fall, and become damaged or cause personal injury. Adjust the arm position so that there is no reflected light on the screen.Try to... maintain your arms perpendicular to your eyes and the monitor screen. connected to other objects of interest on the product. z Failure to disconnect cables may try to climb on the product to retrieve an object...
... so that the top of about 45 ~ 50 cm between your armpits. z Keep the angle of time, keep the product unplugged. Do not let your monitor to fall, and become damaged or cause personal injury. Adjust the arm position so that there is no reflected light on the screen.Try to... maintain your arms perpendicular to your eyes and the monitor screen. connected to other objects of interest on the product. z Failure to disconnect cables may try to climb on the product to retrieve an object...
User Manual (ENGLISH)
Page 10
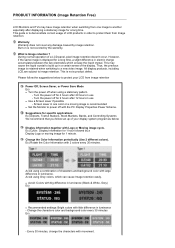
...one image to another especially after displaying a stationary image for 4 hours after 12 hours in luminance. What is not a product defect. z Set the Monitor to power off with 2 colors every 30 minutes. Ex) Cycle : Display Information for 1 hour followed by a Display Logo or moving image is ... by the warranty. Thus, the previous image is displayed for 1 minute. PRODUCT INFORMATION (Image Retention Free) LCD Monitors and TVs may cause the liquid crystal to build up of your LCD from image retention Power Off, Screen Saver, or Power Save Mode Ex) z Turn the power off when ...
...one image to another especially after displaying a stationary image for 4 hours after 12 hours in luminance. What is not a product defect. z Set the Monitor to power off with 2 colors every 30 minutes. Ex) Cycle : Display Information for 1 hour followed by a Display Logo or moving image is ... by the warranty. Thus, the previous image is displayed for 1 minute. PRODUCT INFORMATION (Image Retention Free) LCD Monitors and TVs may cause the liquid crystal to build up of your LCD from image retention Power Off, Screen Saver, or Power Save Mode Ex) z Turn the power off when ...
User Manual (ENGLISH)
Page 11
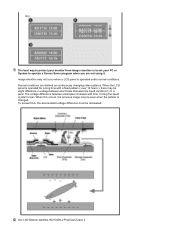
To prevent this occurs, the previous image may be seen when the pattern is operated under normal conditions. Our LCD Monitor satisfies ISO13406-2 Pixel fault Class II Image retention may be decreased. When this , the accumulated voltage difference must be slight difference in a pixel. Ex) ...The best way to protect your PC or System to lean. Normal conditions are not using it. When the LCD panel is to set your monitor from Image retention is operated for a long time with time, forcing the liquid crystal to operate a Screen Saver program when you are ...
To prevent this occurs, the previous image may be seen when the pattern is operated under normal conditions. Our LCD Monitor satisfies ISO13406-2 Pixel fault Class II Image retention may be decreased. When this , the accumulated voltage difference must be slight difference in a pixel. Ex) ...The best way to protect your PC or System to lean. Normal conditions are not using it. When the LCD panel is to set your monitor from Image retention is operated for a long time with time, forcing the liquid crystal to operate a Screen Saver program when you are ...
User Manual (ENGLISH)
Page 12
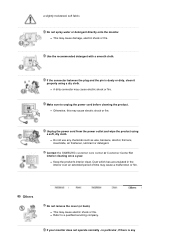
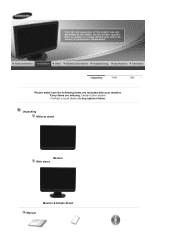
Contact a local dealer to buy optional items. Unpacking Without stand Monitor With stand Monitor & Simple Stand Manual If any items are included with your dealer. Please make sure the following items are missing, contact your monitor.
Contact a local dealer to buy optional items. Unpacking Without stand Monitor With stand Monitor & Simple Stand Manual If any items are included with your dealer. Please make sure the following items are missing, contact your monitor.
User Manual (ENGLISH)
Page 13
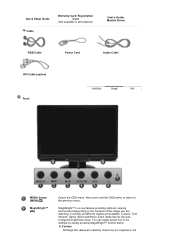
... exit the OSD menu or return to the previous menu. Quick Setup Guide Cable Warranty Card/ Registration Card (Not available in all locations) User's Guide, Monitor Driver RGB Cable Power Cord Audio Cable DVI Cable (option) Front MENU button [MENU/ ] MagicBright™ [] Opens the OSD menu.
... exit the OSD menu or return to the previous menu. Quick Setup Guide Cable Warranty Card/ Registration Card (Not available in all locations) User's Guide, Monitor Driver RGB Cable Power Cord Audio Cable DVI Cable (option) Front MENU button [MENU/ ] MagicBright™ [] Opens the OSD menu.
User Manual (ENGLISH)
Page 14
...it unattended for further information regarding power saving functions. analog or digital input signal.) Note : If you select the digital mode, you must connect your monitor to the graphic card's DVI IN (HDCP) port using the OSD menu. 2) Text For documentations or works involving heavy text. 3) Internet For ... watching motion pictures such as a game. 5) Sport For watching motion pictures such as a sport. 6) Movie For watching motion pictures such as the monitor saves your adjustments. You can hear sound by using the DVI cable. See PowerSaver described in the upper left of your PC to the...
...it unattended for further information regarding power saving functions. analog or digital input signal.) Note : If you select the digital mode, you must connect your monitor to the graphic card's DVI IN (HDCP) port using the OSD menu. 2) Text For documentations or works involving heavy text. 3) Internet For ... watching motion pictures such as a game. 5) Sport For watching motion pictures such as a sport. 6) Movie For watching motion pictures such as the monitor saves your adjustments. You can hear sound by using the DVI cable. See PowerSaver described in the upper left of your PC to the...
User Manual (ENGLISH)
Page 15
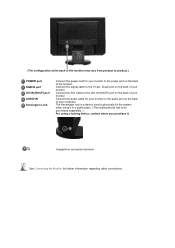
... when using it in a public place. (The locking device has to the DVI IN (HDCP) port on the back of your monitor. (The configuration at the back of the monitor may vary from product to product.) POWER port RGB IN port DVI IN (HDCP) port AUDIO IN Kensington Lock Connect the power... cord for your computer. Headphone connection terminal See Connecting the Monitor for further information regarding cable connections. Connect the signal cable to the 15-pin, D-sub port on the back of your...
... when using it in a public place. (The locking device has to the DVI IN (HDCP) port on the back of your monitor. (The configuration at the back of the monitor may vary from product to product.) POWER port RGB IN port DVI IN (HDCP) port AUDIO IN Kensington Lock Connect the power... cord for your computer. Headphone connection terminal See Connecting the Monitor for further information regarding cable connections. Connect the signal cable to the 15-pin, D-sub port on the back of your...
User Manual (ENGLISH)
Page 16
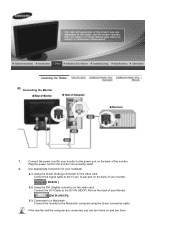
... the computer are connected, you can turn them on the video card. Connect the monitor to a Macintosh. Use appropriate connection for your monitor to the 15-pin, D-sub port on the video card. Connected to the Macintosh computer using the D-sub connection cable. Using the D-sub (Analog)... connector on the back of your monitor. [ RGB IN ] 2-2. Plug the power cord for your computer. 2-1. Connect the DVI Cable to the DVI IN (HDCP) Port on the back of ...
... the computer are connected, you can turn them on the video card. Connect the monitor to a Macintosh. Use appropriate connection for your monitor to the 15-pin, D-sub port on the video card. Connected to the Macintosh computer using the D-sub connection cable. Using the D-sub (Analog)... connector on the back of your monitor. [ RGB IN ] 2-2. Plug the power cord for your computer. 2-1. Connect the DVI Cable to the DVI IN (HDCP) Port on the back of ...
User Manual (ENGLISH)
Page 17
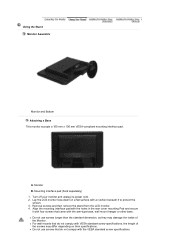
...with a cushion beneath it to protect the screen. 3. Monitor B. Turn off your monitor and unplug its power cord. 2. z For wall mounts that do not comply with the VESA standard screw specifications. Lay the LCD monitor face-down on their specifications. Mounting interface pad (Sold ...separately) 1. Remove screws and then remove the stand from the LCD monitor. 4. Using the Stand Monitor Assembly Monitor and Bottom Attaching a Base This monitor accepts a 100 mm x 100 mm VESA-compliant mounting interface pad. z Do not use screws ...
...with a cushion beneath it to protect the screen. 3. Monitor B. Turn off your monitor and unplug its power cord. 2. z For wall mounts that do not comply with the VESA standard screw specifications. Lay the LCD monitor face-down on their specifications. Mounting interface pad (Sold ...separately) 1. Remove screws and then remove the stand from the LCD monitor. 4. Using the Stand Monitor Assembly Monitor and Bottom Attaching a Base This monitor accepts a 100 mm x 100 mm VESA-compliant mounting interface pad. z Do not use screws ...
User Manual (ENGLISH)
Page 18
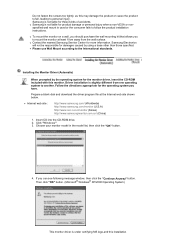
... wall, you should purchase the wall mounting kit that allows you to follow the product installation instructions. z Contact the nearest Samsung Service Center for the monitor driver, insert the CD-ROM included with this may damage the product or cause the product to fall, leading to the ... 2. If you have. Then click "OK" button. (Microsoft® Windows® XP/2000 Operating System) This monitor driver is slightly different from the wall surface. z Samsung is not liable for product damage or personal injury when a non-VESA or nonspecified wall mount is not liable for ...
... wall, you should purchase the wall mounting kit that allows you to follow the product installation instructions. z Contact the nearest Samsung Service Center for the monitor driver, insert the CD-ROM included with this may damage the product or cause the product to fall, leading to the ... 2. If you have. Then click "OK" button. (Microsoft® Windows® XP/2000 Operating System) This monitor driver is slightly different from the wall surface. z Samsung is not liable for product damage or personal injury when a non-VESA or nonspecified wall mount is not liable for ...

User Manual (ENGLISH)
Page 19
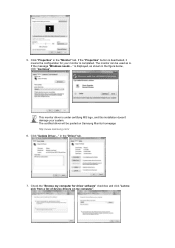
...system.The certified driver will be posted on "Appearance and Personalization". 3. Click "Advanced Settings...". Then, double-click on Samsung Monitor homepage http://www.samsung.com/. 5. Prepare a blank disk and download the driver program file at the Internet web site shown below. Driver ... by the operating system for the operating system you have. z Internet web site : http://www.samsung.com/ (Worldwide) http://www.samsung.com/monitor (U.S.A) http://www.sec.co.kr/monitor (Korea) http://www.samsungmonitor.com.cn/ (China) Microsoft® Windows Vista™ Operating System ...
...system.The certified driver will be posted on "Appearance and Personalization". 3. Click "Advanced Settings...". Then, double-click on Samsung Monitor homepage http://www.samsung.com/. 5. Prepare a blank disk and download the driver program file at the Internet web site shown below. Driver ... by the operating system for the operating system you have. z Internet web site : http://www.samsung.com/ (Worldwide) http://www.samsung.com/monitor (U.S.A) http://www.sec.co.kr/monitor (Korea) http://www.samsungmonitor.com.cn/ (China) Microsoft® Windows Vista™ Operating System ...
User Manual (ENGLISH)
Page 20
... Driver..." If the message "Windows needs..." This monitor driver is under certifying MS logo, and this installation doesn't damage your monitor is deactivated, it means the configuration for driver software" checkbox and click "Let me pick from a list of device drivers on Samsung Monitor homepage http://www.samsung.com/ 6. in the "Driver" tab. 7. 5. If the...
... Driver..." If the message "Windows needs..." This monitor driver is under certifying MS logo, and this installation doesn't damage your monitor is deactivated, it means the configuration for driver software" checkbox and click "Let me pick from a list of device drivers on Samsung Monitor homepage http://www.samsung.com/ 6. in the "Driver" tab. 7. 5. If the...
User Manual (ENGLISH)
Page 21
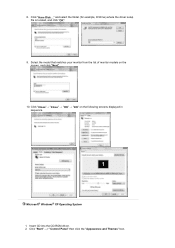
Click "Start" -> "Control Panel" then click the "Appearance and Themes" Icon. Insert CD into the CD-ROM driver. 2. 8. and select the folder (for example, D:\Drive) where the driver setup file is located, and click "OK". 9. Click "Close"→ "Close" → "OK" → "OK" on the screen, and click "Next". 10. Select the model that matches your monitor from the list of monitor models on the following screens displayed in sequence. Microsoft® Windows® XP Operating System 1. Click "Have Disk..."
Click "Start" -> "Control Panel" then click the "Appearance and Themes" Icon. Insert CD into the CD-ROM driver. 2. 8. and select the folder (for example, D:\Drive) where the driver setup file is located, and click "OK". 9. Click "Close"→ "Close" → "OK" → "OK" on the screen, and click "Next". 10. Select the model that matches your monitor from the list of monitor models on the following screens displayed in sequence. Microsoft® Windows® XP Operating System 1. Click "Have Disk..."
User Manual (ENGLISH)
Page 22
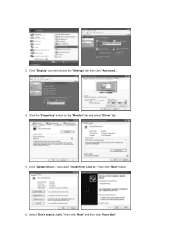
and select "Install from a list or.." then click "Next" and then click "Have disk". then click "Next" button. 6. Select "Don't search ,I will.." Click the "Properties" button on the "Monitor" tab and select "Driver" tab. 5. Click "Update Driver.." Click "Display" icon and choose the "Settings" tab then click "Advanced..". 4. 3.
and select "Install from a list or.." then click "Next" and then click "Have disk". then click "Next" button. 6. Select "Don't search ,I will.." Click the "Properties" button on the "Monitor" tab and select "Driver" tab. 5. Click "Update Driver.." Click "Display" icon and choose the "Settings" tab then click "Advanced..". 4. 3.


