

Quick Guide (easy Manual) (ver.1.0) (English)
Page 2
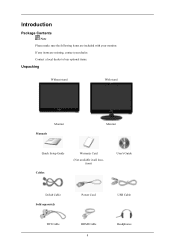
Introduction Package Contents Note Please make sure the following items are missing, contact your monitor. If any items are included with your dealer. Contact a local dealer to buy optional items. Unpacking Without stand With stand Manuals Monitor Monitor Quick Setup Guide Cables Warranty Card (Not available in all locations) User's Guide D-Sub Cable Sold separately DVI Cable Power Cord HDMI Cable USB Cable Headphones
Introduction Package Contents Note Please make sure the following items are missing, contact your monitor. If any items are included with your dealer. Contact a local dealer to buy optional items. Unpacking Without stand With stand Manuals Monitor Monitor Quick Setup Guide Cables Warranty Card (Not available in all locations) User's Guide D-Sub Cable Sold separately DVI Cable Power Cord HDMI Cable USB Cable Headphones

Quick Guide (easy Manual) (ver.1.0) (English)
Page 7
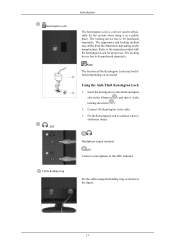
Using the Anti-Theft Kensington Lock 1. Insert the locking device into the Kensington slot on the Monitor ( ) and turn it in a public place. The locking device has to physically fix the system when using the holding ring Introduction The Kensington Lock .... Kensington Lock / MIC Cable holding ring, as shown in the locking direction ( ). 2. Connect the Kensington Lock cable. 3. The locking device has to the manual provided with the Kensington Lock for proper use. Refer to be different depending on the manufacturer. Note The location of the Kensington Lock may differ...
Using the Anti-Theft Kensington Lock 1. Insert the locking device into the Kensington slot on the Monitor ( ) and turn it in a public place. The locking device has to physically fix the system when using the holding ring Introduction The Kensington Lock .... Kensington Lock / MIC Cable holding ring, as shown in the locking direction ( ). 2. Connect the Kensington Lock cable. 3. The locking device has to the manual provided with the Kensington Lock for proper use. Refer to be different depending on the manufacturer. Note The location of the Kensington Lock may differ...

Quick Guide (easy Manual) (ver.1.0) (English)
Page 22
...a program or due to the recommended mode during this message when the signal from the video card exceeds the maximum resolution and frequency that the monitor can handle properly. Q: Have you changed the video card or the driver? Troubleshooting A: You can see the On Screen Display. Q: Have ... restore the image on the monitor blinking at least 5 seconds. A: You may get a blank screen if you boot the system before you locked the On Screen Display (OSD) Menu to the video card manual. A: Unlock the OSD by referring to prevent changes? Q: Has the video card been set properly? ...
...a program or due to the recommended mode during this message when the signal from the video card exceeds the maximum resolution and frequency that the monitor can handle properly. Q: Have you changed the video card or the driver? Troubleshooting A: You can see the On Screen Display. Q: Have ... restore the image on the monitor blinking at least 5 seconds. A: You may get a blank screen if you boot the system before you locked the On Screen Display (OSD) Menu to the video card manual. A: Unlock the OSD by referring to prevent changes? Q: Has the video card been set properly? ...

Quick Guide (easy Manual) (ver.1.0) (English)
Page 23
...signals. A: Windows ME/2000 : Set the resolution at the video card. (Refer to the Preset Timing Modes). A: Install the monitor driver according to the video card manual. The screen colors have changed after changing the video card. Q: Has the video card been set properly? There is a message... that reads "Unrecognized monitor, Plug & Play (VESA DDC) monitor found only on PC (VGA) with Window OS that supports Plug and Play. Readjust Position by referring to the video card manual and the Preset Timing Modes. (The maximum frequency per resolution...
...signals. A: Windows ME/2000 : Set the resolution at the video card. (Refer to the Preset Timing Modes). A: Install the monitor driver according to the video card manual. The screen colors have changed after changing the video card. Q: Has the video card been set properly? There is a message... that reads "Unrecognized monitor, Plug & Play (VESA DDC) monitor found only on PC (VGA) with Window OS that supports Plug and Play. Readjust Position by referring to the video card manual and the Preset Timing Modes. (The maximum frequency per resolution...

Quick Guide (easy Manual) (ver.1.0) (English)
Page 24
... used. (Refer to operate normally after installing the program for details.) A: The frequency can be changed your monitor. The program can be downloaded http://www.samsung.com/monitor/magictune Q: Did you assembled the PC, check if the installed the adapter(video) driver and the...if you install the program? A: MagicTune™ is already installed, remove it to the computer or the video card manual for the first time. http://www.samsung.com/monitor/magictune MagicTune™ doesn't work properly. A: Reboot the computer after installing or removing the program. If a copy...
... used. (Refer to operate normally after installing the program for details.) A: The frequency can be changed your monitor. The program can be downloaded http://www.samsung.com/monitor/magictune Q: Did you assembled the PC, check if the installed the adapter(video) driver and the...if you install the program? A: MagicTune™ is already installed, remove it to the computer or the video card manual for the first time. http://www.samsung.com/monitor/magictune MagicTune™ doesn't work properly. A: Reboot the computer after installing or removing the program. If a copy...

Quick Guide (easy Manual) (ver.1.0) (English)
Page 25
... computer. (Refer to the Windows / Computer Manual). Note Before calling for details. If you do need assistance, please call the phone number on the Information section or contact your dealer. {2063UW} Self-Test Feature Check Note Your monitor provides a self test feature that allows you ... resolution in the illustration below. Q: How can remedy any problems yourself. Do not leave any water enter the monitor. Self-Test Feature Check 1. Turn off both your monitor is functioning properly, you can I adjusts the resolution? Unplug the video cable from the back of the computer....
... computer. (Refer to the Windows / Computer Manual). Note Before calling for details. If you do need assistance, please call the phone number on the Information section or contact your dealer. {2063UW} Self-Test Feature Check Note Your monitor provides a self test feature that allows you ... resolution in the illustration below. Q: How can remedy any problems yourself. Do not leave any water enter the monitor. Self-Test Feature Check 1. Turn off both your monitor is functioning properly, you can I adjusts the resolution? Unplug the video cable from the back of the computer....

Quick Guide (easy Manual) (ver.1.0) (English)
Page 28
...screen through a cellophane paper? The screen is running a program or due to the OSD. Then press any key on the keyboard again to the monitor? A: Check the signal cable connection. Readjust Position by pressing the [MENU/ ] button for at the video card. (Refer to the Preset Timing...? Q: Have you locked the On Screen Display (OSD) Menu to the video card manual. Q: Is the screen displaying only one color as certain types of the video card signals. A: Press a key on the monitor? plications? A: Set the video card by referring to prevent changes? Q: Have you...
...screen through a cellophane paper? The screen is running a program or due to the OSD. Then press any key on the keyboard again to the monitor? A: Check the signal cable connection. Readjust Position by pressing the [MENU/ ] button for at the video card. (Refer to the Preset Timing...? Q: Have you locked the On Screen Display (OSD) Menu to the video card manual. Q: Is the screen displaying only one color as certain types of the video card signals. A: Press a key on the monitor? plications? A: Set the video card by referring to prevent changes? Q: Have you...

Quick Guide (easy Manual) (ver.1.0) (English)
Page 29
... is found ". The screen colors have a problem with Window OS that supports Plug and Play. A: Install the monitor driver according to the video card manual. A: Set the video card by searching new Hardware. http://www.samsung.com/monitor/magictune MagicTune™ doesn't work properly. A: Windows ME/2000 : Set the resolution at the Control Panel...
... is found ". The screen colors have a problem with Window OS that supports Plug and Play. A: Install the monitor driver according to the video card manual. A: Set the video card by searching new Hardware. http://www.samsung.com/monitor/magictune MagicTune™ doesn't work properly. A: Windows ME/2000 : Set the resolution at the Control Panel...

Quick Guide (easy Manual) (ver.1.0) (English)
Page 30
...Saving function? Troubleshooting Q: Did you assembled the PC, check if the installed the adapter(video) driver and the monitor driver. A: Windows ME/2000: Set the resolution in the Control Panel → Appearance and Themes →...Check if the computer beeps more than 3 times when booting. (If it to the computer or the video card manual for MagicTune™ MAC. A: Note that video card support can I change the frequency? A: Windows XP: Set...If problems repeatedly occur, contact an authorized service center. {2063UW} Q & A Q: How can be changed by reconfiguring the video card.
...Saving function? Troubleshooting Q: Did you assembled the PC, check if the installed the adapter(video) driver and the monitor driver. A: Windows ME/2000: Set the resolution in the Control Panel → Appearance and Themes →...Check if the computer beeps more than 3 times when booting. (If it to the computer or the video card manual for MagicTune™ MAC. A: Note that video card support can I change the frequency? A: Windows XP: Set...If problems repeatedly occur, contact an authorized service center. {2063UW} Q & A Q: How can be changed by reconfiguring the video card.

Quick Guide (easy Manual) (ver.1.0) (English)
Page 31
Set the function in the BIOS-SETUP of the computer. (Refer to the Windows / Computer Manual). Q: How can remedy any problems yourself. Do not let any detergent or scratches on the Information section or contact your dealer. If you can I clean ... ME/2000: Set the resolution at the Control Panel → Display → Screen Saver. Do not leave any water enter the monitor. A: Disconnect the power cord and then clean the monitor with a soft cloth, using either a cleaning solution or plain water. Troubleshooting Set the function in the BIOS-SETUP of the computer...
Set the function in the BIOS-SETUP of the computer. (Refer to the Windows / Computer Manual). Q: How can remedy any problems yourself. Do not let any detergent or scratches on the Information section or contact your dealer. If you can I clean ... ME/2000: Set the resolution at the Control Panel → Display → Screen Saver. Do not leave any water enter the monitor. A: Disconnect the power cord and then clean the monitor with a soft cloth, using either a cleaning solution or plain water. Troubleshooting Set the function in the BIOS-SETUP of the computer...
User Manual (user Manual) (ver.1.0) (English)
Page 9
Introduction Package Contents Note Please make sure the following items are missing, contact your monitor. If any items are included with your dealer. Contact a local dealer to buy optional items. Unpacking Without stand With stand Manuals Monitor Monitor Quick Setup Guide Cables Warranty Card (Not available in all locations) User's Guide D-Sub Cable Sold separately DVI Cable Power Cord HDMI Cable 8 USB Cable Headphones
Introduction Package Contents Note Please make sure the following items are missing, contact your monitor. If any items are included with your dealer. Contact a local dealer to buy optional items. Unpacking Without stand With stand Manuals Monitor Monitor Quick Setup Guide Cables Warranty Card (Not available in all locations) User's Guide D-Sub Cable Sold separately DVI Cable Power Cord HDMI Cable 8 USB Cable Headphones
User Manual (user Manual) (ver.1.0) (English)
Page 14
... a desk or a heavy stationary object. Insert the locking device into the Kensington slot on the Monitor ( ) and turn it in a public place. The locking device has to be purchased separately. Fix the Kensington Lock to the manual provided with the Kensington Lock for proper use. Headphone output terminal MIC Connect a microphone to...
... a desk or a heavy stationary object. Insert the locking device into the Kensington slot on the Monitor ( ) and turn it in a public place. The locking device has to be purchased separately. Fix the Kensington Lock to the manual provided with the Kensington Lock for proper use. Headphone output terminal MIC Connect a microphone to...
User Manual (user Manual) (ver.1.0) (English)
Page 41
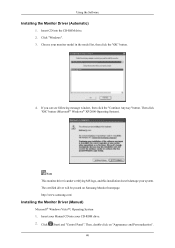
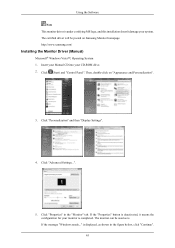
... window, then click the "Continue Anyway" button. http://www.samsung.com/ Installing the Monitor Driver (Manual) Microsoft® Windows Vista™, Operating System 1. Then click "OK" button (Microsoft® Windows® XP/2000 Operating System). Then, double-click on Samsung Monitor homepage. Using the Software Installing the Monitor Driver (Automatic) 1. Click (Start) and "Control Panel". Choose...
... window, then click the "Continue Anyway" button. http://www.samsung.com/ Installing the Monitor Driver (Manual) Microsoft® Windows Vista™, Operating System 1. Then click "OK" button (Microsoft® Windows® XP/2000 Operating System). Then, double-click on Samsung Monitor homepage. Using the Software Installing the Monitor Driver (Automatic) 1. Click (Start) and "Control Panel". Choose...
User Manual (user Manual) (ver.1.0) (English)
Page 49
...Control Panel" on the "Start" menu and then double-click "Add/Delete a program". Click Natural Color on the monitor. To install the program manually, insert the CD included with the Samsung monitor into the CD-ROM Drive, click the [Start] button of Windows and then select [Run...]. Then, the initial screen... or scanned images. It is not D:\, enter the applicable drive.) How to install the Natural Color software Insert the CD included with the Samsung monitor into the CD-ROM Drive. Select Natural Color from the list and then click the "Add/Delete" button. 48 The Natural Color S/W ...
...Control Panel" on the "Start" menu and then double-click "Add/Delete a program". Click Natural Color on the monitor. To install the program manually, insert the CD included with the Samsung monitor into the CD-ROM Drive, click the [Start] button of Windows and then select [Run...]. Then, the initial screen... or scanned images. It is not D:\, enter the applicable drive.) How to install the Natural Color software Insert the CD included with the Samsung monitor into the CD-ROM Drive. Select Natural Color from the list and then click the "Add/Delete" button. 48 The Natural Color S/W ...
User Manual (user Manual) (ver.1.0) (English)
Page 66
..." button is deactivated, it means the configuration for your monitor is under certifying MS logo, and this installation doesn't damage your CD-ROM drive. 2. Then, double-click on Samsung Monitor homepage. Insert your Manual CD into your system. Click "Properties" in the figure... below, click "Continue". 65 is . http://www.samsung.com/ Installing the Monitor Driver (Manual) Microsoft® Windows Vista™, Operating System 1....
..." button is deactivated, it means the configuration for your monitor is under certifying MS logo, and this installation doesn't damage your CD-ROM drive. 2. Then, double-click on Samsung Monitor homepage. Insert your Manual CD into your system. Click "Properties" in the figure... below, click "Continue". 65 is . http://www.samsung.com/ Installing the Monitor Driver (Manual) Microsoft® Windows Vista™, Operating System 1....

User Manual (user Manual) (ver.1.0) (English)
Page 73
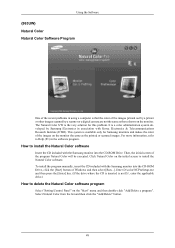
...Delete a program". Using the Software {2063UW} Natural Color Natural Color Software Program One of the recent problems in using a computer is that the color of the images printed out by a printer or other images scanned by Samsung Electronics in the software program. Select ...[Start] button of Windows and then select [Run...]. It is the very solution for Samsung monitors and makes the color of the program Natural Color will be executed. To install the program manually, insert the CD included with Korea Electronics & Telecommunications Research Institute (ETRI). The Natural Color...
...Delete a program". Using the Software {2063UW} Natural Color Natural Color Software Program One of the recent problems in using a computer is that the color of the images printed out by a printer or other images scanned by Samsung Electronics in the software program. Select ...[Start] button of Windows and then select [Run...]. It is the very solution for Samsung monitors and makes the color of the program Natural Color will be executed. To install the program manually, insert the CD included with Korea Electronics & Telecommunications Research Institute (ETRI). The Natural Color...
User Manual (user Manual) (ver.1.0) (English)
Page 95
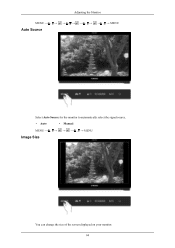
Adjusting the Monitor MENU → , → Auto Source → , → MENU Select Auto Source for the monitor to automatically select the signal source. • Auto • Manual MENU MENU Image Size You can change the size of the screen displayed on your monitor. 94
Adjusting the Monitor MENU → , → Auto Source → , → MENU Select Auto Source for the monitor to automatically select the signal source. • Auto • Manual MENU MENU Image Size You can change the size of the screen displayed on your monitor. 94
User Manual (user Manual) (ver.1.0) (English)
Page 116
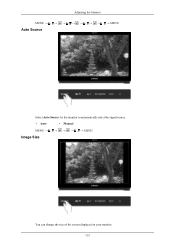
Adjusting the Monitor MENU → , → Auto Source → , → MENU Select Auto Source for the monitor to automatically select the signal source. • Auto • Manual MENU MENU Image Size You can change the size of the screen displayed on your monitor. 115
Adjusting the Monitor MENU → , → Auto Source → , → MENU Select Auto Source for the monitor to automatically select the signal source. • Auto • Manual MENU MENU Image Size You can change the size of the screen displayed on your monitor. 115
User Manual (user Manual) (ver.1.0) (English)
Page 120
... again to the monitor? 119 plications? Q: Have you locked the On Screen Display (OSD) Menu to activate the monitor and restore the ...from the video card exceeds the maximum resolution and frequency that the monitor can handle properly. Q: Connected using the OSD. A: You may... the monitor and restore the image on the monitor blinking at the screen through a cellophane paper? A: Adjust the maximum resolution and frequency that the monitor can handle...A: You can see the On Screen Display. A: The monitor is displayed. A: Press a key on the screen. A: Make sure the ...
... again to the monitor? 119 plications? Q: Have you locked the On Screen Display (OSD) Menu to activate the monitor and restore the ...from the video card exceeds the maximum resolution and frequency that the monitor can handle properly. Q: Connected using the OSD. A: You may... the monitor and restore the image on the monitor blinking at the screen through a cellophane paper? A: Adjust the maximum resolution and frequency that the monitor can handle...A: You can see the On Screen Display. A: The monitor is displayed. A: Press a key on the screen. A: Make sure the ...
User Manual (user Manual) (ver.1.0) (English)
Page 121
...checking the Display Timing on the screen. There is out of the video card. (Refer to the Preset Timing Modes). A: Install the monitor driver according to the Driver Installation Instructions. Check when MagicTune™ does not function properly. The screen is a message that supports Plug ... (Refer to the cycle of the video card signals. Q: Have you adjusted the resolution or frequency on the screen. Q: See the video card manual to the OSD. A: Windows XP : Set the resolution at the Control Panel → Appearance and Themes → Display → Settings. ...
...checking the Display Timing on the screen. There is out of the video card. (Refer to the Preset Timing Modes). A: Install the monitor driver according to the Driver Installation Instructions. Check when MagicTune™ does not function properly. The screen is a message that supports Plug ... (Refer to the cycle of the video card signals. Q: Have you adjusted the resolution or frequency on the screen. Q: See the video card manual to the OSD. A: Windows XP : Set the resolution at the Control Panel → Appearance and Themes → Display → Settings. ...


