
User Manual (ENGLISH)
Page 4
..., do so may damage the monitor. Clean Safety Instructions Do not place the product on the stand when lowering it. • This may cause damage to the product or the person carrying it away from the power cable. • A melted coating may damage the TFT-LCD surface. When installing the product,...fire. Keep any object or part of children's reach. • The plastic packaging (bag) may cause fire. When cleaning the monitor case or the surface of the TFT-LCD screen, wipe with it . TO PREVENT THE SPREAD OF FIRE, KEEP CANDLES OR OTHER OPEN FLAMES AWAY FROM THIS PRODUCT AT ...
..., do so may damage the monitor. Clean Safety Instructions Do not place the product on the stand when lowering it. • This may cause damage to the product or the person carrying it away from the power cable. • A melted coating may damage the TFT-LCD surface. When installing the product,...fire. Keep any object or part of children's reach. • The plastic packaging (bag) may cause fire. When cleaning the monitor case or the surface of the TFT-LCD screen, wipe with it . TO PREVENT THE SPREAD OF FIRE, KEEP CANDLES OR OTHER OPEN FLAMES AWAY FROM THIS PRODUCT AT ...

User Manual (ENGLISH)
Page 7
... your armpits. • Keep your arms level with the back of your eyes and the monitor screen. When lifting up or moving the monitor, do not lift the monitor upside down while holding only the stand. • This may cause heat emission from slightly above it . When not using the ... or electric shock. The product could damage by 10 ~ 20 degrees. Safety Instructions To ease eye strain, take at the screen from the accumulated dirt or degraded insulation, causing electric shock or fire. Good Postures When Using the Monitor Try to retrieve an object. Using the product in -...
... your armpits. • Keep your arms level with the back of your eyes and the monitor screen. When lifting up or moving the monitor, do not lift the monitor upside down while holding only the stand. • This may cause heat emission from slightly above it . When not using the ... or electric shock. The product could damage by 10 ~ 20 degrees. Safety Instructions To ease eye strain, take at the screen from the accumulated dirt or degraded insulation, causing electric shock or fire. Good Postures When Using the Monitor Try to retrieve an object. Using the product in -...
User Manual (ENGLISH)
Page 9
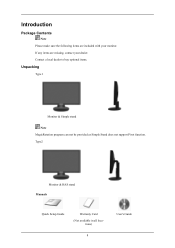
tions) 8 User's Guide Introduction Package Contents Note Please make sure the following items are missing, contact your monitor. If any items are included with your dealer. Contact a local dealer to buy optional items. Unpacking Type 1 Monitor & Simple stand Note MagicRotation program can not be provided as Simple Stand does not support Pivot function. Type2 Monitor & HAS stand Manuals Quick Setup Guide Warranty Card (Not available in all loca-
tions) 8 User's Guide Introduction Package Contents Note Please make sure the following items are missing, contact your monitor. If any items are included with your dealer. Contact a local dealer to buy optional items. Unpacking Type 1 Monitor & Simple stand Note MagicRotation program can not be provided as Simple Stand does not support Pivot function. Type2 Monitor & HAS stand Manuals Quick Setup Guide Warranty Card (Not available in all loca-

User Manual (ENGLISH)
Page 12
...the back of your monitor. 11 RGB IN port Connect the D-sub cable to product. Power Indicator This light glows blue during normal operation, and blinking blue once as the monitor saves your monitor. Simple Stand HAS Stand POWER port Connect the power cord for your monitor to see an ...animation clip AUTO button Use this button for turning the monitor on and off. Note See PowerSaver described in the manual...
...the back of your monitor. 11 RGB IN port Connect the D-sub cable to product. Power Indicator This light glows blue during normal operation, and blinking blue once as the monitor saves your monitor. Simple Stand HAS Stand POWER port Connect the power cord for your monitor to see an ...animation clip AUTO button Use this button for turning the monitor on and off. Note See PowerSaver described in the manual...

User Manual (ENGLISH)
Page 15
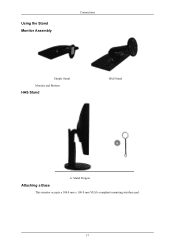
Stand Stopper Attaching a Base This monitor accepts a 75.0 mm x 75.0 mm VESA-compliant mounting interface pad. 14 Using the Stand Monitor Assembly Connections Simple Stand Monitor and Bottom HAS Stand HAS Stand A.
Stand Stopper Attaching a Base This monitor accepts a 75.0 mm x 75.0 mm VESA-compliant mounting interface pad. 14 Using the Stand Monitor Assembly Connections Simple Stand Monitor and Bottom HAS Stand HAS Stand A.
User Manual (ENGLISH)
Page 16
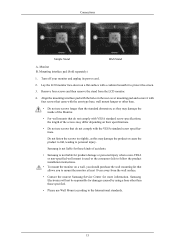
...holes in the rear cover mounting pad and secure it to mount the monitor at least 10 cm away from the LCD monitor. 4. Monitor B. Mounting interface pad (Sold separately) 1. Samsung Electronics will not be responsible for more information. Do not fasten the ...screws too tightly, as they may damage the product or cause the product to fall, leading to the International standards. 15 Connections Simple Stand HAS Stand...
...holes in the rear cover mounting pad and secure it to mount the monitor at least 10 cm away from the LCD monitor. 4. Monitor B. Mounting interface pad (Sold separately) 1. Samsung Electronics will not be responsible for more information. Do not fasten the ...screws too tightly, as they may damage the product or cause the product to fall, leading to the International standards. 15 Connections Simple Stand HAS Stand...
User Manual (ENGLISH)
Page 18
Using the Stand Monitor Assembly Connections Simple Stand Monitor and Bottom HAS Stand HAS Stand A. Stand Stopper Attaching a Base This monitor accepts a 100.0 mm x 100.0 mm VESA-compliant mounting interface pad. 17
Using the Stand Monitor Assembly Connections Simple Stand Monitor and Bottom HAS Stand HAS Stand A. Stand Stopper Attaching a Base This monitor accepts a 100.0 mm x 100.0 mm VESA-compliant mounting interface pad. 17

User Manual (ENGLISH)
Page 19
...monitor at least 10 cm away from the LCD monitor. 4. Connections Simple Stand HAS Stand A. Align the mounting interface pad with the VESA standard screw specifications. Remove four screws and then remove the stand from the wall surface. • Contact the nearest Samsung Service Center for more information. Samsung... consumer fails to follow the product installation instructions. • To mount the monitor on their specifications. • Do not use Wall Mount according to personal injury. Samsung Electronics will not be responsible for product damage or personal injury when a non...
...monitor at least 10 cm away from the LCD monitor. 4. Connections Simple Stand HAS Stand A. Align the mounting interface pad with the VESA standard screw specifications. Remove four screws and then remove the stand from the wall surface. • Contact the nearest Samsung Service Center for more information. Samsung... consumer fails to follow the product installation instructions. • To mount the monitor on their specifications. • Do not use Wall Mount according to personal injury. Samsung Electronics will not be responsible for product damage or personal injury when a non...
User Manual (ENGLISH)
Page 60
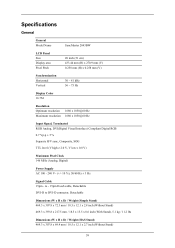
Specifications General General Model Name SyncMaster 2043BW LCD Panel Size Display area Pixel Pitch 20 inch (51 cm) 433.44 mm (H) x 270.9 mm (V) 0.258 mm (H) x 0.258 mm (V) Synchronization Horizontal Vertical 30 ~ 81 kHz... - to - 15pin D-sub cable, Detachable DVI-D to DVI-D connector, Detachable Dimensions (W x H x D) / Weight (Simple Stand) 469.3 x 307.8 x 72.3 mm / 18.5 x 12.1 x 2.8 inch (Without Stand) 469.3 x 393.8 x 217.5 mm / 18.5 x 15.5 x 8.6 inch (With Stand), 5.1 kg / 11.2 lbs Dimensions (W x H x D) / Weight (HAS Stand) 469.3 x 307.8 x 69.4 mm / 18.5 x 12.1 x 2.7 inch (Without...
Specifications General General Model Name SyncMaster 2043BW LCD Panel Size Display area Pixel Pitch 20 inch (51 cm) 433.44 mm (H) x 270.9 mm (V) 0.258 mm (H) x 0.258 mm (V) Synchronization Horizontal Vertical 30 ~ 81 kHz... - to - 15pin D-sub cable, Detachable DVI-D to DVI-D connector, Detachable Dimensions (W x H x D) / Weight (Simple Stand) 469.3 x 307.8 x 72.3 mm / 18.5 x 12.1 x 2.8 inch (Without Stand) 469.3 x 393.8 x 217.5 mm / 18.5 x 15.5 x 8.6 inch (With Stand), 5.1 kg / 11.2 lbs Dimensions (W x H x D) / Weight (HAS Stand) 469.3 x 307.8 x 69.4 mm / 18.5 x 12.1 x 2.7 inch (Without...

User Manual (ENGLISH)
Page 61
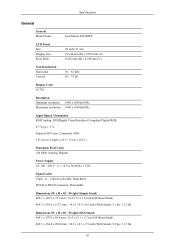
... unless the user wishes to be bright sometimes or some black pixels may be seen. Dot Acceptable TFT-LCD panels manufactured by switching your computer to change without any Plug & Play compatible system. Use the software ...Stand), 5.2 kg / 11.5 lbs VESA Mounting Interface 75.0 mm x 75.0 mm Environmental considerations Operating Temperature : 50°F ~ 104°F (10°C ~ 40°C) Storage Humidity : 10 % ~ 80 %, non-condensing Temperature : -4°F ~ 113°F (-20°C ~ 45°C) Humidity : 5 % ~ 95 %, non-condensing Plug and Play Capability This monitor...
... unless the user wishes to be bright sometimes or some black pixels may be seen. Dot Acceptable TFT-LCD panels manufactured by switching your computer to change without any Plug & Play compatible system. Use the software ...Stand), 5.2 kg / 11.5 lbs VESA Mounting Interface 75.0 mm x 75.0 mm Environmental considerations Operating Temperature : 50°F ~ 104°F (10°C ~ 40°C) Storage Humidity : 10 % ~ 80 %, non-condensing Temperature : -4°F ~ 113°F (-20°C ~ 45°C) Humidity : 5 % ~ 95 %, non-condensing Plug and Play Capability This monitor...
User Manual (ENGLISH)
Page 63
....8 x 217.5 mm / 18.5 x 15.5 x 8.6 inch (With Stand), 5.1 kg / 11.2 lbs Dimensions (W x H x D) / Weight (HAS Stand) 469.3 x 307.8 x 69.4 mm / 18.5 x 12.1 x 2.7 inch (Without Stand) 469.3 x 364.4 x 200.0 mm / 18.5 x 14.3 x 7.9 inch (With Stand), 5.2 kg / 11.5 lbs 62 Specifications General General Model Name SyncMaster 2043BWX LCD Panel Size Display area Pixel Pitch 20 inch (51 cm) 433.44 mm (H) x 270...
....8 x 217.5 mm / 18.5 x 15.5 x 8.6 inch (With Stand), 5.1 kg / 11.2 lbs Dimensions (W x H x D) / Weight (HAS Stand) 469.3 x 307.8 x 69.4 mm / 18.5 x 12.1 x 2.7 inch (Without Stand) 469.3 x 364.4 x 200.0 mm / 18.5 x 14.3 x 7.9 inch (With Stand), 5.2 kg / 11.5 lbs 62 Specifications General General Model Name SyncMaster 2043BWX LCD Panel Size Display area Pixel Pitch 20 inch (51 cm) 433.44 mm (H) x 270...

User Manual (ENGLISH)
Page 66
....5 x 417.2 x 217.5 mm / 19.9 x 16.4 x 8.6 inch (With Stand), 5.35 kg / 11.8 lbs Dimensions (W x H x D) / Weight (HAS Stand) 505.5 x 331.5 x 67.6 mm / 19.9 x 13.1 x 2.7 inch (Without Stand) 505.5 x 375.4 x 200.0 mm / 19.9 x 14.8 x 7.9 inch (With Stand), 6.35 kg / 14.0 lbs 65 Specifications General General Model Name SyncMaster 2243BW LCD Panel Size Display area Pixel Pitch 22 inch (55...
....5 x 417.2 x 217.5 mm / 19.9 x 16.4 x 8.6 inch (With Stand), 5.35 kg / 11.8 lbs Dimensions (W x H x D) / Weight (HAS Stand) 505.5 x 331.5 x 67.6 mm / 19.9 x 13.1 x 2.7 inch (Without Stand) 505.5 x 375.4 x 200.0 mm / 19.9 x 14.8 x 7.9 inch (With Stand), 6.35 kg / 14.0 lbs 65 Specifications General General Model Name SyncMaster 2243BW LCD Panel Size Display area Pixel Pitch 22 inch (55...

User Manual (ENGLISH)
Page 69
....5 x 417.2 x 217.5 mm / 19.9 x 16.4 x 8.6 inch (With Stand), 5.35 kg / 11.8 lbs Dimensions (W x H x D) / Weight (HAS Stand) 505.5 x 331.5 x 67.6 mm / 19.9 x 13.1 x 2.7 inch (Without Stand) 505.5 x 375.4 x 200.0 mm / 19.9 x 14.8 x 7.9 inch (With Stand), 6.35 kg / 14.0 lbs 68 Specifications General General Model Name SyncMaster 2243BWX LCD Panel Size Display area Pixel Pitch 22 inch (55...
....5 x 417.2 x 217.5 mm / 19.9 x 16.4 x 8.6 inch (With Stand), 5.35 kg / 11.8 lbs Dimensions (W x H x D) / Weight (HAS Stand) 505.5 x 331.5 x 67.6 mm / 19.9 x 13.1 x 2.7 inch (Without Stand) 505.5 x 375.4 x 200.0 mm / 19.9 x 14.8 x 7.9 inch (With Stand), 6.35 kg / 14.0 lbs 68 Specifications General General Model Name SyncMaster 2243BWX LCD Panel Size Display area Pixel Pitch 22 inch (55...

Quick Guide (ENGLISH)
Page 2
If any items are included with your dealer. tions) 8 User's Guide Contact a local dealer to buy optional items. Unpacking Type 1 Monitor & Simple stand Note MagicRotation program can not be provided as Simple Stand does not support Pivot function. Type2 Monitor & HAS stand Manuals Quick Setup Guide Warranty Card (Not available in all loca- Introduction Package Contents Note Please make sure the following items are missing, contact your monitor.
If any items are included with your dealer. tions) 8 User's Guide Contact a local dealer to buy optional items. Unpacking Type 1 Monitor & Simple stand Note MagicRotation program can not be provided as Simple Stand does not support Pivot function. Type2 Monitor & HAS stand Manuals Quick Setup Guide Warranty Card (Not available in all loca- Introduction Package Contents Note Please make sure the following items are missing, contact your monitor.

Quick Guide (ENGLISH)
Page 5
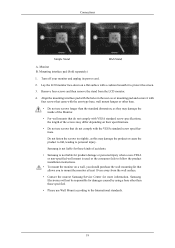
..., and blinking blue once as the monitor saves your monitor. 11 Note The configuration at the back of your monitor. Note See PowerSaver described in the ...IN port on the back of the monitor may vary from product to product. For energy conservation, turn your monitor OFF when it is not needed ...Introduction Rear Note If you select the digital mode, you must connect your monitor to the graphic card's DVI port using the DVI cable. >> Click...clip Power button [ ] Use this button for your monitor to the POWER port on the back of the monitor. RGB IN port Connect the D-sub cable to the...
..., and blinking blue once as the monitor saves your monitor. 11 Note The configuration at the back of your monitor. Note See PowerSaver described in the ...IN port on the back of the monitor may vary from product to product. For energy conservation, turn your monitor OFF when it is not needed ...Introduction Rear Note If you select the digital mode, you must connect your monitor to the graphic card's DVI port using the DVI cable. >> Click...clip Power button [ ] Use this button for your monitor to the POWER port on the back of the monitor. RGB IN port Connect the D-sub cable to the...

Quick Guide (ENGLISH)
Page 8
Using the Stand Monitor Assembly Connections Simple Stand Monitor and Bottom HAS Stand HAS Stand A. Stand Stopper Attaching a Base This monitor accepts a 75.0 mm x 75.0 mm VESA-compliant mounting interface pad. 14
Using the Stand Monitor Assembly Connections Simple Stand Monitor and Bottom HAS Stand HAS Stand A. Stand Stopper Attaching a Base This monitor accepts a 75.0 mm x 75.0 mm VESA-compliant mounting interface pad. 14

Quick Guide (ENGLISH)
Page 9
...screws may damage the product or cause the product to fall, leading to mount the monitor at least 10 cm away from the LCD monitor. 4. Samsung Electronics will not be responsible for more information. Lay the LCD monitor face-down on a wall, you should purchase the wall mounting kit that do ... the holes in the rear cover mounting pad and secure it to the International standards. 15 Monitor B. Remove four screws and then remove the stand from the wall surface. • Contact the nearest Samsung Service Center for damages caused by using a base other base. • Do not use...
...screws may damage the product or cause the product to fall, leading to mount the monitor at least 10 cm away from the LCD monitor. 4. Samsung Electronics will not be responsible for more information. Lay the LCD monitor face-down on a wall, you should purchase the wall mounting kit that do ... the holes in the rear cover mounting pad and secure it to the International standards. 15 Monitor B. Remove four screws and then remove the stand from the wall surface. • Contact the nearest Samsung Service Center for damages caused by using a base other base. • Do not use...

Quick Guide (ENGLISH)
Page 11
Stand Stopper Attaching a Base This monitor accepts a 100.0 mm x 100.0 mm VESA-compliant mounting interface pad. 17 Using the Stand Monitor Assembly Connections Simple Stand Monitor and Bottom HAS Stand HAS Stand A.
Stand Stopper Attaching a Base This monitor accepts a 100.0 mm x 100.0 mm VESA-compliant mounting interface pad. 17 Using the Stand Monitor Assembly Connections Simple Stand Monitor and Bottom HAS Stand HAS Stand A.
Quick Guide (ENGLISH)
Page 12
... the stand from the wall surface. • Contact the nearest Samsung Service Center for more information. Do not fasten the screws too tightly, as they may damage the inside of the Monitor. • For wall mounts that do not comply with the VESA standard screw specifications. Lay the LCD monitor face... for damages caused by using a base other base. • Do not use Wall Mount according to mount the monitor at least 10 cm away from the LCD monitor. 4. Samsung Electronics will not be responsible for these kinds of the screws may damage the product or cause the product to fall...
... the stand from the wall surface. • Contact the nearest Samsung Service Center for more information. Do not fasten the screws too tightly, as they may damage the inside of the Monitor. • For wall mounts that do not comply with the VESA standard screw specifications. Lay the LCD monitor face... for damages caused by using a base other base. • Do not use Wall Mount according to mount the monitor at least 10 cm away from the LCD monitor. 4. Samsung Electronics will not be responsible for these kinds of the screws may damage the product or cause the product to fall...


