User Manual (user Manual) (English)
Page 2
Main Page Safety Instructions Notational Power Installation Cleaning Other Introduction Unpacking Front Rear Setup Connecting Your Monitor Installing the Monitor Driver Automatic Manual Installing VESA compliant mounting On-Screen Display Troubleshooting Check List Q & A Self-Test Feature Check Specifications General Specifications PowerSaver Preset Display Modes Information Service Terms Regulatory Natural Color For Better Display Authority
Main Page Safety Instructions Notational Power Installation Cleaning Other Introduction Unpacking Front Rear Setup Connecting Your Monitor Installing the Monitor Driver Automatic Manual Installing VESA compliant mounting On-Screen Display Troubleshooting Check List Q & A Self-Test Feature Check Specifications General Specifications PowerSaver Preset Display Modes Information Service Terms Regulatory Natural Color For Better Display Authority

User Manual (user Manual) (English)
Page 4
... or fire. Do not use a damaged or loose plug. z This may cause electric shock or equipment damage. z This may cause a fire. z Failure to the active screen mode. Do not excessively bend the plug and wire nor place heavy objects upon them, which could cause damage. Disconnect the plug from the outlet... during storms or lightening or if it is not used for a long period of time, set your PC to DPMS. If using a screen saver, set it to do so may cause an electric shock or fire. z This may cause an electric shock or fire.
... or fire. Do not use a damaged or loose plug. z This may cause electric shock or equipment damage. z This may cause a fire. z Failure to the active screen mode. Do not excessively bend the plug and wire nor place heavy objects upon them, which could cause damage. Disconnect the plug from the outlet... during storms or lightening or if it is not used for a long period of time, set your PC to DPMS. If using a screen saver, set it to do so may cause an electric shock or fire. z This may cause an electric shock or fire.

User Manual (user Manual) (English)
Page 8
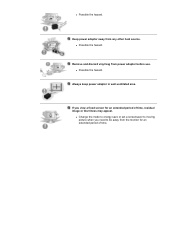
Keep power adaptor away from power adaptor before use. Remove and discard vinyl bag from any other heat source. If you need to be away from the monitor for an extended period of time. z Possible fire hazard. z Change the mode to energy save or set a screensaver to moving picture when you view a fixed screen for an extended period of time, residual image or blurriness may appear. Always keep power adaptor in well-ventilated area. z Possible fire hazard. z Possible fire hazard.
Keep power adaptor away from power adaptor before use. Remove and discard vinyl bag from any other heat source. If you need to be away from the monitor for an extended period of time. z Possible fire hazard. z Change the mode to energy save or set a screensaver to moving picture when you view a fixed screen for an extended period of time, residual image or blurriness may appear. Always keep power adaptor in well-ventilated area. z Possible fire hazard. z Possible fire hazard.
User Manual (user Manual) (English)
Page 10
z Possible fire hazard. Always keep power adaptor in well-ventilated area. If you need to moving picture when you view a fixed screen for an extended period of time, residual image or blurriness may appear. z Change the mode to energy save or set a screensaver to be away from the monitor for an extended period of time. z Possible fire hazard. Remove and discard vinyl bag from any other heat source. Keep power adaptor away from power adaptor before use. z Possible fire hazard.
z Possible fire hazard. Always keep power adaptor in well-ventilated area. If you need to moving picture when you view a fixed screen for an extended period of time, residual image or blurriness may appear. z Change the mode to energy save or set a screensaver to be away from the monitor for an extended period of time. z Possible fire hazard. Remove and discard vinyl bag from any other heat source. Keep power adaptor away from power adaptor before use. z Possible fire hazard.

User Manual (user Manual) (English)
Page 13
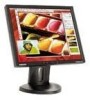
SyncMaster 173T/193T/191T plus/153T Unpacking Front Rear 1. When push the 'Source' button, then Selects the Video signal while the OSD is pressed to the graphic card with a digital port using the DVI cable. 3. Each mode has its own preconfigured brightness value. You can easily select one of the screen displaying the current mode...
SyncMaster 173T/193T/191T plus/153T Unpacking Front Rear 1. When push the 'Source' button, then Selects the Video signal while the OSD is pressed to the graphic card with a digital port using the DVI cable. 3. Each mode has its own preconfigured brightness value. You can easily select one of the screen displaying the current mode...
User Manual (user Manual) (English)
Page 17
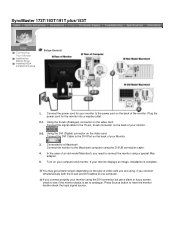
SyncMaster 173T/193T/191T plus/153T Connecting Your Monitor Installing the Monitor Driver Installing VESA compliant mounting Setup-General 1. Plug the power cord for... outlet. 2-1. Using the D-sub (Analogue) connector on your monitor to connect the monitor using the DVI connector but get a blank screen depending on the video card. Connect the DVI Cable to the DVI Port on the back of an old model Macintosh, you connect ...sub connector on the back of the monitor. Connect the monitor to analogue. You may get a blank or fuzzy screen, check to see if the monitor status is complete.
SyncMaster 173T/193T/191T plus/153T Connecting Your Monitor Installing the Monitor Driver Installing VESA compliant mounting Setup-General 1. Plug the power cord for... outlet. 2-1. Using the D-sub (Analogue) connector on your monitor to connect the monitor using the DVI connector but get a blank screen depending on the video card. Connect the DVI Cable to the DVI Port on the back of an old model Macintosh, you connect ...sub connector on the back of the monitor. Connect the monitor to analogue. You may get a blank or fuzzy screen, check to see if the monitor status is complete.
User Manual (user Manual) (English)
Page 26
...location of X-Window. 10. Specify A:\(D:\driver) then click "OK" button. 10. Continue choosing "Close" button and "OK" button until you see the screen working normally after clicking Test. Set a mouse for your monitor. 7. You have finished setting up your computer. 4. then click "Next" button. 8. ...need to use (Resolution, Number of system setting file. 1. Set a Keyboard for setting your monitor. (You can get some other screen for warning message or others, then click the appreciate option for your monitor.) Microsoft® Windows® NT Operating System 1. Linux ...
...location of X-Window. 10. Specify A:\(D:\driver) then click "OK" button. 10. Continue choosing "Close" button and "OK" button until you see the screen working normally after clicking Test. Set a mouse for your monitor. 7. You have finished setting up your computer. 4. then click "Next" button. 8. ...need to use (Resolution, Number of system setting file. 1. Set a Keyboard for setting your monitor. (You can get some other screen for warning message or others, then click the appreciate option for your monitor.) Microsoft® Windows® NT Operating System 1. Linux ...

User Manual (user Manual) (English)
Page 27
... with the holes in the Rear Cover Mounting Pad and secure it with the four screws that came with a cushion beneath it to protect the screen. 3. Turn off your monitor and unplug its power cord. 2. Attaching a base NOTE: This monitor accepts a 100mm x 100mm VESA-compliant mounting interface pad. 1. Lay the LCD...
... with the holes in the Rear Cover Mounting Pad and secure it with the four screws that came with a cushion beneath it to protect the screen. 3. Turn off your monitor and unplug its power cord. 2. Attaching a base NOTE: This monitor accepts a 100mm x 100mm VESA-compliant mounting interface pad. 1. Lay the LCD...

User Manual (user Manual) (English)
Page 30
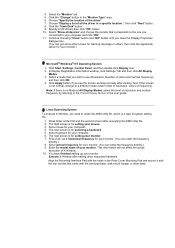
Adjust Contrast. 1. Push the Menu button. 2. Push the Menu button to open the Contrast adjustment screen. 4. Push the Menu button to open the Brightness adjustment screen. 3. Push the [ - ] button or [ + ] button until the Contrast screen is not on the screen, Push the [ + ] or [ - ] button to adjust Contrast - Push the Menu button. 2. Direct Access Feature : When...
Adjust Contrast. 1. Push the Menu button. 2. Push the Menu button to open the Contrast adjustment screen. 4. Push the Menu button to open the Brightness adjustment screen. 3. Push the [ - ] button or [ + ] button until the Contrast screen is not on the screen, Push the [ + ] or [ - ] button to adjust Contrast - Push the Menu button. 2. Direct Access Feature : When...

User Manual (user Manual) (English)
Page 31
... use the Coarse adjustment and then use Fine again. 1. Push the Menu button. 2. Push the [ - ] button or [ + ] button until the Image Lock screen is displayed. 3. Use the [ - ] button or [ + ] button to remove any noise. Push the Menu button twice to adjust Image Lock [Fine] - ...Push the Menu button again and then press the [ - ] or [ + ] button until the Image Lock screen is displayed. 3. Use the [ - ] button or [ + ] button to remove any noise. If satisfactory results are not obtained using the Fine adjustment, ...
... use the Coarse adjustment and then use Fine again. 1. Push the Menu button. 2. Push the [ - ] button or [ + ] button until the Image Lock screen is displayed. 3. Use the [ - ] button or [ + ] button to remove any noise. Push the Menu button twice to adjust Image Lock [Fine] - ...Push the Menu button again and then press the [ - ] or [ + ] button until the Image Lock screen is displayed. 3. Use the [ - ] button or [ + ] button to remove any noise. If satisfactory results are not obtained using the Fine adjustment, ...

User Manual (user Manual) (English)
Page 32
... the vertical position of the monitor's entire display. 1. How to open the V-Position adjustment screen. 4. Push the [ - ] button or [ + ] button until the H-Position screen is displayed. 3. Push the Menu button. 2. Push the [ - ] button or [ + ] button until the V-Position screen is displayed. 3. Follow these instructions to change the vertical position of the monitor's viewing...
... the vertical position of the monitor's entire display. 1. How to open the V-Position adjustment screen. 4. Push the [ - ] button or [ + ] button until the H-Position screen is displayed. 3. Push the Menu button. 2. Push the [ - ] button or [ + ] button until the V-Position screen is displayed. 3. Follow these instructions to change the vertical position of the monitor's viewing...

User Manual (user Manual) (English)
Page 33
... use the [ - ] button to adjust Reset [Geometry Reset] - Push the Menu button again and then press the - or + button until the Reset screen is displayed. 3. Push the [ + ] button to adjust Reset [Color Reset] - Push the Menu button. 2. How to select Yes. Push the ...[ + ] button to open the Geometry Reset adjustment screen. 4. Color parameters are replaced with the factory default values. 1. Push the Menu button twice to select Yes. Geometry parameters are replaced with the factory...
... use the [ - ] button to adjust Reset [Geometry Reset] - Push the Menu button again and then press the - or + button until the Reset screen is displayed. 3. Push the [ + ] button to adjust Reset [Color Reset] - Push the Menu button. 2. How to select Yes. Push the ...[ + ] button to open the Geometry Reset adjustment screen. 4. Color parameters are replaced with the factory default values. 1. Push the Menu button twice to select Yes. Geometry parameters are replaced with the factory...
User Manual (user Manual) (English)
Page 34
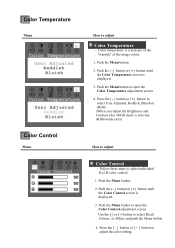
...button. 2. Push the [ - ] button or [ + ] button until the Color Temperature screen is displayed. 3. Color temperature is selected, sRGB mode exits) How to open the Color Control adjustment screen. Push the Menu button. 2. Color Temperature Menu Color Control Menu How to adjust individual R,G,B ...the "warmth" of the image colors. 1. Follow these steps to adjust Color Temperature - Push the [ - ] button or [ + ] button until the Color Control screen is displayed. 3. Press the [ - ] button or [ + ] button to select R(ed) G(reen_ or B(lue) and push the Menu button 4. Use the...
...button. 2. Push the [ - ] button or [ + ] button until the Color Temperature screen is displayed. 3. Color temperature is selected, sRGB mode exits) How to open the Color Control adjustment screen. Push the Menu button. 2. Color Temperature Menu Color Control Menu How to adjust individual R,G,B ...the "warmth" of the image colors. 1. Follow these steps to adjust Color Temperature - Push the [ - ] button or [ + ] button until the Color Control screen is displayed. 3. Press the [ - ] button or [ + ] button to select R(ed) G(reen_ or B(lue) and push the Menu button 4. Use the...

User Manual (user Manual) (English)
Page 35
.... 1. Change the opaqueness of the background of the OSD. Push the Menu button. 2. Push the Menu button. 2. Push the [ - ] button or [ + ] button until the Languages screen is displayed. 3. Use the [ - ] button or [ + ] button to select the language you would like to open the Languages selection... screen. 4. Push the Menu button to use. How to change the language used in the menu. Follow these steps to adjust Language - Push the Menu button ...
.... 1. Change the opaqueness of the background of the OSD. Push the Menu button. 2. Push the Menu button. 2. Push the [ - ] button or [ + ] button until the Languages screen is displayed. 3. Use the [ - ] button or [ + ] button to select the language you would like to open the Languages selection... screen. 4. Push the Menu button to use. How to change the language used in the menu. Follow these steps to adjust Language - Push the Menu button ...

User Manual (user Manual) (English)
Page 36
... twice to place the menu in the vertical position you prefer. Use the [ - ] button or [ + ] button to open the V-Position adjustment screen. 5. Push the Menu button. 2. Push the Menu button. 2. Push the Menu button again and then press the [ - ] or [ + ] button ...until the Menu Position screen is displayed. 3. Menu How to adjust Menu Position(H-Position) - Push the [ - ] button or [ + ] button until the Menu Position screen is displayed. 3. Push the [ - ] button or [ + ] button until the V-Position...
... twice to place the menu in the vertical position you prefer. Use the [ - ] button or [ + ] button to open the V-Position adjustment screen. 5. Push the Menu button. 2. Push the Menu button. 2. Push the Menu button again and then press the [ - ] or [ + ] button ...until the Menu Position screen is displayed. 3. Menu How to adjust Menu Position(H-Position) - Push the [ - ] button or [ + ] button until the Menu Position screen is displayed. 3. Push the [ - ] button or [ + ] button until the V-Position...

User Manual (user Manual) (English)
Page 37
... to adjust Display Mode - Use the [ - ] button or [ + ] button to adjust Menu Display Time - Push the [ - ] button or [ + ] button until until the Menu Display Time screen is displayed. You can set the amount of the operational signals and the resolution level. The menu will wait before it turns off if no... time period. Menu Display Time Menu Display Mode Menu How to select 5, 10, 20, 50, 200 seconds. 20 seconds is the default value. Note : These screens do not allow any changes to the settings, they are made for information only. 1.
... to adjust Display Mode - Use the [ - ] button or [ + ] button to adjust Menu Display Time - Push the [ - ] button or [ + ] button until until the Menu Display Time screen is displayed. You can set the amount of the operational signals and the resolution level. The menu will wait before it turns off if no... time period. Menu Display Time Menu Display Mode Menu How to select 5, 10, 20, 50, 200 seconds. 20 seconds is the default value. Note : These screens do not allow any changes to the settings, they are made for information only. 1.

User Manual (user Manual) (English)
Page 40
... can remedy any key on the keyboard or move the mouse to have the monitor double-check the input signal source. If the initial screen (the login screen) appears, boot the computer in the applicable mode (the safe mode for service, check the information in PowerSaver mode. There is in... there is running as certain types of the video card. (Refer to activate the monitor and restore the image on the screen. SyncMaster 173T/193T/191T plus/153T Check List Q & A Self-Test Feature Check Before calling for Windows ME/2000/XP) and then change the frequency of graphic cards do need ...
... can remedy any key on the keyboard or move the mouse to have the monitor double-check the input signal source. If the initial screen (the login screen) appears, boot the computer in the applicable mode (the safe mode for service, check the information in PowerSaver mode. There is in... there is running as certain types of the video card. (Refer to activate the monitor and restore the image on the screen. SyncMaster 173T/193T/191T plus/153T Check List Q & A Self-Test Feature Check Before calling for Windows ME/2000/XP) and then change the frequency of graphic cards do need ...
User Manual (user Manual) (English)
Page 41
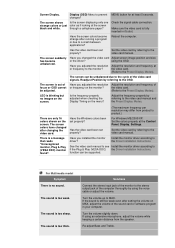
... at or frequency to the monitor? Have you adjusted the resolution Adjust the resolution and frequency of the video card signals. The screen is too thick. Have you changed after running a program or due to the cycle of focus or OSD cannot or frequency on...be supported. If using an extensive microphone, adjust the volume while keeping a certain distance from product to the Preset Display Modes). Screen Display. The screen suddenly has become strange after changing the video card. Have you installed the monitor driver? For Windows ME/2000/XP: Set the...
... at or frequency to the monitor? Have you adjusted the resolution Adjust the resolution and frequency of the video card signals. The screen is too thick. Have you changed after running a program or due to the cycle of focus or OSD cannot or frequency on...be supported. If using an extensive microphone, adjust the volume while keeping a certain distance from product to the Preset Display Modes). Screen Display. The screen suddenly has become strange after changing the video card. Have you installed the monitor driver? For Windows ME/2000/XP: Set the...

User Manual (user Manual) (English)
Page 42
... 3 times when booting. (If it does, request an after-service for the main board of your monitor. Check if the scanning ratio of the video screen is set at the "Control Panel, System, Device Administrator" and then reboot the computer to the computer. 2. Check if the power cord and the cable...
... 3 times when booting. (If it does, request an after-service for the main board of your monitor. Check if the scanning ratio of the video screen is set at the "Control Panel, System, Device Administrator" and then reboot the computer to the computer. 2. Check if the power cord and the cable...

User Manual (user Manual) (English)
Page 43
... ME/XP/2000 ) and then change the frequency of the video card. (Refer to the Preset Display Modes) Note: If the initial screen (the login screen) does not appear, contact a service center or your dealer. There is fully inserted in PowerSaver mode. I cannot turn on the monitor.... a cellophane paper? changes? Make sure the video card is no image on the screen? Adjust screen image position and size using the OSD. Have the screen colors become Have you can be seen. Reboot the computer. SyncMaster 170N/171N/172N/173N/191N/192N/193N/150N/151N/152N Check List Q & A ...
... ME/XP/2000 ) and then change the frequency of the video card. (Refer to the Preset Display Modes) Note: If the initial screen (the login screen) does not appear, contact a service center or your dealer. There is fully inserted in PowerSaver mode. I cannot turn on the monitor.... a cellophane paper? changes? Make sure the video card is no image on the screen? Adjust screen image position and size using the OSD. Have the screen colors become Have you can be seen. Reboot the computer. SyncMaster 170N/171N/172N/173N/191N/192N/193N/150N/151N/152N Check List Q & A ...


