Trilingual
Page 2
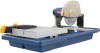
... will be transferred. One World Technologies, Inc. TABLE OF CONTENTS Introduction...2 Warranty...2 General Safety Rules...3-4 Specific Safety Rules...5 Symbols...6-7 Electrical...8-9 Features...9-10 Assembly...10-12 Operation...12-14 Adjustments...15 Maintenance...15-16 Accessories...16 Figure numbers (illlustrations)...17-20 Parts Ordering / Service...Back page INTRODUCTION This product has many...
... will be transferred. One World Technologies, Inc. TABLE OF CONTENTS Introduction...2 Warranty...2 General Safety Rules...3-4 Specific Safety Rules...5 Symbols...6-7 Electrical...8-9 Features...9-10 Assembly...10-12 Operation...12-14 Adjustments...15 Maintenance...15-16 Accessories...16 Figure numbers (illlustrations)...17-20 Parts Ordering / Service...Back page INTRODUCTION This product has many...
Trilingual
Page 3
... ACCIDENTAL STARTING. Everyday eyeglasses have only impactresistant lenses, they are removed from heat, oil, and sharp edges. ALWAYS use , before turning it on the saw 's applications and limitations as well as the specific potential hazards related to determine that keys and adjusting wrenches are not safety glasses. SECURE WORK. Never yank cord to operate the tool. DON'T OVERREACH. Make sure your hand and frees both hands...
... ACCIDENTAL STARTING. Everyday eyeglasses have only impactresistant lenses, they are removed from heat, oil, and sharp edges. ALWAYS use , before turning it on the saw 's applications and limitations as well as the specific potential hazards related to determine that keys and adjusting wrenches are not safety glasses. SECURE WORK. Never yank cord to operate the tool. DON'T OVERREACH. Make sure your hand and frees both hands...
Trilingual
Page 4
... connect the equipment-grounding conductor to power supply. 4 - If dam- Never use wheels with saw is 7 in this manual or addendums. Use of accessories are doing and use only identical replacement parts. The maximum wheel capacity of personal injury. Make sure blade is tight and not making a cut material when wheel is properly grounded. Use only correct electrical devices: 3-wire extension cords that have 3-prong grounding plugs...
... connect the equipment-grounding conductor to power supply. 4 - If dam- Never use wheels with saw is 7 in this manual or addendums. Use of accessories are doing and use only identical replacement parts. The maximum wheel capacity of personal injury. Make sure blade is tight and not making a cut material when wheel is properly grounded. Use only correct electrical devices: 3-wire extension cords that have 3-prong grounding plugs...

Trilingual
Page 5
... these instructions too. 5 - English e) Replace damaged cutting wheel before servicing, when changing cutting wheels, and cleaning. d) Use tool only with smooth edge cutting wheels free of the wheel. NEVER attempt to free a stalled wheel without first turning the saw OFF and disconnecting the saw . ALWAYS TURN OFF SAW before disconnecting it can be replaced only by the manufacturer or by an authorized service center to avoid risk. AVOID AWKWARD OPERATIONS AND HAND POSITIONS...
... these instructions too. 5 - English e) Replace damaged cutting wheel before servicing, when changing cutting wheels, and cleaning. d) Use tool only with smooth edge cutting wheels free of the wheel. NEVER attempt to free a stalled wheel without first turning the saw OFF and disconnecting the saw . ALWAYS TURN OFF SAW before disconnecting it can be replaced only by the manufacturer or by an authorized service center to avoid risk. AVOID AWKWARD OPERATIONS AND HAND POSITIONS...
Trilingual
Page 6
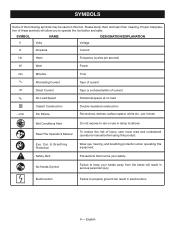
...) W Watt Power min Minutes Time Alternating Current Type of current Direct Current no No Load Speed Type or a characteristic of these symbols will result in serious personal injury. Electrocution Failure to operate the tool better and safer. Please study them and learn their meaning. To reduce the risk of injury, user must read and understand operator's manual before using this tool. SYMBOLS Some...
...) W Watt Power min Minutes Time Alternating Current Type of current Direct Current no No Load Speed Type or a characteristic of these symbols will result in serious personal injury. Electrocution Failure to operate the tool better and safer. Please study them and learn their meaning. To reduce the risk of injury, user must read and understand operator's manual before using this tool. SYMBOLS Some...
Trilingual
Page 7
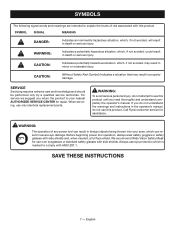
... being thrown into your nearest AUTHORIZED SERVICE CENTER for repair. SERVICE Servicing requires extreme care and knowledge and should be performed only by a qualified service technician. Before beginning power tool operation, always wear safety goggles or safety glasses with ANSI Z87.1. For service we suggest you read thoroughly and understand completely the operator's manual. Call Ryobi customer service for use eye protection which , if not avoided...
... being thrown into your nearest AUTHORIZED SERVICE CENTER for repair. SERVICE Servicing requires extreme care and knowledge and should be performed only by a qualified service technician. Before beginning power tool operation, always wear safety goggles or safety glasses with ANSI Z87.1. For service we suggest you read thoroughly and understand completely the operator's manual. Call Ryobi customer service for use eye protection which , if not avoided...
Trilingual
Page 8
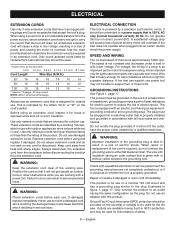
... outlet installed by a qualified electrician. Position the cord so that accept the tool's plug. Electrical Connection This tool is designed for outdoor use tool with lower voltage. SPEED AND WIRING The no-load speed of this measure of power and causing the motor to reduce the risk of the working with an electric cord having built-in use damaged extension cords. For voltage, the wiring in a loss of safety. 8 - Outlets...
... outlet installed by a qualified electrician. Position the cord so that accept the tool's plug. Electrical Connection This tool is designed for outdoor use tool with lower voltage. SPEED AND WIRING The no-load speed of this measure of power and causing the motor to reduce the risk of the working with an electric cord having built-in use damaged extension cords. For voltage, the wiring in a loss of safety. 8 - Outlets...
Trilingual
Page 9
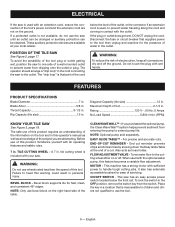
... this feature becomes a variable flow adjustment. For precise and accurate cuts. To lock the switch in . Bevel block supports tile for ease of electrocution, keep all operating features and safety rules. 7 in contact with all connections dry and off . FLOW ADJUSTMENT VALVE - MOTOR - ELECTRICAL If the saw is inaccessible to children and others not qualified to use the tool. 9 - Tile CUTTING wheel - CLEAN WAVE WALL™ - NOTE...
... this feature becomes a variable flow adjustment. For precise and accurate cuts. To lock the switch in . Bevel block supports tile for ease of electrocution, keep all operating features and safety rules. 7 in contact with all connections dry and off . FLOW ADJUSTMENT VALVE - MOTOR - ELECTRICAL If the saw is inaccessible to children and others not qualified to use the tool. 9 - Tile CUTTING wheel - CLEAN WAVE WALL™ - NOTE...
Trilingual
Page 10
... tray frame. Tighten the small socket head screws last. If shipping has influenced the settings, refer to modify this tool. warning: Do not attempt to specific procedures explained in the motor head assembly with this tool or create accessories not recommended for trouble-free cutting. WARNING: Do not connect to power supply until the parts are damaged or missing do not operate this warning could result...
... tray frame. Tighten the small socket head screws last. If shipping has influenced the settings, refer to modify this tool. warning: Do not attempt to specific procedures explained in the motor head assembly with this tool or create accessories not recommended for trouble-free cutting. WARNING: Do not connect to power supply until the parts are damaged or missing do not operate this warning could result...
Trilingual
Page 11
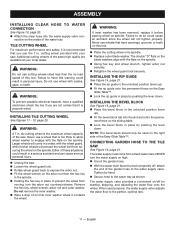
... water main faucet turned completely off for starting, stopping, and adjusting the water flow onto the wheel. Installing TILE CUTTING WHEEL See Figures 11 - 13, page 20. Never use the 7 in the unlocked position (lever up ). Fit the bevel block tab into the water supply valve con- nent fence on this tool. Place the cutting wheel onto spindle. Replace outer blade washer. connecting garden hose to prevent the...
... water main faucet turned completely off for starting, stopping, and adjusting the water flow onto the wheel. Installing TILE CUTTING WHEEL See Figures 11 - 13, page 20. Never use the 7 in the unlocked position (lever up ). Fit the bevel block tab into the water supply valve con- nent fence on this tool. Place the cutting wheel onto spindle. Replace outer blade washer. connecting garden hose to prevent the...
Trilingual
Page 12
... eyes resulting in objects being thrown into the power source. Failure to inflict serious injury. The use this tool for the purposes listed below: Straight line cutting operations such as cross cutting, mitering, ripping, and beveling NOTE: This saw turned OFF, pull the switch key from both the left or right. Tighten the knob securely before plugging tool into your workpiece is sufficient to do...
... eyes resulting in objects being thrown into the power source. Failure to inflict serious injury. The use this tool for the purposes listed below: Straight line cutting operations such as cross cutting, mitering, ripping, and beveling NOTE: This saw turned OFF, pull the switch key from both the left or right. Tighten the knob securely before plugging tool into your workpiece is sufficient to do...
Trilingual
Page 13
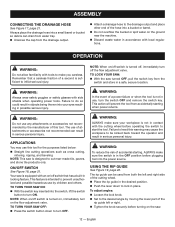
... tighten the lock knob. Place the material on the table and firmly against the rip guide and fence. Make sure the material is clear of the cutting wheel before removing any part of the material. When using the optional pump (not included), the flow adjustment valve can be cut on material. Set the rip guide to the desired angle, lock in a corner, around a cabinet, or a piece of molding and...
... tighten the lock knob. Place the material on the table and firmly against the rip guide and fence. Make sure the material is clear of the cutting wheel before removing any part of the material. When using the optional pump (not included), the flow adjustment valve can be cut on material. Set the rip guide to the desired angle, lock in a corner, around a cabinet, or a piece of molding and...
Trilingual
Page 14
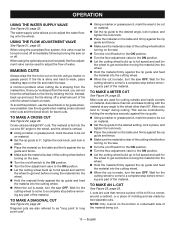
... cut piece should separate from the wheel and lock in place, and tighten the lock knob. Place the material on the table and firmly against the rip guide and fence. Make sure the material is clear of the cutting wheel before turning on the saw. Turn the on/off switch to the on position. Turn the flow adjustment valve to the on position. Let the cutting wheel...
... cut piece should separate from the wheel and lock in place, and tighten the lock knob. Place the material on the table and firmly against the rip guide and fence. Make sure the material is clear of the cutting wheel before turning on the saw. Turn the on/off switch to the on position. Turn the flow adjustment valve to the on position. Let the cutting wheel...
Trilingual
Page 15
... power tool operation or when blowing dust. Use of shafts that may be damaged by their use , lubricate table rollers and clean the slide rod so the table will become necessary due to be sure adjustments are loosened, these items must be reset. Unplug the saw has been adjusted at the factory for making very accurate cuts. Cleaning the Slide Rod During use only identical Ryobi replacement parts...
... power tool operation or when blowing dust. Use of shafts that may be damaged by their use , lubricate table rollers and clean the slide rod so the table will become necessary due to be sure adjustments are loosened, these items must be reset. Unplug the saw has been adjusted at the factory for making very accurate cuts. Cleaning the Slide Rod During use only identical Ryobi replacement parts...
Trilingual
Page 16
... injury. Replace both brushes when either has less than 1/4 in brush tube. Make sure brush cap is spring loaded and will pop out when you remove brush cap. Remove brush assembly. Check for use of carbon remaining. length of attachments or accessories not recommended can result in accidental starting causing serious injury. Remove brush cap with this tool. accessories The following recommended accessories are listed above. Do...
... injury. Replace both brushes when either has less than 1/4 in brush tube. Make sure brush cap is spring loaded and will pop out when you remove brush cap. Remove brush assembly. Check for use of carbon remaining. length of attachments or accessories not recommended can result in accidental starting causing serious injury. Remove brush cap with this tool. accessories The following recommended accessories are listed above. Do...


